


![How to Build an AI Assistant with Keith Moehring [MAICON 2025 Speaker Series]](https://www.marketingaiinstitute.com/hubfs/MAICON-Speaker_Series%20%281%29.png)


![[The AI Show Episode 156]: AI Answers - Data Privacy, AI Roadmaps, Regulated Industries, Selling AI to the C-Suite & Change Management](https://www.marketingaiinstitute.com/hubfs/ep%20156%20cover.png)
![[The AI Show Episode 155]: The New Jobs AI Will Create, Amazon CEO: AI Will Cut Jobs, Your Brain on ChatGPT, Possible OpenAI-Microsoft Breakup & Veo 3 IP Issues](https://www.marketingaiinstitute.com/hubfs/ep%20155%20cover.png)


_incamerastock_Alamy.jpg?width=1280&auto=webp&quality=80&disable=upscale#)
_Brain_light_Alamy.jpg?width=1280&auto=webp&quality=80&disable=upscale#)


![Senators reintroduce App Store bill to rein in ‘gatekeeper power in the app economy’ [U]](https://i0.wp.com/9to5mac.com/wp-content/uploads/sites/6/2025/06/app-store-senate.jpg?resize=1200%2C628&quality=82&strip=all&ssl=1)


How to Use Postgres MCP Server with GitHub Copilot in VS Code
Learn how to make GitHub Copilot your full-stack teammate GitHub Copilot has changed how developers write code, but when combined with an MCP (Model Copilot Protocol) server, it also connects your services. With MCP, Copilot can create database tables, understand your database schema and generate relevant code for your API, data models, or business logic. In this guide, you'll learn how to use the Neon Serverless Postgres MCP server with GitHub Copilot in VS Code to build a sample REST API quickly. We'll walk through how to create an Azure Function that fetches data from a Neon database, all without writing a single line of code manually. From Code Generation to Database Management with GitHub Copilot AI agents are no longer just helping write code—they’re creating and managing databases. When a chatbot logs a customer conversation, or a new region spins up in the Azure cloud, or a new user signs up, an AI agent can automatically create a database in seconds. No need to open a dashboard or call an API. This is the next evolution of software development: infrastructure as intent. With tools like database MCP servers, agents can now generate real backend services as easily as they generate code. GitHub Copilot becomes your full-stack teammate. It can answer database-related questions, fetch your database connection string, update environment variables in your Azure Function, generate SQL queries to populate tables with mock data, and even help you create new databases or tables on the fly. All directly from your editor, with natural language prompts. Neon has a dedicated MCP server that makes it possible for Copilot to directly understand the structure of your Postgres database. Let's get started with using the Neon MCP server and GitHub Copilot. What You’ll Need Node.js (>= v18.0.0) and npm: Download from nodejs.org. An Azure subscription (create one for free) Install either the stable or Insiders release of VS Code: Stable release Insiders release Install the GitHub Copilot, GitHub Copilot for Azure, and GitHub Copilot Chat extensions for VS Code Azure Functions Core Tools (for local testing) Connect GitHub Copilot to the Neon MCP Server Create Neon Database Visit the Neon on Azure Marketplace page and follow the Create a Neon resource guide to deploy Neon on Azure for your subscription. Neon offers a Free plan that provides more than enough resources to build a proof of concept or kick off a new startup project. Install the Neon MCP Server for VS Code Neon MCP Server offers two options for connecting your VS Code MCP client to Neon. We will use the Remote Hosted MCP Server option. This is the simplest setup—no need to install anything locally or configure a Neon API key in your client. Add the following Neon MCP server configuration to your user settings in VS Code: { "mcp": { "servers": { "Neon": { "command": "npx", "args": ["-y", "mcp-remote", "https://mcp.neon.tech/sse"] } } } } Click on Start on the MCP server. A browser window will open with an OAuth prompt. Just follow the steps to give your VS Code MCP client access to your Neon account. Generate an Azure Function REST API using GitHub Copilot Step 1: Create an empty folder (ex: mcp-server-vs-code) and open it in VS Code. Step 2: Open GitHub Copilot Chat in VS Code and switch to Agent mode. You should see the available tools. Step 3: Ask Copilot something like "Create an Azure function with an HTTP trigger”: Copilot will generate a REST API using Azure Functions in JavaScript with a basic setup to run the functions locally. Step 4: Next, you can ask to list existing Neon projects: Step 5: Try out different prompts to fetch the connection string for the chosen database and set it to the Azure Functions settings. Then ask to create a sample Customer table and so on. Or you can even prompt to create a new database branch on Neon. Step 6: Finally, you can prompt Copilot to update the Azure functions code to fetch data from the table: Combine the Azure MCP Server Neon MCP gives GitHub Copilot full access to your database schema, so it can help you write SQL queries, connect to the database, and build API endpoints. But when you add Azure MCP into the mix, Copilot can also understand your Azure services—like Blob Storage, Queues, and Azure AI. You can run both Neon MCP and Azure MCP at the same time to create a full cloud-native developer experience. For example: Use Neon MCP for serverless Postgres with branching and instant scale. Use Azure MCP to connect to other Azure services from the same Copilot chat. Even better: Azure MCP is evolving. In newer versions, you can spin up Azure Functions and other services directly from Copilot chat, without ever leaving your editor. Copilot pulls context from both MCP servers, which means smarter code suggestions and faster devel

Learn how to make GitHub Copilot your full-stack teammate
GitHub Copilot has changed how developers write code, but when combined with an MCP (Model Copilot Protocol) server, it also connects your services. With MCP, Copilot can create database tables, understand your database schema and generate relevant code for your API, data models, or business logic.
In this guide, you'll learn how to use the Neon Serverless Postgres MCP server with GitHub Copilot in VS Code to build a sample REST API quickly. We'll walk through how to create an Azure Function that fetches data from a Neon database, all without writing a single line of code manually.
From Code Generation to Database Management with GitHub Copilot
AI agents are no longer just helping write code—they’re creating and managing databases. When a chatbot logs a customer conversation, or a new region spins up in the Azure cloud, or a new user signs up, an AI agent can automatically create a database in seconds. No need to open a dashboard or call an API. This is the next evolution of software development: infrastructure as intent. With tools like database MCP servers, agents can now generate real backend services as easily as they generate code.
GitHub Copilot becomes your full-stack teammate. It can answer database-related questions, fetch your database connection string, update environment variables in your Azure Function, generate SQL queries to populate tables with mock data, and even help you create new databases or tables on the fly. All directly from your editor, with natural language prompts. Neon has a dedicated MCP server that makes it possible for Copilot to directly understand the structure of your Postgres database.
Let's get started with using the Neon MCP server and GitHub Copilot.
What You’ll Need
- Node.js (>= v18.0.0) and npm: Download from nodejs.org.
- An Azure subscription (create one for free)
- Install either the stable or Insiders release of VS Code:
- Install the GitHub Copilot, GitHub Copilot for Azure, and GitHub Copilot Chat extensions for VS Code
- Azure Functions Core Tools (for local testing)
Connect GitHub Copilot to the Neon MCP Server
Create Neon Database
Visit the Neon on Azure Marketplace page and follow the Create a Neon resource guide to deploy Neon on Azure for your subscription. Neon offers a Free plan that provides more than enough resources to build a proof of concept or kick off a new startup project.
Install the Neon MCP Server for VS Code
Neon MCP Server offers two options for connecting your VS Code MCP client to Neon. We will use the Remote Hosted MCP Server option. This is the simplest setup—no need to install anything locally or configure a Neon API key in your client.
Add the following Neon MCP server configuration to your user settings in VS Code:
{
  "mcp": {
    "servers": {
      "Neon": {
        "command": "npx",
        "args": ["-y", "mcp-remote", "https://mcp.neon.tech/sse"]
      }
    }
  }
}
Click on Start on the MCP server. A browser window will open with an OAuth prompt. Just follow the steps to give your VS Code MCP client access to your Neon account.
Generate an Azure Function REST API using GitHub Copilot
Step 1: Create an empty folder (ex: mcp-server-vs-code) and open it in VS Code.
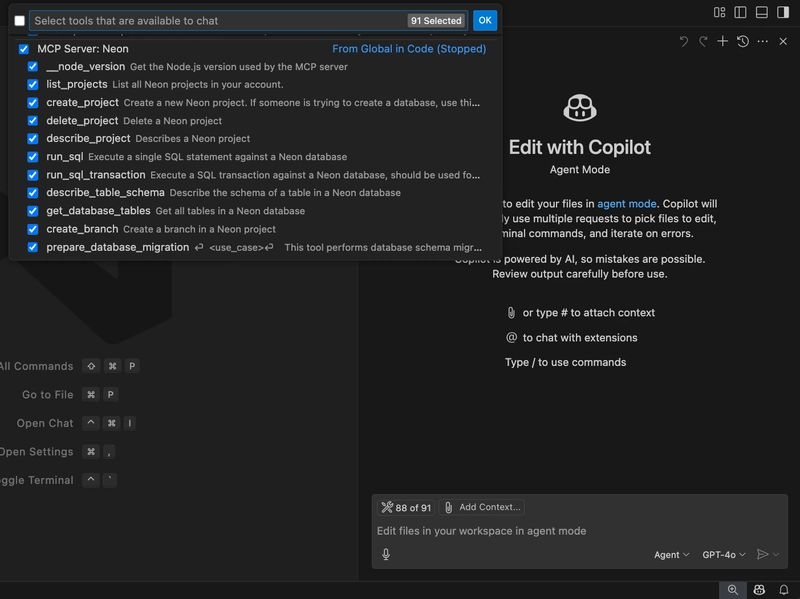
Step 2: Open GitHub Copilot Chat in VS Code and switch to Agent mode. You should see the available tools.
Step 3: Ask Copilot something like "Create an Azure function with an HTTP trigger”:

Copilot will generate a REST API using Azure Functions in JavaScript with a basic setup to run the functions locally.
Step 4: Next, you can ask to list existing Neon projects:

Step 5: Try out different prompts to fetch the connection string for the chosen database and set it to the Azure Functions settings. Then ask to create a sample Customer table and so on. Or you can even prompt to create a new database branch on Neon.

Step 6: Finally, you can prompt Copilot to update the Azure functions code to fetch data from the table:

Combine the Azure MCP Server
Neon MCP gives GitHub Copilot full access to your database schema, so it can help you write SQL queries, connect to the database, and build API endpoints. But when you add Azure MCP into the mix, Copilot can also understand your Azure services—like Blob Storage, Queues, and Azure AI.
You can run both Neon MCP and Azure MCP at the same time to create a full cloud-native developer experience. For example:
- Use Neon MCP for serverless Postgres with branching and instant scale.
- Use Azure MCP to connect to other Azure services from the same Copilot chat.
Even better: Azure MCP is evolving. In newer versions, you can spin up Azure Functions and other services directly from Copilot chat, without ever leaving your editor.
Copilot pulls context from both MCP servers, which means smarter code suggestions and faster development. You can mix and match based on your stack and let Copilot help you build real, working apps in minutes.
Final Thoughts
With GitHub Copilot, Neon MCP server, and Azure Functions, you're no longer writing backend code line by line. It is so fast to build APIs. You're orchestrating services with intent. This is not the future—it’s something you can use today.