


![How to Build an AI Assistant with Keith Moehring [MAICON 2025 Speaker Series]](https://www.marketingaiinstitute.com/hubfs/MAICON-Speaker_Series%20%281%29.png)
![[The AI Show Episode 156]: AI Answers - Data Privacy, AI Roadmaps, Regulated Industries, Selling AI to the C-Suite & Change Management](https://www.marketingaiinstitute.com/hubfs/ep%20156%20cover.png)
![[The AI Show Episode 155]: The New Jobs AI Will Create, Amazon CEO: AI Will Cut Jobs, Your Brain on ChatGPT, Possible OpenAI-Microsoft Breakup & Veo 3 IP Issues](https://www.marketingaiinstitute.com/hubfs/ep%20155%20cover.png)


_incamerastock_Alamy.jpg?width=1280&auto=webp&quality=80&disable=upscale#)
_Brain_light_Alamy.jpg?width=1280&auto=webp&quality=80&disable=upscale#)


![Senators reintroduce App Store bill to rein in ‘gatekeeper power in the app economy’ [U]](https://i0.wp.com/9to5mac.com/wp-content/uploads/sites/6/2025/06/app-store-senate.jpg?resize=1200%2C628&quality=82&strip=all&ssl=1)


INTEGRATING SEERBIT NODE.JS SDK IN YOUR APPLICATION
This tutorial provides a detailed explanation on how to integrate SeerBit’s NodeJS SDK into your applications. And also, you will learn how to install and set up the NodeJS SDL, implement standard and advanced payment functions, handle errors gracefully, test your integrations, and apply optimal approaches for reliable, efficient code. We also include working code samples and screenshots of transaction responses and explain each integration step to make sure you can follow along easily, even if you have no idea how to work with payment APIs. Introduction SeerBit’s NodeJS SDK was built so developers could easily interact with SeerBit’s payment APIs in their NodeJS projects. The SDK offers support for standard checkout, recurring payments, pre-auth, mobile money. This abstracts from the raw HTTP calls, encryption details, and error parsing, which allows developers to focus on business logic rather than low-level API wiring. Prerequisites Make sure you have NodeJS v10+ installed on your machine. SeerBit account with public and secret keys; you can obtain this from your merchant dashboard when you sign in. Basic knowledge of JavaScript and npm/yarn. Installation Install via npm or Yarn in your project directory: npm install --save seerbit-nodejs # or yarn add seerbit-nodejs The package includes TypeScript definitions for autocompletion in modern editors. Generating the Bearer Token To integrate SeerBit's payment services into your Node.js application, you'll need to generate a bearer token for API authentication. SeerBit requires an encrypted key, derived from your secret and public keys, to authenticate API requests. Follow these steps to generate the bearer token: 1.Prepare Your Keys: Public Key: Obtain this from your SeerBit merchant dashboard. Secret Key: Also available on your merchant dashboard. 2.Concatenate and Encrypt Keys: Format: Combine your secret and public keys into a single string, separated by a period (.): SECRET_KEY.PUBLIC_KEY Encryption: Send this concatenated string to SeerBit's encryption endpoint to receive an encrypted key. Request the Encrypted Key: Endpoint: POST https://seerbitapi.com/api/v2/encrypt/keys Headers: Set Content-Type to application/json. Body: Include the concatenated key in the following JSON format: { "key": "SECRET_KEY.PUBLIC_KEY" } Important Considerations: Security: Handle your secret and public keys with care. Avoid exposing them in client-side code or public repositories. Token Validity: The encryptedKey (bearer token) may have a validity period. Ensure you handle token expiration appropriately in your application. Error Handling: Implement comprehensive error handling to manage potential issues during the token generation and payment initialization processes. For detailed information, refer to SeerBit's official documentation on authentication and the Node.js SDK: Authentication: https://apis.seerbit.com/authentication Node.js SDK: https://github.com/seerbit/seerbit-nodejs Configuration Create a config.js to centralize your keys (never commit .env to source control): require('dotenv').config(); module.exports = { PUBLIC_KEY: process.env.SEERBIT_PUBLIC_KEY, SECRET_KEY: process.env.SEERBIT_SECRET_KEY, BEARER_TOKEN: process.env.SEERBIT_BEARER_TOKEN }; Load and initialize the SDK in your application: // app.js const { Client, Config } = require("seerbit-nodejs"); const { PUBLIC_KEY, SECRET_KEY, BEARER_TOKEN } = require("./config"); const sdkConfig = new Config({ publicKey: PUBLIC_KEY, secretKey: SECRET_KEY, bearerToken: BEARER_TOKEN }); const seerbit = new Client(sdkConfig); This setup ensures keys remain secure and easily swappable across environments. Basic Usage Examples Standard Checkout Flow const { StandardCheckout } = require("seerbit-nodejs"); router.post("/standard-checkout", async (req, res, next) => { try { const checkout = new StandardCheckout(seerbit); const { fullName, amount, currency, country, email } = req.body; const payload = { fullName, amount, currency, country, email, paymentReference: Date.now().toString(), callbackUrl: "https://yourapp.com/callback", }; const response = await checkout.Initialize(payload); return res.status(201).json({ response }); } catch (error) { console.error("Checkout Error:", error); return next(error); } }); This prints a JSON similar to: { "status": "success", "data": { "paymentLink": "https://payments.seerbit.com/checkout/abc123", "paymentStatus": "01" "message":"Successful" } } 1.Test the Endpoint with Curl/Postman To get the response above, you can test the standard checkout endpoint with curl or Postman. We use Curl as an example. 2.Checkout UI Copy the payment link and load it on your browser to proceed with the payment. Inp

This tutorial provides a detailed explanation on how to integrate SeerBit’s NodeJS SDK into your applications. And also, you will learn how to install and set up the NodeJS SDL, implement standard and advanced payment functions, handle errors gracefully, test your integrations, and apply optimal approaches for reliable, efficient code. We also include working code samples and screenshots of transaction responses and explain each integration step to make sure you can follow along easily, even if you have no idea how to work with payment APIs.
Introduction
SeerBit’s NodeJS SDK was built so developers could easily interact with SeerBit’s payment APIs in their NodeJS projects. The SDK offers support for standard checkout, recurring payments, pre-auth, mobile money. This abstracts from the raw HTTP calls, encryption details, and error parsing, which allows developers to focus on business logic rather than low-level API wiring.
Prerequisites
- Make sure you have NodeJS v10+ installed on your machine.
- SeerBit account with public and secret keys; you can obtain this from your merchant dashboard when you sign in.
- Basic knowledge of JavaScript and
npm/yarn.
Installation
Install via npm or Yarn in your project directory:
npm install --save seerbit-nodejs

# or

yarn add seerbit-nodejs
The package includes TypeScript definitions for autocompletion in modern editors.
Generating the Bearer Token
To integrate SeerBit's payment services into your Node.js application, you'll need to generate a bearer token for API authentication.
SeerBit requires an encrypted key, derived from your secret and public keys, to authenticate API requests.
Follow these steps to generate the bearer token:
1.Prepare Your Keys:
- Public Key: Obtain this from your SeerBit merchant dashboard.
- Secret Key: Also available on your merchant dashboard.
2.Concatenate and Encrypt Keys:
Format: Combine your secret and public keys into a single string, separated by a period (.):
SECRET_KEY.PUBLIC_KEY
Encryption: Send this concatenated string to SeerBit's encryption endpoint to receive an encrypted key.
Request the Encrypted Key:
Endpoint: POST https://seerbitapi.com/api/v2/encrypt/keys.
Headers: Set Content-Type to application/json
Body: Include the concatenated key in the following JSON format:
{
  "key": "SECRET_KEY.PUBLIC_KEY"
}

Important Considerations:
- Security: Handle your secret and public keys with care. Avoid exposing them in client-side code or public repositories.
- Token Validity: The encryptedKey (bearer token) may have a validity period. Ensure you handle token expiration appropriately in your application.
- Error Handling: Implement comprehensive error handling to manage potential issues during the token generation and payment initialization processes.
For detailed information, refer to SeerBit's official documentation on authentication and the Node.js SDK:
Authentication: https://apis.seerbit.com/authentication
Node.js SDK: https://github.com/seerbit/seerbit-nodejs
Configuration
Create a config.js to centralize your keys (never commit .env to source control):
require('dotenv').config();

module.exports = {

  PUBLIC_KEY: process.env.SEERBIT_PUBLIC_KEY,

  SECRET_KEY: process.env.SEERBIT_SECRET_KEY,

  BEARER_TOKEN: process.env.SEERBIT_BEARER_TOKEN

};
Load and initialize the SDK in your application:
// app.js

const { Client, Config } = require("seerbit-nodejs");

const { PUBLIC_KEY, SECRET_KEY, BEARER_TOKEN } = require("./config");

const sdkConfig = new Config({ publicKey: PUBLIC_KEY, secretKey: SECRET_KEY, bearerToken: BEARER_TOKEN });

const seerbit = new Client(sdkConfig);
This setup ensures keys remain secure and easily swappable across environments.
Basic Usage Examples
Standard Checkout Flow
const { StandardCheckout } = require("seerbit-nodejs");

router.post("/standard-checkout", async (req, res, next) => {
  try {
    const checkout = new StandardCheckout(seerbit);
    const { fullName, amount, currency, country, email } = req.body;
    const payload = {
      fullName,
      amount,      currency,
      country,
      email,
      paymentReference: Date.now().toString(),
      callbackUrl: "https://yourapp.com/callback",
    };
    const response = await checkout.Initialize(payload);
    return res.status(201).json({ response });
  } catch (error) {
    console.error("Checkout Error:", error);
    return next(error);
  }
});
This prints a JSON similar to:
{

  "status": "success",

  "data": {

    "paymentLink": "https://payments.seerbit.com/checkout/abc123",

    "paymentStatus": "01"
    "message":"Successful"

  }

}
1.Test the Endpoint with Curl/Postman
To get the response above, you can test the standard checkout endpoint with curl or Postman. We use Curl as an example.

2.Checkout UI
Copy the payment link and load it on your browser to proceed with the payment. Input your debit/credit card details to proceed with the transaction, or make payment via other suggested options:
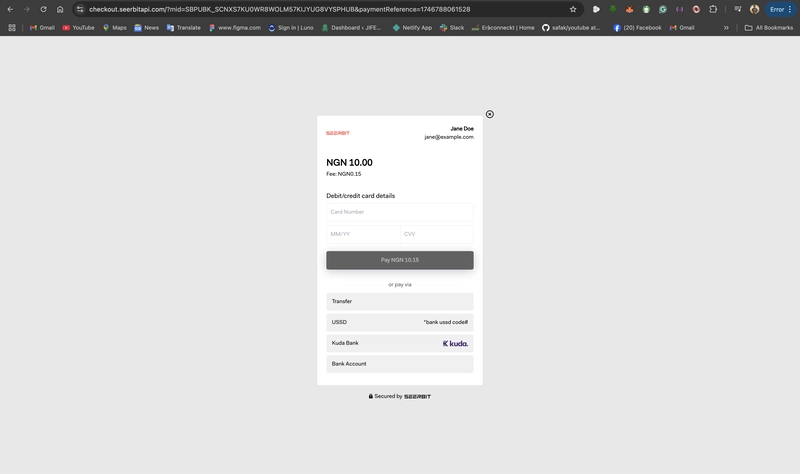
After inputting your card details, you will be prompted to input your card PIN and OTP to verify the transaction. If you have entered all these details correctly, you will get a response of a successful transaction modal that pops up.


Advanced Features
- Recurring Payments For the recurring payment, set the tokenized state to true:
const { StandardCheckout } = require("seerbit-nodejs");

router.post("/standard-checkout", async (req, res, next) => {
  try {
    const checkout = new StandardCheckout(seerbit);
    const { fullName, amount, currency, country, email } = req.body;
    const payload = {
      fullName,
      amount,
      currency,
      country,
      email,
      paymentReference: Date.now().toString(),
      callbackUrl: "https://yourapp.com/callback",
      tokenize: true
    };
    const response = await checkout.Initialize(payload);
    return res.status(201).json({ response });
  } catch (error) {
    console.error("Checkout Error:", error);
    return next(error);
  }
});
This creates a plan that you can later subscribe customers to automatically.
Debit/credit card payment is the only option allowed for recurring payment. This will save the input card details for recurring charges.
2.Mobile Money Payment
Change the country code and currency to match the country of choice.
Note: Our mobile money payment is only available in the following countries at the point of writing this article (Ghana, Kenya, and South Africa).

Error Handling and Logging
Wrap calls in try…catch and inspect error.code / error.message:
try {

  await checkout.Initialize(payload);

} catch (err) {

  console.error("SeerBit Error", err.code, err.message);

}
Use a structured logger like Winston to record failures and facilitate debugging in production.
Best Practices
- Secure Key Management: store API keys in environment variables; rotate regularly.
- Version Pinning: lock seerbit-nodejs version in package.json to avoid breaking changes.
- CI/CD: run linting (ESLint), tests, and vulnerability scans on every pull request.
- Graceful Degradation: Implement retries with exponential backoff for transient network errors.
Conclusion
By following this guide, you’ve set up SeerBit’s NodeJS SDK, performed standard and advanced payment flows, and implemented robust error handling.
For more details, visit the SeerBit Developer Documentations or explore the GitHub repo.
Thanks for reading...
Happy Coding!