


![How to Build an AI Assistant with Keith Moehring [MAICON 2025 Speaker Series]](https://www.marketingaiinstitute.com/hubfs/MAICON-Speaker_Series%20%281%29.png)


![[The AI Show Episode 156]: AI Answers - Data Privacy, AI Roadmaps, Regulated Industries, Selling AI to the C-Suite & Change Management](https://www.marketingaiinstitute.com/hubfs/ep%20156%20cover.png)
![[The AI Show Episode 155]: The New Jobs AI Will Create, Amazon CEO: AI Will Cut Jobs, Your Brain on ChatGPT, Possible OpenAI-Microsoft Breakup & Veo 3 IP Issues](https://www.marketingaiinstitute.com/hubfs/ep%20155%20cover.png)


_incamerastock_Alamy.jpg?width=1280&auto=webp&quality=80&disable=upscale#)
_Brain_light_Alamy.jpg?width=1280&auto=webp&quality=80&disable=upscale#)


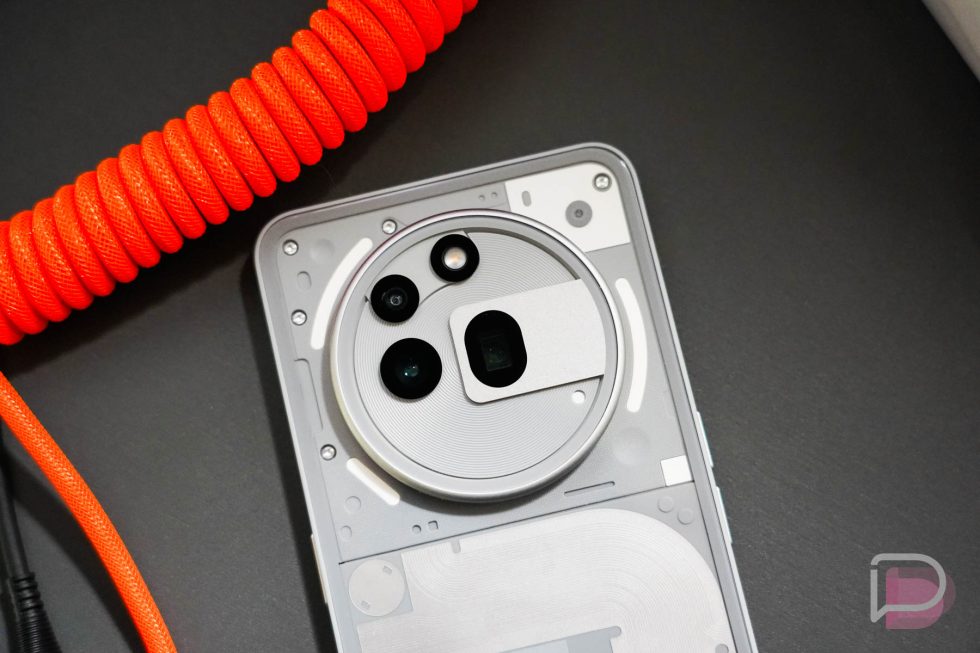
![Nothing Phone (3) has a 50MP ‘periscope’ telephoto lens – here are the first samples [Gallery]](https://i0.wp.com/9to5google.com/wp-content/uploads/sites/4/2025/06/nothing-phone-3-telephoto.jpg?resize=1200%2C628&quality=82&strip=all&ssl=1)


A Simple Guide to Deploying Azure Virtual Machine Scale Sets (VMSS)
A Simple Guide to Deploying Azure Virtual Machine Scale Sets (VMSS) Azure Virtual Machine Scale Sets are a group of load balanced VM instances that can be easily scaled up or down in response to demand or a defined schedule. Scale sets can be deployed with Windows server image or Linux image. But for this tutorial, we’d be deploying a Linux based VMSS via the Azure portal. Step1: On the Azure portal, search for Virtual Machine Scale Sets and select it. Step2: On the VMSS page click create, the basics tab page shows up. Create a new resource group for the VMSS Create a name for the scale set. Select a region close to you. Availability zone: none Orchestration mode: Uniform (create identical VMs when scaling) Security type: Standard Scaling mode: Manual Instance count: 2 Then Click on configure scaling options On the scaling configuration page, Enable forecast for predictive autoscaling. Select Newest VM as the option for deletion in the scale in policy. Then save. This implies that the newest VM created would be the first to be deleted when scaling down. Close and return to the basics tab. Step 3: Configure the VM Select the server image Select the VM size Authentication type: SSH public key Set an Admin Username for logging into the VMs SSH public key source: Generate new key pair SSH key type: RSA SSH Format Name the key pair that would be generated. Then go to the next tab. We could skip the spot and disk tabs and head on to the networking tab. By default, A virtual network and subset is already set, but we need to configure the network Interface of the VMSS to allow SSH and HTTP connections. Click on the pencil icon highlighted in the image below. The Edit network interface page opens, Click on Allow selected ports for Public Inbound ports, then select the ports you want, In this case HTTP(80) and SSH(22). Make sure the Public IP address is also enabled to facilitate connection via SSH to the VMSS, then save. Next we configure load balancing for the VMSS. First select Azure load balancer, then create a load balancer. A side pane opens on the right, We name the load balancer, and then click create. Next, review and create. After validation is passed, we are prompted to download a key pair before the resource is created. Click on it to continue. When the resource is successfully deployed, click go to resource. On the overview page, we can now see that 2 uniform VM instances have been deployed and a public IP address also assigned. We can choose to either connect to the VMs in our scale set individually or manage them as a whole. In this tutorial, the latter would be the case. To do this, we locate our downloaded key pair file and copy the file path. Then set the file permission to read only on mac using **chmod 400 , **via the terminal app. This is not required on Windows. Then we can now connect the VMSS backend via SSH but we have to specify the frontend port range from when we created the load balancer for the VMSS. Run the command*** ssh -i username@IPaddress -p , ***then type yes. The VMSS connects successfully. Any updates or installations made whilst connected now would affect all VM instances running in the scale set, which makes it very easy to manage the Virtual machine scale set. Thanks for your read.

A Simple Guide to Deploying Azure Virtual Machine Scale Sets (VMSS)
Azure Virtual Machine Scale Sets are a group of load balanced VM instances that can be easily scaled up or down in response to demand or a defined schedule.
Scale sets can be deployed with Windows server image or Linux image. But for this tutorial, we’d be deploying a Linux based VMSS via the Azure portal.
Step1: On the Azure portal, search for Virtual Machine Scale Sets and select it.
Step2: On the VMSS page click create, the basics tab page shows up.
Create a new resource group for the VMSS
Create a name for the scale set.
Select a region close to you.
Availability zone: none
Orchestration mode: Uniform (create identical VMs when scaling)
Security type: Standard
Scaling mode: Manual
Instance count: 2
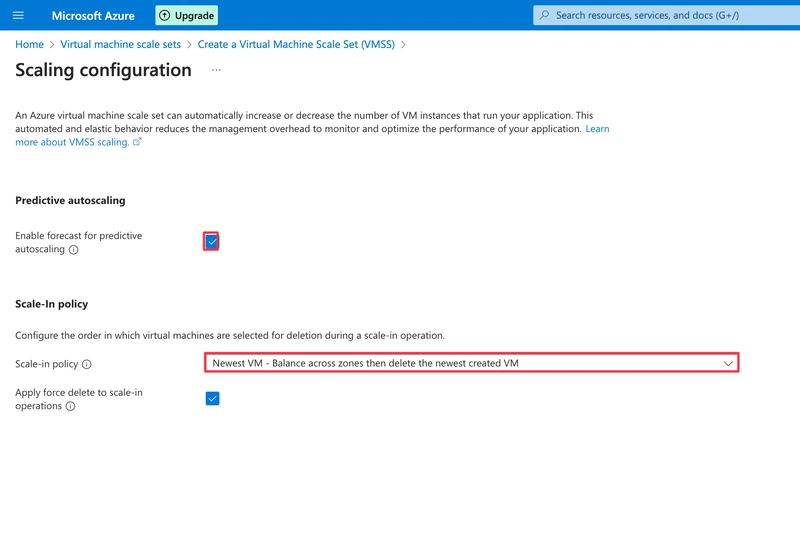
Then Click on configure scaling options
On the scaling configuration page, Enable forecast for predictive autoscaling.
Select Newest VM as the option for deletion in the scale in policy. Then save. This implies that the newest VM created would be the first to be deleted when scaling down.
Close and return to the basics tab.
Step 3: Configure the VM
Select the server image
Select the VM size
Authentication type: SSH public key
Set an Admin Username for logging into the VMs
SSH public key source: Generate new key pair
SSH key type: RSA SSH Format
Name the key pair that would be generated.
Then go to the next tab. We could skip the spot and disk tabs and head on to the networking tab.

By default, A virtual network and subset is already set, but we need to configure the network Interface of the VMSS to allow SSH and HTTP connections.
Click on the pencil icon highlighted in the image below.
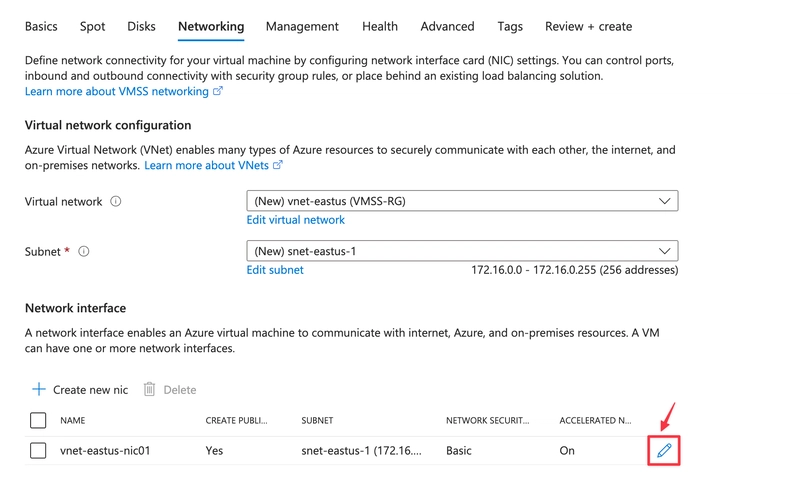
The Edit network interface page opens,
Click on Allow selected ports for Public Inbound ports, then select the ports you want, In this case HTTP(80) and SSH(22).
Make sure the Public IP address is also enabled to facilitate connection via SSH to the VMSS, then save.

Next we configure load balancing for the VMSS.
First select Azure load balancer, then create a load balancer.

A side pane opens on the right,
We name the load balancer, and then click create.

Next, review and create.
After validation is passed, we are prompted to download a key pair before the resource is created. Click on it to continue.

When the resource is successfully deployed, click go to resource.

On the overview page, we can now see that 2 uniform VM instances have been deployed and a public IP address also assigned.

We can choose to either connect to the VMs in our scale set individually or manage them as a whole.
In this tutorial, the latter would be the case.
To do this, we locate our downloaded key pair file and copy the file path.

Then set the file permission to read only on mac using **chmod 400 , **via the terminal app. This is not required on Windows.

Then we can now connect the VMSS backend via SSH but we have to specify the frontend port range from when we created the load balancer for the VMSS.

Run the command*** ssh -i username@IPaddress -p , ***then type yes. The VMSS connects successfully.

Any updates or installations made whilst connected now would affect all VM instances running in the scale set, which makes it very easy to manage the Virtual machine scale set.
Thanks for your read.