Understanding Kubernetes Objects and Deployment Process
Kubernetes is a powerful container orchestration tool that simplifies the management of application workloads. To fully leverage its capabilities, understanding Kubernetes objects like Pods, Deployments, and Services is essential. This guide provides a technical explanation of Kubernetes dependencies and the process of deploying a simple Node.js application. 1. Kubernetes Objects: Pods and Deployments 1.1 Pods: The Atomic Unit In Kubernetes, the smallest deployable unit is a Pod. Think of a Pod as a logical grouping of one or more containers that are always co-located and co-scheduled. These containers within a Pod share resources such as: Shared Volumes: Providing persistent storage accessible to all containers within the Pod. Network Namespace: Allowing containers within the same Pod to communicate via localhost. IP Address: Each Pod is assigned a unique internal IP address within the Kubernetes cluster. Analogy: In the context of AWS Elastic Container Service (ECS), a Pod shares similarities with an ECS task. Key Characteristic: Ephemeral Nature Pods are designed to be ephemeral, meaning they are not intended to be long-lived or persistent. Kubernetes can terminate, scale down, or reschedule Pods as needed for various reasons, such as node failures or scaling events. Therefore, directly managing individual Pods is generally not recommended. 1.2 Deployment Object: Managing Pod Replicas To manage the lifecycle and scalability of Pods, Kubernetes utilizes Controllers. A crucial controller is the Deployment object. Deployments provide declarative updates for Pods and ReplicaSets (a lower-level object that ensures a specified number of Pod replicas are running at any given time). By defining a desired state in a Deployment manifest, you instruct Kubernetes on: Which container image(s) to run in the Pods. The number of Pod instances (replicas) to maintain. The update strategy for rolling out new versions of your application. Benefits of using Deployments: Declarative Configuration: You define the desired state, and Kubernetes works to achieve and maintain it. Rolling Updates and Rollbacks: Deployments facilitate seamless application updates with zero downtime and the ability to easily roll back to previous versions if issues arise. Scaling: You can easily scale the number of Pod replicas up or down based on demand. Self-Healing: If a Pod fails, the Deployment controller will automatically create a new replica to maintain the desired number of instances. In essence, you typically don't directly interact with Pods. Instead, you manage your application's instances through Deployments, which in turn manage the underlying Pods. Practice-Resource 2. Hands-on Deployment of a Node.js Application Let's walk through the steps to containerize and deploy a simple Node.js application on Kubernetes using Minikube, a tool that runs a single-node Kubernetes cluster locally. 2.1 Creating a Docker Image First, we need to package our Node.js application into a Docker image. The provided Dockerfile serves this purpose: FROM node:14-alpine WORKDIR /app COPY package.json . RUN npm install COPY . . EXPOSE 8080 CMD [ "node", "app.js" ] This Dockerfile performs the following actions: Starts with a lightweight Alpine Linux-based Node.js version 14 image. Sets the working directory inside the container to /app. Copies the package.json file to install dependencies. Copies the application code into the /app directory. Exposes port 8080, which our Node.js application will listen on. Specifies the command to run the application when the container starts. We then build and tag the Docker image: docker build -t kub-first-app . To make this image accessible to our Kubernetes cluster, we need to push it to a container registry like Docker Hub. 2.2 Pushing the Image to Docker Hub As mentioned, we create a public repository on Docker Hub (e.g., mayankcse1/kub-first-app). After tagging the local image with the repository name: docker tag kub-first-app mayankcse1/kub-first-app We push the image to Docker Hub: docker push mayankcse1/kub-first-app Now, our container image is publicly available for Kubernetes to pull and run. 2.3 Starting Minikube Before interacting with Kubernetes, we need to ensure our Minikube cluster is running: minikube status If it's not running, we can start or restart it using the Docker driver: minikube start --driver=docker 2.4 Creating a Kubernetes Deployment Now, we can instruct Kubernetes to create a Deployment that will manage Pods running our mayankcse1/kub-first-app image: kubectl create deployment first-app --image=mayankcse1/kub-first-app Behind the Scenes of kubectl create deployment --image: When you execute this command, the kubectl command-line tool communicates with the Kubernetes API server. The API server then does the following: Creates a Deployment object: Kubernetes stores
Kubernetes is a powerful container orchestration tool that simplifies the management of application workloads. To fully leverage its capabilities, understanding Kubernetes objects like Pods, Deployments, and Services is essential. This guide provides a technical explanation of Kubernetes dependencies and the process of deploying a simple Node.js application.
1. Kubernetes Objects: Pods and Deployments
1.1 Pods: The Atomic Unit
In Kubernetes, the smallest deployable unit is a Pod. Think of a Pod as a logical grouping of one or more containers that are always co-located and co-scheduled. These containers within a Pod share resources such as:
- Shared Volumes: Providing persistent storage accessible to all containers within the Pod.
-
Network Namespace: Allowing containers within the same Pod to communicate via
localhost. - IP Address: Each Pod is assigned a unique internal IP address within the Kubernetes cluster.
Analogy: In the context of AWS Elastic Container Service (ECS), a Pod shares similarities with an ECS task.
Key Characteristic: Ephemeral Nature
Pods are designed to be ephemeral, meaning they are not intended to be long-lived or persistent. Kubernetes can terminate, scale down, or reschedule Pods as needed for various reasons, such as node failures or scaling events. Therefore, directly managing individual Pods is generally not recommended.
1.2 Deployment Object: Managing Pod Replicas
To manage the lifecycle and scalability of Pods, Kubernetes utilizes Controllers. A crucial controller is the Deployment object. Deployments provide declarative updates for Pods and ReplicaSets (a lower-level object that ensures a specified number of Pod replicas are running at any given time).
By defining a desired state in a Deployment manifest, you instruct Kubernetes on:
- Which container image(s) to run in the Pods.
- The number of Pod instances (replicas) to maintain.
- The update strategy for rolling out new versions of your application.
Benefits of using Deployments:
- Declarative Configuration: You define the desired state, and Kubernetes works to achieve and maintain it.
- Rolling Updates and Rollbacks: Deployments facilitate seamless application updates with zero downtime and the ability to easily roll back to previous versions if issues arise.
- Scaling: You can easily scale the number of Pod replicas up or down based on demand.
- Self-Healing: If a Pod fails, the Deployment controller will automatically create a new replica to maintain the desired number of instances.
In essence, you typically don't directly interact with Pods. Instead, you manage your application's instances through Deployments, which in turn manage the underlying Pods.
2. Hands-on Deployment of a Node.js Application
Let's walk through the steps to containerize and deploy a simple Node.js application on Kubernetes using Minikube, a tool that runs a single-node Kubernetes cluster locally.
2.1 Creating a Docker Image
First, we need to package our Node.js application into a Docker image. The provided Dockerfile serves this purpose:
FROM node:14-alpine

WORKDIR /app

COPY package.json .

RUN npm install

COPY . .

EXPOSE 8080

CMD [ "node", "app.js" ]
This Dockerfile performs the following actions:
- Starts with a lightweight Alpine Linux-based Node.js version 14 image.
- Sets the working directory inside the container to
/app. - Copies the
package.jsonfile to install dependencies. - Copies the application code into the
/appdirectory. - Exposes port 8080, which our Node.js application will listen on.
- Specifies the command to run the application when the container starts.
We then build and tag the Docker image:
docker build -t kub-first-app .
To make this image accessible to our Kubernetes cluster, we need to push it to a container registry like Docker Hub.
2.2 Pushing the Image to Docker Hub
As mentioned, we create a public repository on Docker Hub (e.g., mayankcse1/kub-first-app). After tagging the local image with the repository name:
docker tag kub-first-app mayankcse1/kub-first-app
We push the image to Docker Hub:
docker push mayankcse1/kub-first-app
Now, our container image is publicly available for Kubernetes to pull and run.
2.3 Starting Minikube
Before interacting with Kubernetes, we need to ensure our Minikube cluster is running:
minikube status
If it's not running, we can start or restart it using the Docker driver:
minikube start --driver=docker
2.4 Creating a Kubernetes Deployment
Now, we can instruct Kubernetes to create a Deployment that will manage Pods running our mayankcse1/kub-first-app image:
kubectl create deployment first-app --image=mayankcse1/kub-first-app
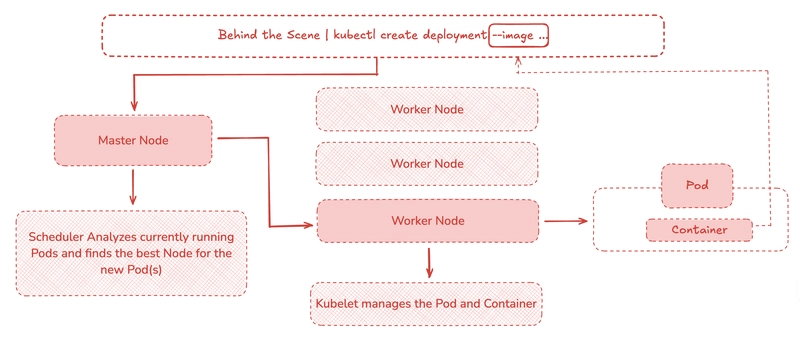
Behind the Scenes of kubectl create deployment --image:
When you execute this command, the kubectl command-line tool communicates with the Kubernetes API server. The API server then does the following:
- Creates a Deployment object: Kubernetes stores the desired state defined in your command (a Deployment named
first-apprunning the specified image) in its etcd datastore. - Triggers the Deployment Controller: The Deployment controller is a component within the Kubernetes control plane that constantly monitors the state of Deployments. It notices the new Deployment object.
- Creates a ReplicaSet: Based on the Deployment specification (in this case, the default is one replica), the Deployment controller creates a ReplicaSet object. The ReplicaSet's responsibility is to maintain a stable set of replica Pods running the specified container image.
- Creates Pods: The ReplicaSet controller then creates the actual Pod(s) based on the Pod template defined in the ReplicaSet. This template includes the container specification (the
mayankcse1/kub-first-appimage). - Schedules Pods: The Kubernetes scheduler component determines the most suitable node in the cluster to run the newly created Pod(s) based on resource availability and other constraints.
- Pulls and Runs Containers: The kubelet agent running on the selected node receives the instruction to run the container(s) defined in the Pod specification. It pulls the
mayankcse1/kub-first-appimage from Docker Hub (or another configured registry) and starts the container(s) using the container runtime (in this case, Docker).
Verification:
You can verify the Deployment and the created Pods using the following commands:
kubectl get deployments
kubectl get pods
Kubernetes Dashboard:
The Minikube dashboard provides a web-based UI to visualize your Kubernetes cluster:
minikube dashboard

This dashboard will show you the created Deployment and the Pods it manages.
3. Service Object: Exposing Applications
While Pods are running and have internal IP addresses, these IPs are ephemeral and only accessible within the cluster. To make our application accessible within the cluster or externally, we need to use a Service object.
A Kubernetes Service provides a stable IP address and DNS name to access a set of Pods. It acts as a load balancer and traffic router, ensuring that requests are distributed across the healthy Pods that match the Service's selector.
Service Types:
Kubernetes offers different types of Services to expose applications in various ways:
-
ClusterIP(Default): Exposes the Service on a cluster-internal IP. This makes the Service only reachable from within the cluster. -
NodePort: Exposes the Service on each Node's IP at a static port (the NodePort). You can then access the Service from outside the cluster using the Node's IP and the NodePort. Drawback: Only allows one Service to be exposed per node port, and the port range is limited. Also, you still need an external load balancer for high availability in multi-node setups. -
LoadBalancer: Exposes the Service externally using a cloud provider's load balancer. The cloud provider provisions a load balancer, and external traffic is routed to the NodePort and ClusterIP Service automatically. This type is typically used in cloud environments.
Exposing our Application:
For this example, we will use the LoadBalancer type (which Minikube simulates):
kubectl expose deployment first-app --type=LoadBalancer --port=8080
This command creates a Service named first-app that selects the Pods managed by our first-app Deployment and exposes port 8080.
Verification:
You can check the created Service using:
kubectl get services
You will see the first-app Service listed with an external IP address (or
Accessing the Application:
To access the exposed application, Minikube provides a convenient command:
minikube service first-app
This command will open your default web browser and navigate to the external IP and port where your application is accessible.
Conclusion:
We have successfully deployed a simple Node.js application on Kubernetes using Deployments to manage the application's instances (Pods) and Services to expose it both internally and externally. This demonstrates the fundamental concepts of Pods, Deployments, and Services, which are essential for running and managing containerized applications on Kubernetes. Remember that in real-world scenarios, you would typically define these objects using YAML manifests for better version control and automation.








![[The AI Show Episode 156]: AI Answers - Data Privacy, AI Roadmaps, Regulated Industries, Selling AI to the C-Suite & Change Management](https://www.marketingaiinstitute.com/hubfs/ep%20156%20cover.png)
![[The AI Show Episode 155]: The New Jobs AI Will Create, Amazon CEO: AI Will Cut Jobs, Your Brain on ChatGPT, Possible OpenAI-Microsoft Breakup & Veo 3 IP Issues](https://www.marketingaiinstitute.com/hubfs/ep%20155%20cover.png)
























_incamerastock_Alamy.jpg?width=1280&auto=webp&quality=80&disable=upscale#)
_Brain_light_Alamy.jpg?width=1280&auto=webp&quality=80&disable=upscale#)











![Senators reintroduce App Store bill to rein in ‘gatekeeper power in the app economy’ [U]](https://i0.wp.com/9to5mac.com/wp-content/uploads/sites/6/2025/06/app-store-senate.jpg?resize=1200%2C628&quality=82&strip=all&ssl=1)


