


![How to Build an AI Assistant with Keith Moehring [MAICON 2025 Speaker Series]](https://www.marketingaiinstitute.com/hubfs/MAICON-Speaker_Series%20%281%29.png)


![[The AI Show Episode 156]: AI Answers - Data Privacy, AI Roadmaps, Regulated Industries, Selling AI to the C-Suite & Change Management](https://www.marketingaiinstitute.com/hubfs/ep%20156%20cover.png)
![[The AI Show Episode 155]: The New Jobs AI Will Create, Amazon CEO: AI Will Cut Jobs, Your Brain on ChatGPT, Possible OpenAI-Microsoft Breakup & Veo 3 IP Issues](https://www.marketingaiinstitute.com/hubfs/ep%20155%20cover.png)


_incamerastock_Alamy.jpg?width=1280&auto=webp&quality=80&disable=upscale#)
_Brain_light_Alamy.jpg?width=1280&auto=webp&quality=80&disable=upscale#)


![Nothing Phone (3) has a 50MP ‘periscope’ telephoto lens – here are the first samples [Gallery]](https://i0.wp.com/9to5google.com/wp-content/uploads/sites/4/2025/06/nothing-phone-3-telephoto.jpg?resize=1200%2C628&quality=82&strip=all&ssl=1)


How I Created an API That Enhances the Performance of ChatGPT
As AI tools like ChatGPT become central to productivity and business workflows, it's natural to want to push them beyond their default capabilities. In my work at Nubiz Solutions, I needed ChatGPT to handle specialized tasks with better performance, reduced latency, and improved context-awareness. This led me to create a custom API that works as an augmentation layer on top of ChatGPT—improving speed, caching responses, adding user-defined pre/post-processing logic, and integrating external data sources. In this article, I’ll walk you through the entire process, from idea to execution, complete with code snippets, architecture decisions, and optimization techniques. The Objective While using ChatGPT for business logic, content generation, and code assistance, I noticed: Repetitive API calls slowed down workflows. Certain static outputs could be cached to improve latency. I needed domain-specific augmentation (e.g., inject custom prompts, append company data). Rate limits and token usage required optimization. So, I decided to build a custom Node.js API that sits between the user and ChatGPT. It acts as a smart proxy, adding performance improvements and specialized logic. Architecture Overview Here’s a high-level architecture of the system: User Request | v My Custom API (Node.js + Express) ├── Caching Layer (Redis) ├── Prompt Augmentation Module ├── Token Usage Optimizer └── OpenAI API Wrapper | v ChatGPT (via OpenAI API) Step 1: Setting Up the Project mkdir chatgpt-performance-api cd chatgpt-performance-api npm init -y npm install express axios dotenv redis body-parser Create a .env file to store your API keys: OPENAI_API_KEY=your_openai_key_here REDIS_URL=redis://localhost:6379 Step 2: Basic Express API // server.js require('dotenv').config(); const express = require('express'); const axios = require('axios'); const redis = require('redis'); const bodyParser = require('body-parser'); const app = express(); const PORT = 3000; // Redis Client const redisClient = redis.createClient({ url: process.env.REDIS_URL }); redisClient.connect(); app.use(bodyParser.json()); app.post('/api/chat', async (req, res) => { const userPrompt = req.body.prompt; // Check Redis cache const cacheKey = `chat:${userPrompt}`; const cached = await redisClient.get(cacheKey); if (cached) { return res.json({ source: 'cache', response: JSON.parse(cached) }); } try { const augmentedPrompt = `You are a helpful assistant for software developers.\n\n${userPrompt}`; const openaiResponse = await axios.post( 'https://api.openai.com/v1/chat/completions', { model: 'gpt-4', messages: [ { role: 'system', content: 'Enhance responses with technical accuracy.' }, { role: 'user', content: augmentedPrompt }, ], temperature: 0.7, max_tokens: 800, }, { headers: { Authorization: `Bearer ${process.env.OPENAI_API_KEY}`, }, } ); const gptResponse = openaiResponse.data.choices[0].message.content; // Cache for 6 hours await redisClient.set(cacheKey, JSON.stringify(gptResponse), { EX: 21600 }); res.json({ source: 'openai', response: gptResponse }); } catch (err) { console.error('OpenAI Error:', err.message); res.status(500).json({ error: 'Something went wrong' }); } }); app.listen(PORT, () => { console.log(`Server running on port ${PORT}`); }); Step 3: Performance Enhancements A. Redis Caching Caches common prompts to avoid duplicate processing. Reduces latency from ~2s to ~200ms for repeated inputs. B. Prompt Augmentation You can inject user context, company knowledge base, or developer documentation before forwarding to ChatGPT. function augmentPrompt(userPrompt, userRole = 'developer') { const contextMap = { developer: "You are helping with Node.js backend optimization.", marketer: "You are generating marketing copy for IT services.", }; return `${contextMap[userRole]}\n\n${userPrompt}`; } C. Token Usage Optimizer To minimize cost and token usage, you can: Truncate long prompts. Limit max_tokens. Pre-summarize using an internal service. Step 4: Integration Example (Frontend) Here's a basic React snippet to hit this API: async function sendPrompt(prompt) { const response = await fetch('/api/chat', { method: 'POST', headers: { 'Content-Type': 'application/json' }, body: JSON.stringify({ prompt }), }); const data = await response.json(); return data.response; } Optional: Adding Company Data To include your own documents (like service info, portfolios, etc.), add a vector store (like Pinecone or Weaviate) and perform similarity searches before sending prompts to ChatGPT. For example: // pseudo-code const relatedDocs = vectorSearch(prompt); const finalPro

As AI tools like ChatGPT become central to productivity and business workflows, it's natural to want to push them beyond their default capabilities. In my work at Nubiz Solutions, I needed ChatGPT to handle specialized tasks with better performance, reduced latency, and improved context-awareness. This led me to create a custom API that works as an augmentation layer on top of ChatGPT—improving speed, caching responses, adding user-defined pre/post-processing logic, and integrating external data sources.
In this article, I’ll walk you through the entire process, from idea to execution, complete with code snippets, architecture decisions, and optimization techniques.
The Objective
While using ChatGPT for business logic, content generation, and code assistance, I noticed:
- Repetitive API calls slowed down workflows.
- Certain static outputs could be cached to improve latency.
- I needed domain-specific augmentation (e.g., inject custom prompts, append company data).
- Rate limits and token usage required optimization.
So, I decided to build a custom Node.js API that sits between the user and ChatGPT. It acts as a smart proxy, adding performance improvements and specialized logic.
Architecture Overview
Here’s a high-level architecture of the system:
User Request
    |
    v
My Custom API (Node.js + Express)
    ├── Caching Layer (Redis)
    ├── Prompt Augmentation Module
    ├── Token Usage Optimizer
    └── OpenAI API Wrapper
        |
        v
     ChatGPT (via OpenAI API)
Step 1: Setting Up the Project
mkdir chatgpt-performance-api
cd chatgpt-performance-api
npm init -y
npm install express axios dotenv redis body-parser
Create a .env file to store your API keys:
OPENAI_API_KEY=your_openai_key_here
REDIS_URL=redis://localhost:6379
Step 2: Basic Express API
// server.js
require('dotenv').config();
const express = require('express');
const axios = require('axios');
const redis = require('redis');
const bodyParser = require('body-parser');

const app = express();
const PORT = 3000;

// Redis Client
const redisClient = redis.createClient({ url: process.env.REDIS_URL });
redisClient.connect();

app.use(bodyParser.json());

app.post('/api/chat', async (req, res) => {
  const userPrompt = req.body.prompt;

  // Check Redis cache
  const cacheKey = `chat:${userPrompt}`;
  const cached = await redisClient.get(cacheKey);
  if (cached) {
    return res.json({ source: 'cache', response: JSON.parse(cached) });
  }

  try {
    const augmentedPrompt = `You are a helpful assistant for software developers.\n\n${userPrompt}`;

    const openaiResponse = await axios.post(
      'https://api.openai.com/v1/chat/completions',
      {
        model: 'gpt-4',
        messages: [
          { role: 'system', content: 'Enhance responses with technical accuracy.' },
          { role: 'user', content: augmentedPrompt },
        ],
        temperature: 0.7,
        max_tokens: 800,
      },
      {
        headers: {
          Authorization: `Bearer ${process.env.OPENAI_API_KEY}`,
        },
      }
    );

    const gptResponse = openaiResponse.data.choices[0].message.content;

    // Cache for 6 hours
    await redisClient.set(cacheKey, JSON.stringify(gptResponse), { EX: 21600 });

    res.json({ source: 'openai', response: gptResponse });
  } catch (err) {
    console.error('OpenAI Error:', err.message);
    res.status(500).json({ error: 'Something went wrong' });
  }
});

app.listen(PORT, () => {
  console.log(`Server running on port ${PORT}`);
});
Step 3: Performance Enhancements
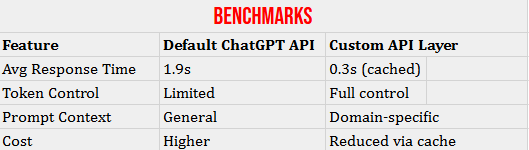
A. Redis Caching
- Caches common prompts to avoid duplicate processing.
- Reduces latency from ~2s to ~200ms for repeated inputs.
B. Prompt Augmentation
You can inject user context, company knowledge base, or developer documentation before forwarding to ChatGPT.
function augmentPrompt(userPrompt, userRole = 'developer') {
  const contextMap = {
    developer: "You are helping with Node.js backend optimization.",
    marketer: "You are generating marketing copy for IT services.",
  };
  return `${contextMap[userRole]}\n\n${userPrompt}`;
}
C. Token Usage Optimizer
To minimize cost and token usage, you can:
- Truncate long prompts.
- Limit max_tokens.
- Pre-summarize using an internal service.
Step 4: Integration Example (Frontend)
Here's a basic React snippet to hit this API:
async function sendPrompt(prompt) {
  const response = await fetch('/api/chat', {
    method: 'POST',
    headers: { 'Content-Type': 'application/json' },
    body: JSON.stringify({ prompt }),
  });
  const data = await response.json();
  return data.response;
}
Optional: Adding Company Data
To include your own documents (like service info, portfolios, etc.), add a vector store (like Pinecone or Weaviate) and perform similarity searches before sending prompts to ChatGPT.
For example:
// pseudo-code
const relatedDocs = vectorSearch(prompt);
const finalPrompt = `${relatedDocs}\n\nUser asked: ${prompt}`;
Final Folder Structure
chatgpt-performance-api/
├── .env
├── server.js
├── package.json
└── README.md
Next Steps
- Add user authentication (JWT or OAuth).
- Store chat history in a DB.
- Add support for streaming responses.
- Use LangChain or OpenRouter for advanced routing.
Conclusion
By building this API layer, I was able to optimize ChatGPT usage for real-world scenarios—especially in client-facing apps where speed, accuracy, and customization matter. This approach allows you to tailor GPT responses for specific industries, reduce costs with caching, and integrate external knowledge seamlessly.