


![[The AI Show Episode 146]: Rise of “AI-First” Companies, AI Job Disruption, GPT-4o Update Gets Rolled Back, How Big Consulting Firms Use AI, and Meta AI App](https://www.marketingaiinstitute.com/hubfs/ep%20146%20cover.png)


![Ditching a Microsoft Job to Enter Startup Hell with Lonewolf Engineer Sam Crombie [Podcast #171]](https://cdn.hashnode.com/res/hashnode/image/upload/v1746753508177/0cd57f66-fdb0-4972-b285-1443a7db39fc.png?#)


.jpg?width=1920&height=1920&fit=bounds&quality=70&format=jpg&auto=webp#)


-Nintendo-Switch-2-Hands-On-Preview-Mario-Kart-World-Impressions-&-More!-00-10-30.png?width=1920&height=1920&fit=bounds&quality=70&format=jpg&auto=webp#)


-xl.jpg)


![New iPad 11 (A16) On Sale for Just $277.78! [Lowest Price Ever]](https://www.iclarified.com/images/news/97273/97273/97273-640.jpg)

![Apple Foldable iPhone to Feature New Display Tech, 19% Thinner Panel [Rumor]](https://www.iclarified.com/images/news/97271/97271/97271-640.jpg)


![[Weekly funding roundup May 3-9] VC inflow into Indian startups touches new high](https://images.yourstory.com/cs/2/220356402d6d11e9aa979329348d4c3e/WeeklyFundingRoundupNewLogo1-1739546168054.jpg)


Transitioning Terraform State File from Local to Remote Backend
DEFINITION The terraform.tfstate file is a JSON file that Terraform uses to track the current state of your infrastructure. It acts as a source of truth, allowing Terraform to understand what resources already exist so it can determine what changes are needed during operations like terraform apply. It's essential for ensuring that Terraform doesn't duplicate or unintentionally alter infrastructure. Because it can include sensitive data, it should be stored securely and never edited manually. Migrating Terraform state from local to remote storage is a** critical step for improving collaboration, security, and reliability in infrastructure as code.** What does terraform.tfstate file contain? The terraform.tfstate file is in JSON format and contains: Resource names and types (e.g., aws_instance.web_server) Resource properties (e.g., IP addresses, IDs, configurations) Metadata, dependencies, and outputs Sometimes sensitive information like secrets or credentials (unless specifically filtered out) WHY MIGRATE? Migrating the file to remote state makes Terraform safer, more scalable, and team-friendly. It's like moving your most important documents from a personal notebook to a secure, shared digital vault—so everyone can work together, safely and efficiently. Let's begin... Go to the link [https://app.terraform.io/public/signup/account]. Create a terraform registry account. Input Username, email, password and click on Create account. You will be prompted that Confirm your email address. Go to your email and click on the confirmation link. It will then redirect you back to the terraform page. Click on Create organization. An organization in the Terraform Registry is a shared namespace used to manage and publish Terraform modules or providers collaboratively under a team or company's name. Input your organization name and click on Create organization. You are now on the Create a** Workspace page**. Click on the CLI-driven Workflow. HCP Terraform organizes your infrastructure resources by workspaces. A workspace contains infrastructure resources, variables, state data, and run history. Why Choose a particular Workflow? The CLI-driven workflow is ideal for users who prefer working directly from the terminal while still benefiting from Terraform Cloud’s features like** remote state storage*, **locking, and **logging. Unlike the **Version Control (VCS)-driven workflow, which automatically runs plans and applies on every Git push—great for teams using **GitOps—the* CLI-driven method** gives you more control and flexibility without needing to change your development habits. The API-driven workflow offers the highest level of automation and customization through scripts or integrations but requires more setup and technical effort. Overall, the CLI-driven workflow strikes a balance between ease of use, control, and cloud-backed reliability, making it a strong choice for individuals or small teams. Give your Workspace a name and click on Create. Click on your account logo. Then click on Account settings. Click on Tokens to generate one. Click on Create an API token Give your token a Description and click on Generate token Copy the token and navigate to your VS code. Run the code terraform login. Type yes to proceed. Just** right click** and p*ress the enter key* when asked to provide the Token for app.terraform.io. You should get the picture below; Navigate back to Terraform cloud to copy your code. To locate the code. Click on Choose an organization at the bottom left hand corner of the page. Then click on your organization name. Click on your Workspace name. In this case Musa-workspace. Boom there is your configuration code block. Copy the segment of it highlighted below. We now need to add the code block to our Terraform configuration files to set up the cloud integration. Navigate to VS code, click on main.tffile and paste the copied code block between line 7 and 9 (i.e line 8) and CTRL S **to **save. You should have something like the one below; Navigate to VS code and run terraform login again. Click on generate a new token. Copy it and proceed to right click in the VS code. You should get the result below once again. Navigate to terraform cloud and click on State. It can be seen no saved states yet. Navigate to VS code and Run terraform init. Afterwards check state in terraform cloud. You should now see it in shaa Allah. From the foregoing we have successfully migrated terraform.tfstate file to terraform cloud (Remote setting). We can decide to delete it from our local state with the command **rm terraform.tfstate**. Since we already have it in the remote state. Bonus If you already had existing resources, you can run the command terraform import azurerm_resource_group.test 'full resource id' To get the full resource id; Navigate to Azure (in this case), Resource group then settings. Click on Properties and copy the resource id. in VS code run t

DEFINITION
The terraform.tfstate file is a JSON file that Terraform uses to track the current state of your infrastructure. It acts as a source of truth, allowing Terraform to understand what resources already exist so it can determine what changes are needed during operations like terraform apply. It's essential for ensuring that Terraform doesn't duplicate or unintentionally alter infrastructure. Because it can include sensitive data, it should be stored securely and never edited manually.
Migrating Terraform state from local to remote storage is a** critical step for improving collaboration, security, and reliability in infrastructure as code.**
What does terraform.tfstate file contain?
The terraform.tfstate file is in JSON format and contains:
- Resource names and types (e.g., aws_instance.web_server)
- Resource properties (e.g., IP addresses, IDs, configurations)
- Metadata, dependencies, and outputs
- Sometimes sensitive information like secrets or credentials (unless specifically filtered out)
WHY MIGRATE?
Migrating the file to remote state makes Terraform safer, more scalable, and team-friendly. It's like moving your most important documents from a personal notebook to a secure, shared digital vault—so everyone can work together, safely and efficiently.
Let's begin...
Go to the link [https://app.terraform.io/public/signup/account]. Create a terraform registry account. Input Username, email, password and click on Create account.
You will be prompted that Confirm your email address.
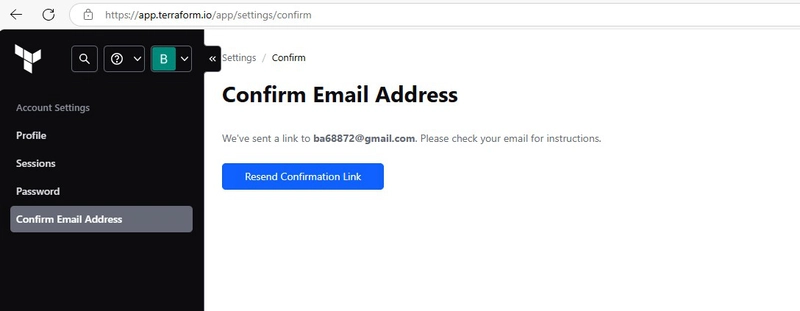
Go to your email and click on the confirmation link. It will then redirect you back to the terraform page. Click on Create organization. An organization in the Terraform Registry is a shared namespace used to manage and publish Terraform modules or providers collaboratively under a team or company's name.

Input your organization name and click on Create organization.

You are now on the Create a** Workspace page**. Click on the CLI-driven Workflow. HCP Terraform organizes your infrastructure resources by workspaces. A workspace contains infrastructure resources, variables, state data, and run history.

Why Choose a particular Workflow?
The CLI-driven workflow is ideal for users who prefer working directly from the terminal while still benefiting from Terraform Cloud’s features like** remote state storage*, **locking, and **logging. Unlike the **Version Control (VCS)-driven workflow, which automatically runs plans and applies on every Git push—great for teams using **GitOps—the* CLI-driven method** gives you more control and flexibility without needing to change your development habits. The API-driven workflow offers the highest level of automation and customization through scripts or integrations but requires more setup and technical effort. Overall, the CLI-driven workflow strikes a balance between ease of use, control, and cloud-backed reliability, making it a strong choice for individuals or small teams.
Give your Workspace a name and click on Create.

Click on your account logo. Then click on Account settings.

Click on Tokens to generate one.

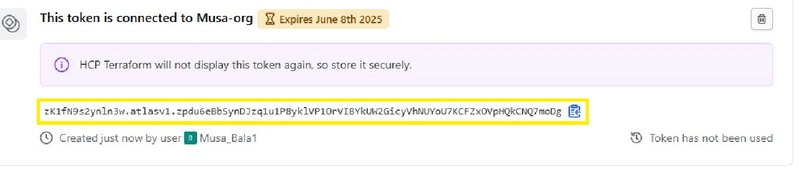
Click on Create an API token

Give your token a Description and click on Generate token

Copy the token and navigate to your VS code.
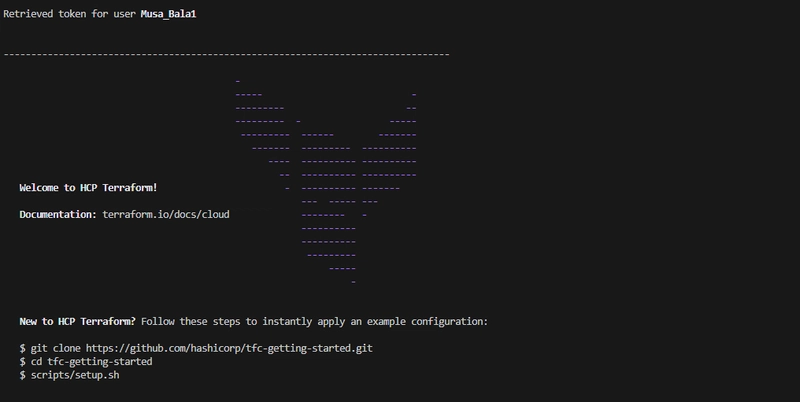
Run the code terraform login. Type yes to proceed. Just** right click** and p*ress the enter key* when asked to provide the Token for app.terraform.io.

You should get the picture below;
Navigate back to Terraform cloud to copy your code. To locate the code. Click on Choose an organization at the bottom left hand corner of the page. Then click on your organization name.

Click on your Workspace name. In this case Musa-workspace.
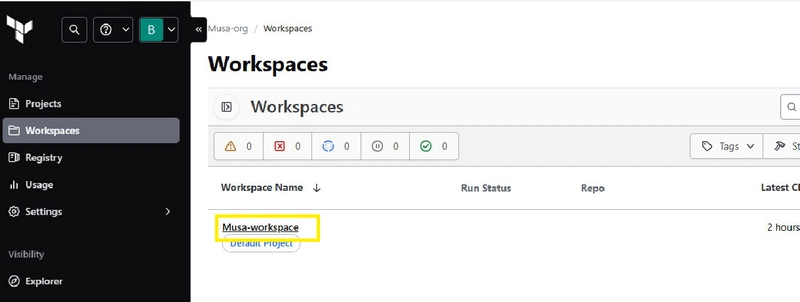
Boom there is your configuration code block. Copy the segment of it highlighted below.

We now need to add the code block to our Terraform configuration files to set up the cloud integration. Navigate to VS code, click on main.tffile and paste the copied code block between line 7 and 9 (i.e line 8) and CTRL S **to **save. You should have something like the one below;

Navigate to VS code and run terraform login again. Click on generate a new token. Copy it and proceed to right click in the VS code. You should get the result below once again.

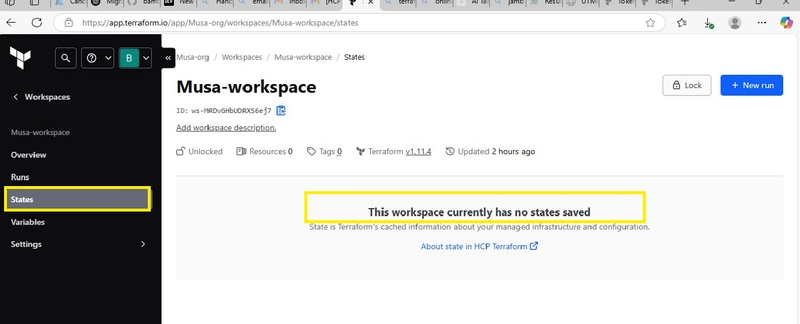
Navigate to terraform cloud and click on State. It can be seen no saved states yet.
Navigate to VS code and Run terraform init. Afterwards check state in terraform cloud. You should now see it in shaa Allah.

From the foregoing we have successfully migrated terraform.tfstate file to terraform cloud (Remote setting).
We can decide to delete it from our local state with the command **rm terraform.tfstate**. Since we already have it in the remote state.
Bonus
If you already had existing resources, you can run the command terraform import azurerm_resource_group.test 'full resource id'
To get the full resource id;
Navigate to Azure (in this case), Resource group then settings. Click on Properties and copy the resource id.
in VS code run the command above. Thereafter run terraform initand yes when appropriate. Visit terraform cloud to find your State.
List of Achievements
- Created a Terraform Cloud account via the official signup portal.
- Verified the email address to activate the Terraform Cloud account.
- Created a new organization in Terraform Cloud to group and manage infrastructure projects.
- Created a workspace using the** CLI-driven workflow**, ideal for terminal-based operations.
- **Generated an API token **for secure authentication between Terraform CLI and Terraform Cloud.
-
Logged in to Terraform Cloud from the terminal using
terraform login. - Copied and added the remote backend configuration block into the local
main.tffile. - Ran
terraform initto reinitialize the project and migrate the state to the remote backend. - Confirmed successful state migration by verifying the uploaded state in Terraform Cloud.
- Optionally deleted the local
terraform.tfstatefile to avoid duplication and conflicts. - (Bonus) Demonstrated how to import existing Azure resources into Terraform using terraform import.


