


![How to Build an AI Assistant with Keith Moehring [MAICON 2025 Speaker Series]](https://www.marketingaiinstitute.com/hubfs/MAICON-Speaker_Series%20%281%29.png)
![[The AI Show Episode 156]: AI Answers - Data Privacy, AI Roadmaps, Regulated Industries, Selling AI to the C-Suite & Change Management](https://www.marketingaiinstitute.com/hubfs/ep%20156%20cover.png)
![[The AI Show Episode 155]: The New Jobs AI Will Create, Amazon CEO: AI Will Cut Jobs, Your Brain on ChatGPT, Possible OpenAI-Microsoft Breakup & Veo 3 IP Issues](https://www.marketingaiinstitute.com/hubfs/ep%20155%20cover.png)


![Rust VS Go VS TypeScript – which back end language is for you? With Tai Groot [Podcast #176]](https://cdn.hashnode.com/res/hashnode/image/upload/v1750974265013/73f79068-0087-4c39-8a8b-feea8cac873b.png?#)


.jpg?width=1920&height=1920&fit=bounds&quality=70&format=jpg&auto=webp#)


Accessibility Testing on Windows on Mac
Today's note is about something that I, as a new Mac user, had to deal with while setting up my work environment. TL;DR: To run NVDA and JAWS on a Mac, you need to install Windows 11 for ARM in a virtual machine like UTM, and map a spare key to the Insert key with SharpKeys. Why do accessibility testing on Windows if you have a Mac? According to the WebAIM Screen Reader User Survey #10, Windows-only screen readers NVDA and JAWS are used by the majority of users. Just like browsers, screen readers have differences in how they present information, so it's always a good idea to test your website or app using different browser/screen reader combinations. In addition, some of the styling, like box shadows, background images, and so on, is removed when Windows High Contrast Mode (WHCM) is enabled. Sadly, there is no alternative to the WHCM on the Mac. Installation Step 1 – Installing a virtual machine There are multiple virtual machines available on Mac, such as Parallels, VirtualBox, and UTM. I'm using UTM, but this guide doesn't depend on its specifics, so you can choose whatever works for you. You can download UTM for free from the official website. You can also purchase it from the Mac App Store to support the team behind the software. Step 2 – Installing Windows When you have got UTM up and running, create a new virtual machine. You will need a Windows installation disk image, which you can download from the Microsoft website. Click on "Create a New Virtual Machine", select "Virtualize", and follow the wizard. You will need to specify the path to the installation ISO here. Step 3 – Installing screen readers Both NVDA and JAWS work on ARM-based devices now, so you can install them in a virtual machine, just as you would on a real device. If you would like to install any other programs, make sure that they also support ARM processors. Step 4 – Mapping missing keys Due to the fact that Mac and Windows use different keyboards, you are not able to use the Insert key in your UTM virtual machine. (You will need it for the various shortcuts for NVDA and JAWS.) You have to use a third-party program to remap keys on Mac or Windows level. I'm using SharpKeys – an open-source program for Windows. Download, install, and run SharpKeys inside the virtual machine. Click on the "Add" button. In the new window, find "Special: Insert" on the right. In the left list, select a key that you would like to act as the Insert key. For instance, if you select F1 on the left, every time you press F1 key inside your virtual machine, it will register as Insert. Make sure to map a key that is not used in any shortcuts. Once finished, press "OK", and then "Write to registry" to save changes – it will not work otherwise. At this point, you're good to go and start your accessibility testing. Hooray! Step 5 (bonus) – Accessing localhost If you are developing a project and running it locally, you might want to do quality assurance before deploying changes. For this, you need to be able to access your project at http://localhost:port from within the virtual machine. One way to do that with UTM is to set the network mode for the virtual machine to "Shared Network". Then, look up the Default Gateway IP address in Windows, which you can do by running ipconfig command in the Command Prompt: Now make sure that your project is accepting requests to this IP address. For example, to run a SvelteKit project in development mode and accept connections on all available IP addresses, you need to slightly modify the default command: npm run dev -- --host You can find a similar command for your tool. Extensive accessibility testing is important Mac is a great platform for web development. However, the reality is that majority of desktop users are Windows users. Thanks to tools like UTM, we are able to run Windows and Windows-specific software directly on a Mac. By testing on a wide range of tools and platforms, we make the Web accessible for all. What is your setup? Share it in the comments!

Today's note is about something that I, as a new Mac user, had to deal with while setting up my work environment.
TL;DR: To run NVDA and JAWS on a Mac, you need to install Windows 11 for ARM in a virtual machine like UTM, and map a spare key to the Insert key with SharpKeys.
Why do accessibility testing on Windows if you have a Mac?
According to the WebAIM Screen Reader User Survey #10, Windows-only screen readers NVDA and JAWS are used by the majority of users. Just like browsers, screen readers have differences in how they present information, so it's always a good idea to test your website or app using different browser/screen reader combinations.
In addition, some of the styling, like box shadows, background images, and so on, is removed when Windows High Contrast Mode (WHCM) is enabled. Sadly, there is no alternative to the WHCM on the Mac.
Installation
Step 1 – Installing a virtual machine
There are multiple virtual machines available on Mac, such as Parallels, VirtualBox, and UTM. I'm using UTM, but this guide doesn't depend on its specifics, so you can choose whatever works for you.
You can download UTM for free from the official website. You can also purchase it from the Mac App Store to support the team behind the software.
Step 2 – Installing Windows
When you have got UTM up and running, create a new virtual machine. You will need a Windows installation disk image, which you can download from the Microsoft website.
Click on "Create a New Virtual Machine", select "Virtualize", and follow the wizard. You will need to specify the path to the installation ISO here.
Step 3 – Installing screen readers
Both NVDA and JAWS work on ARM-based devices now, so you can install them in a virtual machine, just as you would on a real device.
If you would like to install any other programs, make sure that they also support ARM processors.
Step 4 – Mapping missing keys
Due to the fact that Mac and Windows use different keyboards, you are not able to use the Insert key in your UTM virtual machine. (You will need it for the various shortcuts for NVDA and JAWS.)
You have to use a third-party program to remap keys on Mac or Windows level. I'm using SharpKeys – an open-source program for Windows.
Download, install, and run SharpKeys inside the virtual machine.
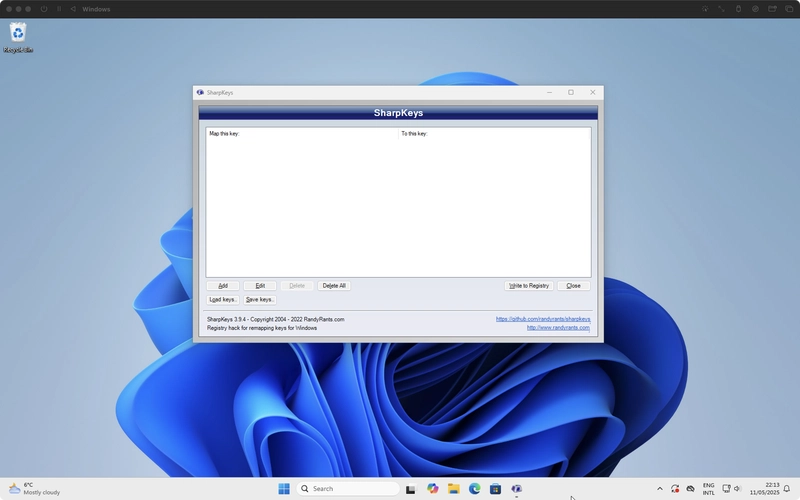
Click on the "Add" button. In the new window, find "Special: Insert" on the right. In the left list, select a key that you would like to act as the Insert key. For instance, if you select F1 on the left, every time you press F1 key inside your virtual machine, it will register as Insert.
Make sure to map a key that is not used in any shortcuts.

Once finished, press "OK", and then "Write to registry" to save changes – it will not work otherwise.

At this point, you're good to go and start your accessibility testing. Hooray!
Step 5 (bonus) – Accessing localhost
If you are developing a project and running it locally, you might want to do quality assurance before deploying changes. For this, you need to be able to access your project at http://localhost:port from within the virtual machine.
One way to do that with UTM is to set the network mode for the virtual machine to "Shared Network". Then, look up the Default Gateway IP address in Windows, which you can do by running ipconfig command in the Command Prompt:

Now make sure that your project is accepting requests to this IP address. For example, to run a SvelteKit project in development mode and accept connections on all available IP addresses, you need to slightly modify the default command:
npm run dev -- --host
You can find a similar command for your tool.
Extensive accessibility testing is important
Mac is a great platform for web development. However, the reality is that majority of desktop users are Windows users. Thanks to tools like UTM, we are able to run Windows and Windows-specific software directly on a Mac.
By testing on a wide range of tools and platforms, we make the Web accessible for all.
What is your setup? Share it in the comments!