


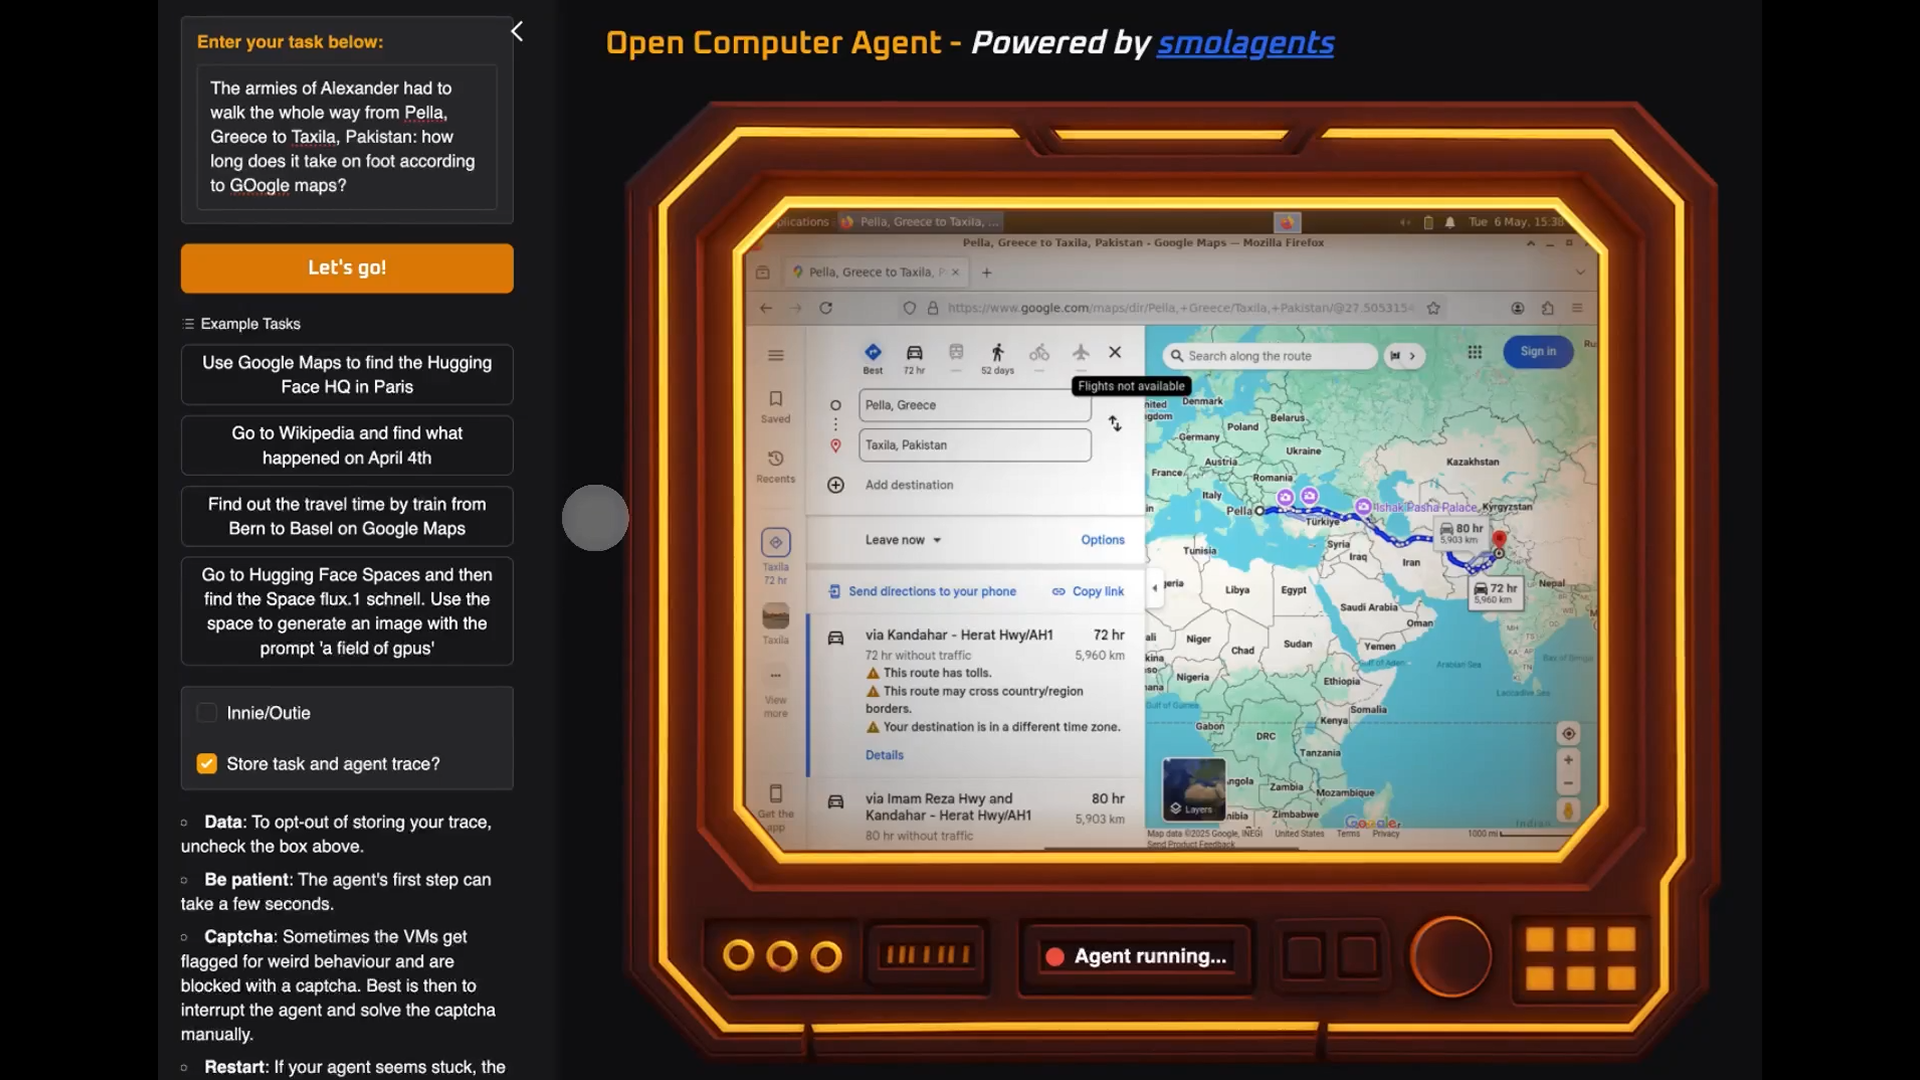


![[The AI Show Episode 146]: Rise of “AI-First” Companies, AI Job Disruption, GPT-4o Update Gets Rolled Back, How Big Consulting Firms Use AI, and Meta AI App](https://www.marketingaiinstitute.com/hubfs/ep%20146%20cover.png)


![Ditching a Microsoft Job to Enter Startup Purgatory with Lonewolf Engineer Sam Crombie [Podcast #171]](https://cdn.hashnode.com/res/hashnode/image/upload/v1746753508177/0cd57f66-fdb0-4972-b285-1443a7db39fc.png?#)


.jpg?width=1920&height=1920&fit=bounds&quality=70&format=jpg&auto=webp#)


![[Exclusive] Infinix GT DynaVue: a Prototype that could change everything!](https://www.gizchina.com/wp-content/uploads/images/2025/05/Screen-Shot-2025-05-10-at-16.07.40-PM-copy.png)


-xl.jpg)


![New iPad 11 (A16) On Sale for Just $277.78! [Lowest Price Ever]](https://www.iclarified.com/images/news/97273/97273/97273-640.jpg)

![Apple Foldable iPhone to Feature New Display Tech, 19% Thinner Panel [Rumor]](https://www.iclarified.com/images/news/97271/97271/97271-640.jpg)


How to Resolve 'Chip Enable Program Error' in AT89S52 Programming?
Introduction If you're encountering a chip enable program error while programming the AT89S52 microcontroller using progisp software, you're not alone. This error can be frustrating, especially when you're trying to upload your code and instead face unexpected issues. In this article, we will explore what this error means, why it happens, and how you can resolve it effectively. Understanding Chip Enable Program Error The chip enable program error typically indicates a communication problem between the programming software and the microcontroller. It can occur due to several reasons: mismatched configurations, hardware issues, or incorrect settings in the progisp software. Understanding the root cause is critical to diagnosing the issue correctly. Let's dive deeper into the common causes of this error. Common Causes of Chip Enable Program Errors Inadequate Power Supply: Ensure that your microcontroller is receiving adequate power. A weak or unstable power supply could hinder the chip's ability to operate, leading to programming errors. Incorrect Fuse Settings: The AT89S52 has certain fuse settings that must be correctly configured for programming. Verify that these settings match the requirements of your project. Connection Problems: Physical connections between the progisp software and the microcontroller should be checked. Loose wires, poor soldering, or wrong pin connections can result in communication failures. Driver Issues: Ensure that the drivers for the programming interface are installed correctly and are compatible with the progisp software. Software Configuration: Check your progisp settings to ensure that you've selected the correct microcontroller and settings compatible with the AT89S52. Step-by-Step Solution to Fix Chip Enable Program Error To resolve the chip enable program error, follow the structured methodology provided below: Step 1: Verify Power Supply Ensure that your power bank or battery provides adequate power to the AT89S52 microcontroller. You can use a multimeter to check the voltage level. The typical voltage required should be around 5V. Step 2: Check Hardware Connections Go through the wiring of your microcontroller: Make sure that the connections from the programmer to the microcontroller are secure. Inspect the wiring for any signs of damage or wear. Cross-verify the pin connections to ensure correct alignment with the microcontroller datasheet. Step 3: Configure Fuses Using Software If your programming software allows setting the fuses, ensure they are correctly configured based on your application. Here’s how to check fuse settings in progisp: 1. Open progisp software. 2. Select AT89S52 as the device. 3. Navigate to the configuration panel. 4. Review and set the fuses as needed for your application. Step 4: Install Drivers If you suspect that there are driver issues, ensure that all necessary drivers related to your programming device are installed. Check manufacturers' websites for updates or suiting suggestions. Step 5: Test with Sample Code Before uploading your actual project code, try programming a simple blink example. It can help isolate the problem: #include void main() { P1 = 0x00; // Set port 1 to low while(1) { P1 = 0xFF; // Turn on LEDs Delay(500); P1 = 0x00; // Turn off LEDs Delay(500); } } Step 6: Review progisp Settings Check the settings in progisp by navigating through the menu options and ensure they correspond to the specifications of the AT89S52 microcontroller. Ensure the frequency settings are also correct, as misconfiguration here can lead to communication errors. Frequently Asked Questions (FAQs) What is the chip enable pin? The chip enable pin (often labeled as CE or /CE) is crucial in controlling the programming process of the microcontroller. It must be set to the correct state to enable communication during programming. How can I avoid chip enable errors in the future? Ensuring solid and reliable connections, appropriate power supply, and correct fuse settings can help minimize future programming errors. Is progisp software reliable for microcontrollers? Yes, progisp is a widely used software tool for programming various microcontrollers, including the AT89S52. However, it is crucial to be familiar with its operation for successful programming. Conclusion Encountering a chip enable program error while using progisp software to program the AT89S52 microcontroller can be a challenging issue. By examining power settings, checking hardware connections, and ensuring proper software configurations, you can troubleshoot and effectively resolve this issue. Remember to perform your tests methodically to confirm that each solution is effective before proceeding to the next step. With patience and adherence to the guidelines provided, you'll be able to program your microcontroller without a hitch.

Introduction
If you're encountering a chip enable program error while programming the AT89S52 microcontroller using progisp software, you're not alone. This error can be frustrating, especially when you're trying to upload your code and instead face unexpected issues. In this article, we will explore what this error means, why it happens, and how you can resolve it effectively.
Understanding Chip Enable Program Error
The chip enable program error typically indicates a communication problem between the programming software and the microcontroller. It can occur due to several reasons: mismatched configurations, hardware issues, or incorrect settings in the progisp software. Understanding the root cause is critical to diagnosing the issue correctly. Let's dive deeper into the common causes of this error.
Common Causes of Chip Enable Program Errors
- Inadequate Power Supply: Ensure that your microcontroller is receiving adequate power. A weak or unstable power supply could hinder the chip's ability to operate, leading to programming errors.
- Incorrect Fuse Settings: The AT89S52 has certain fuse settings that must be correctly configured for programming. Verify that these settings match the requirements of your project.
- Connection Problems: Physical connections between the progisp software and the microcontroller should be checked. Loose wires, poor soldering, or wrong pin connections can result in communication failures.
- Driver Issues: Ensure that the drivers for the programming interface are installed correctly and are compatible with the progisp software.
- Software Configuration: Check your progisp settings to ensure that you've selected the correct microcontroller and settings compatible with the AT89S52.
Step-by-Step Solution to Fix Chip Enable Program Error
To resolve the chip enable program error, follow the structured methodology provided below:
Step 1: Verify Power Supply
Ensure that your power bank or battery provides adequate power to the AT89S52 microcontroller. You can use a multimeter to check the voltage level. The typical voltage required should be around 5V.
Step 2: Check Hardware Connections
Go through the wiring of your microcontroller:
- Make sure that the connections from the programmer to the microcontroller are secure.
- Inspect the wiring for any signs of damage or wear.
- Cross-verify the pin connections to ensure correct alignment with the microcontroller datasheet.
Step 3: Configure Fuses Using Software
If your programming software allows setting the fuses, ensure they are correctly configured based on your application. Here’s how to check fuse settings in progisp:
1. Open progisp software.
2. Select AT89S52 as the device.
3. Navigate to the configuration panel.
4. Review and set the fuses as needed for your application.
Step 4: Install Drivers
If you suspect that there are driver issues, ensure that all necessary drivers related to your programming device are installed. Check manufacturers' websites for updates or suiting suggestions.
Step 5: Test with Sample Code
Before uploading your actual project code, try programming a simple blink example. It can help isolate the problem:
#include
void main() {
    P1 = 0x00; // Set port 1 to low
    while(1) {
        P1 = 0xFF; // Turn on LEDs
        Delay(500);
        P1 = 0x00; // Turn off LEDs
        Delay(500);
    }
}
Step 6: Review progisp Settings
Check the settings in progisp by navigating through the menu options and ensure they correspond to the specifications of the AT89S52 microcontroller. Ensure the frequency settings are also correct, as misconfiguration here can lead to communication errors.
Frequently Asked Questions (FAQs)
What is the chip enable pin?
The chip enable pin (often labeled as CE or /CE) is crucial in controlling the programming process of the microcontroller. It must be set to the correct state to enable communication during programming.
How can I avoid chip enable errors in the future?
Ensuring solid and reliable connections, appropriate power supply, and correct fuse settings can help minimize future programming errors.
Is progisp software reliable for microcontrollers?
Yes, progisp is a widely used software tool for programming various microcontrollers, including the AT89S52. However, it is crucial to be familiar with its operation for successful programming.
Conclusion
Encountering a chip enable program error while using progisp software to program the AT89S52 microcontroller can be a challenging issue. By examining power settings, checking hardware connections, and ensuring proper software configurations, you can troubleshoot and effectively resolve this issue. Remember to perform your tests methodically to confirm that each solution is effective before proceeding to the next step. With patience and adherence to the guidelines provided, you'll be able to program your microcontroller without a hitch.