


![[The AI Show Episode 146]: Rise of “AI-First” Companies, AI Job Disruption, GPT-4o Update Gets Rolled Back, How Big Consulting Firms Use AI, and Meta AI App](https://www.marketingaiinstitute.com/hubfs/ep%20146%20cover.png)


![Ditching a Microsoft Job to Enter Startup Hell with Lonewolf Engineer Sam Crombie [Podcast #171]](https://cdn.hashnode.com/res/hashnode/image/upload/v1746753508177/0cd57f66-fdb0-4972-b285-1443a7db39fc.png?#)


.jpg?width=1920&height=1920&fit=bounds&quality=70&format=jpg&auto=webp#)


-Nintendo-Switch-2-Hands-On-Preview-Mario-Kart-World-Impressions-&-More!-00-10-30.png?width=1920&height=1920&fit=bounds&quality=70&format=jpg&auto=webp#)


-xl.jpg)


![New iPad 11 (A16) On Sale for Just $277.78! [Lowest Price Ever]](https://www.iclarified.com/images/news/97273/97273/97273-640.jpg)

![Apple Foldable iPhone to Feature New Display Tech, 19% Thinner Panel [Rumor]](https://www.iclarified.com/images/news/97271/97271/97271-640.jpg)


Hands-On Guide to Azure Infrastructure as Code Using Terraform and GitHub
Have you wondered how you could build resources in the cloud without the normal clickings? For example: You write down (in code): "I want a resource group in Azure, name it test-group and put it in East US." That is what exactly Terraform does. How does it do this? Terraform reads that note. It logs into Azure **or any other cloud providers and **builds exactly what you asked for, all from the code terminal — no clicks needed. You then login to your cloud provider portal to check and boom - there is everything, already created for you. Sounds cool right? Terraform is like a recipe book for building things in the cloud. Just like how: A recipe tells your kitchen what ingredients to use and how to cook, Terraform code tells Azure (or any cloud) what to build — like a virtual machine, database, or storage. Terraform is an infrastructure-as-code (IAC) software tool created by HashiCorp. The user tells Terraform what cloud resources to build, and Terraform builds them. After understanding completely what terraform is all about, let us understand some basic terraform commands. Commands in Terraform. terraform init "Get ready!" – Sets things up and downloads what Terraform needs. terraform plan "What will happen?" – Shows what it would build or change. `terraform apply "Go!" – Actually builds the stuff in the cloud. terraform destroy "Clean up!" – Destroys everything you made. terraform fmt "Make it neat!" – Fixes spacing and formatting in our files. terraform validate "Is this okay?" – Checks if your code has mistakes. terraform show "What did I build?" – Shows details of what exists now. terraform output "Give me the results." – Shows final values after building stuff. terraform version "What version is this?"– Tells you the Terraform version. Setting Up Terraform on Windows There are two ways this can be done; Manual Download of terraform and adding its path to environment variable on Windows. Running the command; choco install terraform in Windows PowerShell. --- A. Manual Installation i. Go to [https://developer.hashicorp.com/terraform] and click on Install. ii. Select your operating system and your processor architecture. In this case Windows was selected and the download **in front of **amd64 was clicked to download the terraform file. Brief Expo The choice between 386 and AMD64 when downloading Terraform (or any software) depends on your computer's CPU architecture — specifically whether it's a 32-bit or 64-bit system. Use 386 if your PC is very old or 32-bit, and AMD64 if your PC is modern and 64-bit (which is most systems today). IN SIMPLE TERMS If your computer is newer than 2010, you almost definitely need amd64. Continuation... When the folder has downloaded, a pop-up will be seen has shown below. Double click on the pop-up or go to file manager and click on Downloads to reveal it. It will be noted that it is a zip folder. Right click and click on Extract all to have access to its contents. Click on Extract Once extraction is done. Right click on the** terraform file** and copy the path. But for the system we are using the option to copy path is absent. Hence, we must setup terraform using the second method. But for those whose system has the option, I will go on and explain how they can get it done. Navigate to the Windows start menu and search for Environment variables. Click on Edit the system environment variables. System properties dialog box will open up. Under Advanced option click on Environment variables... Under System variables select Path and click on Edit... Click on New... and paste the terraform path you had copied while ensuring it is without quotation marks. Ok ** every opened **dialog box and proceed to sign-in to GitHub account to create a repository. Before proceeding to GitHub, let's recall that we weren't able to setup terraform with the first method. Now let's use the second method. B. Running the command; choco install terraform in **Windows PowerShell.** Navigate to the Windows start up menu search bar and type in PowerShell and click on Run as administrator. Before you run choco install terraform, here are the prerequisites in very simple terms: i. Windows OS: You're using a Windows computer (Chocolatey is for Windows). ii. Admin Access: You must run PowerShell or Command Prompt as Administrator. iii. **Chocolatey Installed: **You need to have Chocolatey installed first. Run the command: choco install terraform. When prompted if you want to run the Script?, type 'A' to answer yes to all and press the Enter key. You should get the result below. To further confirm if successfully installed, run the command terraform --version. You should get something like Terraform v1.11.4. Thus indicating successful installation. PREPARATION OF GITHUB TO COMMUNICATE WITH VS CODE in GitHub, click on the drop-down arrow, then click on New repository to create one. Give the repos

Have you wondered how you could build resources in the cloud without the normal clickings? For example:
You write down (in code):
"I want a resource group in Azure, name it test-group and put it in East US."
That is what exactly Terraform does. How does it do this?
Terraform reads that note.
It logs into Azure **or any other cloud providers and **builds exactly what you asked for, all from the code terminal — no clicks needed.
You then login to your cloud provider portal to check and boom - there is everything, already created for you. Sounds cool right?
Terraform is like a recipe book for building things in the cloud.
Just like how:
A recipe tells your kitchen what ingredients to use and how to cook,
Terraform code tells Azure (or any cloud) what to build — like a virtual machine, database, or storage.
Terraform is an infrastructure-as-code (IAC) software tool created by HashiCorp. The user tells Terraform what cloud resources to build, and Terraform builds them.
After understanding completely what terraform is all about, let us understand some basic terraform commands.
Commands in Terraform.
terraform init
"Get ready!" – Sets things up and downloads what Terraform needs.
terraform plan
"What will happen?" – Shows what it would build or change.
`terraform apply
"Go!" – Actually builds the stuff in the cloud.
terraform destroy
"Clean up!" – Destroys everything you made.
terraform fmt
"Make it neat!" – Fixes spacing and formatting in our files.
terraform validate
"Is this okay?" – Checks if your code has mistakes.
terraform show
"What did I build?" – Shows details of what exists now.
terraform output
"Give me the results." – Shows final values after building stuff.
terraform version
"What version is this?"– Tells you the Terraform version.
Setting Up Terraform on Windows
There are two ways this can be done;
- Manual Download of terraform and adding its path to environment variable on Windows.
- Running the command;
choco install terraformin Windows PowerShell. ---
A. Manual Installation
i. Go to [https://developer.hashicorp.com/terraform] and click on Install.
ii. Select your operating system and your processor architecture. In this case Windows was selected and the download **in front of **amd64 was clicked to download the terraform file.
Brief Expo
The choice between 386 and AMD64 when downloading Terraform (or any software) depends on your computer's CPU architecture — specifically whether it's a 32-bit or 64-bit system.
Use 386 if your PC is very old or 32-bit, and AMD64 if your PC is modern and 64-bit (which is most systems today).
IN SIMPLE TERMS
If your computer is newer than 2010, you almost definitely need amd64.
Continuation...
When the folder has downloaded, a pop-up will be seen has shown below.

Double click on the pop-up or go to file manager and click on Downloads to reveal it. It will be noted that it is a zip folder. Right click and click on Extract all to have access to its contents.

Click on Extract

Once extraction is done. Right click on the** terraform file** and copy the path. But for the system we are using the option to copy path is absent. Hence, we must setup terraform using the second method.

But for those whose system has the option, I will go on and explain how they can get it done.
Navigate to the Windows start menu and search for Environment variables. Click on Edit the system environment variables.

System properties dialog box will open up. Under Advanced option click on Environment variables...

Under System variables select Path and click on Edit...

Click on New... and paste the terraform path you had copied while ensuring it is without quotation marks. Ok ** every opened **dialog box and proceed to sign-in to GitHub account to create a repository.
Before proceeding to GitHub, let's recall that we weren't able to setup terraform with the first method. Now let's use the second method.
B. Running the command; choco install terraform in **Windows
PowerShell.**
Navigate to the Windows start up menu search bar and type in PowerShell and click on Run as administrator.

Before you run choco install terraform, here are the prerequisites in very simple terms:
i. Windows OS: You're using a Windows computer (Chocolatey is for
Windows).
ii. Admin Access: You must run PowerShell or Command Prompt as
Administrator.
iii. **Chocolatey Installed: **You need to have Chocolatey installed
first.
Run the command: choco install terraform. When prompted if you want to run the Script?, type 'A' to answer yes to all and press the Enter key. You should get the result below.

To further confirm if successfully installed, run the command terraform --version. You should get something like Terraform v1.11.4. Thus indicating successful installation.

PREPARATION OF GITHUB TO COMMUNICATE WITH VS CODE
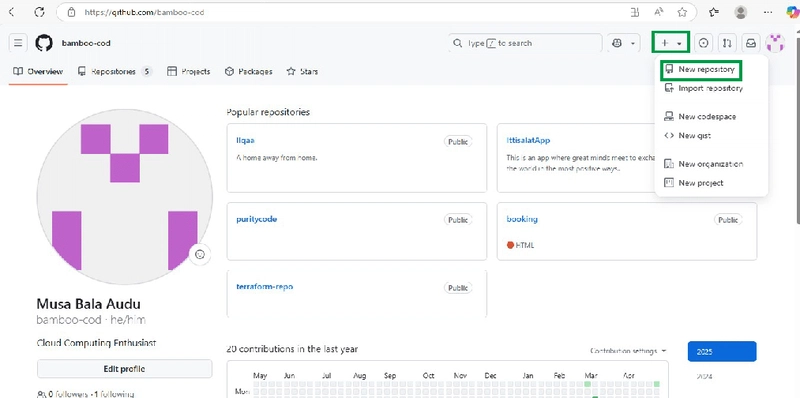
in GitHub, click on the drop-down arrow, then click on New repository to create one.
Give the repository a name, in this case Repo1 and click the box of Add a README file to tick it.

Click on Create repository to create the repository.

Click on Code **and click on the highlight **copy symbol to copy the HTTP URL.

NUGGET;
We use the HTTP URL to clone with Visual Studio (VS) because it works without extra setup, while SSH and GitHub CLI need extra configuration or tools installed.
We now need to clone the created repository in VS code.
CLONING A GITHUB REPOSITORY IN VS CODE
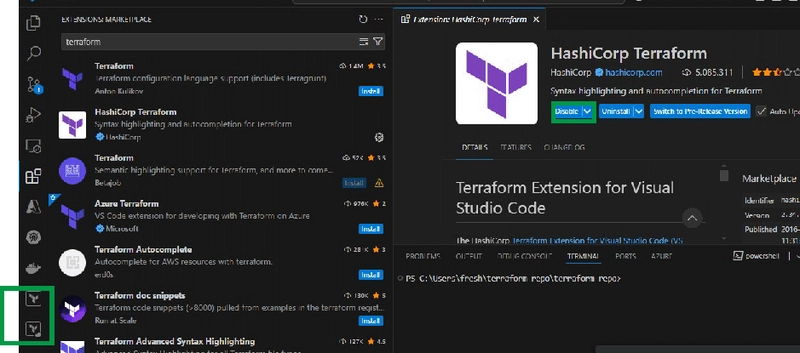
Open VS code and begin by installing the terraform extension. Click on the extensions icon on the left, then in the search bar type terraform and install the HashiCorp terraform.

Once it has finished installing, you should see the terraform extension icons to the left as hightlighted below.
TO CLONE...
Navigate to the Source control icon on the left and click. Then click on the Clone repository option.
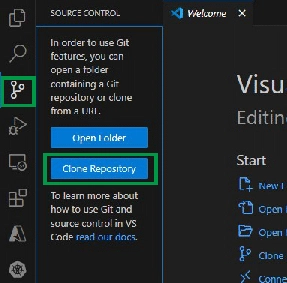
Click on the Clone from GitHub option.

Click on your created repository name in GitHub among the listed options.

Right click in the open dialog box. Then click on New and then Folder to create a folder for your repository.

Give your folder a name, press the Enter key and click on Select as repository destination.

Click on** Open** in the pop-up dialog box.

The repository has successfully been cloned into VS code has highlighted below.

CREATING A main.tf file.
A main.tf file is like the main recipe in Terraform — it tells Terraform **what to build **in the cloud, like virtual machines or networks.
Simple Example:
If Terraform is a cook, main.tf is the instruction sheet saying:
"Make 2 pizzas (VMs), 1 drink (storage), and serve it on a tray (network)."
Without main.tf, Terraform wouldn’t know what you want it to create. Hence this must be kept safe.
To continue...
Click on the file icon in front of the repository name. Type into the empty bar main.tfand press the Enter button.

The main.tf file has just been created.

From the foregoing, the field has been prepared for us to begin planting.
CONNECTING TERRAFORM TO CLOUD SERVICE PROVIDER (AZURE)
We connect Terraform to a cloud service provider **like **Azure so it can create and manage real cloud resources for us automatically, like virtual machines, storage accounts, or networks — instead of us clicking around manually in the Azure Portal.
Layman Analogy:
Imagine** Terraform is a **remote control, and Azure is your smart TV.
To change the channel (make cloud changes), Terraform needs to connect to the TV (Azure) — otherwise, the remote won’t do anything.
What do Providers do?
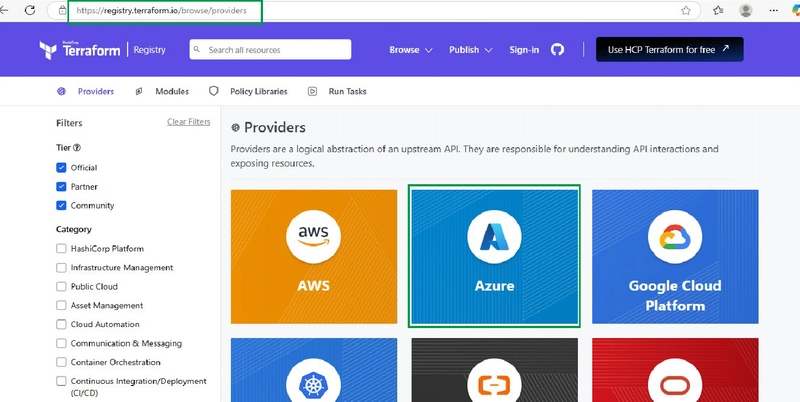
A provider is a plugin that allows Terraform to interact with external systems — like cloud platforms (e.g., AWS, Azure, Google Cloud), SaaS services (e.g., GitHub, Cloudflare), or even local systems.
Go to [https://registry.terraform.io/browse/providers] and among the various providers, click on Azure as we intend using Azure Cloud.
Click on USE PROVIDER

Copy the code
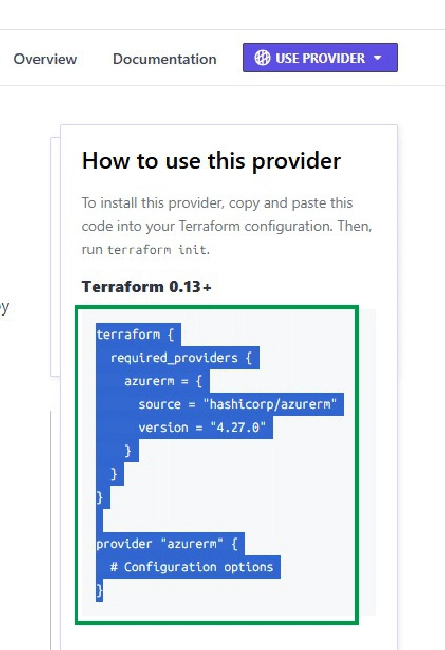
Paste the code into the main.tf file created in VS code. Make the following adjustments into the code
In line 11: Delete the comment # Configuration options and replace with features {. Note that as you type features, the features plugin starting prompting, just select it.
Move the curly brace in Line 13 to 14 and type in its stead subscription id. Select it when prompted and input your Azure subscription id copied from your Azure account. Ensure that your subscription id is within quotation marks.

Click on the three dots(...) in front of Run in the VS code interface. Then click on Terminal. Then click on New terminal to start running the Terraform commands.

THE **terraform init Command**
terraform initprepares your project to use Terraform by downloading the necessary provider plugins (like AWS, Azure, etc.). It sets up your working directory and configures backend settings if needed. It also locks provider versions to ensure consistency in future runs. This information is stored in a file called **.terraform.lock.hcl.**as can be seen below.

CREATING RESOURCES IN AZURE WITH TERRAFORM
Ask any of the AI chatbots or large language model (LLM) assistants like ChatGPT, DeepSeek etc to write you any terraform code for anything you want to create. We will be using the following code as an example.
`
terraform {

  required_providers {

    azurerm = {

      source = "hashicorp/azurerm"

      version = "4.27.0"

    }

  }

}

provider "azurerm" {

    features {}

    subscription_id = "5fdd1cff-4911-4d4a-b28a-969756021e0f"

}
resource "azurerm_resource_group" "test" {

   name     = "acctestrg"

   location = "West US 2"

 }
resource "azurerm_virtual_network" "test" {

   name                = "acctvn"

   address_space       = ["10.0.0.0/16"]

   location            = azurerm_resource_group.test.location

   resource_group_name = azurerm_resource_group.test.name

 }
resource "azurerm_subnet" "test" {

   name                 = "acctsub"

   resource_group_name  = azurerm_resource_group.test.name

   virtual_network_name = azurerm_virtual_network.test.name

   address_prefixes     = ["10.0.2.0/24"]

 }
resource "azurerm_public_ip" "test" {

   name                         = "publicIPForLB"

   location                     = azurerm_resource_group.test.location

   resource_group_name          = azurerm_resource_group.test.name

   allocation_method            = "Static"

 }
resource "azurerm_lb" "test" {
name = "loadBalancer"
location = azurerm_resource_group.test.location
resource_group_name = azurerm_resource_group.test.name
frontend_ip_configuration {
name = "publicIPAddress"
public_ip_address_id = azurerm_public_ip.test.id
}
}
resource "azurerm_lb_backend_address_pool" "test" {
loadbalancer_id = azurerm_lb.test.id
name = "BackEndAddressPool"
}
resource "azurerm_network_interface" "test" {
count = 2
name = "acctni${count.index}"
location = azurerm_resource_group.test.location
resource_group_name = azurerm_resource_group.test.name
ip_configuration {
name = "testConfiguration"
subnet_id = azurerm_subnet.test.id
private_ip_address_allocation = "Dynamic"
}
}
resource "azurerm_managed_disk" "test" {
count = 2
name = "datadisk_existing_${count.index}"
location = azurerm_resource_group.test.location
resource_group_name = azurerm_resource_group.test.name
storage_account_type = "Standard_LRS"
create_option = "Empty"
disk_size_gb = "1023"
}
resource "azurerm_availability_set" "avset" {
name = "avset"
location = azurerm_resource_group.test.location
resource_group_name = azurerm_resource_group.test.name
platform_fault_domain_count = 2
platform_update_domain_count = 2
managed = true
}
resource "azurerm_virtual_machine" "test" {
count = 2
name = "acctvm${count.index}"
location = azurerm_resource_group.test.location
availability_set_id = azurerm_availability_set.avset.id
resource_group_name = azurerm_resource_group.test.name
network_interface_ids = [element(azurerm_network_interface.test.*.id, count.index)]
vm_size = "Standard_DS1_v2"
# Uncomment this line to delete the OS disk automatically when deleting the VM
# delete_os_disk_on_termination = true
# Uncomment this line to delete the data disks automatically when deleting the VM
# delete_data_disks_on_termination = true
storage_image_reference {
publisher = "Canonical"
offer = "UbuntuServer"
sku = "16.04-LTS"
version = "latest"
}
storage_os_disk {
name = "myosdisk${count.index}"
caching = "ReadWrite"
create_option = "FromImage"
managed_disk_type = "Standard_LRS"
}
# Optional data disks
storage_data_disk {
name = "datadisk_new_${count.index}"
managed_disk_type = "Standard_LRS"
create_option = "Empty"
lun = 0
disk_size_gb = "1023"
}
storage_data_disk {
name = element(azurerm_managed_disk.test..name, count.index)
managed_disk_id = element(azurerm_managed_disk.test..id, count.index)
create_option = "Attach"
lun = 1
disk_size_gb = element(azurerm_managed_disk.test.*.disk_size_gb, count.index)
}
os_profile {
computer_name = "hostname"
admin_username = "testadmin"
admin_password = "Password1234!"
}
os_profile_linux_config {
disable_password_authentication = false
}
tags = {
environment = "staging"
}
}`
BREAKDOWN OF WHAT SPECIFIC AREAS OF THE CODE DOES.
1. Specify the Provider
terraform {
required_providers {
azurerm = {
source = "hashicorp/azurerm"
version = "4.27.0"
}
}
}
provider "azurerm" {
features {}
subscription_id = "5fdd1cff-4911-4d4a-b28a-969756021e0f"
}
These lines tell Terraform to use Azure (azurerm) as the cloud provider and connect to your Azure subscription.
2. Create a Resource Group
resource "azurerm_resource_group" "test" {
name = "acctestrg"
location = "West US 2"
}
Creates a resource group in Azure named "acctestrg" where all other resources will live.
3. Create a Virtual Network
resource "azurerm_virtual_network" "test" {
name = "acctvn"
address_space = ["10.0.0.0/16"]
location = azurerm_resource_group.test.location
resource_group_name = azurerm_resource_group.test.name
}
Creates a virtual network (VNet) for your infrastructure with an address space of 10.0.0.0/16.
4. Create a Subnet inside the VNet
resource "azurerm_subnet" "test" {
name = "acctsub"
resource_group_name = azurerm_resource_group.test.name
virtual_network_name = azurerm_virtual_network.test.name
address_prefixes = ["10.0.2.0/24"]
}
Defines a subnet within the virtual network using 10.0.2.0/24.
5. Create a Public IP Address
resource "azurerm_public_ip" "test" {
name = "publicIPForLB"
location = azurerm_resource_group.test.location
resource_group_name = azurerm_resource_group.test.name
allocation_method = "Static"
}
Sets up a static public IP address to be used by a load balancer.
6. Create a Load Balancer
resource "azurerm_lb" "test" {

   name                = "loadBalancer"

   ...

   frontend_ip_configuration {

     name                 = "publicIPAddress"

     public_ip_address_id = azurerm_public_ip.test.id

   }

 }
Creates an Azure load balancer using the public IP defined earlier.
**
- Define a Backend Pool for Load Balancer**
resource "azurerm_lb_backend_address_pool" "test" {

   loadbalancer_id     = azurerm_lb.test.id

   name                = "BackEndAddressPool"

 }
Creates a backend pool for the load balancer to distribute traffic to virtual machines.
8. Create Network Interfaces (NICs)
resource "azurerm_network_interface" "test" {

   count               = 2

   ...

   ip_configuration {

     subnet_id                     = azurerm_subnet.test.id

     private_ip_address_allocation = "Dynamic"

   }

 }
Creates 2 network interfaces that will be attached to the virtual machines and connected to the subnet.
9. Create Managed Disks
resource "azurerm_managed_disk" "test" {

   count                = 2

   ...

   create_option        = "Empty"

   disk_size_gb         = "1023"

 }
Creates 2 managed data disks (empty, 1023 GB each) that will be attached to the virtual machines.
10. Create Availability Set
resource "azurerm_availability_set" "avset" {

   ...

   managed                      = true

 }
Creates an availability set to improve high availability of virtual machines by spreading them across fault and update domains.
11. Create Virtual Machines
resource "azurerm_virtual_machine" "test" {

   count                 = 2

   ...

   vm_size               = "Standard_DS1_v2"

   storage_image_reference {

     publisher = "Canonical"

     ...

   }

   os_profile {

     computer_name  = "hostname"

     admin_username = "testadmin"

     admin_password = "Password1234!"

   }

   os_profile_linux_config {

     disable_password_authentication = false

   }

   tags = {

     environment = "staging"

   }

 }
Creates 2 Ubuntu Linux virtual machines:
Each VM uses a network interface.
Attaches one new data disk and one previously created disk.
Uses an Ubuntu image.
Sets a username and password.
Adds a tag for the environment.
RUNNING COMMANDS CONTINUE..
Run terraform init again because we have paste into the terminal a fresh command codes.

Run terraform plan -out main.tfplan
The command terraform plan -out main.tfplan creates a plan and saves it to a file named main.tfplan instead of just showing it on screen.
It can be noted that when the code was run main.tplan file was added as shown in the picture below.

LOGGING INTO AZURE
Run the code az login. You will then be pompted to selected the appropriate email attached to your account. Select and click on Continue.

You then be asked to select the active subscription if you have more than one. Input the appropriate number and press the Enter key.

Run the terraform apply code
terraform apply actually executes the changes described in your Terraform plan, creating, updating, or deleting resources in your infrastructure. When prompted to enter a value, type yes and press the Enter key.
terraform apply actually executes the changes described in your Terraform plan, creating, updating, or deleting resources in your infrastructure.
Navigate to Azure and appreciate the resources created automatically without clickings

Click on the first Resource group to view its contents

Click on the second Resource group to also view its content

Run the **terraform destroy** command
terraform destroy deletes all the infrastructure resources that were created by your Terraform code, effectively tearing down your setup.
Navigate to Azure portal and ensure all the created resources have been deleted. If not manually delete them to avoid incurring charges.

TAKEHOME FROM THE PROJECT
Understanding Terraform
Terraform is an Infrastructure as Code (IaC) tool developed by HashiCorp.
It lets you describe cloud infrastructure in code instead of manually clicking through portals.
You can specify resources like:
- Resource groups
- Virtual machines
- Databases
- Storage
Terraform uses code to log into cloud providers (like Azure) and build exactly what you describe.
Analogy: Like a recipe for cloud infrastructure – you write instructions, and Terraform cooks it for you.
Core Terraform Commands
Setting Up Terraform on Windows
Method A: Manual Installation
- Download Terraform from the official site.
- Choose the correct version (amd64 for modern 64-bit systems).
- Extract the downloaded ZIP folder.
- Copy the path of the Terraform executable.
- Add the path to your Windows Environment Variables under the System Path.
Method B: Using Chocolatey
- Open PowerShell as Administrator.
- Ensure Chocolatey is installed.
- Run choco install terraform.
- Confirm installation by running terraform --version.
- Preparing GitHub for Terraform Projects
- Create a GitHub account if you don’t have one.
- Create a new repository (e.g., Repo1).
- Enable README creation in the new repo.
Copy the
HTTP URL for cloning (easiest method for VS Code).
Cloning GitHub Repository in VS Code
Install Terraform extension in VS Code.
Open Source Control → Clone Repository → Paste URL or select GitHub repo.
Create/select a folder for the project.
Confirm cloning and open the repo in VS Code.
Creating the main.tf File
- main.tf is the primary configuration file where resources are declared.
- It acts like the instruction sheet for Terraform.
Connecting Terraform to Azure
Providers are plugins that allow Terraform to communicate with external systems (like Azure).
Visit Terraform Registry and select Azure Provider.
- Copy and paste provider block into main.tf.
- Modify the config to include:
- features {} block
- Your Azure subscription_id (inside quotes)
Running Terraform Commands in VS Code
Open a new terminal in VS Code.
Run terraform init to initialize and lock dependencies.
The .terraform.lock.hcl file is generated after init for dependency consistency.