


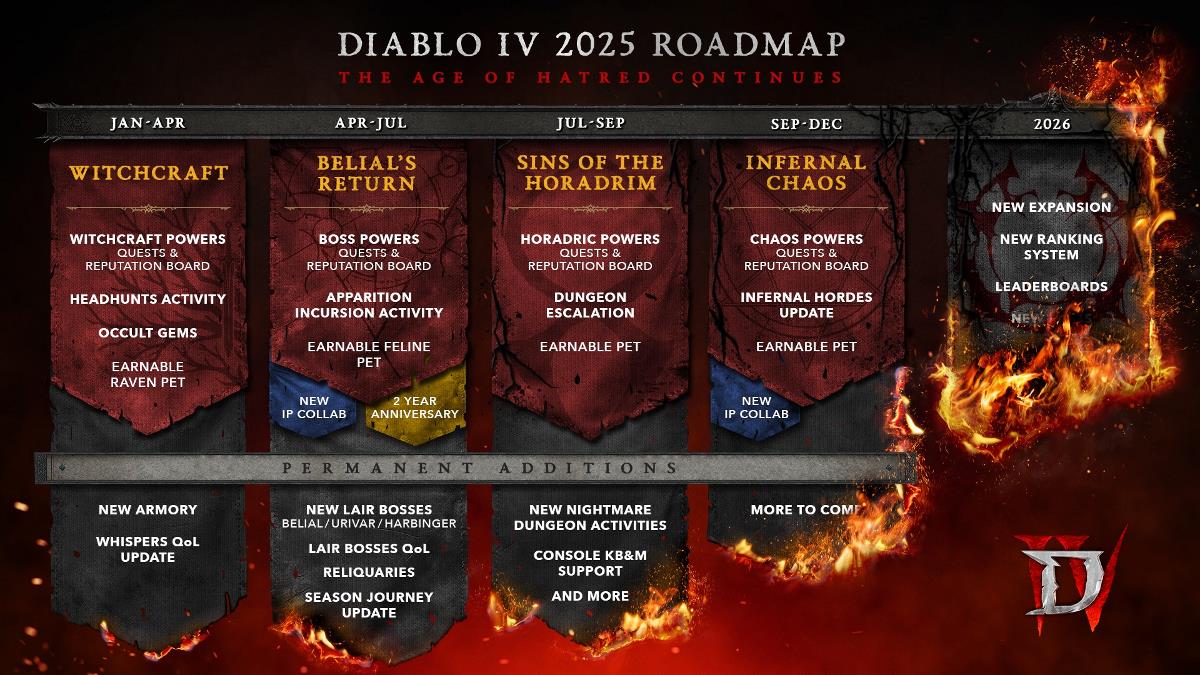
![[The AI Show Episode 143]: ChatGPT Revenue Surge, New AGI Timelines, Amazon’s AI Agent, Claude for Education, Model Context Protocol & LLMs Pass the Turing Test](https://www.marketingaiinstitute.com/hubfs/ep%20143%20cover.png)


-11.11.2024-4-49-screenshot.png?width=1920&height=1920&fit=bounds&quality=70&format=jpg&auto=webp#)


_jvphoto_Alamy.jpg?#)


.png?#)


![Apple Debuts Official Trailer for 'Murderbot' [Video]](https://www.iclarified.com/images/news/96972/96972/96972-640.jpg)
![Alleged Case for Rumored iPhone 17 Pro Surfaces Online [Image]](https://www.iclarified.com/images/news/96969/96969/96969-640.jpg)

![Apple Rushes Five Planes of iPhones to US Ahead of New Tariffs [Report]](https://www.iclarified.com/images/news/96967/96967/96967-640.jpg)


Start Making Games
You've got a game idea but have yet to take the first steps toward making it a reality? This post is for you. Sometimes the most difficult aspect of starting something is just that; getting started. Whether that be out of some fear of not knowing enough to start or simply being overwhelmed by the amount of options available. In this post, I'll help you get started by choosing an engine, getting the tools you need, and cover the basics. The Idea Before we can even be concerned about how to do something technically, think about what you want to creative. What game do you want to make that seems reasonable as a first project? There's a running joke in the games industry about those who have never made a game before choosing something on the scale of an Massively-Multiplayer Online RPG (MMORPG) as their first game. While I'm certainly not here to tell you what to make, I do recommend picking a relatively simple concept for your first game. Even old arcade games like Pac-Man have a surprising amount of work and complexity if you've never made a game before; music, sound effects, programming, art, AI, etc. A benefit of choosing an arcade classic to remake is you already understand the game design and mechanics. This keeps your focus on learning the technical skills. Install Unity To get started I recommend Unity as it has a ton of learning resources available, and the official documentation is great as well. When you're just getting started this is a crucial part of learning a complex piece of software like a game engine. Installing Unity is easy, we can do it all from the command line; no need to open Yet Another Browser Tab. Projects and Unity installations are managed via Unity Hub, so let's get it. # Windows winget install -e Unity.UntiyHub # macOS via Homebrew brew install --cask unity-hub There are a few additional steps for Linux. Add the public signing key wget -qO - https://hub.unity3d.com/linux/keys/public | gpg --dearmor | sudo tee /usr/share/keyrings/Unity_Technologies_ApS.gpg > /dev/null Add the repository for Unity Hub in /etc/apt/sources.list.d sudo sh -c 'echo "deb [signed-by=/usr/share/keyrings/Unity_Technologies_ApS.gpg] https://hub.unity3d.com/linux/repos/deb stable main" > /etc/apt/sources.list.d/unityhub.list' Update the package cache and install sudo apt update && sudo apt install unityhub Install Code Editor We're going to need a code editor that works well with C# and Unity. I don't often recommend it, but for this post I'll show you how to install Visual Studio Code. It has extensions for C# and Unity and is cross-platform. Thankfully, it's easy to install via command line as well. # Windows winget install -e Microsoft.VisualStudioCode # macOS brew install --cask visual-studio-code For Linux, check your distributions app store or download it directly. Now let's install a couple of extensions. Open Visual Studio Code and go to View, Extensions. First, search for C# and install the C# Dev Kit. Next, search for and install the Unity extension. Install Unity 6 With Unity Hub launched we can now install the Unity 6. At some point you'll be prompted to sign in with your Unity ID. Do that so they'll stop bugging you about it. The UI will change over time, so look for an "Installs" section and a button to install editor. I'm going to install Unity 6000.0.43f1, which is currently the latest LTS version of Unity 6 at the time of this post. The specific version doesn't matter just get the latest LTS release. It's going to ask what you want to install with it, and for just getting started you can uncheck all of the options. You can download build support as you need it. Create a Project Let's create our first project together. Back in Unity Hub, you should see a "Projects" tab and under that a "New project" button, which will open the new project wizard and allow us to select a template to start with. Select the "Universal 3D" template and update the project settings as needed. I named the project for this article "hello-unity". You can deselect the checkboxes at the bottom. Unity is far from a lean engine. After a bit of waiting, you'll finally see the Unity Editor. The Editor Interface Hierarchy Window Don't be overwhelmed by the editor interface. At first it can seem daunting, but you'll learn to use just what you need as you need it, similar to learning a tool like Photoshop or Logic Pro We'll take our time and go through a few features one by one, starting with the Hierarchy. The template comes with one Scene to get us started, called SampleScene and it is listed at the top of the Hierarchy window. Expanding the items with the arrow icon to the left of the scene name reveals the Game Objects current in our scene. These Game Objects make up everything in our game. In a full game you may have one for Player, Enemy, Music Manager, etc. Currently,
You've got a game idea but have yet to take the first steps toward making it a reality? This post is for you.
Sometimes the most difficult aspect of starting something is just that; getting started. Whether that be out of some fear of not knowing enough to start or simply being overwhelmed by the amount of options available. In this post, I'll help you get started by choosing an engine, getting the tools you need, and cover the basics.
The Idea
Before we can even be concerned about how to do something technically, think about what you want to creative. What game do you want to make that seems reasonable as a first project? There's a running joke in the games industry about those who have never made a game before choosing something on the scale of an Massively-Multiplayer Online RPG (MMORPG) as their first game.
While I'm certainly not here to tell you what to make, I do recommend picking a relatively simple concept for your first game. Even old arcade games like Pac-Man have a surprising amount of work and complexity if you've never made a game before; music, sound effects, programming, art, AI, etc.
A benefit of choosing an arcade classic to remake is you already understand the game design and mechanics. This keeps your focus on learning the technical skills.
Install Unity
To get started I recommend Unity as it has a ton of learning resources available, and the official documentation is great as well. When you're just getting started this is a crucial part of learning a complex piece of software like a game engine.
Installing Unity is easy, we can do it all from the command line; no need to open Yet Another Browser Tab. Projects and Unity installations are managed via Unity Hub, so let's get it.
# Windows
winget install -e Unity.UntiyHub

# macOS via Homebrew
brew install --cask unity-hub
There are a few additional steps for Linux.
- Add the public signing key
wget -qO - https://hub.unity3d.com/linux/keys/public | gpg --dearmor | sudo tee /usr/share/keyrings/Unity_Technologies_ApS.gpg > /dev/null
- Add the repository for Unity Hub in
/etc/apt/sources.list.d
sudo sh -c 'echo "deb [signed-by=/usr/share/keyrings/Unity_Technologies_ApS.gpg] https://hub.unity3d.com/linux/repos/deb stable main" > /etc/apt/sources.list.d/unityhub.list'
- Update the package cache and install
sudo apt update && sudo apt install unityhub
Install Code Editor
We're going to need a code editor that works well with C# and Unity. I don't often recommend it, but for this post I'll show you how to install Visual Studio Code. It has extensions for C# and Unity and is cross-platform.
Thankfully, it's easy to install via command line as well.
# Windows
winget install -e Microsoft.VisualStudioCode

# macOS
brew install --cask visual-studio-code
For Linux, check your distributions app store or download it directly.
Now let's install a couple of extensions. Open Visual Studio Code and go to View, Extensions.
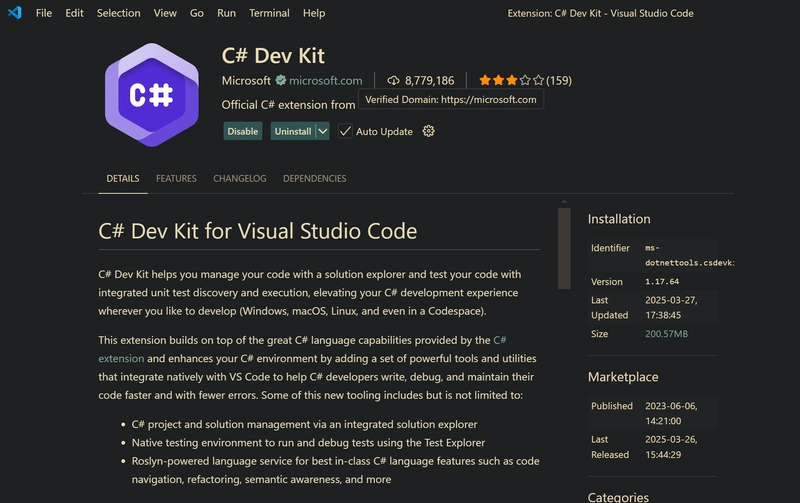
First, search for C# and install the C# Dev Kit.
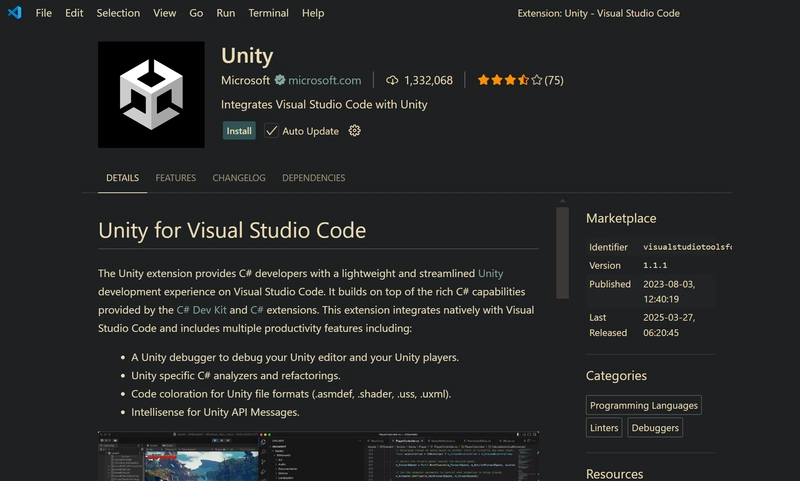
Next, search for and install the Unity extension.
Install Unity 6
With Unity Hub launched we can now install the Unity 6. At some point you'll be prompted to sign in with your Unity ID. Do that so they'll stop bugging you about it.
The UI will change over time, so look for an "Installs" section and a button to install editor. I'm going to install Unity 6000.0.43f1, which is currently the latest LTS version of Unity 6 at the time of this post. The specific version doesn't matter just get the latest LTS release.
It's going to ask what you want to install with it, and for just getting started you can uncheck all of the options. You can download build support as you need it.
Create a Project
Let's create our first project together. Back in Unity Hub, you should see a "Projects" tab and under that a "New project" button, which will open the new project wizard and allow us to select a template to start with.
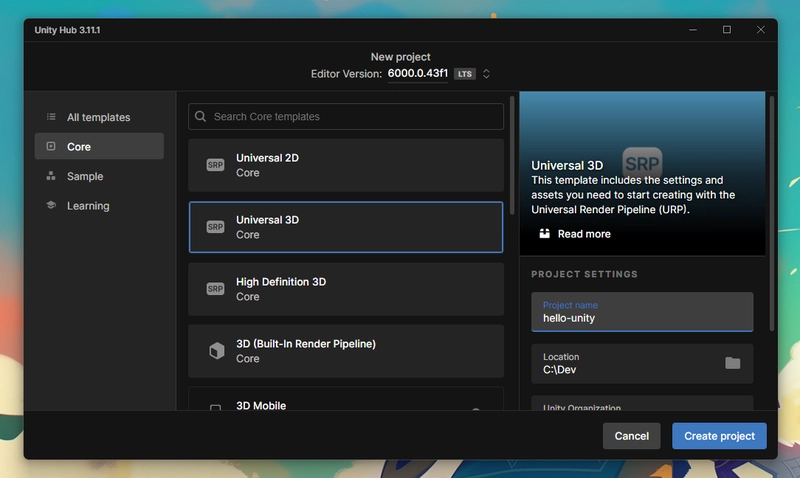
Select the "Universal 3D" template and update the project settings as needed. I named the project for this article "hello-unity". You can deselect the checkboxes at the bottom. Unity is far from a lean engine. After a bit of waiting, you'll finally see the Unity Editor.
The Editor Interface
Hierarchy Window
Don't be overwhelmed by the editor interface. At first it can seem daunting, but you'll learn to use just what you need as you need it, similar to learning a tool like Photoshop or Logic Pro We'll take our time and go through a few features one by one, starting with the Hierarchy.
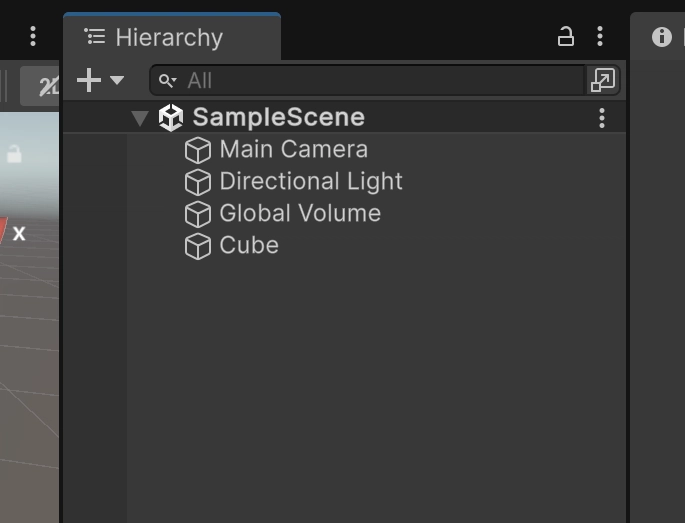
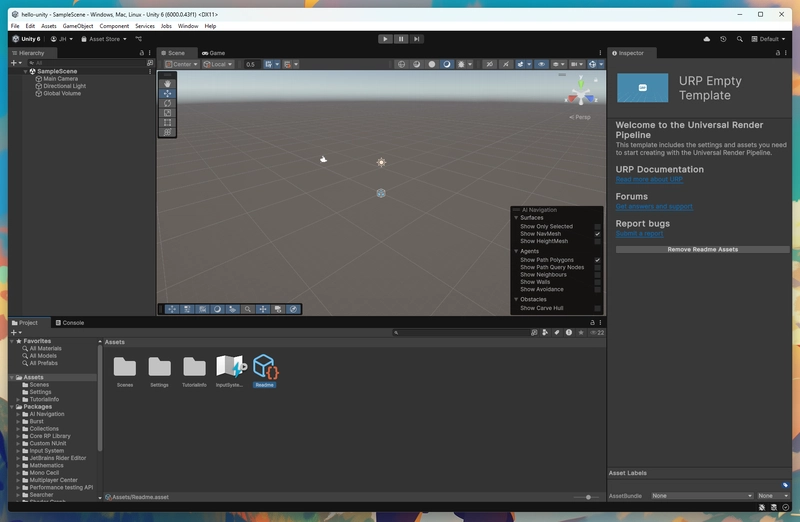
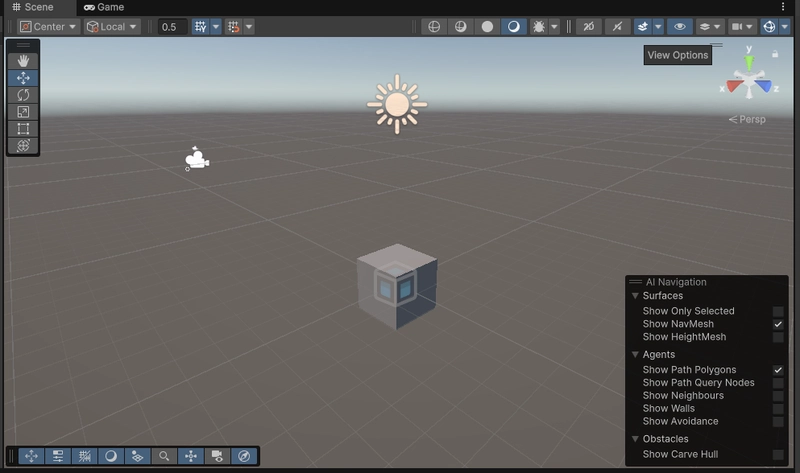
The template comes with one Scene to get us started, called SampleScene and it is listed at the top of the Hierarchy window. Expanding the items with the arrow icon to the left of the scene name reveals the Game Objects current in our scene.
These Game Objects make up everything in our game. In a full game you may have one for Player, Enemy, Music Manager, etc. Currently, we have one for our Main Camera, Directional Light and Global Volume.
If you click on one, you will see it selected within the Scene Window. This should solidify the relationship between the Hierarchy and Scene windows; generally, what you see in the Scene has a representation in the Hierarchy as a Game Object (GO). That's a bit simplified for now, because we still need to cover how GOs are composed.
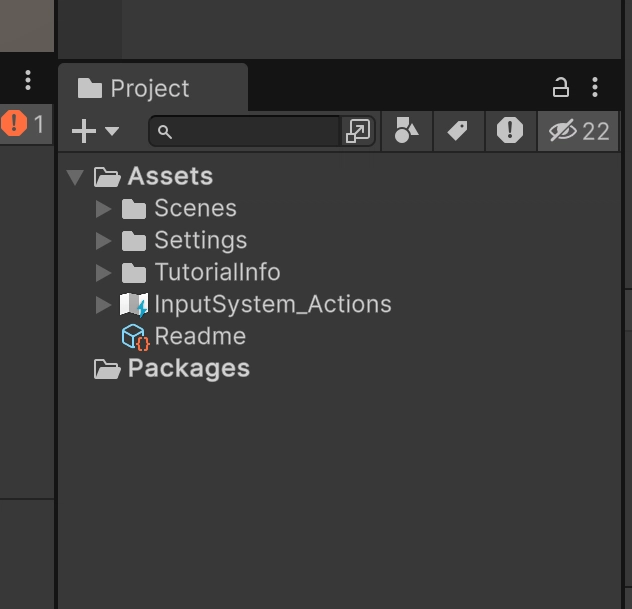
Project Window
Next, we have the Project window which is a representation of the assets that make up our game. When I refer to assets, I mean everything from code to sprites (images) music and even Unity-specific files used to store resulting tool data, like animations. Generally, this is a representation of the files in the project directory.
Inspector Window
You will spend a lot of time using the Inspector Window as it is your window into the composition and configuration of GOs and files that support it.
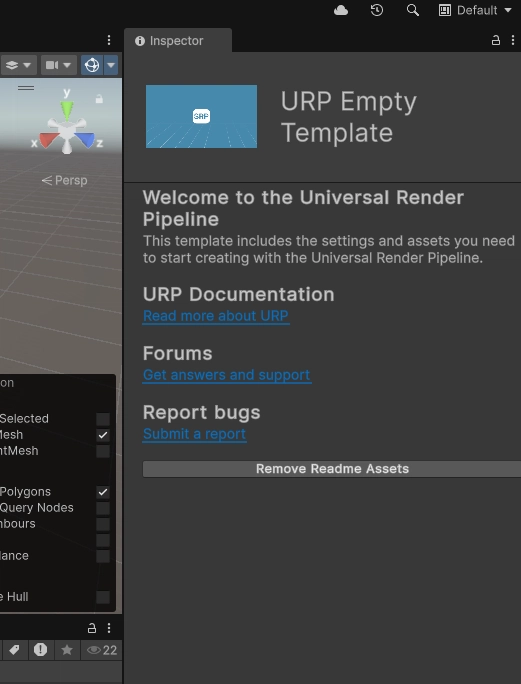
Currently, the Inspector window is displaying the contents of the Readme asset that came with the template welcoming us to the Universal Render Pipeline. Feel free to read about URP via the links in the inspector later, for now let's take a look at the properties of a GO.
Back in the Hierarchy, select the Main Camera GO and take a look at the updated inspector. This is a key aspect of Unity to understand; Game Objects are composed by components. Each section you see in the Inspector (Transform, Camera, etc.) is a component. This is an architectural design that enables us to build up GOs for our specific needs without the need to inherit a lot of base functionality that we don't need for every GO.
Create a Cube
Let's try making a change to see the result in the scene. First, we need something that's a bit easier to see in the scene. That's right, we're creating our first Game Object! There are several ways via the UI to create a Game Object. I'll opt for the longer path so you can see each step.
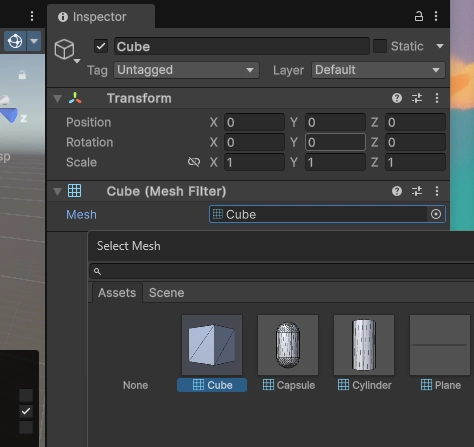
Right click in the Hierarchy window and select "Create Empty" (or do what I do and use the shortcut Ctrl+Shift+N on Windows) and give it the name "Cube". With the Cube GO selected, you'll see we only have a Transform component in the inspector. Every game object must have a Transform, even if the position in the world doesn't matter.
Since we don't have any other components, it has no other capabilities. We need to compose this with components that will give it a cube mesh to render. Thankfully in Unity we have a few common shapes available. Let's add a mesh filter component first.
Click "Add Component" and filter the list of components down by typing mesh filter. Once it's selected in the drop down, press enter to add the component to our GO. There's no Mesh selected by default, so click the button to the right of the mesh field and select "Cube".
Well, what happened? There's no cube in the scene. That's because we have yet to add a component that's responsible for rendering the mesh! Add the component "Mesh Renderer" via the inspector and you will see a magenta cube now sitting at the origin of the world!
Why is it magenta, though? That's the color used for rendering when either a material isn't set in the mesh render, or there's a problem with the material. In our case, you can tell by looking at the Mesh Renderer component that we don't have a material set yet.
Click the button next to the Element 0 field. A window allowing us to select a material will open, but we don't want these materials. We want the standard Lit material from the Universal Render Pipeline, which is hidden in this window by default.
Click the eye visibility icon in the top right side of the window, the find and select the Lit material. Now you should see something similar to this:
Creating Materials
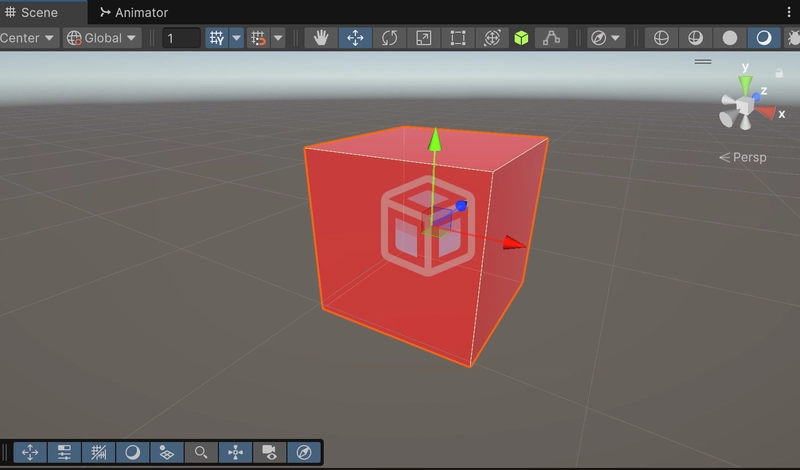
What if we want this cube to be another color? Let's create a new material so we can make the cube red.
Right click in the Assets folder in the Project window and select Create, Material and name it "Red".
With the new material selected, look at the properties in the Inspector window. Under Surface Inputs you'll find the Base Map property with a color input.
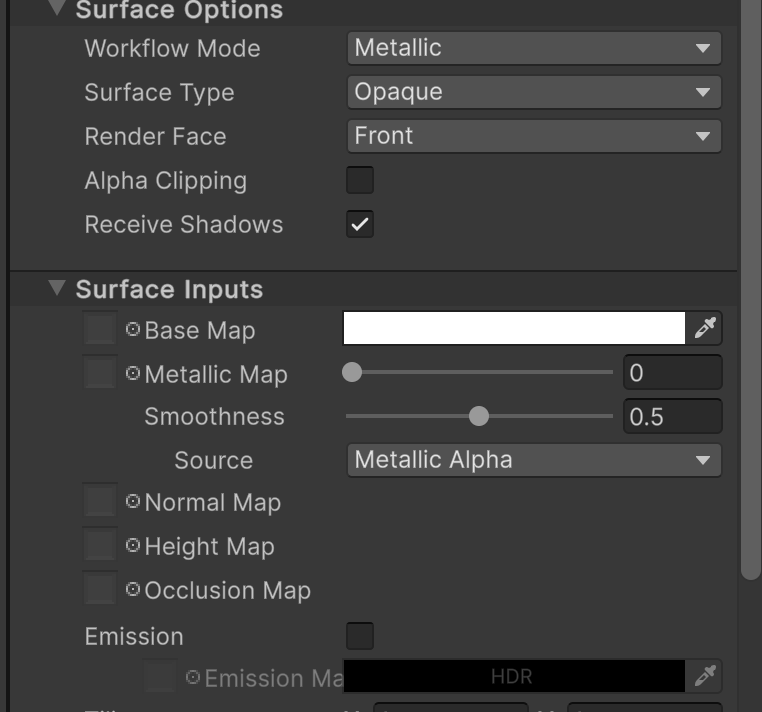
Clicking on the color field will open the color wheel window where you can select a color. You should see the preview section at the bottom of the inspector update with the selected color.
Materials can be applied either by selecting a game object, going to the Mesh Renderer component, and using the picker to select a new material. This is exactly what we did when we updated the cube to use the Lit material.
Another way is to drag and drop the material file onto a mesh surface in the Scene. Try doing that now and you'll see the cube is now using our new material.
Navigate the Scene
You'll spend a lot of time navigating within the Scene window to build worlds, so learning how to navigate efficiently is going to save a lot of time.
For example, we'd like to get closer to our new cube. We can do so with the mouse scroll wheel. Scrolling forward and backward zooms in and out within the Scene. We can also pan with the mouse wheel by clicking it in and moving the mouse.
Holding the right mouse button down and moving will rotate the camera around the Scene. Many times, you'll want to look at a mesh on all sides by rotating around it. You can do so by first focusing on the object (click on it in the Hierarchy or in the Scene) and then press the f key. Now you can hold Alt/Cmd, Left click and mouse the mouse.
Controlling Objects in the Scene
Now we'll cover another set of tools to control objects in the scene, starting with being able to move our cube around. There's a panel of buttons you can use to move, rotate, and scale but it's much faster to use the following shortcuts.
- w - Move
- e - Rotate
- r - Scale
Each tool has a handle in the scene that lets you interact with it directly. For example, switching to the move tool gives us arrows on each axis we can click and drag to move the cube.
Play around with these to get used to switching between them via keyboard and using their handles to manipulate Game Objects. Of course, we're just cover the basics in this post, but you can learn more in the manual.
Scripting Movement
Finally, we want to be able to script behaviors during gameplay, and with that, let me introduce you to scripting. In Unity, the primary way of scripting is by using a language called C#.
This is going to be a very high level look at coding, but just know there's a ton of resources to learn C#, and in the world of game development, it's one of the easiest to learn in my opinion.
Enough talk, let's create our first script. In the Project window, right click on Assets, then go to Create, MonoBehavior Script. I named it Mover.
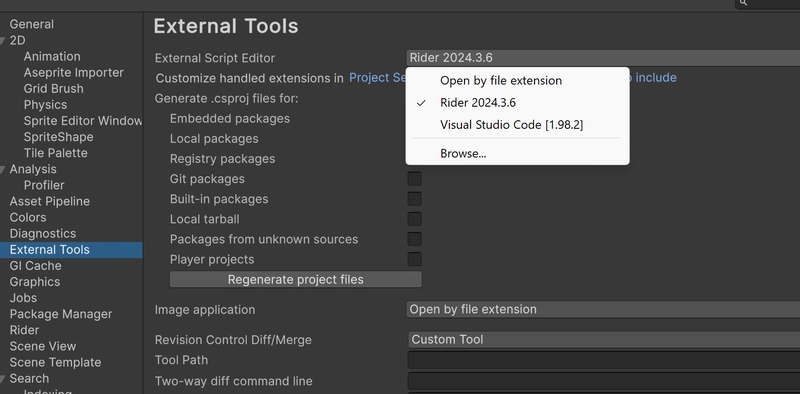
Unity will open code files in your preferred code editor. You can configure that in Unity preferences on the "External Tools" section. I'm using Rider from JetBrains
We've created the script, but it is not yet a component of our Cube GO. Select the Cube and in the inspector you can click Add Component and search for Mover, or you can drag and drop the script from the Project window to the Cube GO in the Hierarchy.
Now, double click the new script and take a look at the content in your preferred code editor.
using UnityEngine;

public class Mover : MonoBehaviour
{
    // Start is called once before the first execution of Update after the MonoBehaviour is created
    void Start()
    {

    }

    // Update is called once per frame
    void Update()
    {

    }
}
You can see we have some helpful comments generated letting us know when Start and Updateare called. What exactly are they though? Blocks of code within a class are called methods, which are blocks of code that can be called/executed from other places.
Unity is a specialized scenario because the game engine itself calls these methods on our game objects. Let's demonstrate.
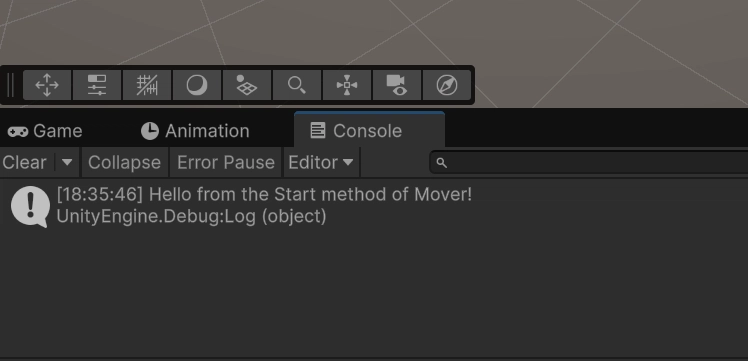
Inside the Start method, add the following lines.
void Start()
{
    Debug.Log("Hello from the Start method of Mover!");
|
Back in Unity, press the play button at the top of the editor window to start playing the game in the editor.
Look at the Console window and you should see the message displayed. If you don't make sure you added the Mover script to the Cube Game Object in the inspector.
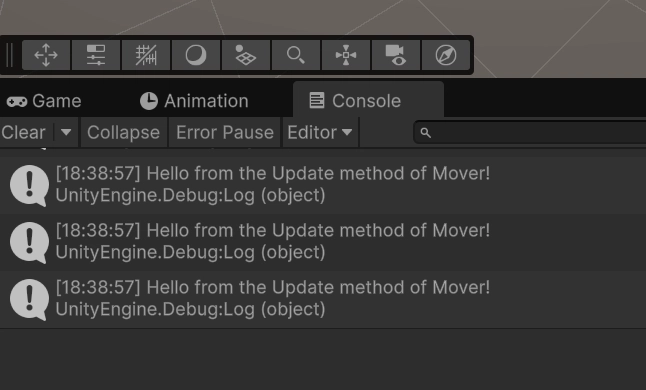
Now add this to the Update method.
void Update()
{
    Debug.Log("Hello from the Update method of Mover!");
}
Now play again and you'll see the a log for every frame! This is because the Update method is called every frame of the game.
In order to move the cube as soon as we hit play, we need to access the transform component that stores position, rotation, and scale data.
Fortunately, this is easy to do. The following code will move the position of the cube by 1 unit every second. Note that I removed the log statement as well.
void Update()
{
    transform.position += Time.deltaTime * Vector3.right;
}
The position property of transform is a vector with three decimal numbers (what we call a float for floating point value) that represnt the X, Y, and Z positions in 3D space.
Since we want to move to the right, we want a vector with values (1, 0, 0) which is X of 1 and Y and Z of 0. This is provided by Vector3.right.
Now, if that's all we did there would be a problem. The cube would move, but it would be frame dependent, meaning that the speed of the cube moving would be faster on a more capable machine with a higher frames per second (FPS) and slower on less capable machines.
Of course, this isn't acceptable. We could solve this problem if we knew how much time had elapsed since the last frame. With that value, we could muiltiply it to move X per second. We want to think about updating values in seconds to create frame independence.
Unity provides this elapsed time since the previous frame via Time.deltaTime. By multiplying it with Vector3.right, we are sure to have frame independent movement and can say we are moving 1 unit a second.
Summary
If you've been considering getting into game development but needed a bit of help taking that first step, I genuinely hope you found this article helpful.
Game development is incredibly fun and rewarding. There are many challenges along the way to keep it interesting. I've been a programmer for over 2 decades and out of everything I've worked on in my career I've never experienced anything as fun as making games.
With what you've learned here you can already start making a simple game. It may not seem that way, but remember everything is built atop simple fundamentals.
For example, you could make a few cubes, learn how to change their colors dynamically via script and create a color matching game, or with your ability to create different shapes it could be a shape matching game of some kind.
If you enjoyed this post, consider following me here and sharing it on social media. I'd greatly appreciate your support. Also let me know if you find any mistakes and I'll fix them ASAP.
Until next time.
Take care.
Stay awesome.