


![[The AI Show Episode 144]: ChatGPT’s New Memory, Shopify CEO’s Leaked “AI First” Memo, Google Cloud Next Releases, o3 and o4-mini Coming Soon & Llama 4’s Rocky Launch](https://www.marketingaiinstitute.com/hubfs/ep%20144%20cover.png)


![GrandChase tier list of the best characters available [April 2025]](https://media.pocketgamer.com/artwork/na-33057-1637756796/grandchase-ios-android-3rd-anniversary.jpg?#)


.webp?#)


![New Beats USB-C Charging Cables Now Available on Amazon [Video]](https://www.iclarified.com/images/news/97060/97060/97060-640.jpg)

![Apple M4 13-inch iPad Pro On Sale for $200 Off [Deal]](https://www.iclarified.com/images/news/97056/97056/97056-640.jpg)


Getting Started with AWS IAM: Understanding Users
When I first started using AWS, I logged in with my root account and built everything from there. It worked—until I needed to collaborate with someone and realized they couldn't access my AWS resources. That’s when I learned about IAM. A friend recently asked me about IAM because he's new to AWS. I explained what I could, then figured—why not write it down and help more people? This blog is what I wish I had when I started out. This is part of a beginner-friendly IAM series: Users ← (this post) Groups Roles Policies Final: Putting it all together Let’s start with IAM Users. What is IAM? IAM stands for Identity and Access Management. It’s the AWS service that helps you manage: Authentication: Who can access your AWS resources Authorization: What actions they can perform What’s an IAM User? An IAM user is an identity you create in your AWS account to represent a person or application that interacts with AWS services. Each user: Has a name Can have credentials (passwords, access keys) Can be given permissions (via policies) By default, new IAM users have no access to anything. You decide what access they get. Creating Your First IAM User Let’s walk through creating an IAM user from the AWS Console. 1. Log in to AWS 2. Go to the IAM Dashboard From the sidebar, under Access management, click on Users. 3. Click “Create users” You'll see a button to create a user. 4. Set a username Enter a name for the user (e.g., test-user). 5. Skip group assignment IAM groups come next in the series, so skip this step and click Next. 6. Review and create the user Check your input and click Create user. After the user is created, click on their name to view their details. Go to the Security credentials tab. Enable Console access so the user can log in via the web. You can: Let AWS generate a password Or create your own Download the credentials file (CSV). It contains the username, password, and login link. Recap You’ve just created your first IAM user—a key step toward building more secure and scalable AWS projects. IAM might seem like a small detail at first, but it becomes critical as your infrastructure grows or your team expands. Start small. Avoid using the root account. Create IAM users with just the right permissions. That’s how you build good habits early. In the next post, we’ll explore IAM groups—how they help you manage permissions for multiple users at once and make your setup easier to maintain. If this helped you, consider bookmarking it for later or sharing it with a friend who’s also getting into AWS. Coming Up Next
When I first started using AWS, I logged in with my root account and built everything from there. It worked—until I needed to collaborate with someone and realized they couldn't access my AWS resources. That’s when I learned about IAM.
A friend recently asked me about IAM because he's new to AWS. I explained what I could, then figured—why not write it down and help more people? This blog is what I wish I had when I started out.
This is part of a beginner-friendly IAM series:
- Users ← (this post)
- Groups
- Roles
- Policies
- Final: Putting it all together
Let’s start with IAM Users.
What is IAM?
IAM stands for Identity and Access Management. It’s the AWS service that helps you manage:
- Authentication: Who can access your AWS resources
- Authorization: What actions they can perform
What’s an IAM User?
An IAM user is an identity you create in your AWS account to represent a person or application that interacts with AWS services.
Each user:
- Has a name
- Can have credentials (passwords, access keys)
- Can be given permissions (via policies)
By default, new IAM users have no access to anything. You decide what access they get.
Creating Your First IAM User
Let’s walk through creating an IAM user from the AWS Console.
1. Log in to AWS
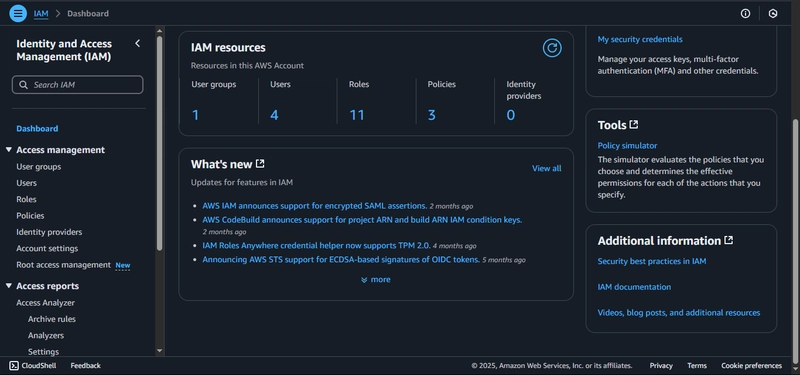
2. Go to the IAM Dashboard
From the sidebar, under Access management, click on Users.
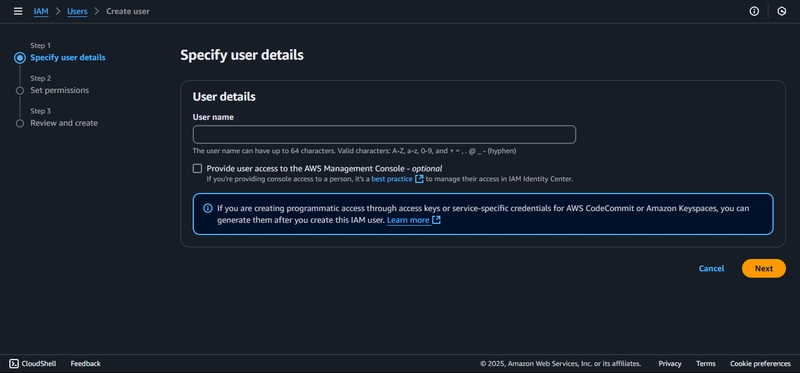
3. Click “Create users”
You'll see a button to create a user.

4. Set a username
Enter a name for the user (e.g., test-user).
5. Skip group assignment
IAM groups come next in the series, so skip this step and click Next.
6. Review and create the user
Check your input and click Create user.
After the user is created, click on their name to view their details.
Go to the Security credentials tab.
Enable Console access so the user can log in via the web.
You can:
- Let AWS generate a password
- Or create your own
Download the credentials file (CSV). It contains the username, password, and login link.
Recap
You’ve just created your first IAM user—a key step toward building more secure and scalable AWS projects. IAM might seem like a small detail at first, but it becomes critical as your infrastructure grows or your team expands.
Start small. Avoid using the root account. Create IAM users with just the right permissions. That’s how you build good habits early.
In the next post, we’ll explore IAM groups—how they help you manage permissions for multiple users at once and make your setup easier to maintain.
If this helped you, consider bookmarking it for later or sharing it with a friend who’s also getting into AWS.
Coming Up Next