


![[The AI Show Episode 143]: ChatGPT Revenue Surge, New AGI Timelines, Amazon’s AI Agent, Claude for Education, Model Context Protocol & LLMs Pass the Turing Test](https://www.marketingaiinstitute.com/hubfs/ep%20143%20cover.png)


![From Accountant to Data Engineer with Alyson La [Podcast #168]](https://cdn.hashnode.com/res/hashnode/image/upload/v1744420903260/fae4b593-d653-41eb-b70b-031591aa2f35.png?#)


.png?#)


![Apple Watch SE 2 On Sale for Just $169.97 [Deal]](https://www.iclarified.com/images/news/96996/96996/96996-640.jpg)

![Apple Posts Full First Episode of 'Your Friends & Neighbors' on YouTube [Video]](https://www.iclarified.com/images/news/96990/96990/96990-640.jpg)


How to Build a Multilingual Social Recipe Application with Flutter and Strapi
Hey there! In this project, you will build a multilingual social recipe application using Flutter and Strapi. Flutter is an open-source UI software development kit created by Google. It allows you to build beautiful and highly interactive user interf...
Hey there!
In this project, you will build a multilingual social recipe application using Flutter and Strapi.
Flutter is an open-source UI software development kit created by Google. It allows you to build beautiful and highly interactive user interfaces for mobile, web, and desktop from a single codebase.
Strapi, on the other hand, is a headless CMS that makes it easy to create, manage and distribute content anywhere you need – all from one place.
The multilingual feature of the application will allow users from different parts of the world to interact with the app in their native language, making it more user-friendly and accessible. This feature is particularly beneficial for a social recipe application where users share recipes from different cuisines and cultures.
In this application, users will be able to view recipes, request a specific recipe, share their favorite recipes, and like or comment on recipes.
Table of Contents
Prerequisites
To follow along with this tutorial, make sure you have:
Node.js installed.
Basic knowledge of Flutter
Basic understanding of Strapi with this quick guide
Demo
Here’s what you will be building in the tutorial:
Authentication and Authorization: Demo
Comment and Likes: Demo
Request recipe: Demo
Language Switch: Demo
You can get the full code of the application from this GitHub repository.
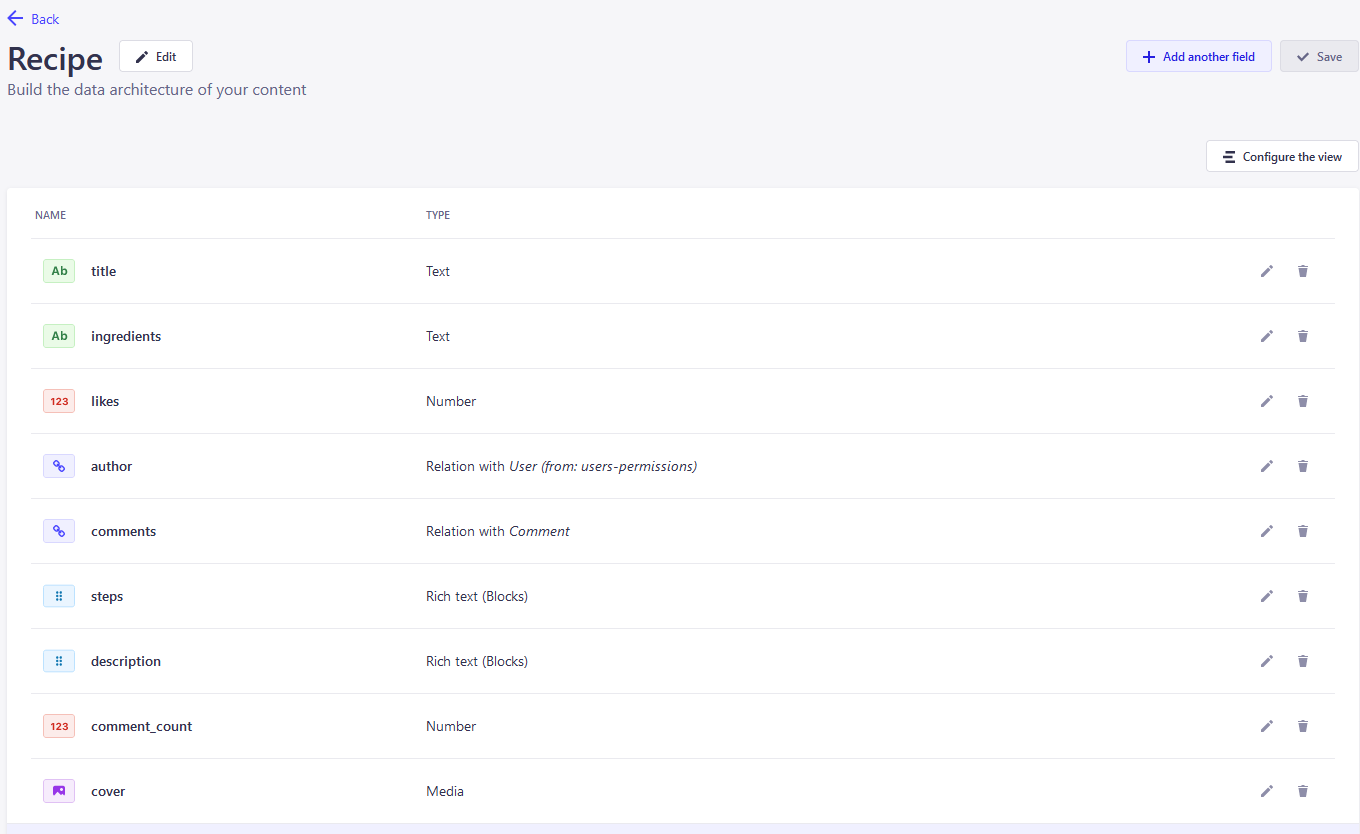
Create Models
Once you have set up a Strapi project with this quick guide, create two models, Recipe and RecipeRequest, in the Strapi admin panel.
A recipe typically has the following elements:
Title:
textwhich represents the title of the recipeIngredients:
textwhich represent the of ingredients of the recipeLikes:
intwhich represent the number of likesAuthor:
relationwhich represent the author of the recipeComments:
relationwhich represent the list of comments of a specific recipeSteps:
rich textwhich represents the main content of the recipeDescription:
rich textwhich represents a description of what the recipe is likeComment Count:
intwhich represents the number of comment a recipe hasCover Image:
mediawhich represents the cover image of the recipe
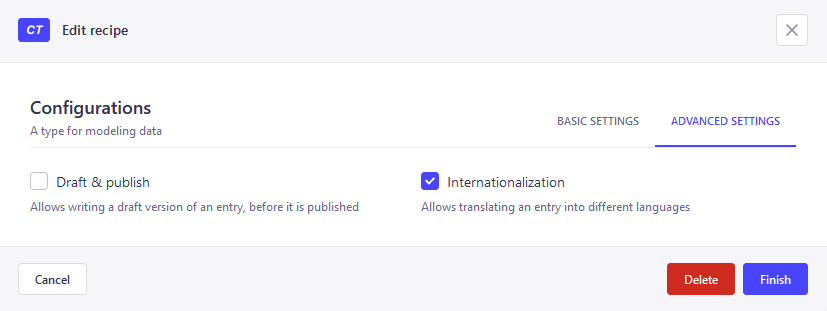
Make sure to enable internationalization for Recipe Content Type when you create it:
A recipe request typically has:
Title, which is
textthat represents the title of the requestDescription, which is
rich textthat represents the content of the request
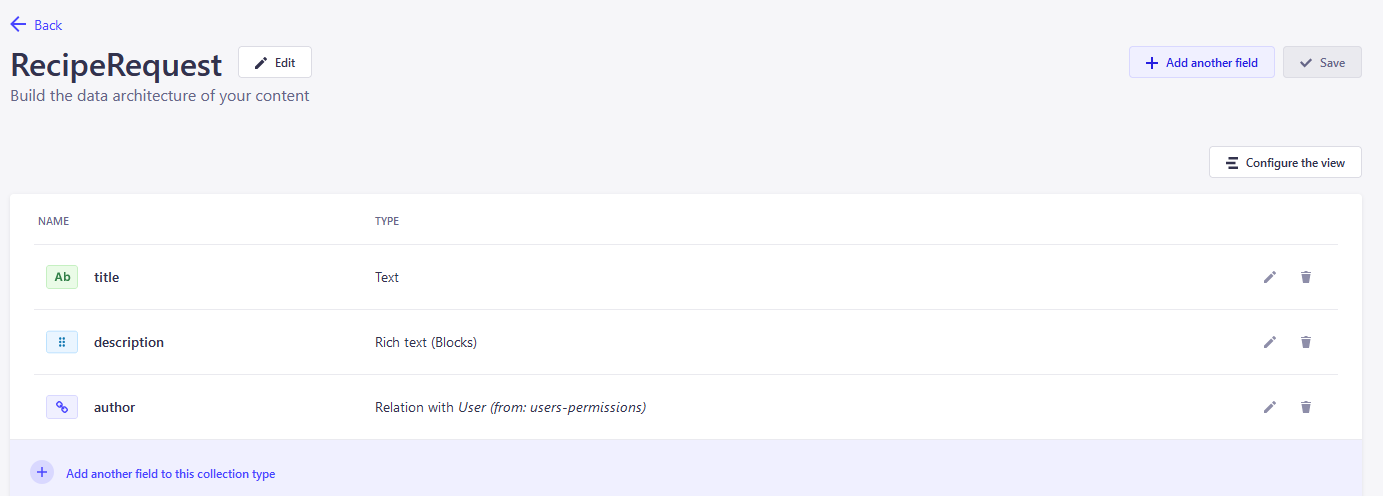
A comment typical has:
Author, which is a
relationthat represents the author of the commentContent, which is
textthat represents the content of the commentsDate, which is a
datethat represents the published date of the comment
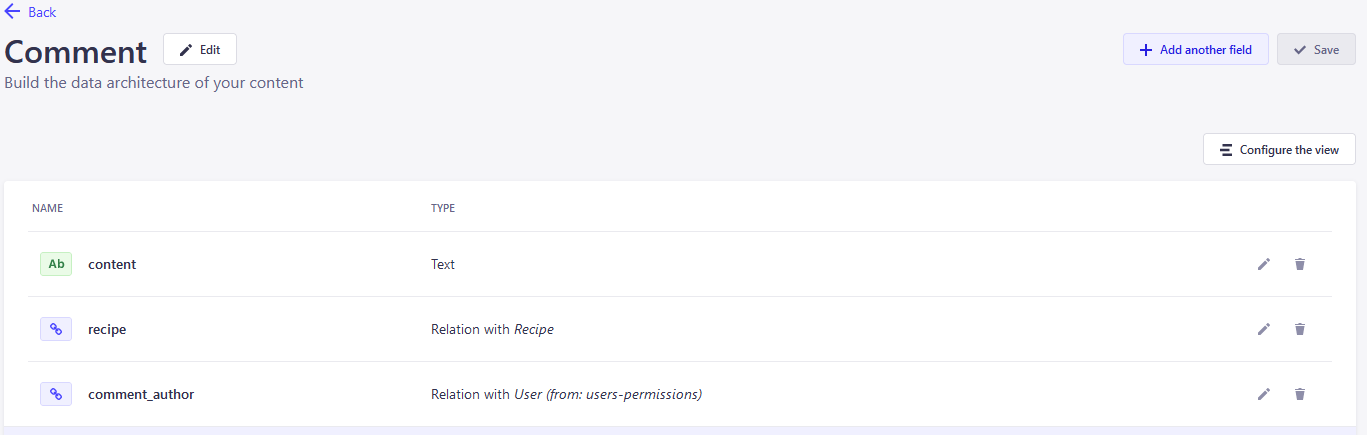
The user will also have 4 new fields:

Add Languages and Enable Internationalization in Strapi
The application will support three different languages (English, French, and Japanese). English is the default language, so you need to add the two others. In the Strapi panel, you’ll need to navigate to Settings and then Internationalization and add French and Japanese. I will explain the process in detail in the next sections.
Add Recipe Content
Next, you will populate some recipe data in English, French, and Japanese.
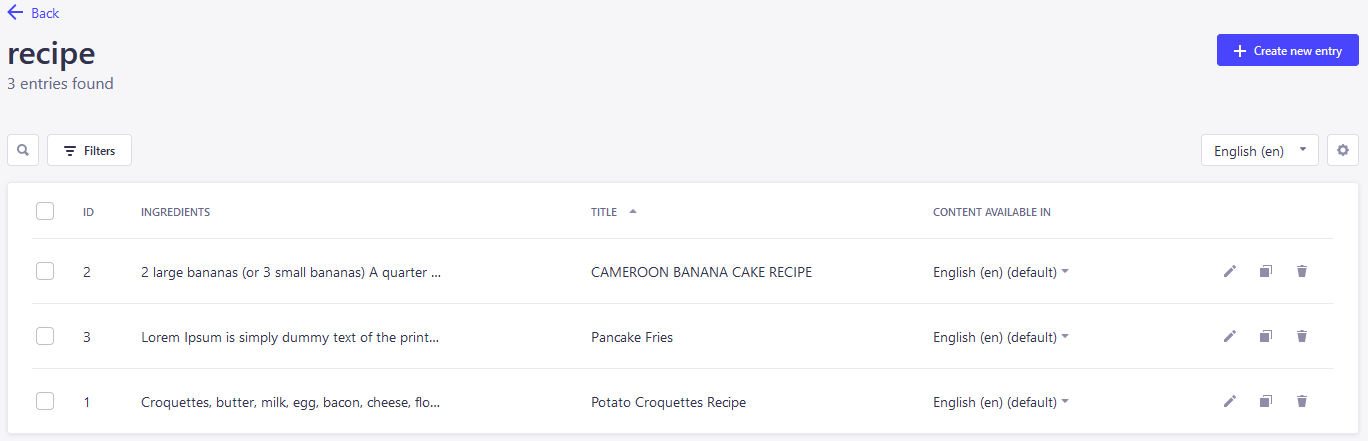
Add Recipe English Content
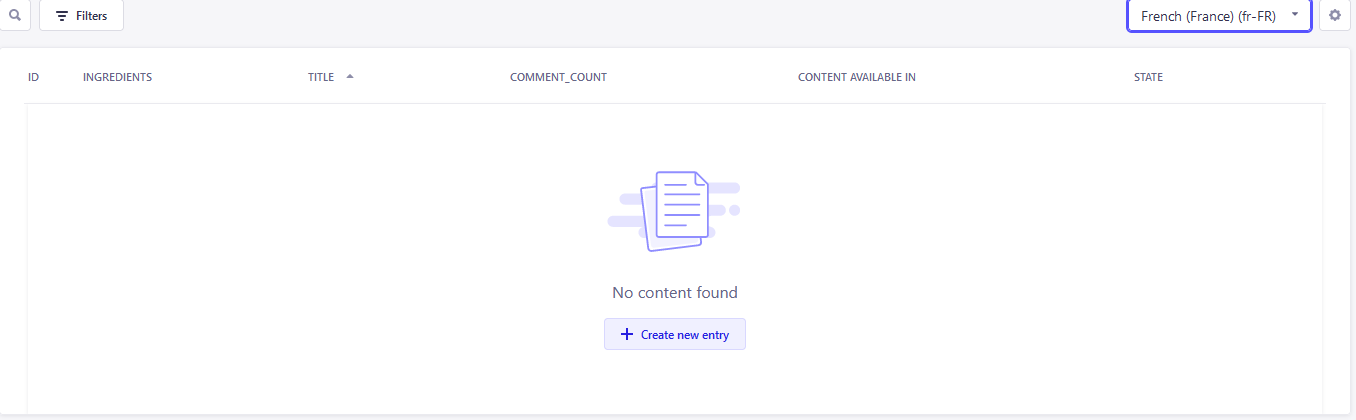
Since English is the default language, go to Content manager, then select Recipe, and then select Create new entry:
Add Recipe French Content
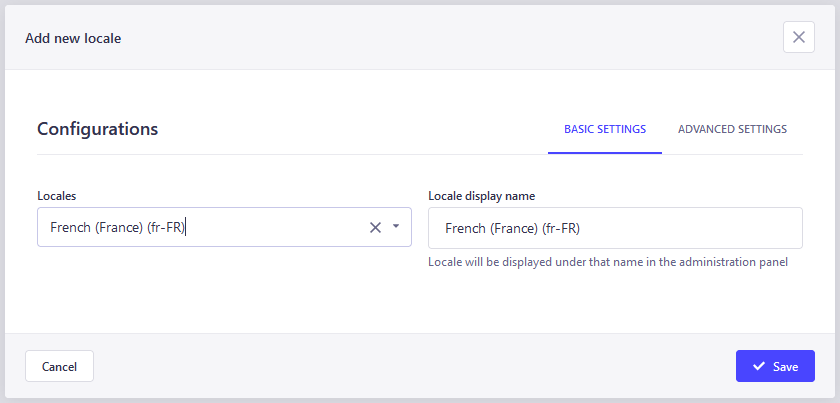
For French, navigate to Settings, select Internationalization, and then under global settings click on Add new locale. Here you will add the French language.
Back to the Content manager, click on recipe and select the French language in the top right corner. Then choose the Create recipe entry in French.
Add Recipe Japanese Content
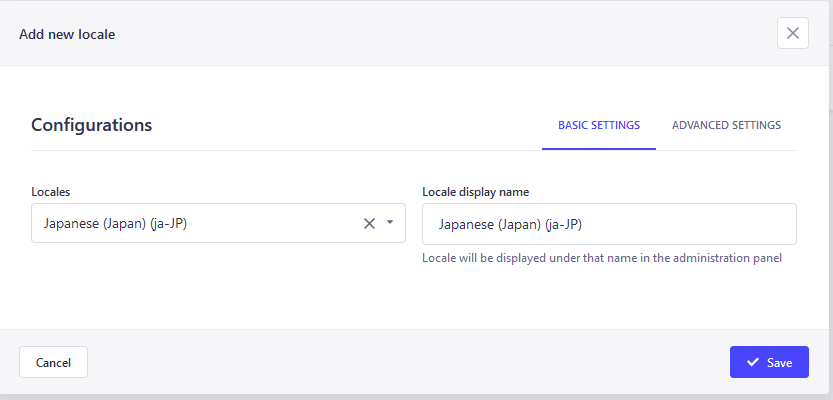
Navigate back to Settings and Internationalization, and under global settings again click on Add new locale. Now you will add the Japanese language.
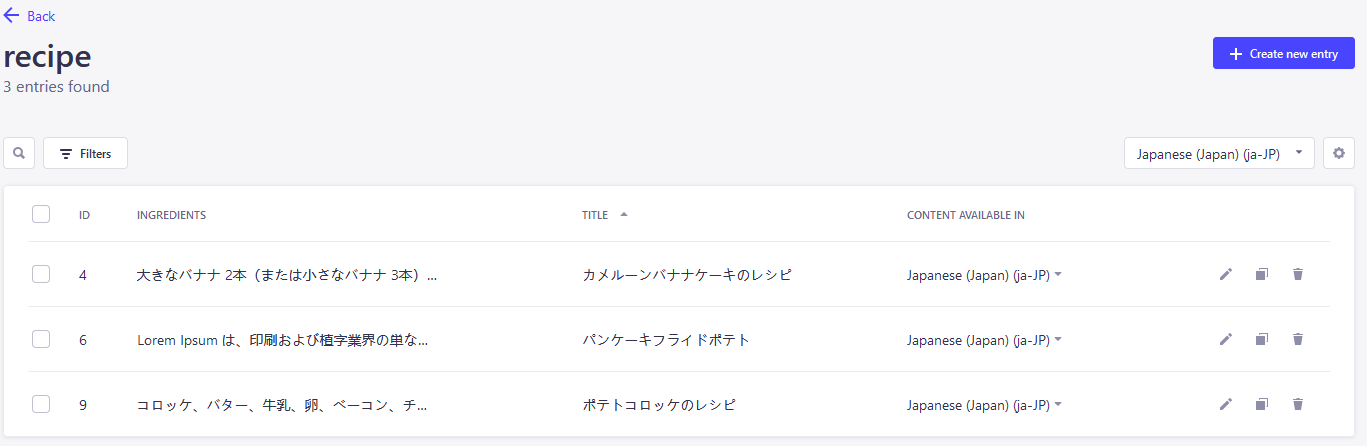
Back to the Content manager, click on recipe and select the Japanese language in the top right corner. Then select Create new entry in Japanese.
Generate API Token and Set permissions
Once you’ve added the content for the various languages, it’s time to create your API and set the necessary permissions.
To do this, navigate to Settings, then API Tokens, and then Create API Token. Add the details of your key there.
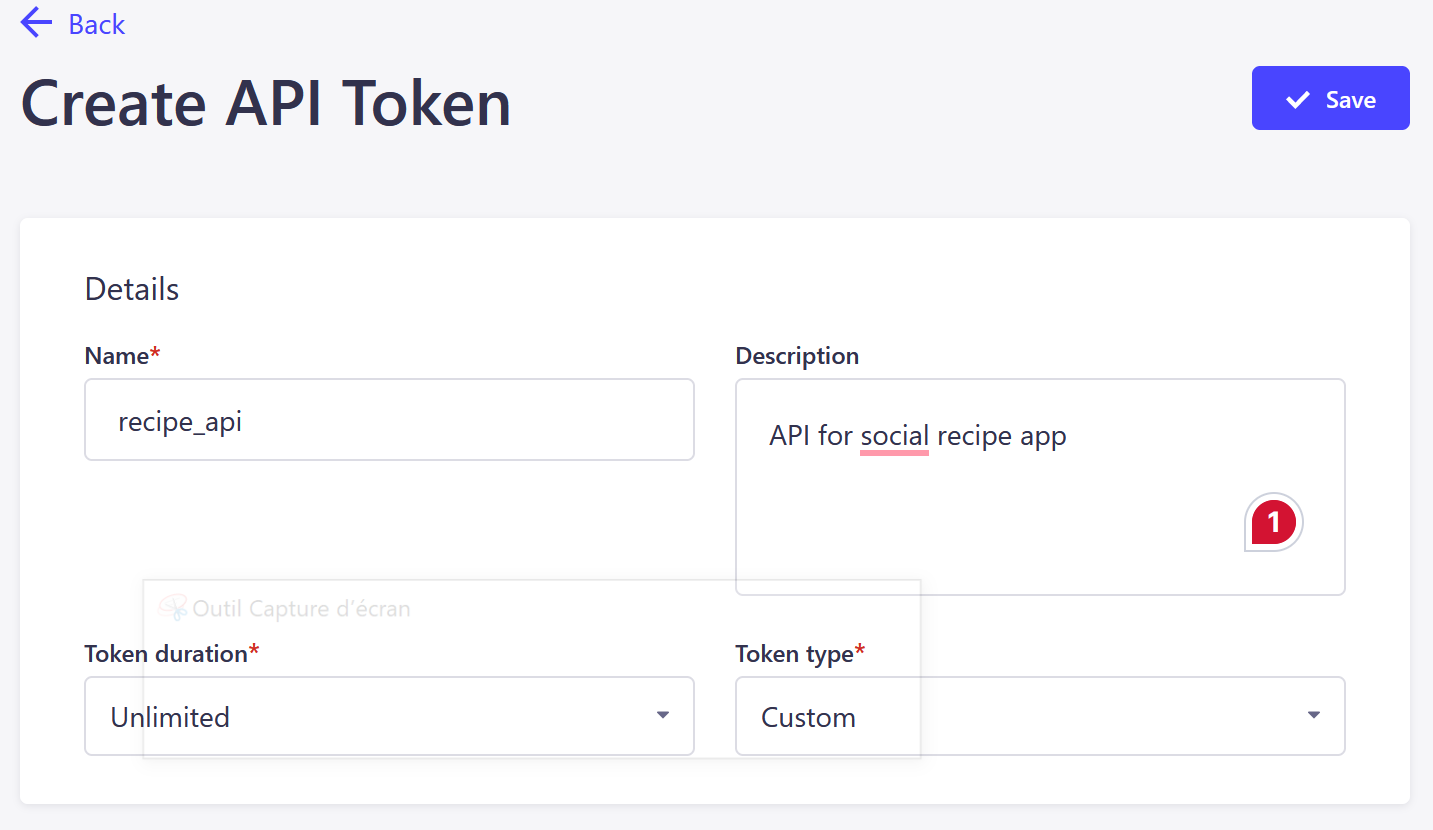
Token duration: choose Unlimited
Token Type: Custom. The custom type allows you to specify permission for certain entities.
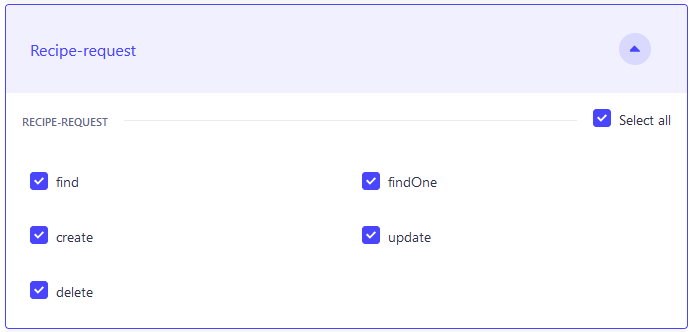
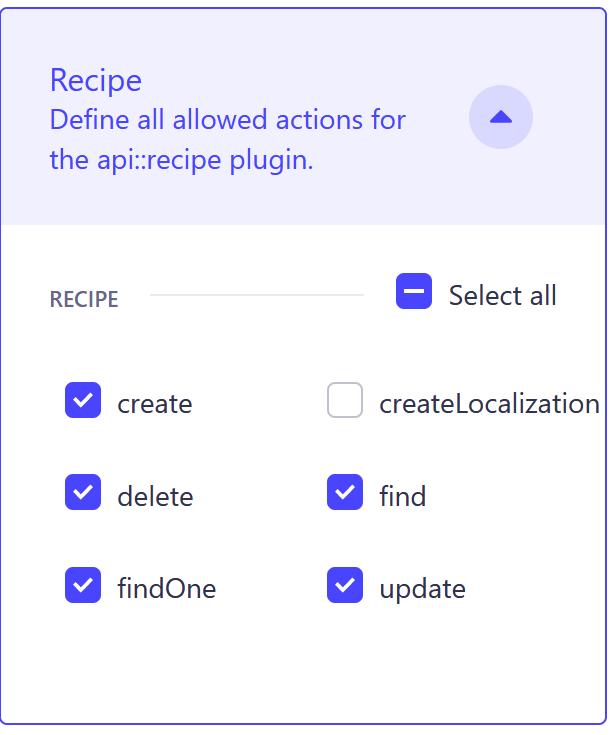
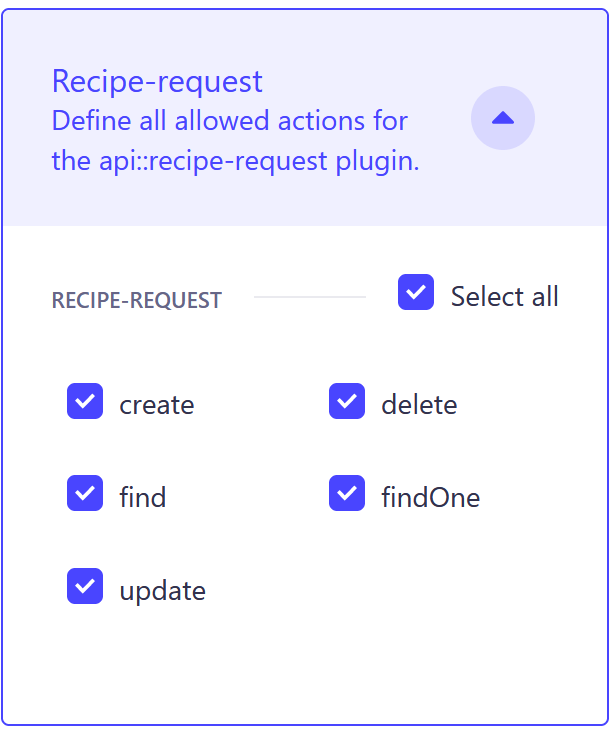
Next, still in the Create API Token screen, scroll down to the permission section and set the permission to “Select all” for Comments, and RecipeRequest, upload, email, content type, i18n, and User permissions like in the screenshot below for Recipe-request:
Then click on the Save button in the top right corner to generate your API key. Copy and save the key in your PC as you won’t be able to see it again
Set User Roles and Permissions
You’ll also need to set the user roles and permissions using the User and Permission Plugin. It allows you to manage what both authenticated and non-authenticated users can do in your application.
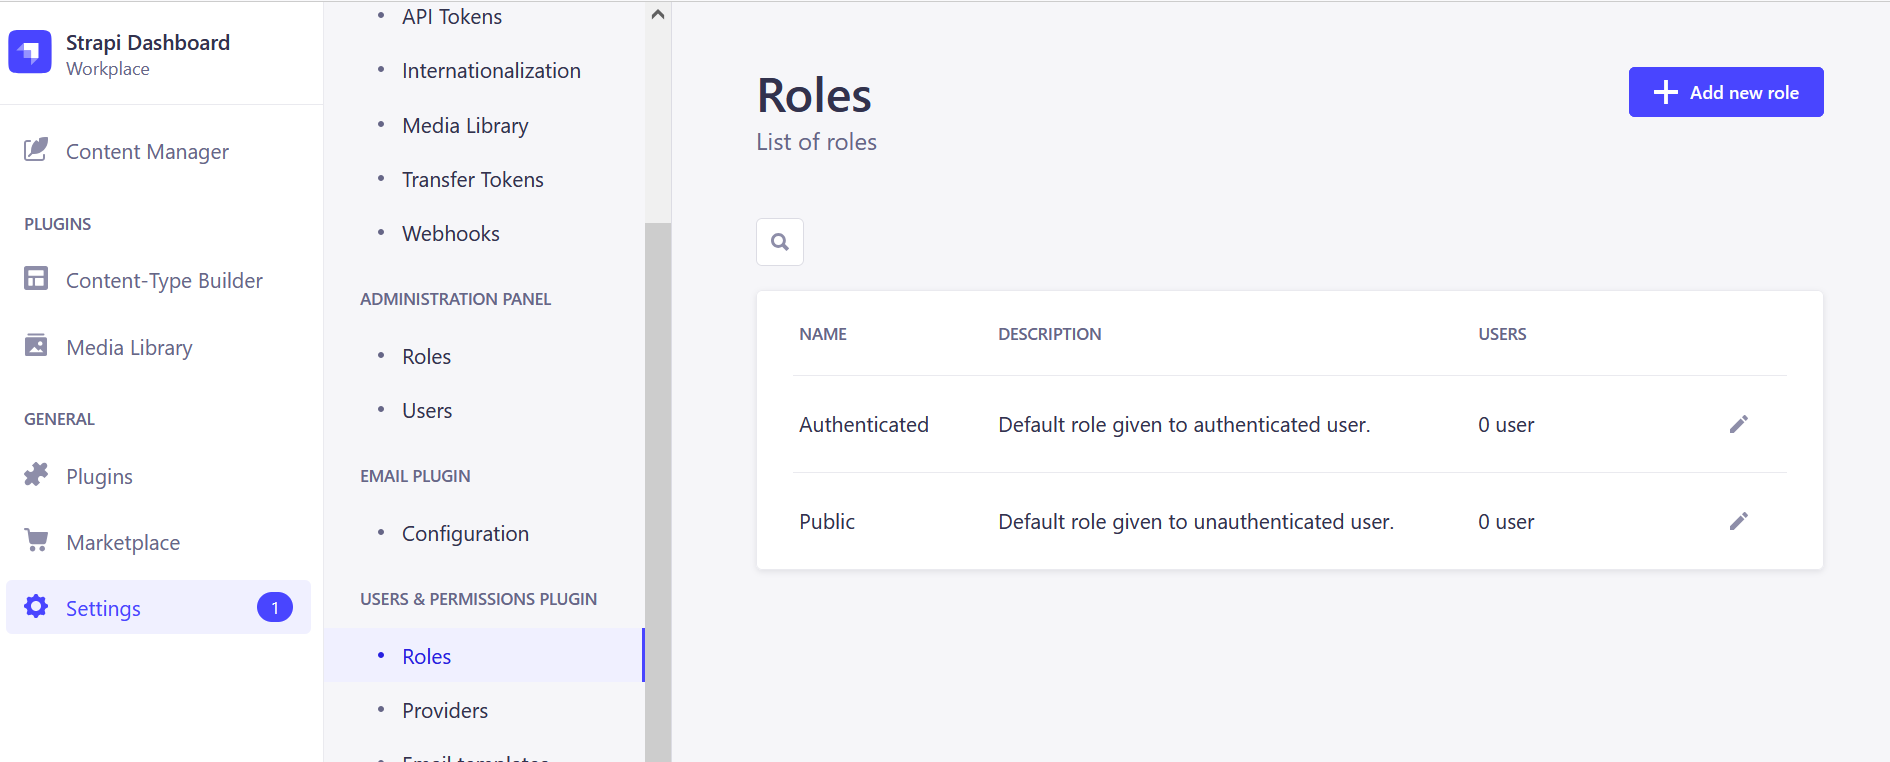
Head to the Settings section of the dashboard and go to Roles under the User and Permission plugin.
We have two types of users:
Authenticated users
Public users
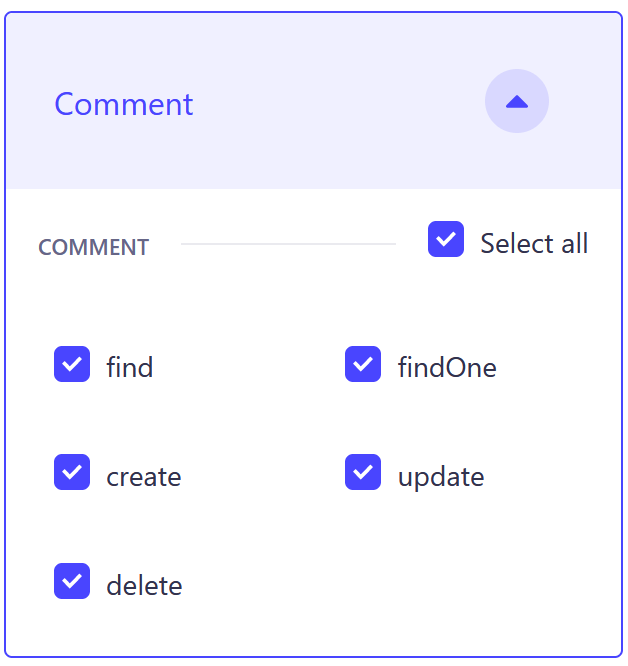
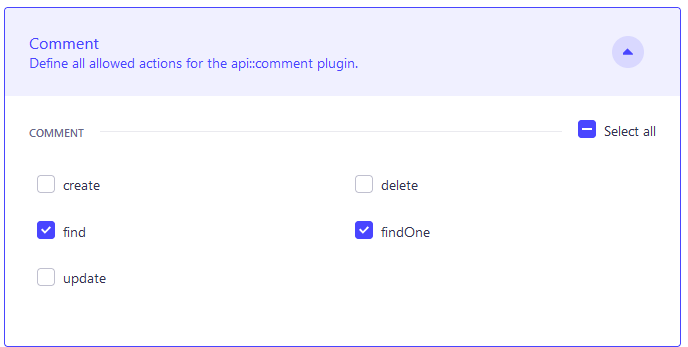
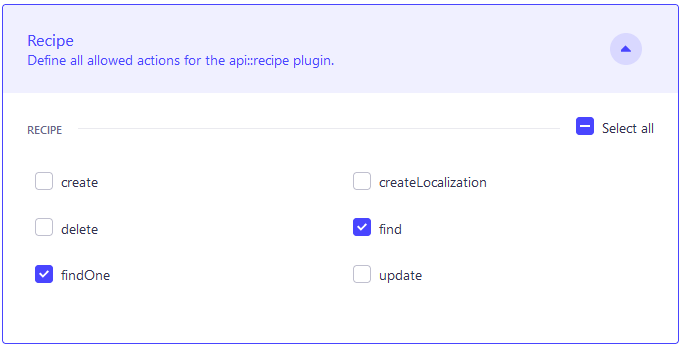
Select the authenticated users and give them the following permissions for:
Comment:
Recipe:
Request-recipe:
Also select all for Content-type builder, i18n, and Upload and then save.
Public users can only read recipes and comments:
Set Up Flutter
Once you have set up Flutter in your environment, run the following command to bootstrap a new application in your favorite directory:
flutter create flutter_recipe_app
To see your app in action, you need to run it on a mobile device. You can either:
Use an emulator (a virtual Android or iOS device that runs on your computer), or
Connect a physical device (like your smartphone) to your computer with a USB cable.
Once your emulator or device is ready, navigate into the newly created project folder:
flutter run
This command builds the app and starts it on your connected device or emulator.
Project Structure
Now let's look at the file structure of the project:
flutter_recipe_app/
|
|-- .dart_tool/
|-- .idea/
|-- android/ [flutter_recipe_app_android]
|   |-- assets/
|   |   |-- images/
|   |   |-- translations/
|
|-- build/
|-- ios/
|-- lib/
|   |-- components/
|   |   |-- appBar.dart
|   |   |-- drawer.dart
|   |
|   |-- models/
|   |   |-- recipe.dart
|   |
|   |-- screens/
|   |   |-- detail.dart
|   |   |-- home.dart
|   |   |-- login.dart
|   |   |-- profile.dart
|   |   |-- requestRecipe.dart
|   |   |-- signUp.dart
|   |
|   |-- utils/
|       |-- server2.dart
|
|-- main.dart
|-- test/
|-- .env
The structure is organized as follows:
.dart_tool/: Contains Dart tools and build outputs..idea/: IDE-specific settings.android/: Android-specific project files, including custom assets like images and translations.build/: Generated files from the build process.ios/: iOS-specific project files.lib/: The main source directory for Dart code, which includes:components/: Reusable widgets or UI components likeappBaranddrawer.models/: Data models for your application, likerecipe.screens/: Individual screens of the app, such as therecipe details,home,login,profile,request recipeandsignUpscreens of the apputils/: Utilities and helper functions, likeserver2.dartfor the server communication logic.
main.dart: The entry point of the Flutter application.test/: Directory for test files..env: Environment-specific variables file.
This setup is typical for a moderately complex Flutter application, segregating functionality into manageable, logical sections for better organization and maintainability.
Install Packages
In this tutorial, we’re using five main packages:
flutter_dotenv: to manage environment variables
http: to handle HTTP requests and interact with Strapi REST API
shared_preferences: persists key-value data on the device like user login tokens
provider: for state management and updating your UI reactively when the underlying state changes
easy_localization: for managing translations and locale data. It supports both JSON and YAML file formats for defining translations.
In your pubspec.yaml file, add the following lines:
dependencies:
  flutter:
    ...
  flutter_dotenv: ^5.1.0
  http: ^1.1.0
  shared_preferences: ^2.2.2
  provider: ^6.1.2
  easy_localization: ^3.0.7
Then run the command below to install the packages:
flutter pub get
Add Assets
Add the path to your assets in your pubspec.yaml file found at the root of your project:
flutter:
  uses-material-design: true
  assets:
    - .env
    - assets/translations/
    - assets/images/
The translations folder contains the list of your translations while the images folder hosts the photos of your application.
Taking a look at main.dart
In the main.dart file, you need to set up your localization, load environment variables, and a list of providers for dependency injection:
import 'package:easy_localization/easy_localization.dart';
import 'package:flutter/material.dart';
import 'package:flutter_recipe_app/screens/home.dart';
import 'package:flutter_recipe_app/screens/login.dart';
import 'package:flutter_recipe_app/screens/requestRecipe.dart';
import 'package:flutter_recipe_app/screens/signUp.dart';
import 'package:flutter_recipe_app/utils/server.dart';
import 'package:provider/provider.dart';
import 'package:flutter_dotenv/flutter_dotenv.dart';

Future<void> main() async{
  // Ensure all bindings are initialized
  WidgetsFlutterBinding.ensureInitialized();
  await EasyLocalization.ensureInitialized();

  // Load environment variables
  await dotenv.load(fileName: ".env");
  runApp(EasyLocalization(
    supportedLocales: const [
      Locale('en'),
      Locale('fr', 'FR'),
      Locale('ja', 'JP')],
    path: 'assets/translations', //
    fallbackLocale: Locale('en'),
    child: MyApp(),
  ));
}

class MyApp extends StatelessWidget {
  @override
  Widget build(BuildContext context) {
    return MultiProvider(
      providers: [
        Provider(create: (_) => ApiService()),
      ],
      child: MaterialApp(
        title: tr('app_description'),
        localizationsDelegates: context.localizationDelegates,
        supportedLocales: context.supportedLocales,
        locale: context.locale,
        initialRoute: '/home',
        routes: {
          '/request': (context) => RecipeRequestScreen(),
          '/login': (context) => LoginScreen(),
          '/register': (context) => RegisterScreen(),
          '/home': (context) => HomeScreen(), // Implement HomeScreen
        },
      ),
    );
  }
}
From the code snippet above, the WidgetsFlutterBinding.ensureInitialized() ensures that all Flutter bindings are initialized before any other operations and the EasyLocalization.ensureInitialized() initializes the EasyLocalization package to handle translations.
Load the environment variables with dotenv.load(fileName: ".env") to read variables from the .env file. The runApp function wraps the MyApp widget with the EasyLocalization widget, which is configured to support English (en), French (fr_FR), and Japanese (ja_JP) locales. The path for translation files is set to 'assets/translations', and the fallback locale is set to English.
It also creates the main routes of the recipe application and sets home as the initial route.
Add Environment Variables
You will store configuration data such as API keys, environment-specific URLs (base URL, recipe endpoints, comments endpoints), and other sensitive or configurable data outside your codebase using the flutter_dotenv package you installed earlier. Create an .env file in your root directory and add your environment variables:
BASE_URL=your-base-url
USERS_ENDPOINT=/auth/local
USERS_ENDPOINT_REG=/auth/local/register
ACCESS_TOKEN=your-api-key
RECIPE_ENDPOINT=/recipes
COMMENT_ENDPOINT=/comments
R_REQUEST_ENDPOINT=/recipe-requests
BASE_URL: This is the base URL for your Strapi backend server. The/apimeans that all API endpoints are accessed via this base path. This URL is used to construct full URLs for all API requests by appending specific endpoints to it.USERS_ENDPOINT: This endpoint typically handles login operations where existing users authenticate by submitting their credentials.USERS_ENDPOINT_REG: This is the registration endpoint for new users.ACCESS_TOKEN: This is the API token you created earlier which is used for authenticating API requests.RECIPE_ENDPOINT: This endpoint is used to fetch a list of recipes or a single recipe. You can also use it to post new recipes, or update or delete a recipe.COMMENT_ENDPOINT: This endpoint manages comments related to recipes.R_REQUEST_ENDPOINT: This endpoint manages requests related to recipes.
Create Models
Here you will create the different models of the app. You can create all the models in a single file or create them in individual files. In this tutorial, we’ll create all the models in a single file which is lib/models/recipe.dart:
import 'package:flutter_dotenv/flutter_dotenv.dart';

// models recipe_ request
class RecipeRequest {
  final int id;
  final String title;
  final List description

  RecipeRequest({
    required this.id,
    required this.title,
    required this.description,
  });

  factory RecipeRequest.fromJson(Map<String, dynamic> json) {
    var attr = json['attributes'] ?? {};
    var attributes = json['attributes'] ?? {};
    List descriptionList = (attr['description'] as List? ?? [])
        .map((desc) => Description.fromJson(desc)).toList();

    print("Parsed Recipe: ${json['id']} - Descriptions: ${descriptionList.length}");

    return RecipeRequest(
      id: json['id'] ?? 0,
      title: attr['title'] ?? 'No title',
      description: descriptionList,
    );
  }

  Map<String, dynamic> toJson() {
    return {
      'title': title,
      'description': description.map((desc) => desc.toJson()).toList(),
      // 'id': id
    };
  }
}

// step model

class Step {
  final String type;
  final List children;
  final int? level;

  Step({required this.type, required this.children, this.level});

  factory Step.fromJson(Map<String, dynamic> json) {
    var childrenList = json['children'] as List? ?? [];
    List parsedChildren = childrenList.map((child) => TextContent.fromJson(child)).toList();
    return Step(
      type: json['type'] ?? '',
      children: parsedChildren,
      level: json['level'],
    );
  }

  Map<String, dynamic> toJson() {
    return {
      'type': type,
      'children': children.map((child) => child.toJson()).toList(),
      'level': level,
    };
  }
}

// description model

class Description {
  final String type;
  final List children;
  final int? level;

  Description({required this.type, required this.children, this.level});

  factory Description.fromJson(Map<String, dynamic> json) {
    var childrenList = json['children'] as List? ?? [];
    List parsedChildren = childrenList.map((child) => TextContent.fromJson(child)).toList();
    return Description(
      type: json['type'] ?? '',
      children: parsedChildren,
      level: json['level'],
    );
  }

  Map<String, dynamic> toJson() {
    return {
      'type': type,
      'children': children.map((child) => child.toJson()).toList(),
      'level': level,
    };
  }
}

class TextContent {
  final String type;
  final String text;
  final bool? bold;

  TextContent({required this.type, required this.text, this.bold});

  factory TextContent.fromJson(Map<String, dynamic> json) {
    return TextContent(
      type: json['type'] ?? '',
      text: json['text'] ?? '',
      bold: json['bold'] ?? false,
    );
  }

  Map<String, dynamic> toJson() {
    return {
      'type': type,
      'text': text,
      'bold': bold,
    };
  }
}

class Comment {
  final String content;
  final String author;
  final DateTime createdAt;

  Comment({
    required this.content,
    required this.author,
    required this.createdAt,
  });

  factory Comment.fromJson(Map<String, dynamic> json) {
    var attributes = json['attributes'] as Map<String, dynamic> ?? {};
    var authorData = attributes['comment_author']?['data']?['attributes'] ?? {};
    return Comment(
      content: attributes['content'] ?? 'No content',
      author: authorData['username'] ?? 'Unknown',
      createdAt: DateTime.parse(attributes['createdAt'] ?? DateTime.now().toString()),
    );
  }

  Map<String, dynamic> toJson() {
    return {
      'content': content,
      'author': author,
      'createdAt': createdAt.toIso8601String(),
    };
  }
}

//recipe model

class Recipe {
  final int id;
  final String title;
  final List description;
  final String ingredients;
  late int likes;
  final DateTime createdAt;
  final DateTime updatedAt;
  final DateTime publishedAt;
  final List steps;
  late int commentCount;
  final List comments;
  final String coverImageUrl;

  Recipe({
    required this.id,
    required this.title,
    required this.description,
    required this.ingredients,
    required this.likes,
    required this.createdAt,
    required this.updatedAt,
    required this.publishedAt,
    required this.steps,
    required this.commentCount,
    required this.comments,
    required this.coverImageUrl
  });

  factory Recipe.fromJson(Map<String, dynamic> json) {
    var attr = json['attributes'] as Map<String, dynamic> ?? {};

    // Parse descriptions
    List descriptionList = [];
    if (attr['description'] != null && attr['description'] is List) {
      descriptionList = (attr['description'] as List).map((desc) => Description.fromJson(desc)).toList();
    }

    // Parse steps
    List stepsList = [];
    if (attr['steps'] != null && attr['steps'] is List) {
      stepsList = (attr['steps'] as List).map((step) => Step.fromJson(step)).toList();
    }

    // Parse comments
    List commentList = [];
    if (attr['comments'] != null && attr['comments']['data'] != null && attr['comments']['data'] is List) {
      commentList = (attr['comments']['data'] as List).map((comment) => Comment.fromJson(comment)).toList();
    }

    // var attr = json['attributes'] as Map;
    final String baseUrl = dotenv.env['BASE_URL']!;

    // Ensure image URL is correctly prefixed
    String coverImageUrl = '';
    if (attr['cover'] != null && attr['cover']['data'] != null) {
      var imageUrl = attr['cover']['data']['attributes']['url'];
      coverImageUrl = imageUrl.startsWith('http')
          ? imageUrl
          : baseUrl + imageUrl;
    }

    return Recipe(
        id: json['id'] ?? 0,
        title: attr['title'] ?? 'No title',
        description: descriptionList,
        ingredients: attr['ingredients'] ?? 'No ingredients',
        likes: attr['likes'] ?? 0,
        createdAt: DateTime.tryParse(attr['createdAt'] ?? DateTime.now().toIso8601String()) ?? DateTime.now(),
        updatedAt: DateTime.tryParse(attr['updatedAt'] ?? DateTime.now().toIso8601String()) ?? DateTime.now(),
        publishedAt: DateTime.tryParse(attr['publishedAt'] ?? DateTime.now().toIso8601String()) ?? DateTime.now(),
        steps: stepsList,
        commentCount: commentList.length,
        comments: commentList,
        coverImageUrl: coverImageUrl
    );
  }

  Map<String, dynamic> toJson() {
    return {
      'id': id,
      'title': title,
      'description': description.map((desc) => desc.toJson()).toList(),
      'ingredients': ingredients,
      'likes': likes,
      'createdAt': createdAt.toIso8601String(),
      'updatedAt': updatedAt.toIso8601String(),
      'publishedAt': publishedAt.toIso8601String(),
      'steps': steps.map((step) => step.toJson()).toList(),
      'commentCount': commentCount,
      'comments': comments.map((comment) => comment.toJson()).toList(),
      'cover': coverImageUrl
    };
  }
}
Let’s go over this code piece by piece, as it’s a lot:
1. RecipeRequest
The RecipeRequest class represents the class that allows a user to request a recipe. It has three properties (id, title, and a list of Description objects as defined in the Strapi backend) with 2 methods:
fromJson: to convert JSON data into aRecipeRequestobject, including parsing a list of descriptions.toJson: to convert aRecipeRequestobject back to JSON.
2. Step
Represents the cooking steps in a recipe. It contains a list of Textcontent objects, and each Step object has a type, level, and children as it is a richtext type. It also has two methods:
fromJson: to parse JSON to create aStepobject.toJson: to convert aStepobject back to JSON.
3. Description
This class also contains a list of TextContent objects (children). Each Description object also has a type and an optional level to indicate hierarchical structure. It has two methods, too:
fromJson: to convert JSON into aDescriptionobject.toJson: to serialise aDescriptionobject to JSON.
4. TextContent
This class is designed to represent individual pieces of text within larger structures. Each TextContent object can contain a string of text (text), the type of text (type), and an optional boolean to indicate whether the text is bold (bold)
fromJson: Parses JSON into aTextContentobject.toJson: Converts aTextContentobject back to JSON.
5. Comment
As the name indicates, this represents a comment written by a use. It has three properties: the comment content, author, and createdAt. Like others, it also includes two methods:
fromJson: to extract and construct aCommentobject from JSON, including parsing author data.toJson: to serializes aCommentobject to JSON.
6. Recipe
Finally, there is the Recipe class which is the main recipe object. It contains various details about a recipe, including id, title, descriptions, ingredients, likes, timestamps, steps, comment count, comment list, and a cover image URL. We have the:
fromJson: to build aRecipeobject from JSON data. This includes parsing lists of descriptions, steps, and comments. It also adjusts the image URL to ensure it is absolute.toJson: to convert theRecipeobject to JSON format.
As you can see, each class is designed to handle specific parts of the recipe data, with fromJson methods to parse JSON into Dart objects and toJson methods to serialize Dart objects back to JSON.
Create Services
Now that your environment variables are set up, you can create different services for communicating with the server. In your lib/utils/server.dart file, add the code below:
import 'dart:convert';
import 'dart:developer';
import 'package:flutter/material.dart';
import 'package:flutter_dotenv/flutter_dotenv.dart';
import 'package:http/http.dart' as http;
import 'package:shared_preferences/shared_preferences.dart';
import 'package:easy_localization/easy_localization.dart';
import '../models/recipe.dart';

class ApiService {
  final String baseUrl = dotenv.env['BASE_URL']!;
  final String registerEndpoint = dotenv.env['USERS_ENDPOINT_REG']!;
  final String loginEndpoint = dotenv.env['USERS_ENDPOINT']!;
  final String accessToken = dotenv.env['ACCESS_TOKEN']!;
  final String recipeEndpoint = dotenv.env['RECIPE_ENDPOINT']!;
  final String commentEndpoint = dotenv.env['COMMENT_ENDPOINT']!;
  final String requestEndpoint = dotenv.env['R_REQUEST_ENDPOINT']!;

  // Helper method to get headers with optional JWT token
  Future<Map<String, String>> _getHeaders({bool includeJwt = false}) async {
    final headers = {
      "Content-Type": "application/json",
      "Authorization": "Bearer $accessToken",
    };
    if (includeJwt) {
      final jwt = await getJwt();
      if (jwt != null) {
        headers["Authorization"] = "Bearer $jwt";
      }
    }
    return headers;
  }

  // Get JWT
  Future<String?> getJwt() async {
    final prefs = await SharedPreferences.getInstance();
    return prefs.getString('jwt');
  }

  // Set JWT
  Future<void> setJwt(String jwt) async {
    final prefs = await SharedPreferences.getInstance();
    await prefs.setString('jwt', jwt);
  }

  // Remove JWT
  Future<void> removeJwt() async {
    final prefs = await SharedPreferences.getInstance();
    await prefs.remove('jwt');
  }

  // Set User Data
  Future<void> setUserData(Map<String, dynamic> data) async {
    final prefs = await SharedPreferences.getInstance();
    await prefs.setString('userId', data['user']['id'].toString());
    await prefs.setString('username', data['user']['username']);
  }

  // Remove User Data
  Future<void> removeUserData() async {
    final prefs = await SharedPreferences.getInstance();
    await prefs.remove('userId');
    await prefs.remove('username');
  }

  // User Registration
  Future register(String username, String email, String password) async {
    final url = Uri.parse('$baseUrl$registerEndpoint');
    try {
      final response = await http.post(
        url,
        headers: await _getHeaders(),
        body: json.encode({
          "username": username,
          "email": email,
          "password": password,
        }),
      );
      return response;
    } catch (e) {
      log("Error registering user: $e");
      rethrow;
    }
  }

  // User Login
  Future login(String email, String password) async {
    final url = Uri.parse('$baseUrl$loginEndpoint');
    try {
      final response = await http.post(
        url,
        headers: await _getHeaders(),
        body: json.encode({
          "identifier": email,
          "password": password,
        }),
      );

      if (response.statusCode == 200) {
        final data = json.decode(response.body);
        await setJwt(data['jwt']);
        await setUserData(data);
      }

      return response;
    } catch (e) {
      log("Error logging in user: $e");
      rethrow;
    }
  }

  // User Logout
  Future<void> logout() async {
    await removeJwt();
    await removeUserData();
  }

  // Fetch Recipes
  Future<List> fetchRecipes(BuildContext context) async {
    final String localeCode = context.locale.toString().replaceAll('_', '-');
    final String lang = localeCode == 'en' ? 'en' : localeCode;
    final url = Uri.parse('$baseUrl$recipeEndpoint?locale=$lang&populate=*');
    final response = await http.get(url);

    if (response.statusCode == 200) {
      var jsonResponse = jsonDecode(response.body);
      List<dynamic> dataList = jsonResponse['data'];
      List recipes = [];

      for (var item in dataList) {
        try {
          recipes.add(Recipe.fromJson(item));
        } catch (e) {
          print('Failed to parse item: $e');
          print('Item data: $item');
        }
      }

      return recipes;
    } else {
      throw Exception('Failed to load recipes: HTTP ${response.statusCode}');
    }
  }

  // Fetch Comments
    Future<List> fetchComments(int recipeId) async {
    final url = Uri.parse('$baseUrl$commentEndpoint?filters[recipe][id][\$eq]=$recipeId&populate=comment_author');
    try {
      final response = await http.get(url, headers: await _getHeaders());
      print('Response fetch status: ${response.statusCode}');
      print('Response fetch body: ${response.body}');

      if (response.statusCode == 200) {
        var jsonData = jsonDecode(response.body);
        print("Parsed JSON: $jsonData");

        if (jsonData != null && jsonData.containsKey('data')) {
          List<dynamic> data = jsonData['data'];
          return data.map((json) {
            if (json == null || json['attributes'] == null) {
              print('json or json[\'attributes\'] is null');
              return Comment(content: 'Invalid', author: 'Invalid', createdAt: DateTime.now());
            }
            return Comment.fromJson(json);
          }).toList();
        } else {
          print('Data field is missing or null in the response');
          return [];
        }
      } else {
        print('Failed to load comments with status code: ${response.statusCode}');
        return [];
      }
    } catch (e) {
      print('Error server fetching comments: $e');
      throw Exception('Error fetching comments: $e');
    }
  }

  Future postComment(String content, int recipeId, String authorId) async {
    final url = Uri.parse('$baseUrl$commentEndpoint?populate=comment_author');
    try {
      final response = await http.post(
        url,
        headers: await _getHeaders(),
        body: json.encode({
          "data": {
            "content": content,
            "recipe": recipeId,
            "comment_author": authorId,
          },
        }),
      );
      print('Post comment response status: ${response.statusCode}');
      print('Post comment response body: ${response.body}');

      if (response.statusCode == 200 || response.statusCode == 201) {
        var jsonData = jsonDecode(response.body);
        return Comment.fromJson(jsonData['data']);
      } else {
        throw Exception('Failed to post comment');
      }
    } catch (e) {
      log("Error posting comment: $e");
      rethrow;
    }
  }

  Future<void> updateCommentCount(int recipeId, {required bool increment}) async {
    final recipeUrl = Uri.parse('$baseUrl$recipeEndpoint/$recipeId');
    try {
      // Fetch the current recipe data
      final recipeResponse = await http.get(recipeUrl, headers: await _getHeaders());
      print('Fetch recipe response status: ${recipeResponse.statusCode}');
      print('Fetch recipe response body: ${recipeResponse.body}');

      if (recipeResponse.statusCode == 200) {
        var recipeData = jsonDecode(recipeResponse.body)['data'];
        int currentComments = recipeData['attributes']['comments'] ?? 0;
        int updatedComments = increment ? currentComments + 1 : currentComments - 1;

        // Ensure updatedComments is not negative
        if (updatedComments < 0) {
          updatedComments = 0;
        }

        // Update the recipe with the new comment count
        final updateResponse = await http.put(
          recipeUrl,
          headers: await _getHeaders(),
          body: json.encode({
            "data": {
              "comments": updatedComments,
            },
          }),
        );

        print('Update recipe response status: ${updateResponse.statusCode}');
        print('Update recipe response body: ${updateResponse.body}');

        if (updateResponse.statusCode != 200) {
          throw Exception('Failed to update comment count');
        }
      } else {
        throw Exception('Failed to fetch recipe data');
      }
    } catch (e) {
      log("Error updating comment count: $e");
      throw Exception('Error updating comment count: $e');
    }
  }

  // Like Recipe
  Future<void> likeRecipe(int recipeId) async {
    final recipeUrl = Uri.parse('$baseUrl$recipeEndpoint/$recipeId');
    try {
      // Fetch the current recipe data
      final recipeResponse = await http.get(recipeUrl, headers: await _getHeaders());
      if (recipeResponse.statusCode == 200) {
        var recipeData = jsonDecode(recipeResponse.body)['data'];
        int currentLikes = recipeData['attributes']['likes'] ?? 0;
        int updatedLikes = currentLikes + 1;

        // Update the recipe with the new likes count
        final updateResponse = await http.put(
          recipeUrl,
          headers: await _getHeaders(),
          body: json.encode({
            "data": {
              "likes": updatedLikes,
            },
          }),
        );

        if (updateResponse.statusCode != 200) {
          throw Exception('Failed to update likes count');
        }
      } else {
        throw Exception('Failed to fetch recipe data');
      }
    } catch (e) {
      log("Error liking recipe: $e");
      throw Exception('Error liking recipe: $e');
    }
  }

  // Submit Recipe Request
  Future<void> submitRecipeRequest(RecipeRequest r_request) async {
    final url = Uri.parse('$baseUrl$requestEndpoint');

    try {
      final response = await http.post(
        url,
        headers: await _getHeaders(includeJwt: true),
        body: jsonEncode({
          'data': r_request.toJson(), // Wrap the request in a 'data' object
        }),
      );
      print('Response status code: ${response.statusCode}');
      print('Response body: ${response.body}');
      if (response.statusCode != 200 && response.statusCode != 201) {
        throw Exception('Failed to submit recipe request');
      }
    } catch (e) {
      print("Error submitting recipe request: $e");
      rethrow;
    }
  }

  // Fetch User Requested Recipes
  Future<List> fetchUserRequestedRecipes() async {
    final url = Uri.parse('$baseUrl$requestEndpoint');
    try {
      final response = await http.get(
        url,
        headers: await _getHeaders(includeJwt: true),
      );
      print('Response status code: ${response.statusCode}');
      print('Response body: ${response.body}');

      if (response.statusCode == 200) {
        var jsonResponse = jsonDecode(response.body);
        List<dynamic> data = jsonResponse['data'];
        return data.map((json) => RecipeRequest.fromJson(json)).toList();
      } else {
        throw Exception('Failed to load user requested recipes');
      }
    } catch (e) {
      print("Error fetching user requested recipes: $e");
      rethrow;
    }
  }
}
The ApiService class from the code above is a utility for handling various operations related to user authentication and data fetching from a backend server. This service uses HTTP requests to communicate with the Strapi server.
There are four main entities:
1. Class Variables
baseUrlis the base URL.registerEndpoint,loginEndpoint,recipeEndpoint,commentEndpoint,requestEndpointare the specific endpoints for registration, login, recipes, comments, and requests.accessTokenis the token used for API authentication.
2. Helper Methods
_getHeadersprepares the headers for HTTP requests and it optionally includes a JWT token ifincludeJwtis true.getJwtretrieves the JWT token from shared preferences.setJwtandsetUserDatastore the JWT token and user data (ID and username) in shared preferences once the user logs in.removeJwtandremoveUserDataremove the JWT token and user data from shared preferences, respectively, and log the user out.
3. User Operations
registerregisters a new user with the given username, email, and password. It sends a POST request to the registration endpoint with the user details.loginlogs in a user with the given email and password. If successful, it stores the received JWT token and user data.logoutlogs out the user by removing the JWT token and user data from shared preferences.
4. Data Fetching and Manipulation
fetchRecipesfetches a list of recipes based on the current locale (language) from the backend. It handles parsing the JSON response into a list ofRecipeobjects.fetchCommentsfetches comments for a specific recipe by its ID. It populates thecomment_authorfield and returns a list ofCommentobjects.postCommentposts a new comment on a specific recipe. It sends the comment content, recipe ID, and author ID to the backend.updateCommentCountupdates the comment count for a specific recipe. It first fetches the current count, modifies it, and then updates it on the backend.likeRecipe: Increments the like count for a specific recipe by fetching the current count, adding one, and updating the backend.submitRecipeRequestsubmits a new recipe request to the backend. It sends the request data wrapped in adataobject.fetchUserRequestedRecipesfetches a list of recipes requested by a specific user from the backend.
Authorization and Authentication
Authorization is what allows a user to access a particular resource and determines if a user can perform certain actions within the application like commenting on a recipe, liking a recipe, or requesting a recipe.
On the other hand, authentication is the process of validating and verifying a user.
There are many Authorization and Authentication methods, but in this tutorial we’ll use password-based authentication and an API Key for authorization.
Registration
In the lib/screen/signUp.dart file, add the code below:
import 'package:easy_localization/easy_localization.dart';
import 'package:flutter/material.dart';
import 'package:provider/provider.dart';
import '../utils/server2.dart';
import 'login.dart';

class RegisterScreen extends StatefulWidget {
  @override
  _RegisterScreenState createState() => _RegisterScreenState();
}

class _RegisterScreenState extends State<RegisterScreen> {
  final TextEditingController usernameController = TextEditingController();
  final TextEditingController emailController = TextEditingController();
  final TextEditingController passwordController = TextEditingController();
  final _formKey = GlobalKey();
  bool _isLoading = false;

  @override
  void dispose() {
    usernameController.dispose();
    emailController.dispose();
    passwordController.dispose();
    super.dispose();
  }

  Future<void> _register() async {
    if (_formKey.currentState!.validate()) {
      setState(() {
        _isLoading = true;
      });

      final response = await Provider.of(context, listen: false)
          .register(usernameController.text, emailController.text, passwordController.text);

      setState(() {
        _isLoading = false;
      });

      if (response.statusCode == 200) {
        // Navigate to the login screen after successful registration
        Navigator.pushReplacement(
          context,
          MaterialPageRoute(builder: (_) => LoginScreen()),
        );
      } else {
        // Handle error
        showDialog(
          context: context,
          builder: (context) => AlertDialog(
            title: Text(tr('register_fail')),
            content: Text(tr('register_error')),
            actions: [
              TextButton(
                onPressed: () {
                  Navigator.of(context).pop();
                },
                child: Text(tr('ok')),
              ),
            ],
          ),
        );
      }
    }
  }

  @override
  Widget build(BuildContext context) {
    return Scaffold(
      appBar: AppBar(title: Text(tr('register'))),
      body: Padding(
        padding: const EdgeInsets.all(16.0),
        child: Form(
          key: _formKey,
          child: Column(
            children: [
              TextFormField(
                controller: usernameController,
                decoration: InputDecoration(labelText: tr('username')),
                validator: (value) {
                  if (value == null || value.isEmpty) {
                    return tr('username_required');
                  }
                  return null;
                },
              ),
              TextFormField(
                controller: emailController,
                decoration: InputDecoration(labelText: tr('email')),
                validator: (value) {
                  if (value == null || value.isEmpty) {
                    return tr('email_required');
                  } else if (!RegExp(r'^[^@]+@[^@]+\.[^@]+').hasMatch(value)) {
                    return tr('email_invalid');
                  }
                  return null;
                },
              ),
              TextFormField(
                controller: passwordController,
                decoration: InputDecoration(labelText: tr('password')),
                obscureText: true,
                validator: (value) {
                  if (value == null || value.isEmpty) {
                    return tr('password_required');
                  }
                  return null;
                },
              ),
              SizedBox(height: 20),
              _isLoading
                  ? CircularProgressIndicator()
                  : ElevatedButton(
                onPressed: _register,
                child: Text(tr('register')),
              ),
              TextButton(
                onPressed: () {
                  // Navigate to the login screen
                  Navigator.pushReplacement(
                    context,
                    MaterialPageRoute(builder: (_) => LoginScreen()),
                  );
                },
                child: Text(
                  tr("have_account"),
                  style: const TextStyle(fontSize: 16),
                ),
              ),
            ],
          ),
        ),
      ),
    );
  }
}
This code provides a user-friendly registration interface for the recipe application. The RegisterScreen class is a stateful widget that manages the registration process.
The _register method validates the form and calls the register method from the ApiService. If the registration is successful (indicated by a 200 HTTP status code), it redirects to the login screen. If it fails, an error dialog is displayed with a message.
The code above also employs form validation to ensure that users enter valid information. The username and password fields must not be empty, and the email field must follow a proper email format.
Upon submission, the form displays a loading indicator while the app communicates with the server to register the user.
The form's state is managed using a GlobalKey, and controllers for the text fields are properly disposed of to free up resources when the widget is removed from the tree.
Login
import 'package:easy_localization/easy_localization.dart';
import 'package:flutter/material.dart';
import 'package:provider/provider.dart';
import '../utils/server2.dart';
import 'signUp.dart';

class LoginScreen extends StatefulWidget {
  @override
  _LoginScreenState createState() => _LoginScreenState();
}

class _LoginScreenState extends State<LoginScreen> {
  final TextEditingController emailController = TextEditingController();
  final TextEditingController passwordController = TextEditingController();
  final _formKey = GlobalKey();
  bool _isLoading = false;

  @override
  void dispose() {
    emailController.dispose();
    passwordController.dispose();
    super.dispose();
  }

  Future<void> _login() async {
    if (_formKey.currentState!.validate()) {
      setState(() {
        _isLoading = true;
      });

      final response = await Provider.of(context, listen: false)
          .login(emailController.text, passwordController.text);

      setState(() {
        _isLoading = false;
      });

      if (response.statusCode == 200) {
        Navigator.pushReplacementNamed(context, '/home');
      } else {
        showDialog(
          context: context,
          builder: (context) => AlertDialog(
            title: Text(tr('login_failed')),
            content: Text(tr('invalid_email_password')),
            actions: [
              TextButton(
                onPressed: () {
                  Navigator.of(context).pop();
                },
                child: Text(tr('ok')),
              ),
            ],
          ),
        );
      }
    }
  }

  @override
  Widget build(BuildContext context) {
    return Scaffold(
      appBar: AppBar(title: Text(tr('login'))),
      body: Padding(
        padding: const EdgeInsets.all(16.0),
        child: Form(
          key: _formKey,
          child: Column(
            children: [
              TextFormField(
                controller: emailController,
                decoration: InputDecoration(labelText: tr('email')),
                validator: (value) {
                  if (value == null || value.isEmpty) {
                    return tr('email_required');
                  } else if (!RegExp(r'^[^@]+@[^@]+\.[^@]+').hasMatch(value)) {
                    return tr('email_invalid');
                  }
                  return null;
                },
              ),
              TextFormField(
                controller: passwordController,
                decoration: InputDecoration(labelText: tr('password')),
                obscureText: true,
                validator: (value) {
                  if (value == null || value.isEmpty) {
                    return tr('password_required');
                  }
                  return null;
                },
              ),
              SizedBox(height: 20),
              _isLoading
                  ? CircularProgressIndicator()
                  : ElevatedButton(
                      onPressed: _login,
                      child: Text(tr('login')),
                    ),
              TextButton(
                onPressed: () {
                  Navigator.push(
                    context,
                    MaterialPageRoute(builder: (_) => RegisterScreen()),
                  );
                },
                child: Text(
                  tr("dont_have_account"),
                  style: const TextStyle(fontSize: 16),
                ),
              ),
            ],
          ),
        ),
      ),
    );
  }
}
The LoginScreen contains two input fields for the user's email and password, and it validates the inputs before attempting to log in. When the user submits the form, the app checks if the input is valid. If valid, it sets a loading indicator and sends a login request to the backend API.
If the login is successful, the app navigates to the home screen, whereas if the login fails, an alert dialog is displayed to inform the user of the invalid email or password. The form also uses a GlobalKey to manage its state and ensures that the text controllers are properly disposed of when the widget is removed from the tree.
Build App Components
Drawer
The Drawer is a side panel that slides in from the left (by default) and provides navigation options for the user. It’s a great way to organize your app’s sections without crowding the main screen.
In our app, the drawer will include links to the Request recipe screen, Profile, Logout, and languages for authenticated users.
In the lib/components/drawer.dart file, add the code below:
import 'package:easy_localization/easy_localization.dart';
import 'package:flutter/material.dart';
import 'package:shared_preferences/shared_preferences.dart';
import '../screens/profile.dart';
import '../screens/requestRecipe.dart';

class CustomDrawer extends StatefulWidget {
  @override
  _CustomDrawerState createState() => _CustomDrawerState();
}

class _CustomDrawerState extends State<CustomDrawer> {
  bool _isAuthenticated = false;
  String? _username;
  String? _userId;

  @override
  void initState() {
    super.initState();
    _checkAuthentication();
  }

  Future<void> _checkAuthentication() async {
    final prefs = await SharedPreferences.getInstance();
    setState(() {
      _isAuthenticated = prefs.containsKey('jwt');
      _username = prefs.getString('username');
      _userId = prefs.getString('userId');
    });
  }

  void _navigateToLogin() {
    Navigator.pushReplacementNamed(context, '/login');
  }

  Future<void> _logout() async {
    final prefs = await SharedPreferences.getInstance();
    await prefs.clear();
    setState(() {
      _isAuthenticated = false;
      _username = null;
      _userId = null;
    });
    Navigator.pushReplacementNamed(context, '/login');
  }

  void _changeLanguage(Locale locale) {
    context.setLocale(locale);
  }

  @override
  Widget build(BuildContext context) {
    return Drawer(
      child: ListView(
        padding: EdgeInsets.zero,
        children: [
          DrawerHeader(
            decoration: BoxDecoration(
              color: Colors.blue,
            ),
            child: Text(
              _isAuthenticated ? tr('hello', namedArgs: {'username': _username ?? ''}) : tr('welcome'),
              style: TextStyle(
                color: Colors.white,
                fontSize: 24,
              ),
            ),
          ),
          if (_isAuthenticated)
            ListTile(
              leading: Icon(Icons.request_page),
              title:Text(tr('request_recipe')),
              onTap: () {

                Navigator.push(
                  context,
                  MaterialPageRoute(builder: (context) => RecipeRequestScreen()),

                );
              },
            ),
          if (_isAuthenticated)
            ListTile(
              leading: const Icon(Icons.person),
              title: Text(tr('profile')),
              onTap: () {
                if (_userId != null) {
                  Navigator.push(
                    context,
                    MaterialPageRoute(builder: (context) => ProfileScreen()),
                  );
                }
              },
            ),
          if (_isAuthenticated)
            ListTile(
              leading: Icon(Icons.logout),
              title: Text(tr('logout')),
              onTap: _logout,

            )
          else
            ListTile(
              leading: Icon(Icons.login),
              title: Text(tr('login')),
              onTap: _navigateToLogin,
            ),
          Divider(),
          ListTile(
            leading: SizedBox(
              width: 24.0,
              height: 24.0,
              child: Image.asset(
                'assets/images/en-flag.jpg',
              ),
            ),
            title: Text(tr('english')),
            onTap: () {
              Navigator.pop(context);
              _changeLanguage(Locale('en'));
    },
          ),
          ListTile(
            leading: SizedBox(
              width: 24.0,
              height: 24.0,
              child: Image.asset(
                'assets/images/fr-flag.jpg',
              ),
            ),
            title: Text(tr('french')),
            onTap: () {
              Navigator.pop(context);
              _changeLanguage(Locale('fr', 'FR'));
            },
          ),
          ListTile(
            leading: SizedBox(
              width: 24.0,
              height: 24.0,
              child: Image.asset(
                'assets/images/ja-flag.jpg',
              ),
            ),
            title: Text(tr('japanese')),
            onTap: () {
              Navigator.pop(context);
              _changeLanguage(Locale('ja', 'JP'));
            },
          ),
        ],
      ),
    );
  }
}
The CustomDrawer gives users access to different parts of the app and lets them switch languages. It updates its content based on the user's login status. Logged-in users see options like “Request a Recipe,” “Profile,” and “Logout,” while guests only see a “Login” option. It personalizes the user experience by greeting logged-in users with their username.
It also includes a language switcher with flag icons for English, French, and Japanese, powered by the easy_localization package. This allows users to change the app’s language instantly.
On startup, the drawer checks the user's authentication status using SharedPreferences and adjusts the UI accordingly. Navigation is handled with Navigator, enabling smooth transitions to different screens based on the selected menu item.
AppBar
The AppBar is the top bar of your app’s screen. It typically contains the app’s title, a back button (if needed), and sometimes actions like search, settings, or a language toggle. In our multilingual recipe app, we’ll use the AppBar to show the current page title and allow easy navigation through the drawer.
In the lib/components/appBar.dart file, add the code below:
import 'package:flutter/material.dart';

/// A customizable AppBar for the Recipe application.
///
/// This AppBar allows for setting a title, actions, a leading widget,
/// centering the title, background color, and elevation.
class RecipeBar extends StatelessWidget implements PreferredSizeWidget {
  final String title;
  final List? actions;
  final Widget? leading;
  final bool centerTitle;
  final Color? backgroundColor;
  final double elevation;

  const RecipeBar({
    required this.title,
    this.actions,
    this.leading,
    this.centerTitle = true,
    this.backgroundColor,
    this.elevation = 4.0,
    Key? key,
  }) : super(key: key);

  @override
  Widget build(BuildContext context) {
    return AppBar(
      title: Text(title),
      actions: actions,
      leading: leading,
      centerTitle: centerTitle,
      backgroundColor: backgroundColor,
      elevation: elevation,
    );
  }

  @override
  Size get preferredSize => const Size.fromHeight(kToolbarHeight);
}
The AppBar uses a StatelessWidget since it does not manage any state that changes over time. It implements the PreferredSizeWidget interface, which is necessary for AppBar customization in Flutter.
The constructor of the RecipeBar class takes several parameters to customize the AppBar. The title parameter is required, while the others are optional with default values. The actions parameter allows adding widgets like buttons for login, language switching, or simply navigating to another screen of the app.
In the build method, the AppBar is constructed using the provided parameters. The preferredSize getter returns the preferred height of the AppBar, which is set to the standard toolbar height using kToolbarHeight. This class provides a flexible and reusable AppBar component for the Recipe application, enabling easy customization and consistent UI design across different screens.
Fetch Recipes
In the lib/screens/home.dart file, add the code below:
import 'package:easy_localization/easy_localization.dart';
import 'package:flutter/material.dart';
import 'package:shared_preferences/shared_preferences.dart';
import '../components/drawer.dart';
import '../models/recipe.dart';
import '../utils/server2.dart';
import 'detail.dart';

class HomeScreen extends StatefulWidget {
  @override
  _HomeScreenState createState() => _HomeScreenState();
}

class _HomeScreenState extends State<HomeScreen> {
  late Future<List> _recipesFuture;
  bool _isAuthenticated = false;
  String? _username;

  @override
  void initState() {
    super.initState();
    _checkAuthentication(); // Check authentication state when initializing
  }

  Future<void> _checkAuthentication() async {
    final prefs = await SharedPreferences.getInstance();
    setState(() {
      _isAuthenticated = prefs.containsKey('jwt'); // Check if JWT token is stored
      _username = prefs.getString('username'); // Get the logged-in user's username from shared preferences
    });
  }

  void _navigateToLogin() {
    Navigator.pushReplacementNamed(context, '/login');
  }

  // Logout method
  Future<void> _logout() async {
    await ApiService().logout();
    setState(() {
      _isAuthenticated = false;
      _username = null;
    });
    Navigator.pushReplacementNamed(context, '/login');
  }

  String truncateWithEllipsis(int cutoff, String myString) {
    return (myString.length <= cutoff) ? myString : '${myString.substring(0, cutoff)}...';
  }

  @override
  void didChangeDependencies() {
    super.didChangeDependencies();
    // Initialize _recipesFuture  after context is available
    _recipesFuture = ApiService().fetchRecipes(context);
  }

  @override
  Widget build(BuildContext context) {
    return Scaffold(
      appBar: AppBar(
        title: Text(tr('recipe_list')),
        actions: [
          if (_isAuthenticated)
            Padding(
              padding: const EdgeInsets.all(8.0),
              child: Center(
                child: Text(tr('hello', namedArgs: {'username': _username ?? ''})),
              ),
            ),
          if (_isAuthenticated)
            IconButton(
              icon: const Icon(Icons.logout),
              onPressed: _logout,
            )
          else
            TextButton(
              onPressed: _navigateToLogin,
              child: Text(
                tr('login'),
                style: const TextStyle(color: Colors.white),
              ),
            ),
        ],
      ),
      drawer: CustomDrawer(),
      body: FutureBuilder<List>(
        future: _recipesFuture,
        builder: (context, snapshot) {
          if (snapshot.connectionState == ConnectionState.waiting) {
            return const Center(child: CircularProgressIndicator());
          } else if (snapshot.hasError) {
            return Center(child: Text('Error: ${snapshot.error.toString()}'));
          } else if (snapshot.data == null || snapshot.data!.isEmpty) {
            return Center(child: Text(tr('no_recipe')));
          }

          return ListView.builder(
            itemCount: snapshot.data!.length,
            itemBuilder: (context, index) {
              Recipe recipe = snapshot.data![index];
              String fullDescription = recipe.description.isNotEmpty
                  ? recipe.description.map((d) => d.children.map((t) => t.text).join(' ')).join('\n')
                  : tr('no_description');
              String truncatedDescription = truncateWithEllipsis(100, fullDescription);

              print("Recipe Title: ${recipe.title}");
              print("Full Description: $fullDescription");

              return GestureDetector(
                onTap: () async {
                  final result = await Navigator.push(
                    context,
                    MaterialPageRoute(
                      builder: (context) => RecipeDetailPage(recipe: recipe),
                    ),
                  );

                  if (result != null && result is Map<String, int>) {
                    setState(() {
                      Recipe updatedRecipe = Recipe(
                        id: recipe.id,
                        title: recipe.title,
                        description: recipe.description,
                        ingredients: recipe.ingredients,
                        likes: result['likes']!,
                        createdAt: recipe.createdAt,
                        updatedAt: recipe.updatedAt,
                        publishedAt: recipe.publishedAt,
                        steps: recipe.steps,
                        commentCount: result['commentsCount']!,
                        comments: recipe.comments,
                        coverImageUrl: recipe.coverImageUrl,
                      );
                      snapshot.data![index] = updatedRecipe;
                    });
                  }
                },
                child: Container(
                  margin: const EdgeInsets.symmetric(horizontal: 10, vertical: 8),
                  padding: const EdgeInsets.all(10),
                  decoration: BoxDecoration(
                    color: Colors.white,
                    borderRadius: BorderRadius.circular(15),
                    border: Border.all(
                      color: const Color(0xff595959),
                      width: 0.5,
                    ),
                  ),
                  child: Row(
                    children: [
                      Container(
                        height: 80,
                        width: 80,
                        decoration: BoxDecoration(
                          borderRadius: BorderRadius.circular(15),
                          image: DecorationImage(
                            image: NetworkImage(recipe.coverImageUrl),
                            fit: BoxFit.cover,
                          ),
                        ),
                      ),
                      const SizedBox(width: 10),
                      Expanded(
                        flex: 3,
                        child: Column(
                          crossAxisAlignment: CrossAxisAlignment.start,
                          children: [
                            Text(
                              recipe.title.toUpperCase(),
                              style: const TextStyle(fontWeight: FontWeight.bold),
                            ),
                            const SizedBox(height: 5),
                            Text(
                              truncatedDescription,
                              style: const TextStyle(color: Color(0xff595959)),
                            ),
                            const SizedBox(height: 5),
                            Row(
                              children: [
                                Expanded(
                                  child: Row(
                                    children: [
                                      Text('${recipe.likes}'),
                                      const SizedBox(width: 5),
                                      const Icon(Icons.thumb_up, size: 18, color: Colors.redAccent),
                                    ],
                                  ),
                                ),
                                Expanded(
                                  child: Row(
                                    children: [
                                      Text('${recipe.commentCount}'),
                                      const SizedBox(width: 5),
                                      const Icon(Icons.comment, size: 18, color: Colors.blue),
                                    ],
                                  ),
                                ),
                              ],
                            ),
                          ],
                        ),
                      ),
                    ],
                  ),
                ),
              );
            },
          );
        },
      ),
    );
  }
}
The HomeScreen mainly displays a list of recipes. It checks if the user is authenticated by looking for a JWT token in shared preferences and sets the authentication state accordingly. If the user is authenticated, it shows a greeting with their username and provides a logout option in the app bar.
The FutureBuilder to fetch recipes from the ApiService. While the data is being fetched, it shows a loading indicator. Once the data is fetched, it displays the list of recipes. Each recipe card includes the title, truncated description, cover image, and the counts of likes and comments.
When a user taps on a recipe, it navigates to a detailed page for that recipe. If the detailed page updates the recipe's likes or comments, the list updates accordingly without reloading the entire screen.
View Recipe
In the lib/screens/detail.dart file, add the code below:
import 'dart:developer';
import 'package:easy_localization/easy_localization.dart';
import 'package:flutter/material.dart';
import 'package:shared_preferences/shared_preferences.dart';
import '../models/recipe.dart';
import '../utils/server2.dart';

class RecipeDetailPage extends StatefulWidget {
  final Recipe recipe;

  const RecipeDetailPage({Key? key, required this.recipe}) : super(key: key);

  @override
  _RecipeDetailPageState createState() => _RecipeDetailPageState();
}

class _RecipeDetailPageState extends State<RecipeDetailPage> {
  final _commentController = TextEditingController();
  List _comments = [];
  bool _isLoading = true;
  bool _isAuthenticated = false;
  String? _userId;
  int _likes = 0;
  int _commentsCount = 0;

  @override
  void initState() {
    super.initState();
    _initializePage();
  }

  Future<void> _initializePage() async {
    _checkAuthentication();
    _loadComments();
    _likes = widget.recipe.likes;
    _comments = widget.recipe.comments;
    _commentsCount = widget.recipe.commentCount;
    _commentController.addListener(() => setState(() {}));
  }

  @override
  void dispose() {
    _commentController.dispose();
    super.dispose();
  }

  Future<void> _checkAuthentication() async {
    final prefs = await SharedPreferences.getInstance();
    setState(() {
      _isAuthenticated = prefs.containsKey('jwt');
      _userId = prefs.getString('userId');
    });
  }

  void _showError(String message) {
    final snackBar = SnackBar(content: Text(message));
    ScaffoldMessenger.of(context).showSnackBar(snackBar);
  }

  Future<void> _loadComments() async {
    try {
      var comments = await ApiService().fetchComments(widget.recipe.id);
      setState(() {
        _comments = comments;
        _commentsCount = comments.length;
        _isLoading = false;
      });
    } catch (e) {
      log('Error server fetching comments: $e');
      _showError('Failed to load comments: $e');
      setState(() => _isLoading = false);
    }
  }

  Future<void> _addComment() async {
    if (_commentController.text.isNotEmpty && _userId != null) {
      try {
        Comment newComment = await ApiService().postComment(
            _commentController.text, widget.recipe.id, _userId!);

        setState(() {
          _comments.add(newComment);
          _commentsCount++;
          _commentController.clear();
        });

        await ApiService().updateCommentCount(widget.recipe.id, increment: true);
      } catch (e) {
        log("Error posting comment: $e");
        _showError('Error posting comment: $e');
      }
    }
  }

  Future<void> _likeRecipe() async {
    try {
      await ApiService().likeRecipe(widget.recipe.id);
      setState(() => _likes++);
    } catch (e) {
      log("Error liking recipe: $e");
      _showError('Error liking recipe: $e');
    }
  }

  Future<void> _logout() async {
    await ApiService().logout();
    setState(() {
      _isAuthenticated = false;
      _userId = null;
    });
    Navigator.pushReplacementNamed(context, '/login');
  }

  @override
  Widget build(BuildContext context) {
    return WillPopScope(
      onWillPop: () async {
        Navigator.pop(context, {
          'likes': _likes,
          'commentsCount': _commentsCount,
        });
        return true;
      },
      child: Scaffold(
        appBar: AppBar(
          title: Text(widget.recipe.title),
          actions: [
            if (_isAuthenticated)
              IconButton(
                icon: const Icon(Icons.logout),
                onPressed: _logout,
              ),
          ],
        ),
        body: SingleChildScrollView(
          child: Padding(
            padding: const EdgeInsets.all(8.0),
            child: Column(
              crossAxisAlignment: CrossAxisAlignment.start,
              children: [
                if (widget.recipe.coverImageUrl.isNotEmpty)
                  Image.network(
                    widget.recipe.coverImageUrl,
                    width: double.infinity,
                    height: 200,
                    fit: BoxFit.cover,
                  ),
                const SizedBox(height: 10),
                Row(
                  children: [
                    Expanded(
                      child: Row(
                        children: [
                          Text('$_likes'),
                          const SizedBox(width: 5),
                          IconButton(
                            icon: const Icon(Icons.thumb_up, size: 18, color: Colors.redAccent),
                            onPressed: _likeRecipe,
                          ),
                        ],
                      ),
                    ),
                    Expanded(
                      child: Row(
                        children: [
                          Text('$_commentsCount'),
                          const SizedBox(width: 5),
                          const Icon(Icons.comment, size: 18, color: Colors.blue),
                        ],
                      ),
                    ),
                  ],
                ),
                const SizedBox(height: 20),
                ...widget.recipe.description.map((desc) =>
                    Text(desc.children.map((child) => child.text).join())),
                const SizedBox(height: 20),
                const Text('Ingredients', style: TextStyle(fontWeight: FontWeight.bold)),
                const SizedBox(height: 20),
                Text(widget.recipe.ingredients),
                const SizedBox(height: 20),
                const Text('Procedure', style: TextStyle(fontWeight: FontWeight.bold)),
                const SizedBox(height: 20),
                ...widget.recipe.steps.map((step) =>
                    Text(step.children.map((child) => child.text).join())),
                if (_isLoading)
                  const CircularProgressIndicator(),
                ..._comments.map((comment) => ListTile(
                  title: Text(comment.author),
                  subtitle: Text(comment.content),
                  trailing: Text(comment.createdAt.toLocal().toString()),
                )),
                if (_isAuthenticated)
                  Column(
                    children: [
                      TextField(
                        controller: _commentController,
                        decoration: InputDecoration(labelText: tr('add_comment')),
                      ),
                      ElevatedButton(
                        onPressed: _commentController.text.isNotEmpty ? _addComment : null,
                        child: Text(tr('submit')),
                      ),
                    ],
                  )
                else
                  Text(tr('login_comment')),
              ],
            ),
          ),
        ),
      ),
    );
  }
}
This RecipeDetailPage displays detailed information about a selected recipe, including its cover image, likes, comments, ingredients, and procedure. Only authenticated users can comment or like a recipe. During initialization, the page checks if the user is authenticated by reading from local storage. If authenticated, it sets _isAuthenticated to true and retrieves the user's ID, enabling features like adding comments and liking recipes.
Adding a comment: The
_addCommentfunction posts the new comment to the server, adds it to the local comments list, increments the comment count, and clears the input field.Liking a recipe: The
_likeRecipefunction sends a like request to the server, increases the local like count, and updates the UI.
If the user is not authenticated, they are prompted to log in to leave a comment or interact with the recipe.
Create Request Recipe Screen
In the lib/screens/requestRecipe.dart file, add the code below:
import 'package:easy_localization/easy_localization.dart';
import 'package:flutter/material.dart';
import '../models/recipe.dart';
import '../utils/server2.dart';

class RecipeRequestScreen extends StatefulWidget {
  @override
  _RecipeRequestScreenState createState() => _RecipeRequestScreenState();
}

class _RecipeRequestScreenState extends State<RecipeRequestScreen> {
  final _formKey = GlobalKey();
  final _titleController = TextEditingController();
  final _descriptionController = TextEditingController();
  final ApiService _apiService = ApiService();

  @override
  void dispose() {
    _titleController.dispose();
    _descriptionController.dispose();
    super.dispose();
  }

  Future<void> _submitRequest() async {
    if (_formKey.currentState!.validate()) {
      final description = _descriptionController.text;
      final descriptionList = [
        Description(
          type: 'paragraph',
          children: [
            TextContent(
              type: 'text',
              text: description,
              bold: false
            ),
          ],
        ),
      ];
      final request = RecipeRequest(
        title: _titleController.text,
        description: descriptionList,
        id: 0,
      );
      try {
        await _apiService.submitRecipeRequest(request);
        ScaffoldMessenger.of(context).showSnackBar(
          SnackBar(content: Text(tr('request_successful'))),
        );
        _titleController.clear();
        _descriptionController.clear();
      } catch (e) {
        ScaffoldMessenger.of(context).showSnackBar(
          SnackBar(content: Text('Failed to submit recipe request: $e')),
        );
      }
    }
  }

  @override
  Widget build(BuildContext context) {
    return Scaffold(
      appBar: AppBar(
        title: Text(tr('request_recipe')),
      ),
      body: Padding(
        padding: const EdgeInsets.all(16.0),
        child: Form(
          key: _formKey,
          child: Column(
            children: [
              TextFormField(
                controller: _titleController,
                decoration: InputDecoration(labelText: tr('recipe_title')),
                validator: (value) {
                  if (value == null || value.isEmpty) {
                    return 'Please enter a title';
                  }
                  return null;
                },
              ),
              TextFormField(
                controller: _descriptionController,
                decoration: InputDecoration(labelText: tr('description')),
                maxLines: 5,
                validator: (value) {
                  if (value == null || value.isEmpty) {
                    return tr('enter_description');
                  }
                  return null;
                },
              ),
              SizedBox(height: 20),
              ElevatedButton(
                onPressed: _submitRequest,
                child: Text(tr('submit_request')),
              ),
            ],
          ),
        ),
      ),
    );
  }
}
The RecipeRequestPage allows authenticated users to submit a request for a new recipe. widget is a statefull widget managed by the _RecipeRequestPageState class. It uses a form with two input fields: one for the recipe title and one for the description. These input fields are controlled by TextEditingController instances, which manage the text entered by the user.
The _submitRequest method handles the form submission. It validates the form fields, constructs a RecipeRequest object with the entered title and description, and sends it to the server using the ApiService. If the submission is successful, a success message is displayed using ScaffoldMessenger. If there is an error, an error message is shown.
The build method constructs the user interface of the screen and displays the form with its inputs.
Create User Profile Screen
In the lib/screens/profile.dart file, add the code below:
import 'package:easy_localization/easy_localization.dart';
import 'package:flutter/material.dart';
import 'package:flutter_recipe_app/screens/requestRecipe.dart';
import '../models/recipe.dart';
import '../utils/server2.dart';

class ProfileScreen extends StatefulWidget {
  @override
  _ProfileScreenState createState() => _ProfileScreenState();
}

class _ProfileScreenState extends State<ProfileScreen> {
  late Future<List> _requestedRecipesFuture;

  @override
  void initState() {
    super.initState();
    _requestedRecipesFuture = ApiService().fetchUserRequestedRecipes();
  }

  @override
  Widget build(BuildContext context) {
    return Scaffold(
      appBar: AppBar(
        title: Text(tr('profile')),
      ),
      body: Column(
        children: [
          Padding(
            padding: const EdgeInsets.all(16.0),
            child: Column(
              crossAxisAlignment: CrossAxisAlignment.start,
              children: [
                SizedBox(height: 10),
                Text(
                  tr('request_list'),
                  style: TextStyle(fontSize: 16, color: Colors.grey[600]),
                ),
                SizedBox(height: 20),
                ElevatedButton(
                  onPressed: () {
                    Navigator.pop(context);
                    Navigator.push(
                      context,
                      MaterialPageRoute(
                        builder: (context) => RecipeRequestScreen(),
                      ),
                    );
                  },
                  child: Text(tr('request_new_recipe')),
                ),
              ],
            ),
          ),
          Expanded(
            child: FutureBuilder<List>(
              future: _requestedRecipesFuture,
              builder: (context, snapshot) {
                if (snapshot.connectionState == ConnectionState.waiting) {
                  return Center(child: CircularProgressIndicator());
                } else if (snapshot.hasError) {
                  return Center(child: Text('Error: ${snapshot.error.toString()}'));
                } else if (snapshot.data == null || snapshot.data!.isEmpty) {
                  return Center(child: Text(tr('no_request_found')));
                }

                return ListView.builder(
                  itemCount: snapshot.data!.length,
                  itemBuilder: (context, index) {
                    RecipeRequest request = snapshot.data![index];
                    String fullDescription = request.description
                        .map((d) => d.children.map((t) => t.text).join('\n'))
                        .join('\n\n');

                    return Padding(
                      padding: const EdgeInsets.symmetric(horizontal: 40.0),
                      child: ListTile(
                        title: Text(
                          request.title.toUpperCase(),
                          style: const TextStyle(fontWeight: FontWeight.bold),
                        ),
                        subtitle: Text(fullDescription),
                      ),
                    );
                  },
                );
              },
            ),
          ),
        ],
      ),
    );
  }
}
The ProfileScreen class in this Flutter application represents a user's profile page where they can view their requested recipes. When the screen is initialized, it fetches a list of recipes requested by the user by calling the fetchUserRequestedRecipes method from the ApiService. This data is then stored in the _requestedRecipesFuture variable, which is a Future that will eventually hold the list of requested recipes.
In the build method, the screen is constructed using a Scaffold widget.
The main part of the screen is an Expanded widget containing a FutureBuilder. The FutureBuilder widget waits for the _requestedRecipesFuture to complete and then builds the list of requested recipes. If the data is still loading, it shows a CircularProgressIndicator. If there's an error, it displays an error message. And if there are no recipes, it shows a "no request found" message. Otherwise, it displays the list of requested recipes, each rendered as a ListTile with the recipe title and description.
Test the App
To test the application, connect your device or launch an emulator then run the backend with the command below:
npm run develop
And the frontend:
npm run dev
Conclusion
In this tutorial, you built a Flutter and Strapi recipe application where user could register and login to request a recipe from the admin, view and like recipes, or add their comments to a specific recipe.
To improve the application, you can add search functionality, share functionality, or allow users not only to request a recipe but also to create a personal list of recipes they can share with others.
Thanks for reading!