


![[The AI Show Episode 143]: ChatGPT Revenue Surge, New AGI Timelines, Amazon’s AI Agent, Claude for Education, Model Context Protocol & LLMs Pass the Turing Test](https://www.marketingaiinstitute.com/hubfs/ep%20143%20cover.png)


![From Accountant to Data Engineer with Alyson La [Podcast #168]](https://cdn.hashnode.com/res/hashnode/image/upload/v1744420903260/fae4b593-d653-41eb-b70b-031591aa2f35.png?#)


.png?#)


![Apple Posts Full First Episode of 'Your Friends & Neighbors' on YouTube [Video]](https://www.iclarified.com/images/news/96990/96990/96990-640.jpg)

![Apple May Implement Global iPhone Price Increases to Mitigate Tariff Impacts [Report]](https://www.iclarified.com/images/news/96987/96987/96987-640.jpg)


How to Use Lazygit to Improve Your Git Workflow
Lazygit is an open-source command line terminal UI for Git commands that I’ve used for the last couple of years, and it’s become my new best friend. Basically, the Lazygit tool is a wrapper for the Git command line that replaces it with a UI. Instead...
Lazygit is an open-source command line terminal UI for Git commands that I’ve used for the last couple of years, and it’s become my new best friend.
Basically, the Lazygit tool is a wrapper for the Git command line that replaces it with a UI. Instead of typing out Git commands again and again in your terminal, you can use keyboard shortcuts to commit, push, pull, create, edit, and delete branches in your project.
In simple terms, Lazygit helps you increase your productivity while working with Git.
In this article, we'll walk through the essential features of Lazygit, and I’ll show you how it works.
Table of Contents:
How to Install Lazygit
Before we start, you’ll need to make sure it’s installed on your machine. You can install the tool in your system using the following methods (depending on your system):
Homebrew
You can install lazygit in macOS using Homebrew like this:
brew install lazygit
Scoop (Windows)
You can install lazygit in Windows using Scoop like this:
# Add the extras bucket
scoop bucket add extras

# Install lazygit
scoop install lazygit
Arch Linux
You can install lazygit in Arch using Pacman like this:
sudo pacman -S lazygit
Ubuntu and Debian
You can install lazygit in Ubuntu and Debian using the following command:
LAZYGIT_VERSION=$(curl -s "https://api.github.com/repos/jesseduffield/lazygit/releases/latest" | \grep -Po '"tag_name": *"v\K[^"]*')
curl -Lo lazygit.tar.gz "https://github.com/jesseduffield/lazygit/releases/download/v${LAZYGIT_VERSION}/lazygit_${LAZYGIT_VERSION}_Linux_x86_64.tar.gz"
tar xf lazygit.tar.gz lazygit
sudo install lazygit -D -t /usr/local/bin/
Verify the correct installation of lazygit:
lazygit --version
The command output looks like this:
➜  lazygit --version
commit=, build date=, build source=nix, version=0.44.1, os=linux, arch=amd64, git version=2.47.0
Fedora and RHEL
You can install lazygit in Fedora and RHEL using DNF like this:
sudo dnf copr enable atim/lazygit -y
sudo dnf install lazygit
NixOS
You can install lazygit in NixOS using the following method:
# with nix-shell
nix-shell -p lazygit

# with nix-env
nix-env -iA lazygit

# with /etc/nixos/configuration.nix
environment.systemPackages = [
  pkgs.lazygit
];
# or with enable lazygit flakes
nix run nixpkgs#lazygit
How to Use Lazygit
To use Lazygit, you don’t need any advanced knowledge about Lazygit or the Git CLI. If you are a beginner, that’s okay – I’ll walk you through the process and the basics here.
The main thing to understand is how the key mappings (shortcut keys) work. In this tutorial, I won’t discuss every key mapping, but I’ll teach you about some of the most common Lazygit key mappings which you’ll use on a daily basis. They’ll help you build a solid base for using the tool effectively.
To use Lazygit, first open the terminal you use. For example, I’m using the GNOME distro, so I’ll use the Ptyxis terminal.
Type the lazygit command in your terminal:
lazygit
The command output should look like this in your terminal:

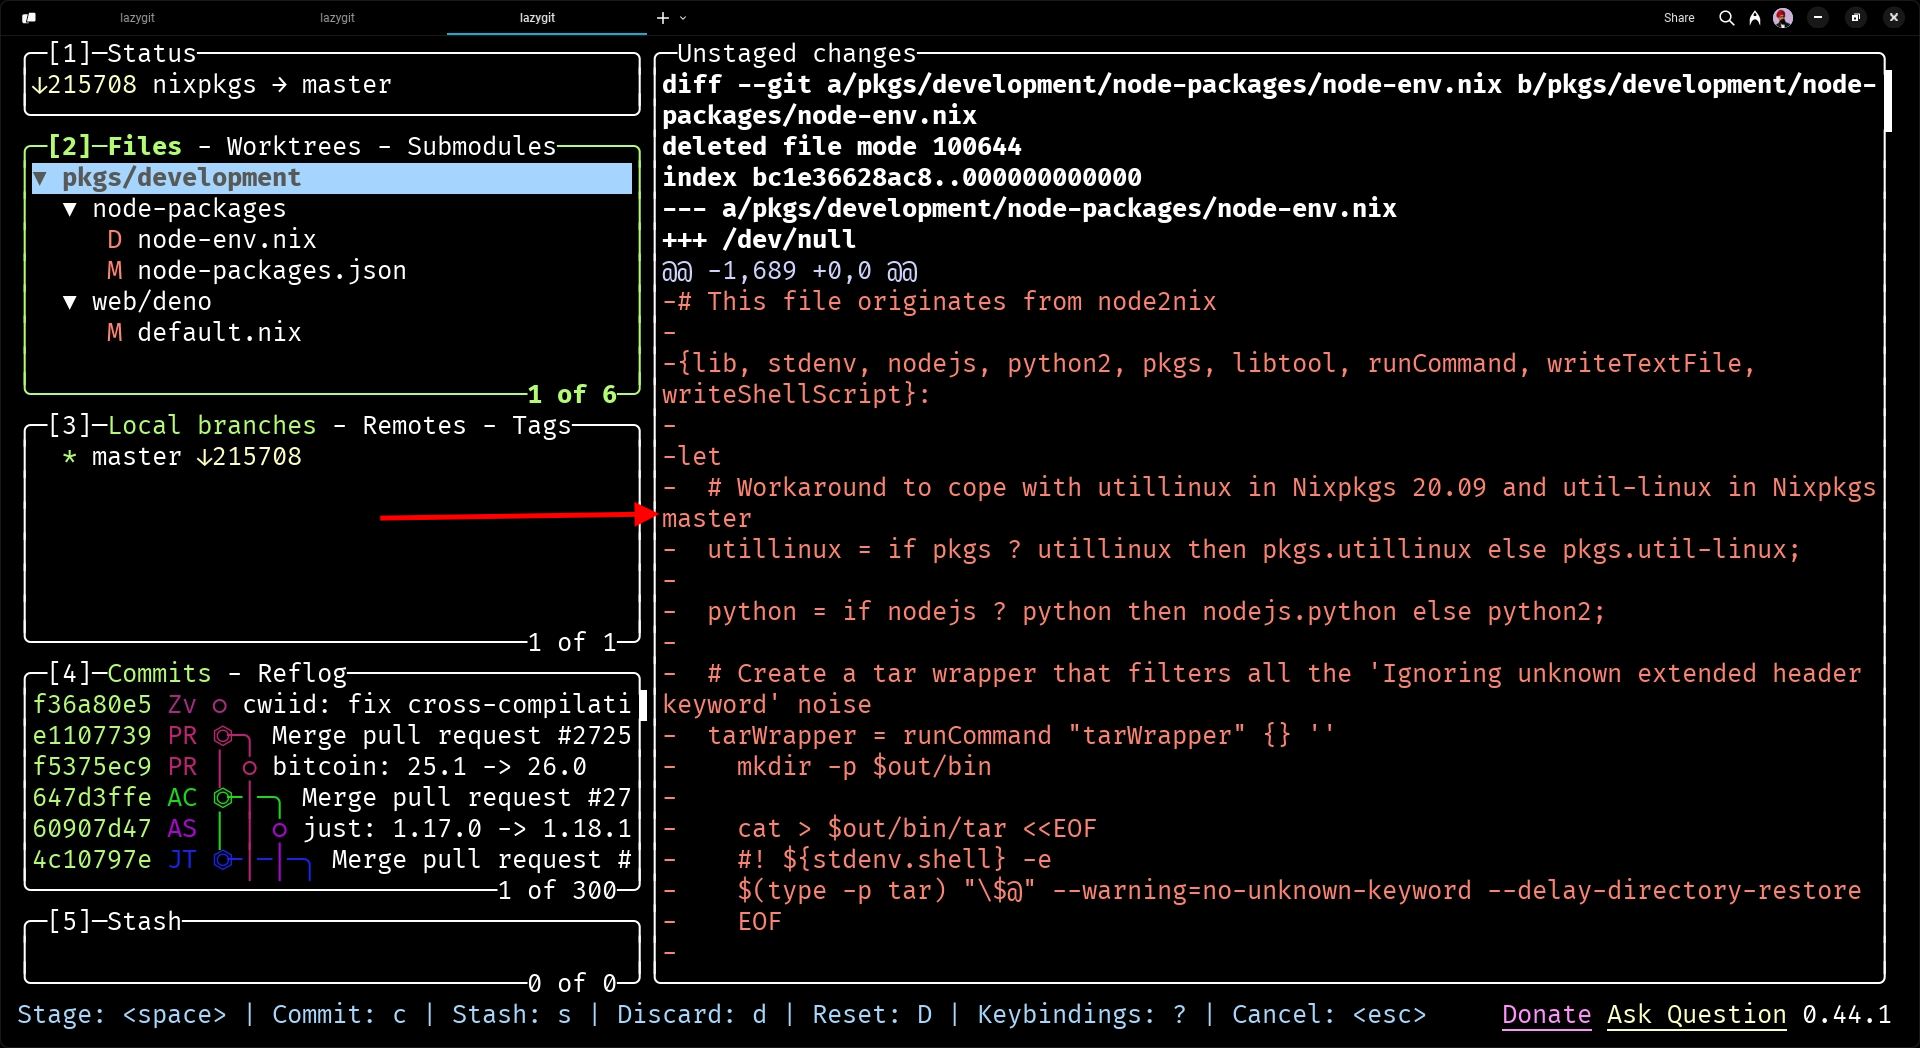
The Lazygit UI is divided into six panels, or sections. Each panel serves a specific use case. Let’s explore these panels in more detail. You can see them highlighted in the image below:
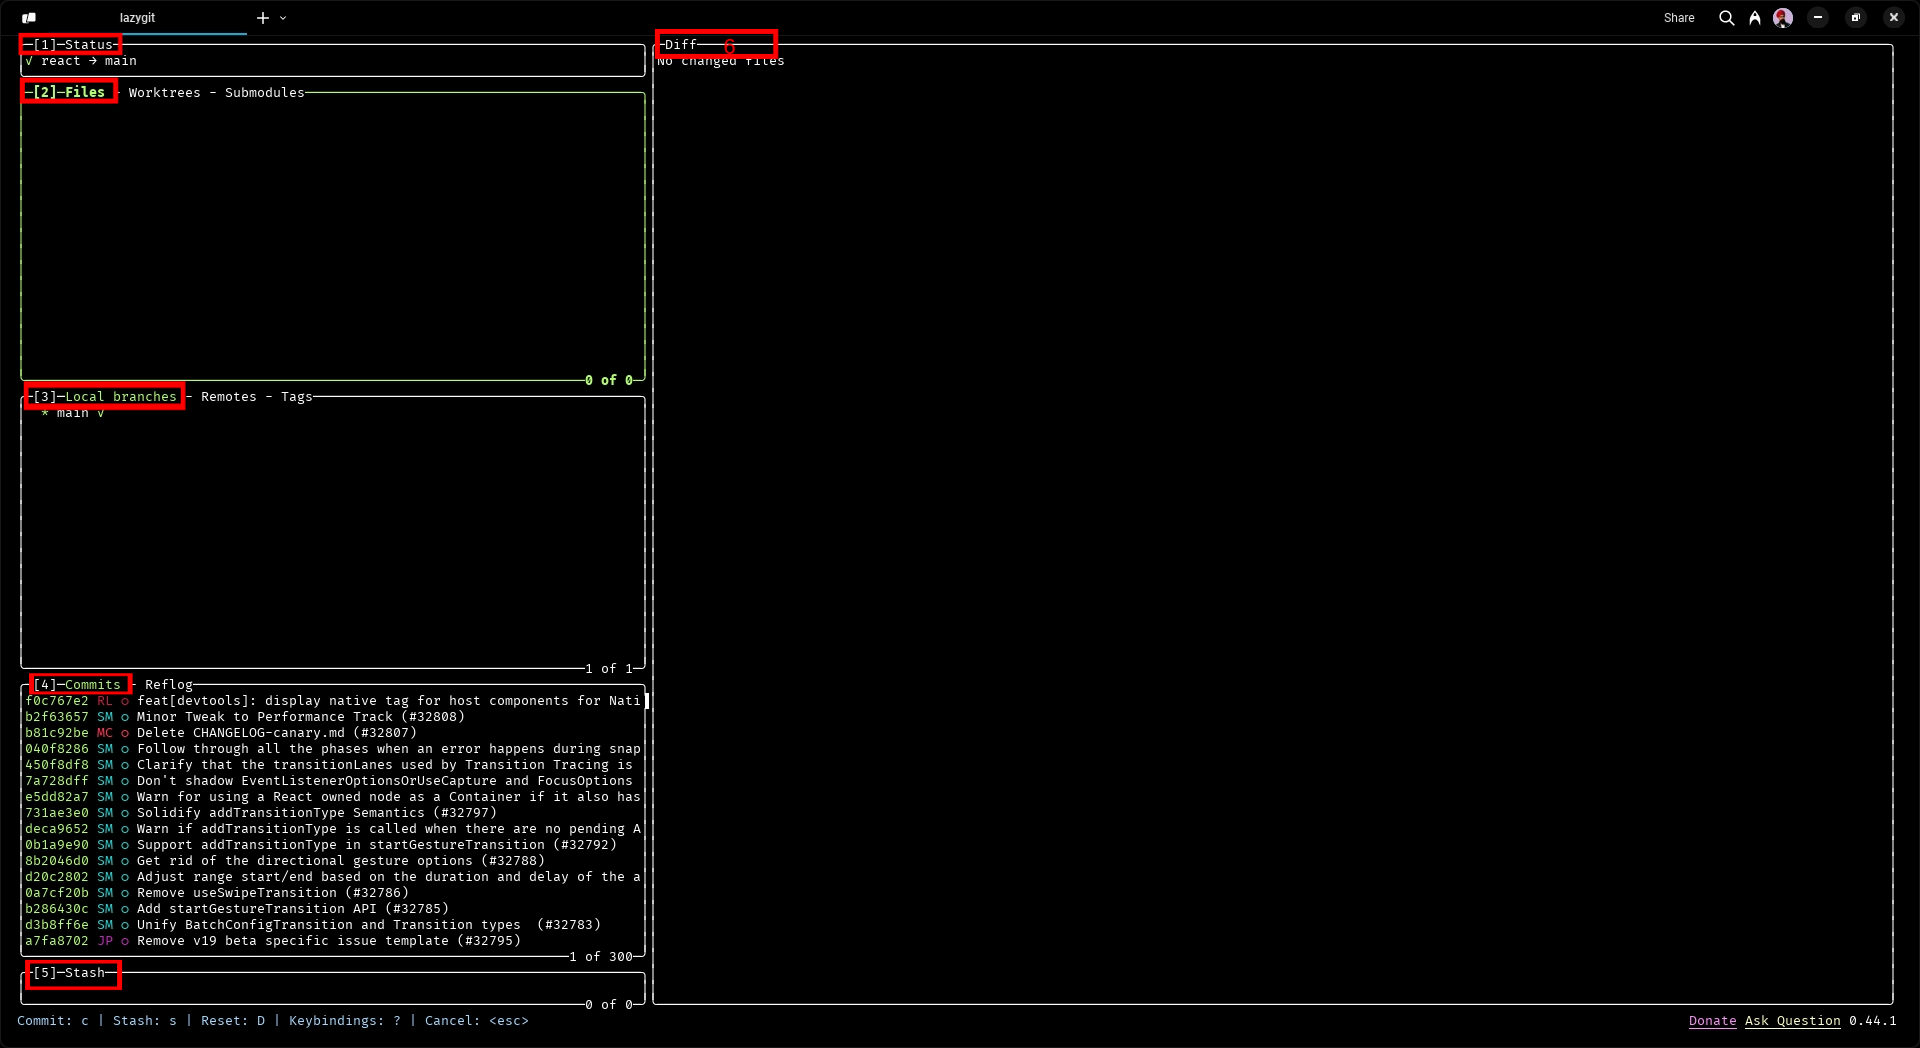
Panels or Sections in Lazygit
As I mentioned above, there are six main panels in Lazygit. They are:
Status
Files
Branches
Commits
Stash
Previews
The most important panels in Lazygit are files, branches, and commits, but we’ll examine each of the six now.
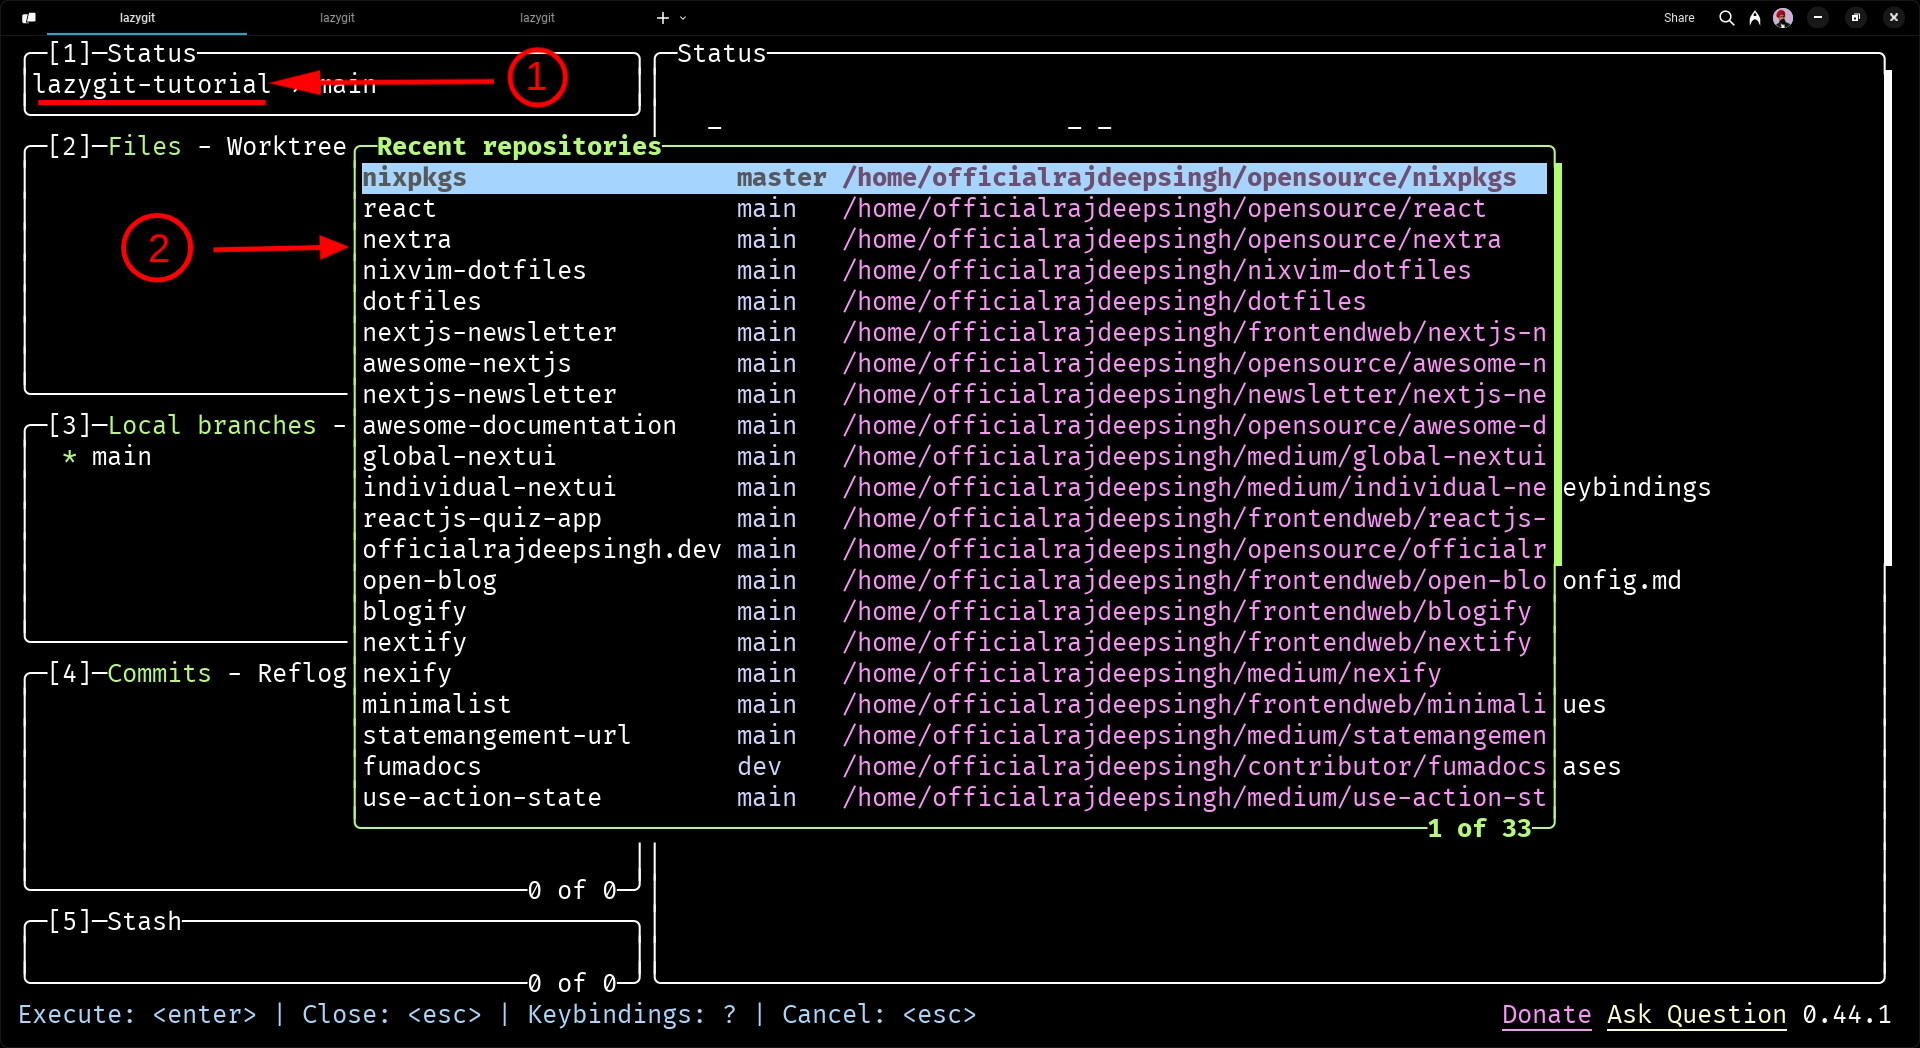
Status panel
The status panel provides an overview of your current repository and the current checked-out branch, including local and remote changes.

Also, when you click on the status panel text, it opens a new tab or panel where it shows the recently opened repository list.
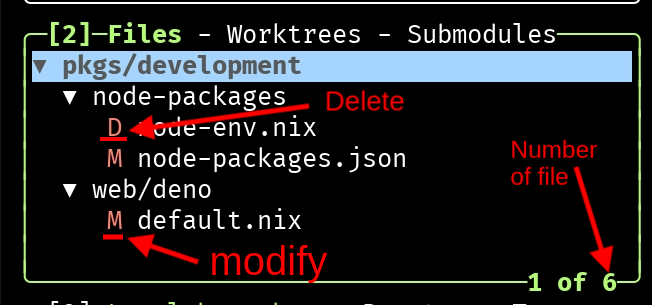
Files panel
The Files panel shows lists of the files in your repository that have been modified or changed. You can see files that you’ve deleted or discarded and unstaged.
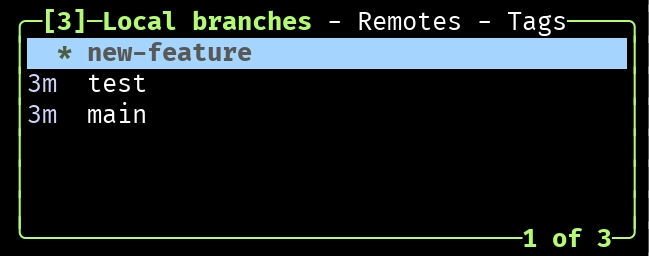
Branches panel
The Branches panel shows lists of local and remote branches which are available in this repository.
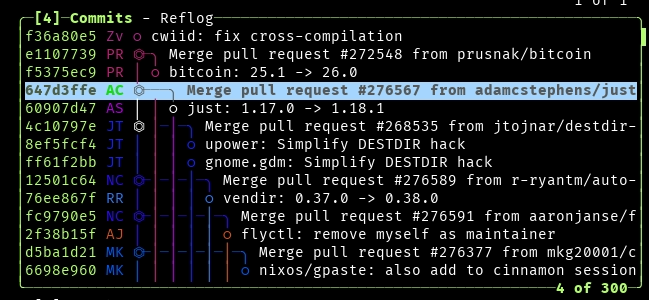
Commits panel
The Commits panel shows a list of commits in the current branch, which allows you to view, checkout, or interact with (view/undo/and so on) specific commits.
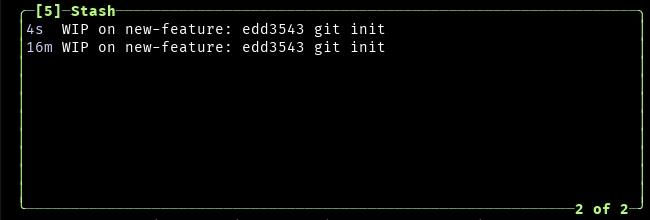
Stashes panel
The Stashes panel helps you manage your stashed changes, allowing you to apply, drop, or view them. Git stash is a location for storing uncommitted changes (modified, staged, or untracked files) in a hidden place, letting you switch branches without committing or discarding them.
Preview panel
The preview panel lets you preview unstaged changes, commits, logs, file content, and so on in Lazygit.
To switch between panels, use the left and right arrow keys or the specific keybindings displayed at the top of each panel.
Press 1 to open the Status panel, 2 for Files, 3 for Branches, 4 for Commits, and 5 for the Stash panel.
Shortcuts and Key Mappings in Lazygit
Lazygit is especially popular because of its shortcuts. You don’t need to write the same Git commands in the terminal over and over. Rather, you just need to use a shortcut.
For example, usually when you commit a file, you’ll first add the file using git add and then commit the file using git commit.
But in Lazygit, you just have to select the file using your mouse or the up and down keys and press space to commit the file.
In Lazygit, everything works around the shortcut commands, and you use shortcuts to perform common Git operations. Here are a few essential commands we’ll go over in this tutorial:
a– Stage or unstage all the files available in the Files panel.space(file panel) – Stage or unstage a single file in the Files panel.c– Commit staged changes by opening a commit message editor.p– Push commits to the remote repository.P– Pull changes from the remote repository.z– Undo the commit.s– Stash changes, allowing you to switch branches or perform other operations.S– View and apply stashed changes.n– Create a new branch.d– Delete your branch.y– Copy to clipboard.M– Merge branch.space(branches panel) – Check out the selected target branch.e– Edit or open the file in an external editor.q– Quit Lazygit and return to the terminal.d– Discard any changes in the file.?– Open the keybinding menu.
Now let’s go over these shortcuts so you can understand how they work and see them in action.
How to Commit a File
To commit a file in Lazygit, first select the file you need by pressing the space key or the a key or double-clicking on the file. Then press c, and a new panel should open. There, you can add a message and hit enter to commit the file.
How to Pull and Push Code
To pull remote code from the Git server (Github, GitLab, Gitea, and so on), you can press p (lower case p):
To push local code into a Git server, you can press P (upper case P):
How to Create and Delete a Branch
To create a new branch in Lazygit, press n. A new panel will open where you’ll add the name of the branch and hit Enter.
To delete a branch, press d and then specify whether you want to delete the branch in a local or remote repository. In the following example, I’m deleting a local branch.
Note: To delete and create a new branch in Lazygit, first select the branch panel and then press the corresponding shortcut key for deleting a branch. Press the d key to delete, and then to create a branch press the n key. Otherwise, it won’t work.
How to Undo a Commit
To undo the last commit in Lazygit, just press z. A new panel will open, showing the details of the commit you are undoing. Then, hit Enter.
How to Merge a Branch
To merge a branch, press M (capital M). To open the merge options, choose the merge type, then hit Enter.
Merge type:
Merge: A standard merge, preserving the branch history.
Squash merge: Combines all commits from the branch into a single commit on the target branch.
Squash merge and leave uncommitted: Same as squash merge, but leaves the changes uncommitted.
How to Resolve Merge Conflicts
To resolve merge conflicts in Lazygit, first merge a branch by pressing M, then choose the merge type (which I describe in the subsection on how to merge a branch) and hit Enter.
If any merge conflicts occur, the conflicting file(s) appear in the files panel. Press Enter to view the merge conflicts in the preview panel and navigate between conflicts using the up and down keys. Select the correct merge conflicts, press the space key, and your merge issue will be resolved.
How to Discard Changes
To discard or drop any changes in a file or commit, press d.
How to Copy
To copy a file name, path, commit hash, message, URL, author, or any other details, first select the commit or file, then press y to copy the information.
Other Keybindings in Lazygit
There are other keybindings in Lazygit which I did not discuss in this article. To learn about every keybinding, you can check out the keybindings menu. Open the keybindings menu and press the ?.
When you open the keybindings help menu, it changes according to the panel you’re in.
Conclusion
Lazygit helps you become more productive when working with Git or Git commands. As a beginner, starting with Lazygit can be somewhat challenging because of its key mappings, but once you get the hang of them, they’re pretty easy to remember and use.
If you are a first-time Lazygit user, my suggestion is to avoid using Lazygit on a working repository. Instead, create a demo repository and try it out/practice.
To learn more about LazyGit keybindings or shortcuts, you can refer to the Lazygit documentation. You can also check out the following YouTube tutorials for beginners:


![Learn fewer skills but go deeper - the Caleb Curry interview [Podcast #163]](https://cdn.hashnode.com/res/hashnode/image/upload/v1741377315559/585b915d-2390-45a7-9f4a-171dc134af5d.png?#)