


![[The AI Show Episode 143]: ChatGPT Revenue Surge, New AGI Timelines, Amazon’s AI Agent, Claude for Education, Model Context Protocol & LLMs Pass the Turing Test](https://www.marketingaiinstitute.com/hubfs/ep%20143%20cover.png)


![From Accountant to Data Engineer with Alyson La [Podcast #168]](https://cdn.hashnode.com/res/hashnode/image/upload/v1744420903260/fae4b593-d653-41eb-b70b-031591aa2f35.png?#)


.png?#)


![iPadOS 19 Will Be More Like macOS [Gurman]](https://www.iclarified.com/images/news/97001/97001/97001-640.jpg)
![Apple TV+ Summer Preview 2025 [Video]](https://www.iclarified.com/images/news/96999/96999/96999-640.jpg)
![Apple Watch SE 2 On Sale for Just $169.97 [Deal]](https://www.iclarified.com/images/news/96996/96996/96996-640.jpg)


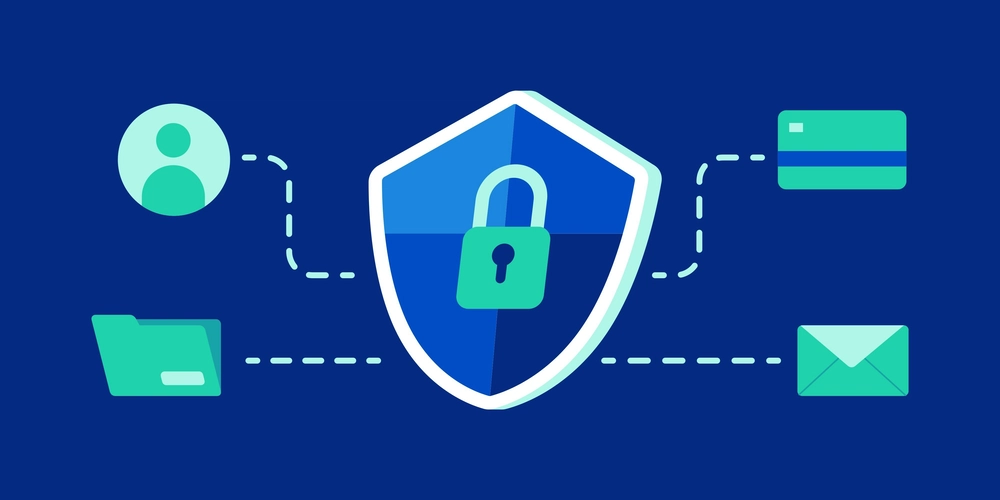
Securing Vibe Coded Applications using Cloudflare Access
Background I wanted to share some large video files with my friends on Discord, but due to the file size limit I could not. I could have easily uploaded them to YouTube (and make them unlisted) or my Google Drive (which would have eaten up my space), but where's the fun in that. Instead, I thought, why not upload them to my R2 bucket and then share that URL instead. This being a fun little project, I thought why not also give "vibe coding" a try. The project is open source on my GitHub as well. But now the issue was, the domain from which I was uploading the files was unauthenticated. Anyone could just visit the domain and begin uploading files to my R2 bucket which I did not want. Furthermore, having auth for such a simple side project seemed overkill to me. Cloudflare Access to the rescue Cloudflare Access allows you to configure who can reach your application based on the policies you set. Automatic identification via GitHub OAuth worked the best for me since I'm always logged into GitHub from pretty much everywhere. Below steps will show you how to configure one for yourself. Confguration Creating a login method Go to Cloudflare One, click on Settings and then Authentication. Under Login methods click on Add new and then click on GitHub on the next screen. Follow the on screen instructions and put in the App ID and Client Secret. Creating a policy Now that a login method has been created, we need to configure it a bit. Under Access, click on Policies and then Add an application. Enter Policy name, Action as Allow and Session duration to whatever you want. I personally like to set it to 24 hours. Under Selector select Login methods and under Value choose the GitHub login method you created earlier. Click on + Add include, choose Emails under Selector and add the emails which you want to allow under the Value field. Click on Save. Securing the application Under Access, click on Applications and then Add an application. Select Self-hosted. Add an Application name. If your website is on a subdomain, enter it, else leave it blank and choose the Domain already added in your Cloudflare account. Click on Select existing policies and choose the GitHub policy which you created earlier. Under Login methods disable Accept all available identity providers, select only the GitHub provider (in case you have multiple configured) and enable Instant Auth which would automatically trigger the GitHub OAuth flow. Click on Next, Next and Save. Now if anyone visits your application, they would be allowed only if their GitHub email maches the one which you have specified. You have now successfully secured your "vibe coded" application. If you have a separate API, ensure you have something similar in place for that as well. I only needed to secure my single app since it was a fullstack application. Enjoy
Background
I wanted to share some large video files with my friends on Discord, but due to the file size limit I could not. I could have easily uploaded them to YouTube (and make them unlisted) or my Google Drive (which would have eaten up my space), but where's the fun in that. Instead, I thought, why not upload them to my R2 bucket and then share that URL instead.
This being a fun little project, I thought why not also give "vibe coding" a try. The project is open source on my GitHub as well.
But now the issue was, the domain from which I was uploading the files was unauthenticated. Anyone could just visit the domain and begin uploading files to my R2 bucket which I did not want. Furthermore, having auth for such a simple side project seemed overkill to me.
Cloudflare Access to the rescue
Cloudflare Access allows you to configure who can reach your application based on the policies you set. Automatic identification via GitHub OAuth worked the best for me since I'm always logged into GitHub from pretty much everywhere. Below steps will show you how to configure one for yourself.
Confguration
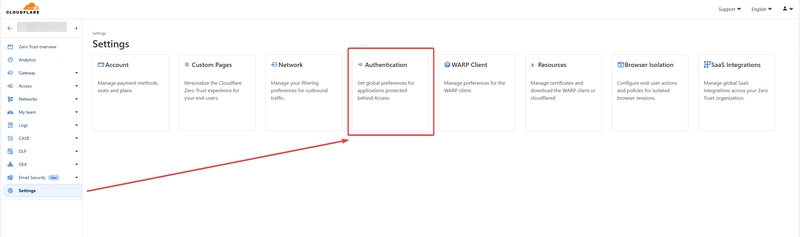
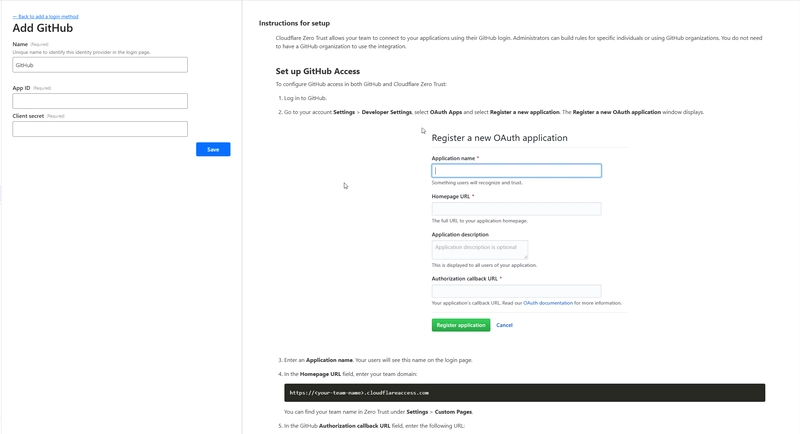
Creating a login method
- Go to Cloudflare One, click on Settings and then Authentication.
- Under Login methods click on Add new and then click on GitHub on the next screen.
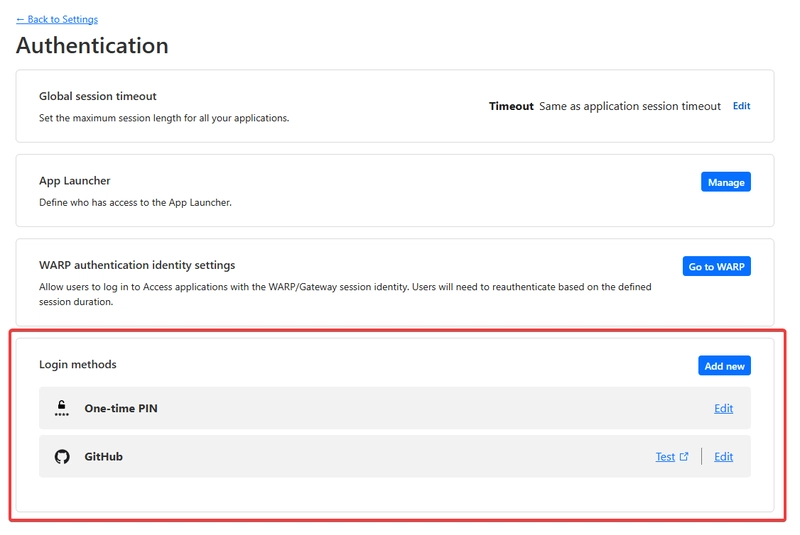
- Follow the on screen instructions and put in the App ID and Client Secret.
Creating a policy
Now that a login method has been created, we need to configure it a bit.
- Under Access, click on Policies and then Add an application.
- Enter Policy name, Action as Allow and Session duration to whatever you want. I personally like to set it to 24 hours.
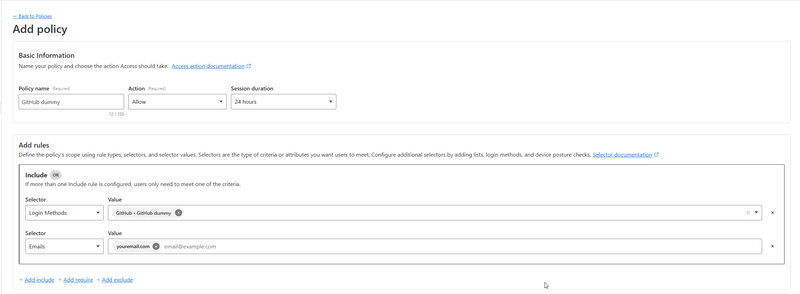
- Under Selector select Login methods and under Value choose the GitHub login method you created earlier.
- Click on + Add include, choose Emails under Selector and add the emails which you want to allow under the Value field.
- Click on Save.
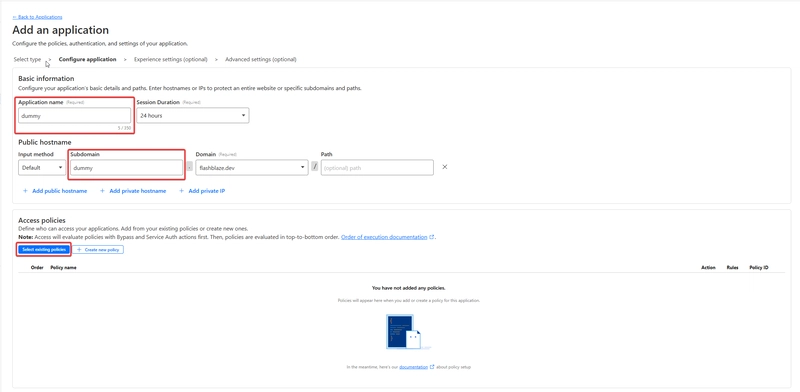
Securing the application
- Under Access, click on Applications and then Add an application.
- Select Self-hosted.
- Add an Application name. If your website is on a subdomain, enter it, else leave it blank and choose the Domain already added in your Cloudflare account.
- Click on Select existing policies and choose the GitHub policy which you created earlier.
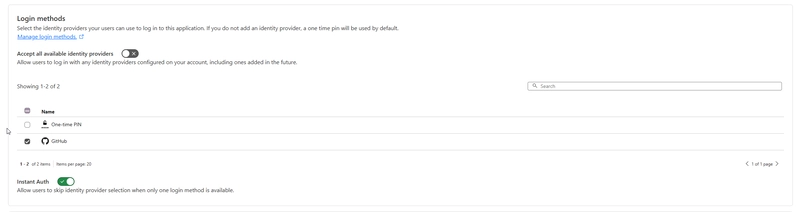
- Under Login methods disable Accept all available identity providers, select only the GitHub provider (in case you have multiple configured) and enable Instant Auth which would automatically trigger the GitHub OAuth flow.
- Click on Next, Next and Save.
Now if anyone visits your application, they would be allowed only if their GitHub email maches the one which you have specified. You have now successfully secured your "vibe coded" application.
If you have a separate API, ensure you have something similar in place for that as well. I only needed to secure my single app since it was a fullstack application.
Enjoy