


![Top Features of Vision-Based Workplace Safety Tools [2025]](https://static.wixstatic.com/media/379e66_7e75a4bcefe14e4fbc100abdff83bed3~mv2.jpg/v1/fit/w_1000,h_884,al_c,q_80/file.png?#)


![How to Use AI as a Productivity Tool with Mike Kaput [MAICON 2025 Speaker Series]](https://www.marketingaiinstitute.com/hubfs/v2MAICON-Speaker_Series.png)
![[The AI Show Episode 152]: ChatGPT Connectors, AI-Human Relationships, New AI Job Data, OpenAI Court-Ordered to Keep ChatGPT Logs & WPP’s Large Marketing Model](https://www.marketingaiinstitute.com/hubfs/ep%20152%20cover.png)


-0-6-screenshot.png?width=1920&height=1920&fit=bounds&quality=70&format=jpg&auto=webp#)


![Someone is selling a bunch of those rare Essential ‘Gem’ phones for $1,200 [Gallery]](https://i0.wp.com/9to5google.com/wp-content/uploads/sites/4/2019/10/next-essential-phone.jpg?resize=1200%2C628&quality=82&strip=all&ssl=1)


![Apple Shares Teaser Trailer for 'The Lost Bus' Starring Matthew McConaughey [Video]](https://www.iclarified.com/images/news/97582/97582/97582-640.jpg)


Network Infrastructure and Demon-Slaying: Virtualization Expands What a Desktop Can Do
The original DOOM is famously portable — any computer made within at least the last two decades, including those in printers, heart monitors, passenger vehicles, and routers is almost guaranteed …read more


The original DOOM is famously portable — any computer made within at least the last two decades, including those in printers, heart monitors, passenger vehicles, and routers is almost guaranteed to have a port of the iconic 1993 shooter. The more modern iterations in the series are a little trickier to port, though. Multi-core processors, discrete graphics cards, and gigabytes of memory are generally needed, and it’ll be a long time before something like an off-the-shelf router has all of these components.
 But with a specialized distribution of Debian Linux called Proxmox and a healthy amount of configuration it’s possible to flip this idea on its head: getting a desktop computer capable of playing modern video games to take over the network infrastructure for a LAN instead, all with minimal impact to the overall desktop experience. In effect, it’s possible to have a router that can not only play DOOM but play 2020’s DOOM Eternal, likely with hardware most of us already have on hand.
The key that makes a setup like this work is virtualization. Although modern software makes it seem otherwise, not every piece of software needs an eight-core processor and 32 GB of memory. With that in mind, virtualization software splits modern multi-core processors into groups which can act as if they are independent computers. These virtual computers or virtual machines (VMs) can directly utilize not only groups or single processor cores independently, but reserved portions of memory as well as other hardware like peripherals and disk drives.
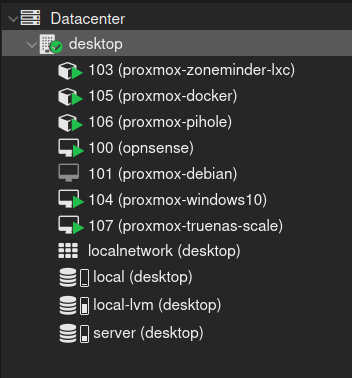
Proxmox itself is a version of Debian with a number of tools available that streamline this process, and it installs on PCs in essentially the same way as any other Linux distribution would. Once installed, tools like LXC for containerization, KVM for full-fledged virtual machines, and an intuitive web interface are easily accessed by the user to allow containers and VMs to be quickly set up, deployed, backed up, removed, and even sent to other Proxmox installations.
Desktop to Server
The hardware I’m using for Proxmox is one of two desktop computers that I put together shortly after writing this article. Originally this one was set up as a gaming rig and general-purpose desktop computer running Debian, but with its hardware slowly aging and my router not getting a software update for the last half decade I thought I would just relegate the over-powered ninth-generation Intel Core i7 with 32 GB of RAM to run the OPNsense router operating system on bare metal, while building a more modern desktop to replace it. This was both expensive not only in actual cost but in computer resources as well, so I began investigating ways that I could more efficiently use this aging desktop’s resources. This is where Proxmox comes in.
By installing Proxmox and then allocating four of my eight cores to an OPNsense virtual machine, in theory the desktop could function as a router while having resources leftover for other uses, like demon-slaying. Luckily my motherboard already has two network interfaces, so the connection to a modem and the second out to a LAN could both be accommodated without needing to purchase and install more hardware. But this is where Proxmox’s virtualization tools start to shine. Not only can processor cores and chunks of memory be passed through to VMs directly, but other hardware can be sectioned off and passed through as well.
So I assigned one network card to pass straight through to OPNsense, which connects to my modem and receives an IP address from my ISP like a normal router would. The other network interface stays with the Proxmox host, where it is assigned to an internal network bridge where other VMs get network access. With this setup, all VMs and containers I create on the Proxmox machine can access the LAN through the bridge, and since the second networking card is assigned to this bridge as well, any other physical machines (including my WiFi access point) can access this LAN too.
Not All VMs are Equal
Another excellent virtualization feature that Proxmox makes easily accessible is the idea of “CPU units”. In my setup, having four cores available for a router might seem like overkill, and indeed it is until my network gets fully upgraded to 10 Gigabit Ethernet. Until then, it might seem like these cores are wasted.
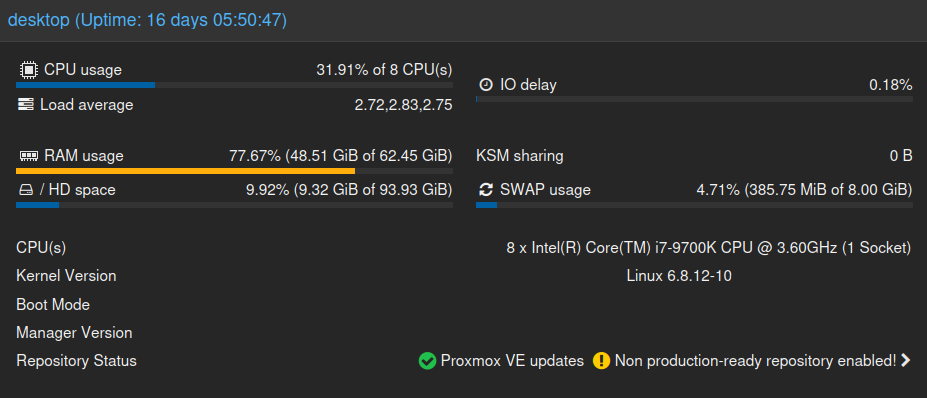
However, using CPU units the Proxmox host can assign unused or underutilized cores to other machines on the fly. This also lets a user “over-assign” cores, while the CPU units value acts as a sort of priority list. My ninth-generation Intel Core i7 has eight cores, so in this simple setup I can assign four cores to OPNsense with a very high value for CPU units and then assign six cores to a Debian 12 VM with a lower CPU unit value. This scheduling trick makes it seem as though my eight-core machine is actually a ten-core machine, where the Debian 12 VM can use all six cores unless the OPNsense VM needs them. However, this won’t get around the physical eight-core reality where doing something like playing a resource-intense video game while there’s a large network load, and this reassignment of cores back to the router’s VM could certainly impact performance in-game.
Of course, if I’m going to install DOOM Eternal on my Debian 12 VM, it’s going to need a graphics card and some peripherals as well. Passing through USB devices like a mouse and keyboard is straightforward. Passing through a graphics card isn’t much different, with some caveats.
The motherboard, chipset, and processor must support IOMMU to start. From there, hardware that’s passed through to a VM won’t be available to anything else including the host, so with the graphics card assigned to a VM, the display for the host won’t be available anymore. This can be a problem if something goes wrong with the Proxmox machine and the network at the same time (not out of the question since the router is running in Proxmox too), rendering both the display and the web UI unavailable simultaneously.
To mitigate this, I went into the UEFI settings for the motherboard and set the default display to the integrated Intel graphics card on the i7. When Proxmox boots it’ll grab the integrated graphics card, saving the powerful Radeon card for whichever VM needs it.
At this point I’ve solved my initial set of problems, and effectively have a router that can also play many modern PC games. Most importantly, I haven’t actually spent any money at this point either. But with the ability to over-assign processor cores as well as arbitrarily passing through bits of the computer to various VMs, there’s plenty more that I found for this machine to do besides these two tasks.
Containerized Applications
The ninth-gen Intel isn’t the only machine I have from this era. I also have an eighth-generation machine (with the IME disabled) that had been performing some server duties for me, including network-attached storage (NAS) and media streaming, as well as monitoring an IP security camera system. With my more powerful desktop ready for more VMs I slowly started migrating these services over to Proxmox, freeing the eighth-gen machine for bare-metal tasks largely related to gaming and media. The first thing to migrate was my NAS. Rather than have Debian manage a RAID array and share it over the network on its own, I used Proxmox to spin up a TrueNAS Scale VM. TrueNAS has the benefit of using ZFS as a filesystem, a much more robust setup than the standard ext4 filesystem I use in most of my other Linux installations. I installed two drives in the Proxmox machine, passed them through to this new VM, and then set up my new NAS with a mirrored configuration, making this NAS even more robust than it previously was under Debian.
The next thing to move over were some of my containerized applications. Proxmox doesn’t only support VMs, it has the ability to spin up LXC containers as well. Containers are similar to VMs in that the software they run is isolated from the rest of the machine, but instead of running their own operating system they share the host’s kernel, taking up much less system resources. Proxmox still allows containers to be assigned processor cores and uses the CPU unit priority system as well, so for high-availability containers like Pihole I can assign the same number of CPU units as my OPNsense VM, but for my LXC container running Jelu (book tracking), Navidrome (streaming music), and Vikunja (task lists), I can assign a lower CPU unit value as well as only one or two cores.
The final containerized application I use is Zoneminder, which keeps an eye on a few security cameras at my house. It needs a bit more system resources than any of these other two, and it also gets its own hard drive assigned for storing recordings. Unlike TrueNAS, though, the hard drive isn’t passed through but rather the container mounts a partition that the Proxmox host retains ultimate control over. This allows other containers to see and use it as well.
At this point my Proxmox setup has gotten quite complex for a layperson such as myself, with a hardware or system failure meaning that not only would I lose my desktop computer but also essentially all of my home’s network infrastructure and potentially all of my data as well. But Proxmox also makes keeping backups easy, a system that has saved me many times.
For example, OPNsense once inexplicably failed to boot, and another time a kernel update in TrueNAS Scale caused it to kernel panic on boot. In both cases I was able to simply revert to a prior backup. I have backups scheduled for all of my VMs and containers once a week, and this has saved me many headaches. Of course, it’s handy to have a second computer or external drive for backups, as you wouldn’t want to store them on your virtualized NAS which might end up being the very thing you need to restore.
I do have one final VM to mention too, which is a Windows 10 installation. I essentially spun this up because I was having an impossibly difficult time getting my original version of Starcraft running in Debian and thought that it might be easier on a Windows machine. Proxmox makes it extremely easy to assign a few processor cores and some memory and test something like this out, and it turned to work out incredibly well.
So well, in fact, that I also installed BOINC in the Windows VM and now generally leave this running all the time to take advantage of any underutilized cores on this machine for the greater good when they’re not otherwise in use. BOINC is also notoriously difficult to get running in Debian, especially for those using non-Nvidia GPUs, so at least while Windows 10 is still supported I’ll probably keep this setup going for the long term.
Room for Improvement
There are a few downsides to a Proxmox installation, though. As I mentioned previously, it’s probably not the best practice to keep backups on the same hardware, so if it’s your only physical computer then that’ll take some extra thought. I’ve also had considerable difficulty passing an optical drive through to VMs, which is not nearly as straightforward as passing through other hardware types for reasons which escape me. Additionally, some software doesn’t take well to running on virtualized hardware at all. In the past I have experimented with XMR mining software as a way to benchmark hardware capabilities, and although I never let it run nearly long enough to ever actually mine anything it absolutely will not run at all in a virtualized environment. There are certainly other pieces of software that are similar.
I also had a problem that took a while to solve regarding memory use. Memory can be over-assigned like processor cores, but an important note is that if Proxmox is using ZFS for its storage, as mine does, the host OS will use up an incredibly large amount of memory. In my case, file transfers to or from my TrueNAS VM were causing out-of-memory issues on some of my other VMs, leading to their abrupt termination. I still don’t fully understand this problem and as such it took a bit of time to solve, but I eventually both limited the memory the host was able to use for ZFS as well as doubled the physical memory to 64 GB. This had the downstream effect of improving the performance of my other VMs and containers as well, so it was a win-win at a very minimal cost.
The major downside for most, though, will be gaming. While it’s fully possible to run a respectable gaming rig with a setup similar to mine and play essentially any modern game available, this is only going to work out if none of those games use kernel-level anticheat. Valorant, Fortnite, and Call of Duty are all examples that are likely to either not run at all on a virtualized computer or to get an account flagged for cheating.
There are a number of problems with kernel-level anti-cheat including arguments that they are types of rootkits, that they are attempts to stifle Linux gaming, and that they’re lazy solutions to problems that could easily be solved in other ways, but the fact remains that these games will have to be played on bare metal. Personally I’d just as soon not play them at all for any and all of these reasons, even on non-virtualized machines.
Beat On, Against the Current
The only other thing worth noting is that while Proxmox is free and open-source, there are paid enterprise subscription options available, and it is a bit annoying about reminding the user that this option is available. But that’s minor in the grand scheme of things. For me, the benefits far outweigh these downsides. In fact, I’ve found that using Proxmox has reinvigorated my PC hobby in a new way.
While restoring old Apple laptops is one thing, Proxmox has given me a much deeper understanding of computing hardware in general, as well as made it easy to experiment and fiddle with different pieces of software without worrying that I’ll break my entire system. In a very real way it feels like if I want a new computer, it lets me simply create a virtual one that I am free to experiment with and then throw away if I wish. It also makes fixing mistakes easy. Additionally, most things running on my Proxmox install are more stable, more secure, and make more efficient use of system resources.
It’s saved me a ton of money since I nether had to buy individual machines like routers or a NAS and its drives too, nor have I had to build a brand new gaming computer. In fact, the only money I spent on this was an arguably optional 32 GB memory upgrade, which is pennies compared to having to build a brand new desktop. With all that in mind, I’d recommend experimenting with Proxmox for anyone with a computer or similarly flagging interest in their PC in general, especially if they still occasionally want to rip and tear.