


![[The AI Show Episode 146]: Rise of “AI-First” Companies, AI Job Disruption, GPT-4o Update Gets Rolled Back, How Big Consulting Firms Use AI, and Meta AI App](https://www.marketingaiinstitute.com/hubfs/ep%20146%20cover.png)


![Ditching a Microsoft Job to Enter Startup Purgatory with Lonewolf Engineer Sam Crombie [Podcast #171]](https://cdn.hashnode.com/res/hashnode/image/upload/v1746753508177/0cd57f66-fdb0-4972-b285-1443a7db39fc.png?#)


.jpg?width=1920&height=1920&fit=bounds&quality=70&format=jpg&auto=webp#)


-xl.jpg)


![New iPad 11 (A16) On Sale for Just $277.78! [Lowest Price Ever]](https://www.iclarified.com/images/news/97273/97273/97273-640.jpg)

![Apple Foldable iPhone to Feature New Display Tech, 19% Thinner Panel [Rumor]](https://www.iclarified.com/images/news/97271/97271/97271-640.jpg)


Mastering Azure Load Balancers: Your Step-by-Step Journey to Efficient Traffic Management
Introduction Welcome to this comprehensive guide on understanding and implementing load balancers within the Azure ecosystem. This tutorial will walk you through the fundamentals and practical steps of setting up your first load balancer in Microsoft Azure. What is a Load Balancer? Imagine a highly skilled air traffic controller for your data. A load balancer acts as this crucial orchestrator, intelligently distributing incoming network requests across a cluster of servers. Its primary role is to prevent any single server from becoming overwhelmed, ensuring smooth, uninterrupted service delivery. It's like having a smart dispatcher for your application's traffic, routing each request to the most available and capable server. Why are Load Balancers Indispensable? Load balancers are vital for modern applications due to several key advantages: Optimized Performance: By evenly distributing workloads, they eliminate bottlenecks and ensure faster response times, leading to a superior user experience. Guaranteed High Availability: Should a server fail or go offline, the load balancer automatically reroutes traffic to the remaining healthy servers, ensuring your applications stay online and accessible. Enhanced Security Posture: They serve as an initial line of defense, capable of mitigating certain cyber threats, such as Distributed Denial-of-Service (DDoS) attacks, by effectively spreading malicious traffic. Exploring Azure's Load Balancing Solutions Azure offers a versatile suite of load balancing services, each tailored for specific use cases: Azure Load Balancer (Layer 4 – Transport Layer): Ideal for distributing traffic within a single Azure Virtual Network, operating at the TCP/UDP level. Azure Application Gateway (Layer 7 – Application Layer): This service goes beyond basic load balancing, offering advanced features like SSL offloading, web application firewall (WAF) capabilities, and content-based routing (e.g., directing traffic based on URL paths). Azure Traffic Manager: A DNS-based traffic distribution service that routes user requests to different geographical endpoints, perfect for global deployments and disaster recovery strategies. Azure Front Door: Specifically designed for global web applications, Azure Front Door routes traffic based on optimal performance, robust security features, and low-latency paths, providing a unified global entry point. Step-by-Step Guide of Creating a Load Balancer In Azure Step 1: Login to an Azure Portal. Open your web browser and go to Azure Portal Sign in using your Microsoft Azure Account. Step 2: Create a New Load Balancer In the search bar at the top, type "Load Balancer" and select "Load Balancers" Click "+Create" to start setting up your load balancer. "Take note of the type on the left panel marked" Step3: Configure the Basic Settings ** **Subscription: Select your Azure active Subscription. Resource Group: Choose an Existing Resource Group or Create a New One Region: Pick the Azure Region where you want to deploy the load balancer. Name: Give your load balancer a name(e.g. load-Balancer-1) SKU: Choose Standard, Gateway, or Basic(Standard is recommended for production use since it distributes traffic to backend resources). Type: Select either Public(for internet-facing applications) or Internal (for internal network applications). For the purpose of this tutorial, we choose public. Tier: Select either Regional or Global Click Next: Frontend IP Configuration. Step 4: Configure the Frontend IP Click +Add a Frontend IP configuration Give your Frontend IP a name Create a new Public IP if you are using a public load balancer or select Private IP for internal use. Name: Give the public address a name Availability Zone: Choose Zone Redundant or No Zone Click save Click Next: Backend Pools Step 5: Configure the Backend Pool Click +Add a backend pool Give your Backend Pool a name(e.g. Backend-Pool-1) On the Virtual Network: Select Virtual Machines as the backend Add the Virtual Machines that will receive the traffic Click Save Click Next: Inbound rules Step 7: Configure Load Balancing Rules Click *+Add a load balancing rules * Give the rule a name(e.g. LB-rule-1) Set the frontend IP configuration. Choose the backend pool created earlier Protocol: Select the (TCP, or UDP). Port: Set as 80 for web traffic) Health Probe: Click create new Give it a name (e.g, Health-Probe) Select the protocol (TCP, HTTP, or HTTPS) Set a port (e.g, 80 for HTTP Traffic). Configure probe intervals (recommended: 5 secs) Then click Save Click on Review + Create. Click Create to Deploy your load Balancer Deployment is Complete

Introduction
Welcome to this comprehensive guide on understanding and implementing load balancers within the Azure ecosystem. This tutorial will walk you through the fundamentals and practical steps of setting up your first load balancer in Microsoft Azure.
What is a Load Balancer?
Imagine a highly skilled air traffic controller for your data. A load balancer acts as this crucial orchestrator, intelligently distributing incoming network requests across a cluster of servers. Its primary role is to prevent any single server from becoming overwhelmed, ensuring smooth, uninterrupted service delivery. It's like having a smart dispatcher for your application's traffic, routing each request to the most available and capable server.
Why are Load Balancers Indispensable?
Load balancers are vital for modern applications due to several key advantages:
Optimized Performance: By evenly distributing workloads, they eliminate bottlenecks and ensure faster response times, leading to a superior user experience.
Guaranteed High Availability: Should a server fail or go offline, the load balancer automatically reroutes traffic to the remaining healthy servers, ensuring your applications stay online and accessible.
Enhanced Security Posture: They serve as an initial line of defense, capable of mitigating certain cyber threats, such as Distributed Denial-of-Service (DDoS) attacks, by effectively spreading malicious traffic.
Exploring Azure's Load Balancing Solutions
Azure offers a versatile suite of load balancing services, each tailored for specific use cases:
- Azure Load Balancer (Layer 4 – Transport Layer): Ideal for distributing traffic within a single Azure Virtual Network, operating at the TCP/UDP level.
- Azure Application Gateway (Layer 7 – Application Layer): This service goes beyond basic load balancing, offering advanced features like SSL offloading, web application firewall (WAF) capabilities, and content-based routing (e.g., directing traffic based on URL paths).
- Azure Traffic Manager: A DNS-based traffic distribution service that routes user requests to different geographical endpoints, perfect for global deployments and disaster recovery strategies.
- Azure Front Door: Specifically designed for global web applications, Azure Front Door routes traffic based on optimal performance, robust security features, and low-latency paths, providing a unified global entry point.
Step-by-Step Guide of Creating a Load Balancer In Azure
Step 1: Login to an Azure Portal.
Open your web browser and go to Azure Portal
Sign in using your Microsoft Azure Account.
Step 2: Create a New Load Balancer
In the search bar at the top, type "Load Balancer" and select "Load Balancers"

Click "+Create" to start setting up your load balancer.

"Take note of the type on the left panel marked"
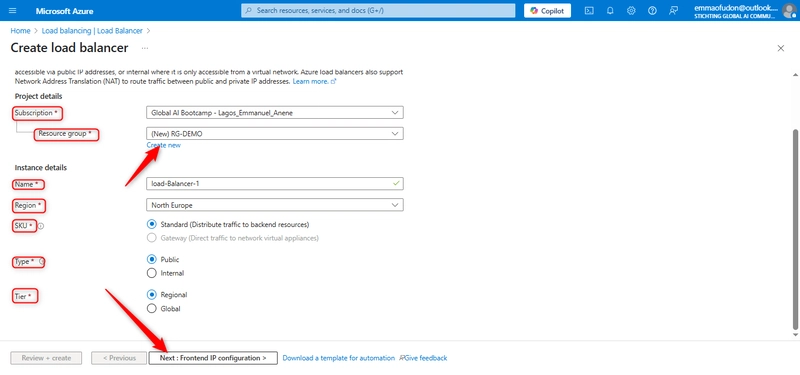
Step3: Configure the Basic Settings
**
**Subscription: Select your Azure active Subscription.
Resource Group: Choose an Existing Resource Group or Create a New One
Region: Pick the Azure Region where you want to deploy the load balancer.
Name: Give your load balancer a name(e.g. load-Balancer-1)
SKU: Choose Standard, Gateway, or Basic(Standard is recommended for production use since it distributes traffic to backend resources).
Type: Select either Public(for internet-facing applications) or Internal (for internal network applications). For the purpose of this tutorial, we choose public.
Tier: Select either Regional or Global
Click Next: Frontend IP Configuration.
Step 4: Configure the Frontend IP
Click +Add a Frontend IP configuration

Give your Frontend IP a name

Create a new Public IP if you are using a public load balancer or select Private IP for internal use.

Name: Give the public address a name
Availability Zone: Choose Zone Redundant or No Zone
Click save
Click Next: Backend Pools

Step 5: Configure the Backend Pool
Click +Add a backend pool

Give your Backend Pool a name(e.g. Backend-Pool-1)
On the Virtual Network: Select Virtual Machines as the backend
Add the Virtual Machines that will receive the traffic

Click Save

Click Next: Inbound rules

Step 7: Configure Load Balancing Rules
Click *+Add a load balancing rules *

Give the rule a name(e.g. LB-rule-1)
Set the frontend IP configuration.
Choose the backend pool created earlier
Protocol: Select the (TCP, or UDP).
Port: Set as 80 for web traffic)

Health Probe: Click create new

Give it a name (e.g, Health-Probe)
Select the protocol (TCP, HTTP, or HTTPS)
Set a port (e.g, 80 for HTTP Traffic).
Configure probe intervals (recommended: 5 secs)
Then click Save

Click on Review + Create.

Click Create to Deploy your load Balancer

Deployment is Complete