


![[The AI Show Episode 146]: Rise of “AI-First” Companies, AI Job Disruption, GPT-4o Update Gets Rolled Back, How Big Consulting Firms Use AI, and Meta AI App](https://www.marketingaiinstitute.com/hubfs/ep%20146%20cover.png)


_Aleksey_Funtap_Alamy.jpg?width=1280&auto=webp&quality=80&disable=upscale#)
_Sergey_Tarasov_Alamy.jpg?width=1280&auto=webp&quality=80&disable=upscale#)


![Apple Foldable iPhone to Feature New Display Tech, 19% Thinner Panel [Rumor]](https://www.iclarified.com/images/news/97271/97271/97271-640.jpg)
![Apple Developing New Chips for Smart Glasses, Macs, AI Servers [Report]](https://www.iclarified.com/images/news/97269/97269/97269-640.jpg)
![Apple Shares New Mother's Day Ad: 'A Gift for Mom' [Video]](https://www.iclarified.com/images/news/97267/97267/97267-640.jpg)
![Apple Shares Official Trailer for 'Stick' Starring Owen Wilson [Video]](https://www.iclarified.com/images/news/97264/97264/97264-640.jpg)


How to Install Falcon 3 Locally?
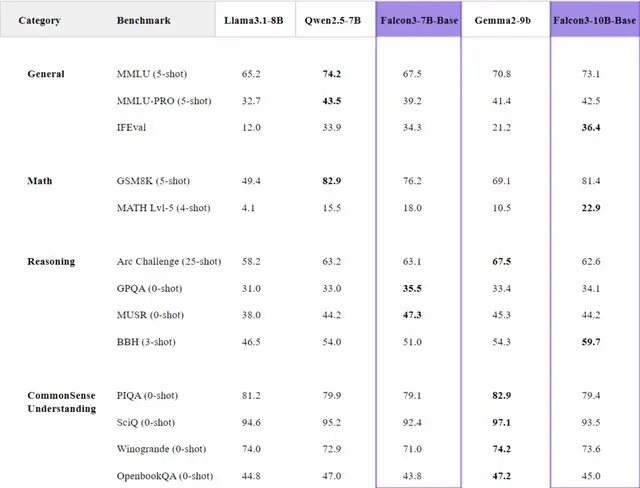
Falcon 3 marks a bold step forward in open and efficient AI development. Built by the Technology Innovation Institute (TII) in Abu Dhabi, Falcon 3 is a family of language models crafted to balance power, performance, and accessibility — all while staying under the 10 billion parameter mark. Designed to excel in science, mathematics, and coding, these models showcase innovative training techniques that improve both reasoning and real-world usability. The lineup includes a range of models from lightweight (1B) to highly capable versions (up to 10B), each tuned for different levels of complexity and tasks. Whether you need a small, fast model for everyday tasks or a strong reasoning model for math and coding challenges, Falcon 3 delivers. From knowledge distillation for tiny models to advanced pre-training for larger ones, Falcon 3 combines efficiency with smart design. The models are open, easy to integrate, and optimized for long context tasks — making them ideal for developers, researchers, and anyone looking to build powerful AI solutions without the heavy compute costs. Model Resource Hugging Face Link : https://huggingface.co/blog/falcon3 Ollama Link: https://ollama.com/library/falcon3 Falcon3-1B (Tiny, lightweight model) Recommended GPU: 8 GB VRAM (minimum) — RTX 3060, RTX A2000, or better 16 GB system RAM 40 GB disk storage Use case: Perfectly runs on mid-tier consumer GPUs. No need for expensive GPUs. Falcon3-3B (Small, capable model) Recommended GPU: 12 GB VRAM (minimum) — RTX 3060 Ti, RTX 4070, or better 32 GB system RAM 60 GB disk storage Use case: Comfortable inference, can even experiment with quantized versions on 8GB cards with optimizations. Falcon3-7B Recommended GPU: 24 GB VRAM (recommended) — RTX 3090, RTX 4090, or A6000 64 GB system RAM 100 GB disk storage Use case: Needs serious GPU memory for smooth inference and longer context. Can use quantized models for smaller GPUs (16 GB+ works but will be tight). Falcon3-10B (Flagship, SOTA under 13B) Recommended GPU: 40 GB VRAM (recommended) — A100 40GB, H100 40GB, or RTX 6000 Ada 96 GB system RAM 150 GB disk storage Use case: Large context, math and coding heavy tasks → requires serious memory and bandwidth. Can quantize down for 24GB+ GPUs but best performance needs 40GB. General Recommendation for smooth experience (any model up to 10B) Step-by-Step Process to Install Falcon 3 Locally For the purpose of this tutorial, we will use a GPU-powered Virtual Machine offered by NodeShift; however, you can replicate the same steps with any other cloud provider of your choice. NodeShift provides the most affordable Virtual Machines at a scale that meets GDPR, SOC2, and ISO27001 requirements. Step 1: Sign Up and Set Up a NodeShift Cloud Account Visit the NodeShift Platform and create an account. Once you’ve signed up, log into your account. Follow the account setup process and provide the necessary details and information. Step 2: Create a GPU Node (Virtual Machine) GPU Nodes are NodeShift’s GPU Virtual Machines, on-demand resources equipped with diverse GPUs ranging from H100s to A100s. These GPU-powered VMs provide enhanced environmental control, allowing configuration adjustments for GPUs, CPUs, RAM, and Storage based on specific requirements. Navigate to the menu on the left side. Select the GPU Nodes option, create a GPU Node in the Dashboard, click the Create GPU Node button, and create your first Virtual Machine deploy Step 3: Select a Model, Region, and Storage In the “GPU Nodes” tab, select a GPU Model and Storage according to your needs and the geographical region where you want to launch your model. We will use 1 x RTX A6000 GPU for this tutorial to achieve the fastest performance. However, you can choose a more affordable GPU with less VRAM if that better suits your requirements. Step 4: Select Authentication Method There are two authentication methods available: Password and SSH Key. SSH keys are a more secure option. To create them, please refer to our official documentation. Step 5: Choose an Image Next, you will need to choose an image for your Virtual Machine. We will deploy Falcon 3 on an NVIDIA Cuda Virtual Machine. This proprietary, closed-source parallel computing platform will allow you to install Falcon 3 on your GPU Node. After choosing the image, click the ‘Create’ button, and your Virtual Machine will be deployed. Step 6: Virtual Machine Successfully Deployed You will get visual confirmation that your node is up and running. Step 7: Connect to GPUs using SSH NodeShift GPUs can be connected to and controlled through a terminal using the SSH key provided during GPU creation. Once your GPU Node deployment is successfully created and has reached the ‘RUNNING’ status, you can

Falcon 3 marks a bold step forward in open and efficient AI development. Built by the Technology Innovation Institute (TII) in Abu Dhabi, Falcon 3 is a family of language models crafted to balance power, performance, and accessibility — all while staying under the 10 billion parameter mark. Designed to excel in science, mathematics, and coding, these models showcase innovative training techniques that improve both reasoning and real-world usability.
The lineup includes a range of models from lightweight (1B) to highly capable versions (up to 10B), each tuned for different levels of complexity and tasks. Whether you need a small, fast model for everyday tasks or a strong reasoning model for math and coding challenges, Falcon 3 delivers.
From knowledge distillation for tiny models to advanced pre-training for larger ones, Falcon 3 combines efficiency with smart design. The models are open, easy to integrate, and optimized for long context tasks — making them ideal for developers, researchers, and anyone looking to build powerful AI solutions without the heavy compute costs.
Model Resource
Hugging Face
Link : https://huggingface.co/blog/falcon3
Ollama
Link: https://ollama.com/library/falcon3
Falcon3-1B (Tiny, lightweight model)
Recommended GPU:
- 8 GB VRAM (minimum) — RTX 3060, RTX A2000, or better
- 16 GB system RAM
- 40 GB disk storage
- Use case: Perfectly runs on mid-tier consumer GPUs. No need for expensive GPUs.
Falcon3-3B (Small, capable model)
Recommended GPU:
- 12 GB VRAM (minimum) — RTX 3060 Ti, RTX 4070, or better
- 32 GB system RAM
- 60 GB disk storage
- Use case: Comfortable inference, can even experiment with quantized versions on 8GB cards with optimizations.
Falcon3-7B
Recommended GPU:
- 24 GB VRAM (recommended) — RTX 3090, RTX 4090, or A6000
- 64 GB system RAM
- 100 GB disk storage
- Use case: Needs serious GPU memory for smooth inference and longer context. Can use quantized models for smaller GPUs (16 GB+ works but will be tight).
Falcon3-10B (Flagship, SOTA under 13B)
Recommended GPU:
- 40 GB VRAM (recommended) — A100 40GB, H100 40GB, or RTX 6000 Ada
- 96 GB system RAM
- 150 GB disk storage
- Use case: Large context, math and coding heavy tasks → requires serious memory and bandwidth. Can quantize down for 24GB+ GPUs but best performance needs 40GB.
General Recommendation for smooth experience (any model up to 10B)
Step-by-Step Process to Install Falcon 3 Locally
For the purpose of this tutorial, we will use a GPU-powered Virtual Machine offered by NodeShift; however, you can replicate the same steps with any other cloud provider of your choice. NodeShift provides the most affordable Virtual Machines at a scale that meets GDPR, SOC2, and ISO27001 requirements.
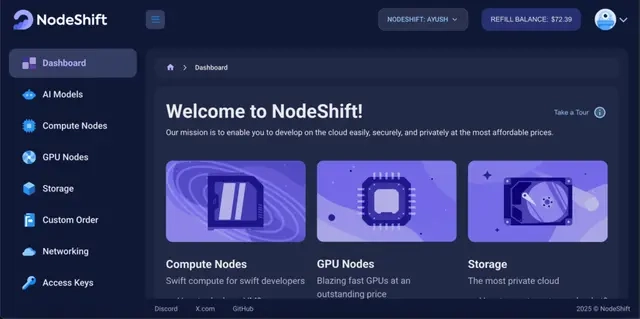
Step 1: Sign Up and Set Up a NodeShift Cloud Account
Visit the NodeShift Platform and create an account. Once you’ve signed up, log into your account.
Follow the account setup process and provide the necessary details and information.

Step 2: Create a GPU Node (Virtual Machine)
GPU Nodes are NodeShift’s GPU Virtual Machines, on-demand resources equipped with diverse GPUs ranging from H100s to A100s. These GPU-powered VMs provide enhanced environmental control, allowing configuration adjustments for GPUs, CPUs, RAM, and Storage based on specific requirements.
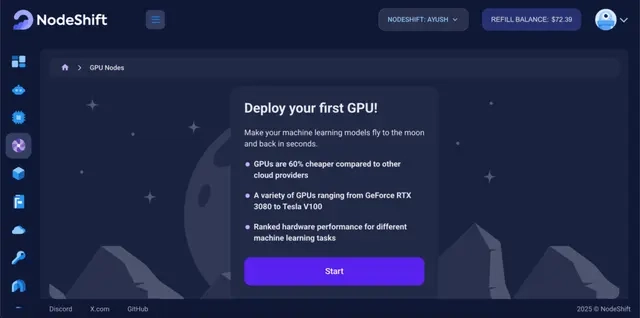
Navigate to the menu on the left side. Select the GPU Nodes option, create a GPU Node in the Dashboard, click the Create GPU Node button, and create your first Virtual Machine deploy
Step 3: Select a Model, Region, and Storage
In the “GPU Nodes” tab, select a GPU Model and Storage according to your needs and the geographical region where you want to launch your model.


We will use 1 x RTX A6000 GPU for this tutorial to achieve the fastest performance. However, you can choose a more affordable GPU with less VRAM if that better suits your requirements.
Step 4: Select Authentication Method
There are two authentication methods available: Password and SSH Key. SSH keys are a more secure option. To create them, please refer to our official documentation.
Step 5: Choose an Image
Next, you will need to choose an image for your Virtual Machine. We will deploy Falcon 3 on an NVIDIA Cuda Virtual Machine. This proprietary, closed-source parallel computing platform will allow you to install Falcon 3 on your GPU Node.
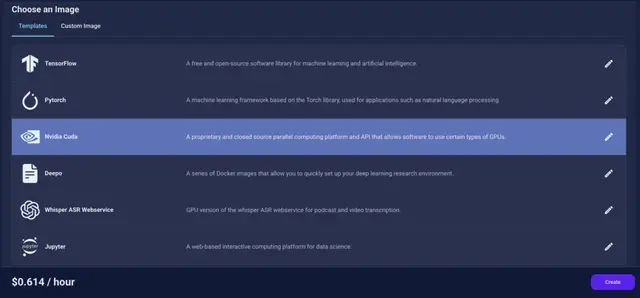
After choosing the image, click the ‘Create’ button, and your Virtual Machine will be deployed.

Step 6: Virtual Machine Successfully Deployed
You will get visual confirmation that your node is up and running.
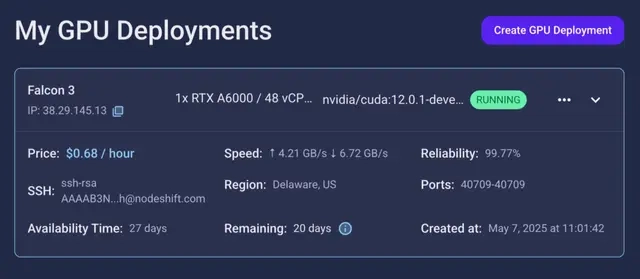
Step 7: Connect to GPUs using SSH
NodeShift GPUs can be connected to and controlled through a terminal using the SSH key provided during GPU creation.
Once your GPU Node deployment is successfully created and has reached the ‘RUNNING’ status, you can navigate to the page of your GPU Deployment Instance. Then, click the ‘Connect’ button in the top right corner.


Now open your terminal and paste the proxy SSH IP or direct SSH IP.

Next, if you want to check the GPU details, run the command below:
nvidia-smi

Step 8: Install Ollama
After connecting to the terminal via SSH, it’s now time to install Ollama from the official Ollama website.
Website Link: https://ollama.com/
Run the following command to install the Ollama:
curl -fsSL https://ollama.com/install.sh | sh

Step 9: Serve Ollama
Run the following command to host the Ollama so that it can be accessed and utilized efficiently:
ollama serve

Now, “Ollama is running.”
Step 10: Select Falcon 3 Model
Link: https://ollama.com/library/falcon3
Falcon 3 model is available in four sizes: 1b, 3b, 7b, and 10b. We will run it one by one on our GPU virtual machine.

Step 11: Connect with SSH
Now, open a new tab in the terminal and reconnect using SSH.

Step 12: Check Commands
Run, the following command to see a list of available commands:
ollama

Step 13: Pull Falcon 3 Model
Run the following command to pull the Falcon 3 model:
ollama pull falcon3

Step 14: Run Falcon 3 1b Model
Run the following command to interact with Falcon 3 1b Model:
ollama run falcon3:1b

Step 15: Run Falcon 3 3b Model
Run the following command to interact with Falcon 3 3b Model:
ollama run falcon3:3b

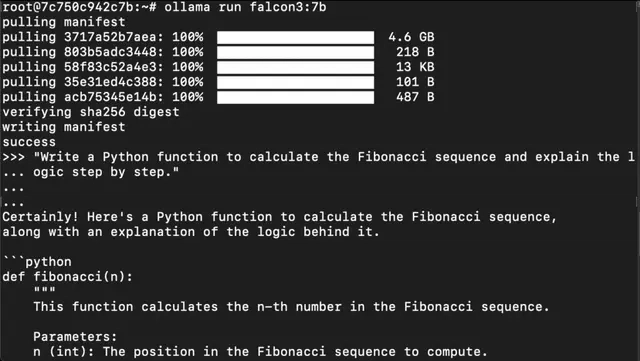
Step 16: Run Falcon 3 7b Model
Run the following command to interact with Falcon 3 7b Model:
ollama run falcon3:7b

Step 17: Run Falcon 3 10b Model
Run the following command to interact with Falcon 3 10b Model:
ollama run falcon3:10b


Conclusion
Falcon 3 is more than just another family of language models — it is a clear demonstration of how performance and efficiency can go hand in hand. From lightweight models built for fast, everyday tasks to powerful versions designed for science, math, and coding, Falcon 3 offers something for everyone. Thanks to innovations like knowledge distillation, depth upscaling, and extended context support, these models are well suited for developers, researchers, and builders alike.
With simple deployment through Ollama and compatibility across a wide range of GPU configurations, getting started with Falcon 3 has never been easier. Whether you are experimenting locally or scaling for production, Falcon 3 provides a flexible and open path forward.