


![[The AI Show Episode 146]: Rise of “AI-First” Companies, AI Job Disruption, GPT-4o Update Gets Rolled Back, How Big Consulting Firms Use AI, and Meta AI App](https://www.marketingaiinstitute.com/hubfs/ep%20146%20cover.png)


![Ditching a Microsoft Job to Enter Startup Hell with Lonewolf Engineer Sam Crombie [Podcast #171]](https://cdn.hashnode.com/res/hashnode/image/upload/v1746753508177/0cd57f66-fdb0-4972-b285-1443a7db39fc.png?#)


.jpg?width=1920&height=1920&fit=bounds&quality=70&format=jpg&auto=webp#)


-Nintendo-Switch-2-Hands-On-Preview-Mario-Kart-World-Impressions-&-More!-00-10-30.png?width=1920&height=1920&fit=bounds&quality=70&format=jpg&auto=webp#)


-xl.jpg)


![New iPad 11 (A16) On Sale for Just $277.78! [Lowest Price Ever]](https://www.iclarified.com/images/news/97273/97273/97273-640.jpg)

![Apple Foldable iPhone to Feature New Display Tech, 19% Thinner Panel [Rumor]](https://www.iclarified.com/images/news/97271/97271/97271-640.jpg)
![Apple Developing New Chips for Smart Glasses, Macs, AI Servers [Report]](https://www.iclarified.com/images/news/97269/97269/97269-640.jpg)


![[Weekly funding roundup May 3-9] VC inflow into Indian startups touches new high](https://images.yourstory.com/cs/2/220356402d6d11e9aa979329348d4c3e/WeeklyFundingRoundupNewLogo1-1739546168054.jpg)


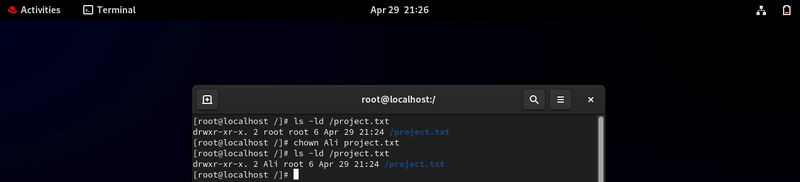
Setting Up Inter-Region VPC Communication Using AWS Transit Gateway
As cloud environments grow across multiple AWS regions and accounts, managing a scalable and secure network architecture becomes essential. AWS Transit Gateway (TGW) offers a hub-and-spoke model that consolidates routing between VPCs and on-prem networks. Unlike traditional VPC peering (point-to-point), TGW enables centralized routing, dynamic scalability, and BGP-based routing for efficient inter-region communication. In this article, we’ll build a Transit Gateway-based Inter-Region VPC architecture, walk through step-by-step GUI and CLI setup. Architecture for this Setup A Transit Gateway in each region (us-east-1, us-west-2) Two VPCs (VPC-East, VPC-West) with non-overlapping CIDRs Attach VPCs to their local TGWs Peer both TGWs across regions Create TGW Route Tables to enable traffic flow Simulate a blackhole scenario Step 1: Create VPCs and Subnets GUI: Go to the AWS Console for both regions (us-east-1 and us-west-2) Navigate to VPC → Create VPC Select “VPC only” For Region A: CIDR block: 10.10.0.0/16, name: VPC-East For Region B: CIDR block: 10.20.0.0/16, name: VPC-West On the left-hand menu, click “Subnets”. Click “Create subnet”. Select the VPC you want to attach the subnet to. Add the following: For Region A: Name tag: Subnet-East Availability Zone: us-east-1a IPv4 CIDR block: 10.10.1.0/24 For Region B: Name tag: Subnet-West Availability Zone: us-west-2a IPv4 CIDR block: 10.20.1.0/24 CLI: # VPC-East aws ec2 create-vpc --cidr-block 10.10.0.0/16 --region us-east-1 --tag-specifications 'ResourceType=vpc,Tags=[{Key=Name,Value=VPC-East}]' # Subnet-East (in VPC-East) aws ec2 create-subnet \ --vpc-id \ --cidr-block 10.10.1.0/24 \ --availability-zone us-east-1a \ --region us-east-1 \ --tag-specifications 'ResourceType=subnet,Tags=[{Key=Name,Value=Subnet-East}]' # VPC-West aws ec2 create-vpc --cidr-block 10.20.0.0/16 --region us-west-2 --tag-specifications 'ResourceType=vpc,Tags=[{Key=Name,Value=VPC-West}]' # Subnet-West (in VPC-West) aws ec2 create-subnet \ --vpc-id \ --cidr-block 10.20.1.0/24 \ --availability-zone us-west-2a \ --region us-west-2 \ --tag-specifications 'ResourceType=subnet,Tags=[{Key=Name,Value=Subnet-West}]' Step 2: Create Transit Gateways GUI: Navigate to VPC Console in Region A (us-east-1) Select “Transit Gateways” from the left menu Click “Create Transit Gateway” Configure settings: Note: Repeat the same process in region B (us-west-2) CLI: # Create Transit Gateway in Region A aws ec2 create-transit-gateway \ — description “Transit Gateway for Region A” \ — region us-east-1 \ — tag-specifications ‘ResourceType=transit-gateway,Tags=[{Key=Name,Value=TGW-Region-A}]’ # Create Transit Gateway in Region B aws ec2 create-transit-gateway \ — description “Transit Gateway for Region B” \ — region us-west-2 \ — tag-specifications ‘ResourceType=transit-gateway,Tags=[{Key=Name,Value=TGW-Region-B}]’ Step 3: Attach VPCs to Transit Gateways GUI: In VPC Console, select “Transit Gateway Attachments” Click “Create Transit Gateway Attachment” Configure settings: CLI: # Attach VPC to Transit Gateway in Region A aws ec2 create-transit-gateway-vpc-attachment \ - transit-gateway-id tgw-xxxxx \ - vpc-id vpc-xxxxx \ - subnet-ids subnet-xxxxx subnet-yyyyy \ - region us-east-1 # Attach VPC to Transit Gateway in Region B aws ec2 create-transit-gateway-vpc-attachment \ - transit-gateway-id tgw-yyyyy \ - vpc-id vpc-yyyyy \ - subnet-ids subnet-aaaaa subnet-bbbbb \ - region us-west-2 Step 4: Create Transit Gateway Peering Attachment GUI: In Region A’s VPC Console Select “Transit Gateway Attachments” Click “Create Transit Gateway Attachment” Configure settings: Attachment type: Peering Connection Transit Gateway (Accepter): Select Region B’s TGW ID Region: Select Region B CLI: # Create peering attachment aws ec2 create-transit-gateway-peering-attachment \ - transit-gateway-id tgw-xxxxx \ - peer-transit-gateway-id tgw-yyyyy \ - peer-region us-west-2 \ - region us-east-1 Step 5: Accept Peering Attachment GUI: Switch to Region B’s VPC Console Select “Transit Gateway Attachments” Select the pending peering attachment Click “Accept” CLI: # Accept peering attachment aws ec2 accept-transit-gateway-peering-attachment \ - transit-gateway-attachment-id tgw-attach-xxxxx \ - region us-west-2 Step 6: Configure Route Tables GUI: In each region’s VPC Console: Go to “Transit Gateway Route Tables” Add routes pointing to the peered TGW Update VPC route tables to route inter-region traffic through TGW CLI: # Add route to Transit Gateway route table in Region A aws ec2 create-transit-gateway-route \ - destination-cidr-block 10.20.0.0/16 \ - transit-gateway-route-table-id tgw-rtb-xxxxx \ - transit-gateway-attachment-id tgw-attach-xxxxx \ - region us-east-1 # Add route to VPC route table in Region A aws

As cloud environments grow across multiple AWS regions and accounts, managing a scalable and secure network architecture becomes essential. AWS Transit Gateway (TGW) offers a hub-and-spoke model that consolidates routing between VPCs and on-prem networks. Unlike traditional VPC peering (point-to-point), TGW enables centralized routing, dynamic scalability, and BGP-based routing for efficient inter-region communication.
In this article, we’ll build a Transit Gateway-based Inter-Region VPC architecture, walk through step-by-step GUI and CLI setup.
Architecture for this Setup
- A Transit Gateway in each region (us-east-1, us-west-2)
- Two VPCs (VPC-East, VPC-West) with non-overlapping CIDRs
- Attach VPCs to their local TGWs
- Peer both TGWs across regions
- Create TGW Route Tables to enable traffic flow
- Simulate a blackhole scenario
Step 1: Create VPCs and Subnets
GUI:
- Go to the AWS Console for both regions (us-east-1 and us-west-2)
- Navigate to VPC → Create VPC
- Select “VPC only”
For Region A: CIDR block: 10.10.0.0/16, name: VPC-East
For Region B: CIDR block: 10.20.0.0/16, name: VPC-West
- On the left-hand menu, click “Subnets”.
- Click “Create subnet”.
- Select the VPC you want to attach the subnet to.
- Add the following:
For Region A:
- Name tag: Subnet-East
- Availability Zone: us-east-1a
- IPv4 CIDR block: 10.10.1.0/24
For Region B:
- Name tag: Subnet-West
- Availability Zone: us-west-2a
- IPv4 CIDR block: 10.20.1.0/24
CLI:
# VPC-East
aws ec2 create-vpc --cidr-block 10.10.0.0/16 --region us-east-1 --tag-specifications 'ResourceType=vpc,Tags=[{Key=Name,Value=VPC-East}]'

# Subnet-East (in VPC-East)
aws ec2 create-subnet \
--vpc-id  \
--cidr-block 10.10.1.0/24 \
--availability-zone us-east-1a \
--region us-east-1 \
--tag-specifications 'ResourceType=subnet,Tags=[{Key=Name,Value=Subnet-East}]'


# VPC-West
aws ec2 create-vpc --cidr-block 10.20.0.0/16 --region us-west-2 --tag-specifications 'ResourceType=vpc,Tags=[{Key=Name,Value=VPC-West}]'

# Subnet-West (in VPC-West)
aws ec2 create-subnet \
--vpc-id  \
--cidr-block 10.20.1.0/24 \
--availability-zone us-west-2a \
--region us-west-2 \
--tag-specifications 'ResourceType=subnet,Tags=[{Key=Name,Value=Subnet-West}]'
Step 2: Create Transit Gateways
GUI:
- Navigate to VPC Console in Region A (us-east-1)
- Select “Transit Gateways” from the left menu
- Click “Create Transit Gateway”
- Configure settings:


Note: Repeat the same process in region B (us-west-2)
CLI:
# Create Transit Gateway in Region A
aws ec2 create-transit-gateway \
 — description “Transit Gateway for Region A” \
 — region us-east-1 \
 — tag-specifications ‘ResourceType=transit-gateway,Tags=[{Key=Name,Value=TGW-Region-A}]’

# Create Transit Gateway in Region B
aws ec2 create-transit-gateway \
 — description “Transit Gateway for Region B” \
 — region us-west-2 \
 — tag-specifications ‘ResourceType=transit-gateway,Tags=[{Key=Name,Value=TGW-Region-B}]’
Step 3: Attach VPCs to Transit Gateways
GUI:
- In VPC Console, select “Transit Gateway Attachments”
- Click “Create Transit Gateway Attachment”
- Configure settings:

CLI:
# Attach VPC to Transit Gateway in Region A

aws ec2 create-transit-gateway-vpc-attachment \
 - transit-gateway-id tgw-xxxxx \
 - vpc-id vpc-xxxxx \
 - subnet-ids subnet-xxxxx subnet-yyyyy \
 - region us-east-1

# Attach VPC to Transit Gateway in Region B

aws ec2 create-transit-gateway-vpc-attachment \
 - transit-gateway-id tgw-yyyyy \
 - vpc-id vpc-yyyyy \
 - subnet-ids subnet-aaaaa subnet-bbbbb \
 - region us-west-2
Step 4: Create Transit Gateway Peering Attachment
GUI:
- In Region A’s VPC Console
- Select “Transit Gateway Attachments”
- Click “Create Transit Gateway Attachment”
- Configure settings:
- Attachment type: Peering Connection
- Transit Gateway (Accepter): Select Region B’s TGW ID
- Region: Select Region B
CLI:
# Create peering attachment
aws ec2 create-transit-gateway-peering-attachment \
 - transit-gateway-id tgw-xxxxx \
 - peer-transit-gateway-id tgw-yyyyy \
 - peer-region us-west-2 \
 - region us-east-1
Step 5: Accept Peering Attachment
GUI:
- Switch to Region B’s VPC Console
- Select “Transit Gateway Attachments”
- Select the pending peering attachment
- Click “Accept”
CLI:
# Accept peering attachment
aws ec2 accept-transit-gateway-peering-attachment \
 - transit-gateway-attachment-id tgw-attach-xxxxx \
 - region us-west-2
Step 6: Configure Route Tables
GUI:
In each region’s VPC Console:
- Go to “Transit Gateway Route Tables”
- Add routes pointing to the peered TGW
- Update VPC route tables to route inter-region traffic through TGW
CLI:
# Add route to Transit Gateway route table in Region A
aws ec2 create-transit-gateway-route \
 - destination-cidr-block 10.20.0.0/16 \
 - transit-gateway-route-table-id tgw-rtb-xxxxx \
 - transit-gateway-attachment-id tgw-attach-xxxxx \
 - region us-east-1

# Add route to VPC route table in Region A
aws ec2 create-route \
 - route-table-id rtb-xxxxx \
 - destination-cidr-block 10.20.0.0/16 \
 - transit-gateway-id tgw-xxxxx \
 - region us-east-1
Step 7: Implementing Blackhole Routes
What Are Blackhole Routes?
A blackhole route drops traffic that matches a destination CIDR. It’s useful for:
- Blocking specific IP ranges
- Preventing unauthorized access
- Implementing security controls
- Avoiding routing loops
- Isolating problematic traffic
GUI:
- Navigate to VPC Console
- Select “Transit Gateway Route Tables”
- Select the appropriate route table
- Choose “Actions” → “Create static route”
- Configure the blackhole route:
- CIDR block: (specify the IP range to block)
- Choose “Blackhole”
CLI:
# Create a blackhole route in Region A
aws ec2 create-transit-gateway-route \
    --destination-cidr-block 10.0.0.0/16 \
    --blackhole \
    --transit-gateway-route-table-id tgw-rtb-xxxxx \
    --region us-east-1

# Create a blackhole route in Region B
aws ec2 create-transit-gateway-route \
    --destination-cidr-block 172.16.0.0/16 \
    --blackhole \
    --transit-gateway-route-table-id tgw-rtb-yyyyy \
    --region us-west-2
Common Blackhole Route Use Cases:
- Blocking Non-Routable Address Spaces:
# Block RFC 1918 private addresses
aws ec2 create-transit-gateway-route \
 - destination-cidr-block 192.168.0.0/16 \
 - blackhole \
 - transit-gateway-route-table-id tgw-rtb-xxxxx

aws ec2 create-transit-gateway-route \
 - destination-cidr-block 172.16.0.0/12 \
 - blackhole \
 - transit-gateway-route-table-id tgw-rtb-xxxxx

aws ec2 create-transit-gateway-route \
 - destination-cidr-block 10.0.0.0/8 \
 - blackhole \
 - transit-gateway-route-table-id tgw-rtb-xxxxx
- Implementing Network Segmentation:
# Block access to specific environment
aws ec2 create-transit-gateway-route \
 - destination-cidr-block 10.100.0.0/16 \
 - blackhole \
 - transit-gateway-route-table-id tgw-rtb-xxxxx
Best Practices for Blackhole Routes:
Documentation
- Maintain a list of all blackhole routes
- Document the purpose of each blackhole route
- Include expiration dates if temporary
Implementation Strategy
- Start with more specific routes (/32, /24) before broader ones
- Test in non-production environment first
- Implement gradually to minimize impact
Monitoring
- Monitor dropped packet metrics
- Set up CloudWatch alarms for blocked traffic
- Regular review of blackhole routes
Step 8: Verify Connectivity
Monitor dropped packet metrics
- Launch EC2 instances in both VPCs
- Test connectivity using ping or other network tools
- Check Transit Gateway route tables for proper route propagation
Best Practices
- Monitor dropped packet metrics
- Use unique ASNs for each Transit Gateway
- Implement proper security groups and NACLs
- Monitor TGW CloudWatch metrics
- Use resource tagging for better management
- Document CIDR ranges and routing configurations
Troubleshooting Tips
- Verify route table configurations
- Check security group rules
- Ensure CIDR ranges don’t overlap
- Validate TGW attachment states
- Review VPC route tables
Cost Considerations
- Data transfer charges apply for inter-region traffic
- TGW attachment hours are billed
- Consider using AWS Cost Explorer for monitoring
Conclusion
With AWS Transit Gateway, you unlock a scalable and resilient inter-region communication framework. Integrating blackhole routes enhances your network control and stability. Whether you’re working in a multi-account, global setup, or building DR strategies, this architecture sets you up for long-term success.