


![[The AI Show Episode 143]: ChatGPT Revenue Surge, New AGI Timelines, Amazon’s AI Agent, Claude for Education, Model Context Protocol & LLMs Pass the Turing Test](https://www.marketingaiinstitute.com/hubfs/ep%20143%20cover.png)


![From Accountant to Data Engineer with Alyson La [Podcast #168]](https://cdn.hashnode.com/res/hashnode/image/upload/v1744420903260/fae4b593-d653-41eb-b70b-031591aa2f35.png?#)


.png?#)


![What Google Messages features are rolling out [April 2025]](https://i0.wp.com/9to5google.com/wp-content/uploads/sites/4/2023/12/google-messages-name-cover.png?resize=1200%2C628&quality=82&strip=all&ssl=1)


![iPadOS 19 Will Be More Like macOS [Gurman]](https://www.iclarified.com/images/news/97001/97001/97001-640.jpg)
![Apple TV+ Summer Preview 2025 [Video]](https://www.iclarified.com/images/news/96999/96999/96999-640.jpg)
![Apple Watch SE 2 On Sale for Just $169.97 [Deal]](https://www.iclarified.com/images/news/96996/96996/96996-640.jpg)


How to Create an API Using Next.js
A Brief Overview of Next.js Next.js is a React-based framework that allows you to build projects that run both on the server and the client. This means you can create server-rendered pages for faster loading times or client-rendered pages for greater customization possibilities. Additionally, Next.js enables you to build APIs, making it possible to create full-stack applications using the same framework. What attracted me to Next.js is its versatility and well-documented resources. For more details, check out the official documentation. Now, let’s dive into the tutorial: Step-by-Step Guide to Creating an API Step 1: Create a Next.js Project Run the following command in your terminal to initialize a new project with the default Next.js template: npx create-next-app@latest Choose a name and configure your project. In this example, we named the project "tutorial" and used the default settings. Step 2: Set Up the API Structure Once the initial code is generated, create a folder named api inside the src/app directory. This folder will be used to define your API routes. To configure the base route (http://localhost:3000/api), create a file named route.ts at src/app/api/route.ts. To create a route like /api/books, add another route.ts file at src/app/api/books/route.ts. Step 3: Implement the API Code In the route.ts file, add the following code to create a simple GET endpoint that returns "Hello, Mariana!": import { NextRequest } from "next/server"; export async function GET(request: NextRequest) { return new Response("Hello, Mariana!"); } To run your project and test the API, use: npm run dev Visit http://localhost:3000/api in your browser or use tools like Postman to verify the response. How to add parameters Query Parameters To retrieve query parameters from a request, use this code: import { NextRequest } from "next/server"; export async function GET(request: NextRequest) { const searchParams = request.nextUrl.searchParams; const name = searchParams.get("name"); return new Response(`Hello, ${name}!`); } This retrieves a parameter named name from the request and includes it in the response. For more details: Next.js Query Parameters Documentation. Path Parameters To handle path parameters, create a folder with a dynamic segment (e.g., [name]) in your desired route. For example: Path: api/hello/[name]/route.ts Here’s how you can access path parameters: import { NextRequest } from "next/server"; export async function GET( request: NextRequest, { params }: { params: { name: string } } ) { const { name } = params; return new Response(`Hello, ${name}!`); } For more details: Next.js Dynamic Route Segments Documentation. POST Requests To handle POST requests and retrieve data from the request body: export async function POST(request: NextRequest) { const body = await request.json(); return new Response(`Hello, ${body.name}!`); } Test this by sending a POST request with JSON data using Postman or similar tools. For more details: Next.js Request Body Documentation. Helpful Tips If Hot Reloading Doesn’t Work: If you’re using WSL (Windows Subsystem for Linux), automatic updates might fail. Add the following flag in your package.json: "scripts": { "dev": "WATCHPACK_POLLING=true next dev", "build": "next build", "start": "next start", "lint": "next lint" }, If npm run dev Fails: Run npm install to ensure all dependencies are installed, then try again. Using Postman: If testing locally with Postman Web fails due to agent issues, download and use the Desktop version instead. Access My Code You can find all the code for this tutorial in my GitHub repository under the branch create-hello-world-api: GitHub Repository.
A Brief Overview of Next.js
Next.js is a React-based framework that allows you to build projects that run both on the server and the client. This means you can create server-rendered pages for faster loading times or client-rendered pages for greater customization possibilities. Additionally, Next.js enables you to build APIs, making it possible to create full-stack applications using the same framework.
What attracted me to Next.js is its versatility and well-documented resources. For more details, check out the official documentation.
Now, let’s dive into the tutorial:
Step-by-Step Guide to Creating an API
Step 1: Create a Next.js Project
Run the following command in your terminal to initialize a new project with the default Next.js template:
npx create-next-app@latest
Choose a name and configure your project. In this example, we named the project "tutorial" and used the default settings.
Step 2: Set Up the API Structure
Once the initial code is generated, create a folder named api inside the src/app directory. This folder will be used to define your API routes.
- To configure the base route (
http://localhost:3000/api), create a file namedroute.tsatsrc/app/api/route.ts. - To create a route like
/api/books, add anotherroute.tsfile atsrc/app/api/books/route.ts.
Step 3: Implement the API Code
In the route.ts file, add the following code to create a simple GET endpoint that returns "Hello, Mariana!":
import { NextRequest } from "next/server";

export async function GET(request: NextRequest) {
  return new Response("Hello, Mariana!");
}
To run your project and test the API, use:
npm run dev
Visit http://localhost:3000/api in your browser or use tools like Postman to verify the response.
How to add parameters
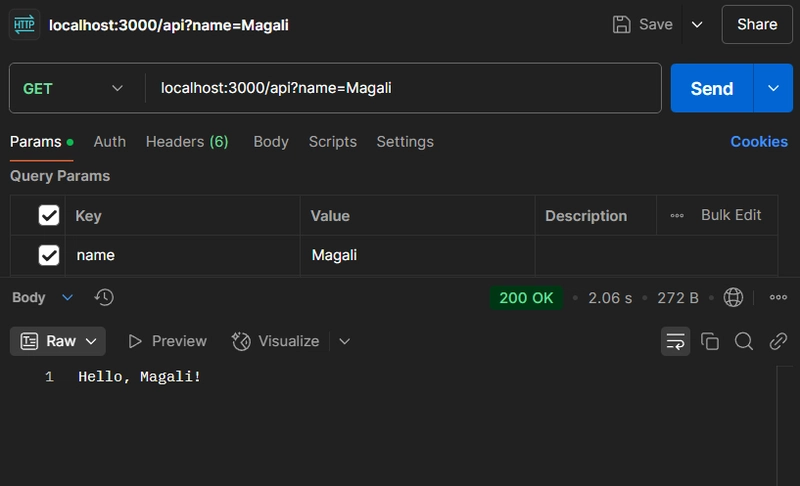
Query Parameters
To retrieve query parameters from a request, use this code:
import { NextRequest } from "next/server";

export async function GET(request: NextRequest) {
  const searchParams = request.nextUrl.searchParams;
  const name = searchParams.get("name");
  return new Response(`Hello, ${name}!`);
}
This retrieves a parameter named name from the request and includes it in the response.
For more details: Next.js Query Parameters Documentation.
Path Parameters
To handle path parameters, create a folder with a dynamic segment (e.g., [name]) in your desired route. For example:
- Path:
api/hello/[name]/route.ts
Here’s how you can access path parameters:
import { NextRequest } from "next/server";

export async function GET(
  request: NextRequest,
  { params }: { params: { name: string } }
) {
  const { name } = params;
  return new Response(`Hello, ${name}!`);
}
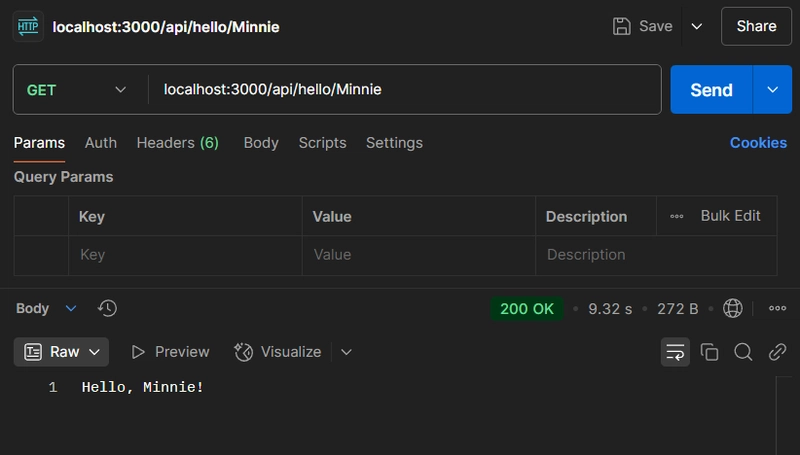
For more details: Next.js Dynamic Route Segments Documentation.
POST Requests
To handle POST requests and retrieve data from the request body:
export async function POST(request: NextRequest) {
  const body = await request.json();
  return new Response(`Hello, ${body.name}!`);
}
Test this by sending a POST request with JSON data using Postman or similar tools.

For more details: Next.js Request Body Documentation.
Helpful Tips
-
If Hot Reloading Doesn’t Work:
If you’re using WSL (Windows Subsystem for Linux), automatic updates might fail. Add the following flag in your
package.json:
   "scripts": {
     "dev": "WATCHPACK_POLLING=true next dev",
     "build": "next build",
     "start": "next start",
     "lint": "next lint"
   },
If
npm run devFails:
Runnpm installto ensure all dependencies are installed, then try again.Using Postman:
If testing locally with Postman Web fails due to agent issues, download and use the Desktop version instead.
Access My Code
You can find all the code for this tutorial in my GitHub repository under the branch create-hello-world-api: GitHub Repository.