


![[The AI Show Episode 146]: Rise of “AI-First” Companies, AI Job Disruption, GPT-4o Update Gets Rolled Back, How Big Consulting Firms Use AI, and Meta AI App](https://www.marketingaiinstitute.com/hubfs/ep%20146%20cover.png)


.jpeg?#)


-Pokemon-GO---Official-Gigantamax-Pokemon-Trailer-00-02-12.png?width=1920&height=1920&fit=bounds&quality=70&format=jpg&auto=webp#)


![Beats Studio Pro Wireless Headphones Now Just $169.95 - Save 51%! [Deal]](https://www.iclarified.com/images/news/97258/97258/97258-640.jpg)


Dockerize a Node.js Application for Efficient Deployment
As a DevOps engineer, containerizing applications is a crucial part of my workflow. Recently, I worked on dockerizing a simple Node.js front-end project, and I’d love to walk you through the process I followed from crafting the Dockerfile to building the image. Here is the command to the repository I cloned for this project, run it on the terminal of your directory/folder. $ git clone https://github.com/docker/welcome-to-docker Project Structure Create a file name “dockerfile” on your folder/directory and here is a quick look at the project layout: welcome-to-docker/ │ ├── dockerfile ├── package.json ├── package-lock.json ├── .dockerignore ├── src/ ├── public/ ├── README.md └── ... The app is a basic React project created with create-react-app, and I aimed to build and serve the static files using a lightweight Docker image. FROM node:20-alpine WORKDIR /app COPY package*.json ./ COPY ./src ./src COPY ./public ./public RUN npm install EXPOSE 3000 CMD ["serve", "-s", "build"] Choosing a Base Image To keep the image small and efficient,I used node:20-alpine as the base image: FROM node:20-alpine Alpine-based images are minimal and perfect for production environments. Setting the Working Directory I then defined /app as the working directory inside the container: WORKDIR /app This ensures all subsequent commands execute relative to this directory. Copying Project Files I copied the essential files required to install dependencies and build the project: COPY package*.json ./ COPY ./src ./src COPY ./public ./public This step ensures that only necessary files are added to the Docker image, keeping it clean and efficient. Installing Dependencies and Building the App This was the key part of the Dockerfile. I configured npm for better reliability and installed the necessary packages before building the project: RUN npm install This installs the node modules will be installed into the node_modules directory inside our image. Exposing the Application Port EXPOSE 3000 CMD ["serve", "-s", "build"] This sets the default command that runs on port 3000 when the container starts. Building the Docker Image Once the Dockerfile was ready, I ran the following command to build the image: docker build -t my-react-app . This created a Docker image tagged my-react-app. Running the Container to serve the application, I used: docker run -p 3000:80. “Image name” serve -s build This spins up a container maps port 3000 on your host to port 3000 in the container. Using Docker Desktop to manually run your container after build Step 1: Launch Docker Desktop. Step 2: Navigate to the “Images” tab on the left panel. Step 3: Run the Image • Find your image (e.g., my-react-app) in the list. • Click the “Run” button next to it. • In the popup: • Set a container name (optional). • Set the port mapping — e.g., host port 5000 to container port • Click Run. Step 4: Access the App • Go to your browser and open http://localhost:5000 to view your app. Dockerizing applications simplifies deployment, ensures consistency across environments, and makes scaling easier. By carefully crafting a Dockerfile, I containerized my React app in a clean, efficient way ready for production or further development.
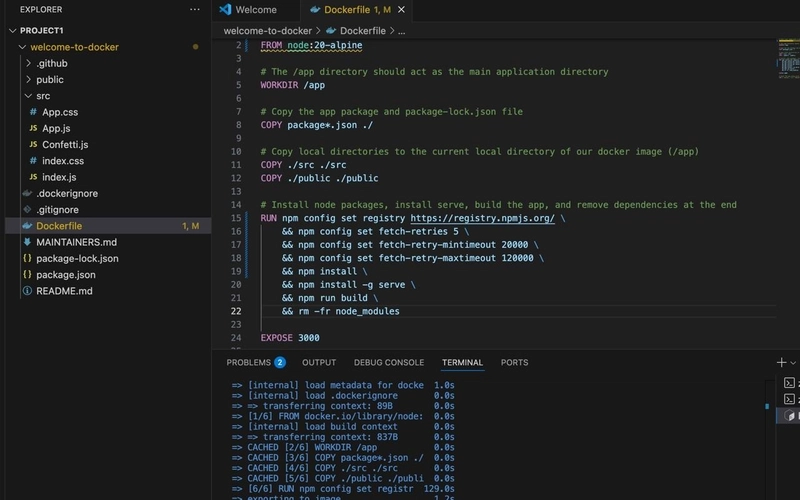
As a DevOps engineer, containerizing applications is a crucial part of my workflow. Recently, I worked on dockerizing a simple Node.js front-end project, and I’d love to walk you through the process I followed from crafting the Dockerfile to building the image. Here is the command to the repository I cloned for this project, run it on the terminal of your directory/folder.
$ git clone https://github.com/docker/welcome-to-docker
- Project Structure Create a file name “dockerfile” on your folder/directory and here is a quick look at the project layout:
welcome-to-docker/

│

├── dockerfile

├── package.json

├── package-lock.json

├── .dockerignore

├── src/

├── public/

├── README.md

└── ...
The app is a basic React project created with create-react-app, and I aimed to build and serve the static files using a lightweight Docker image.
FROM node:20-alpine

WORKDIR /app

COPY package*.json ./

COPY ./src ./src

COPY ./public ./public

RUN npm install

EXPOSE 3000

CMD ["serve", "-s", "build"]
- Choosing a Base Image To keep the image small and efficient,I used node:20-alpine as the base image:
FROM node:20-alpine
Alpine-based images are minimal and perfect for production environments.
- Setting the Working Directory I then defined /app as the working directory inside the container:
WORKDIR /app
This ensures all subsequent commands execute relative to this directory.
- Copying Project Files I copied the essential files required to install dependencies and build the project:
COPY package*.json ./

 COPY ./src ./src

 COPY ./public ./public
This step ensures that only necessary files are added to the Docker image, keeping it clean and efficient.
- Installing Dependencies and Building the App This was the key part of the Dockerfile. I configured npm for better reliability and installed the necessary packages before building the project:
RUN npm install
This installs the node modules will be installed into the node_modules directory inside our image.
- Exposing the Application Port
EXPOSE 3000

  CMD ["serve", "-s", "build"]
This sets the default command that runs on port 3000 when the container starts.
- Building the Docker Image Once the Dockerfile was ready, I ran the following command to build the image:
docker build -t my-react-app .
This created a Docker image tagged my-react-app.
- Running the Container to serve the application, I used:
docker run -p 3000:80. “Image name” serve -s build
This spins up a container maps port 3000 on your host to port 3000 in the container.
Using Docker Desktop to manually run your container after build
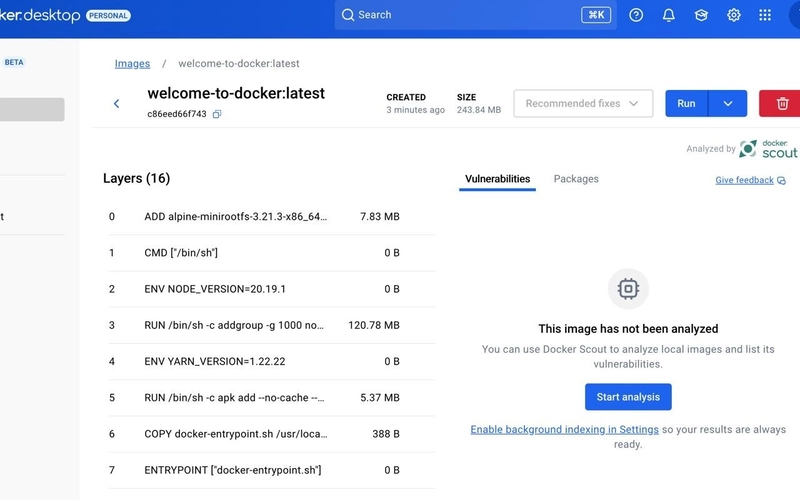
Step 1: Launch Docker Desktop.
Step 2: Navigate to the “Images” tab on the left panel.
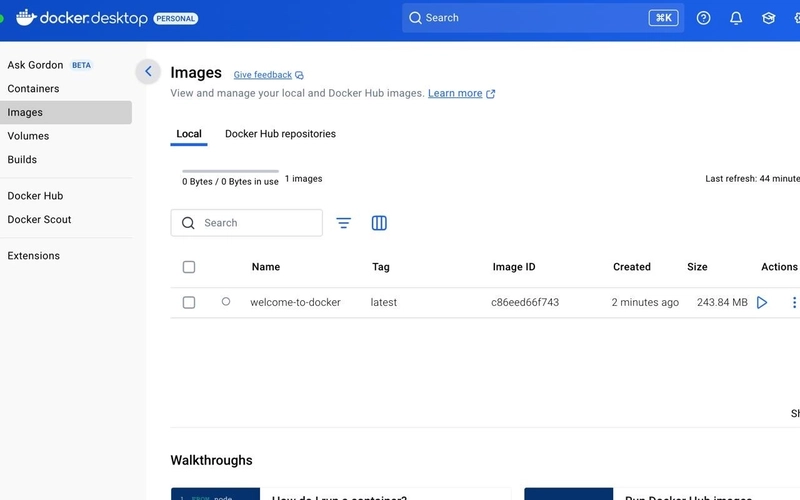
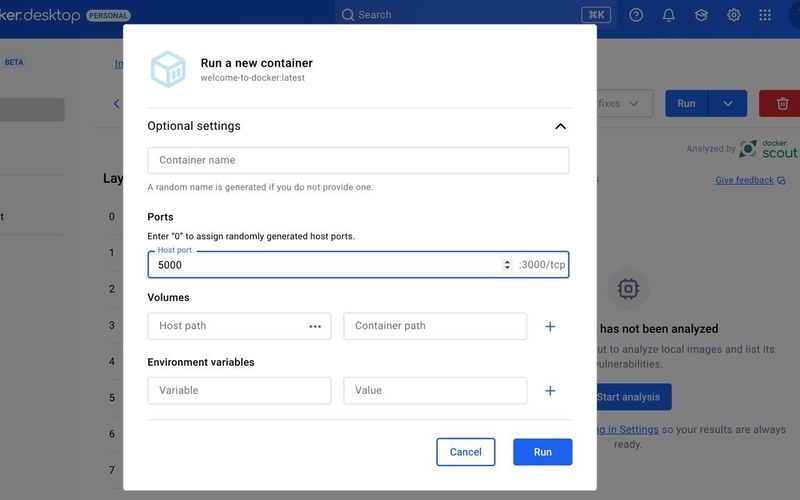
Step 3: Run the Image
• Find your image (e.g., my-react-app) in the list.
• Click the “Run” button next to it.
• In the popup:
• Set a container name (optional).
• Set the port mapping — e.g., host port 5000 to container port
• Click Run.
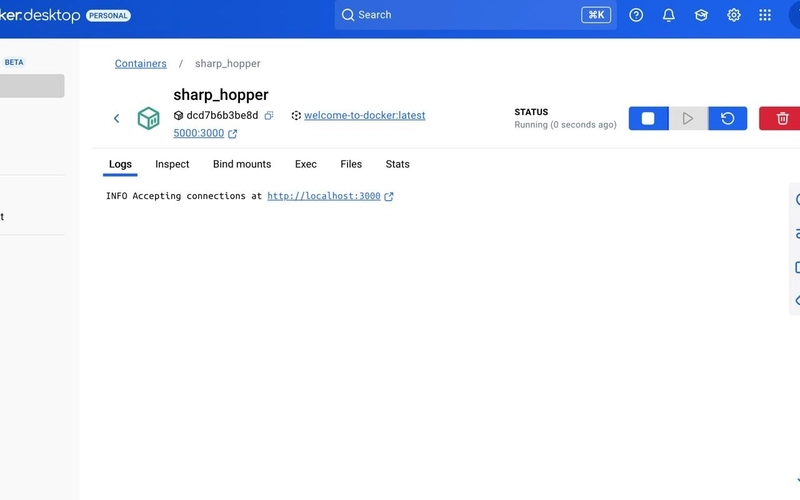
Step 4: Access the App
• Go to your browser and open http://localhost:5000 to view your app.

Dockerizing applications simplifies deployment, ensures consistency across environments, and makes scaling easier. By carefully crafting a Dockerfile, I containerized my React app in a clean, efficient way ready for production or further development.