


![[The AI Show Episode 143]: ChatGPT Revenue Surge, New AGI Timelines, Amazon’s AI Agent, Claude for Education, Model Context Protocol & LLMs Pass the Turing Test](https://www.marketingaiinstitute.com/hubfs/ep%20143%20cover.png)


![From Accountant to Data Engineer with Alyson La [Podcast #168]](https://cdn.hashnode.com/res/hashnode/image/upload/v1744420903260/fae4b593-d653-41eb-b70b-031591aa2f35.png?#)


.png?#)


![Apple Watch SE 2 On Sale for Just $169.97 [Deal]](https://www.iclarified.com/images/news/96996/96996/96996-640.jpg)

![Apple Posts Full First Episode of 'Your Friends & Neighbors' on YouTube [Video]](https://www.iclarified.com/images/news/96990/96990/96990-640.jpg)


Connecting an Azure Web App with SQL Server using Private endpoints
In today's digital age, security is paramount for every company, regardless of its size or industry. The increasing prevalence of cyber threats, data breaches, and malicious attacks underscores the necessity of robust security measures. Some key reasons why security is critical are protection of sensitive data, maintaining trust, preventing financial loss that gives a competitive advantage. Security can be enables at multiple levels, that includes identity level and network level. By identity here we mean securing access to company resources using user identities. Network layer of resources can be protected using Firewalls and access-policies, that enable only authorized traffic (IP addresses) to reach your resources. Prerequisites Active Azure Subscription Resources created SQL Server SQL database VNet and Subnets Private Endpoints Web Apps VNets/Subnets Creation Virtual Networks provide isolation ad enables secure communication between different resources withing a virtual network. This prevents enabling public access to different resource hence enhancing the network layer security. We will create a Virtual Network and a Subnet inside it. Creating a subnet within the Vnet, this is the Subnet that will have the private endpoint in it Finally, hit create to create the Virtual network with the Subnet. SQL Server and Database We will create a SQL Server with Public access disabled and only use private endpoint to access the server. Instead of SQL authentication we will use AAD based auth for the SQL server, this will help us be credential free. Disable Public access on the SQL Server by going to the Networking Tab Enable private access using Private endpoints. Create a private endpoint inside the Subnet created above. Make sure to enable Private DNS zones, so that the DNS name for the Private Endpoint can be resolved to an IP address inside the VNet. When we create Private endpoints from resource itself, the target resource gets filled automatically, here we want it to be "sqlServer" Selecting this option will create all the required resources, that are related to DNS. The private endpoint domain name can be used to connect to the service later on. Now the SQL Server can be accessed from the VNet using a Private endpoint. Accessing the created database for Table creation A virtual machine in the same Vnet as the Private endpoint can be used to access the SQL server. Create a virtual machine and RDP into it. Login to Azure from the VM and access the Query editor tile of the database Accessing the DB from outside the VNet, you will get the below issue While accessing from the VM would allow the access to the database. You might need access to the query editor below while creating tables and users in the database. Now the database is ready. Using Managed Identity to allow Web App to access the database Managed Identities (MI) help us become credential free, we whitelist these MIs in a resource and other resources can use to this MI to access the resource it is whitelisted in, just like a user. Go to the Web App resource in the portal and turn on the System assigned managed identity. This will create a MI with the same name as the Web App, bound to the lifecycle of the Web App. Now, this MI has to be added as a user in the database, you can navigate to the query editor of the database and run the below command CREATE USER [web-app-name] FROM EXTERNAL PROVIDER ; ALTER ROLE db_datareader ADD MEMBER [web-app-name]; ALTER ROLE db_datawriter ADD MEMBER [web-app-name]; ALTER ROLE db_ddladmin ADD MEMBER [web-app-name]; GO The connection string for the database would be something like this Server=tcp:.database.windows.net,1433;Initial Catalog=;Encrypt=True;TrustServerCertificate=False;Connection Timeout=30;Authentication="Active Directory Default"; Note the Authentication variable as "Active Directory Default". This helps us go credential free. You can save the Connection string in the Environment variables of the Web App instead of using it directly inside the code. Enabling the Web App to access the SQL Server using Private endpoint Now, in the above section we covered the part where we restrict access to the SQL Database based on identity. Now, we will see how to protect the SQL Server at the network level. We have enabled only private access to the server using private endpoints. But the web app does not belong to the VNet where the Private endpoint exists. This is where we have a feature called "Vnet integration" for Web App. This allows the Web App to access resources within a given Vnet, therefore enabling access to the Private endpoint. VNet integration directs outbound calls from the service to land into the VNet. Create a VNet integration and select the VNet where the Private endpoint is created, simple as that! Now, the outbound calls from the Web app would land into the VNet and use the Private endpoint to access the database.
In today's digital age, security is paramount for every company, regardless of its size or industry. The increasing prevalence of cyber threats, data breaches, and malicious attacks underscores the necessity of robust security measures.
Some key reasons why security is critical are protection of sensitive data, maintaining trust, preventing financial loss that gives a competitive advantage.
Security can be enables at multiple levels, that includes identity level and network level. By identity here we mean securing access to company resources using user identities. Network layer of resources can be protected using Firewalls and access-policies, that enable only authorized traffic (IP addresses) to reach your resources.
Prerequisites
- Active Azure Subscription
Resources created
- SQL Server
- SQL database
- VNet and Subnets
- Private Endpoints
- Web Apps
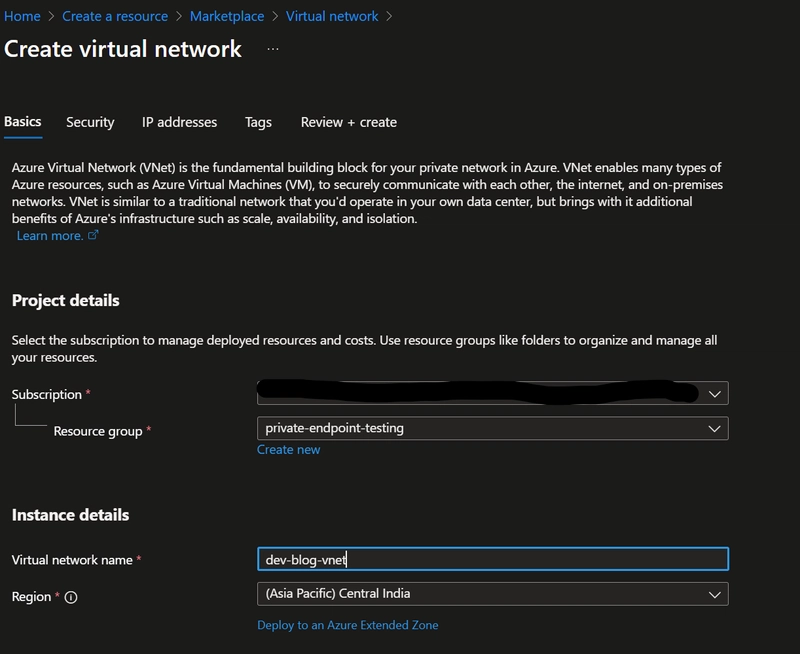
VNets/Subnets Creation
Virtual Networks provide isolation ad enables secure communication between different resources withing a virtual network. This prevents enabling public access to different resource hence enhancing the network layer security.
- We will create a Virtual Network and a Subnet inside it.
- Creating a subnet within the Vnet, this is the Subnet that will have the private endpoint in it
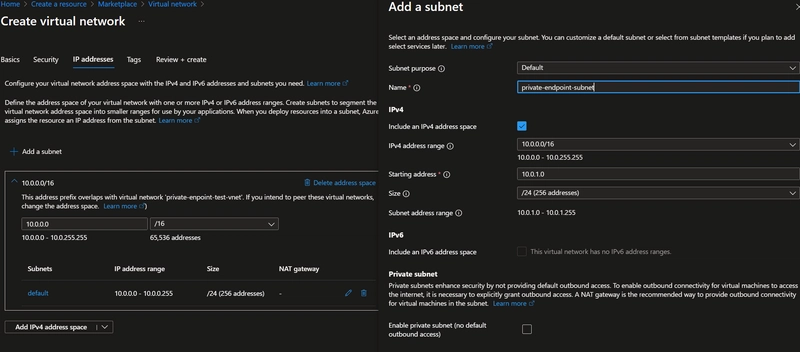
Finally, hit create to create the Virtual network with the Subnet.
SQL Server and Database
We will create a SQL Server with Public access disabled and only use private endpoint to access the server. Instead of SQL authentication we will use AAD based auth for the SQL server, this will help us be credential free.
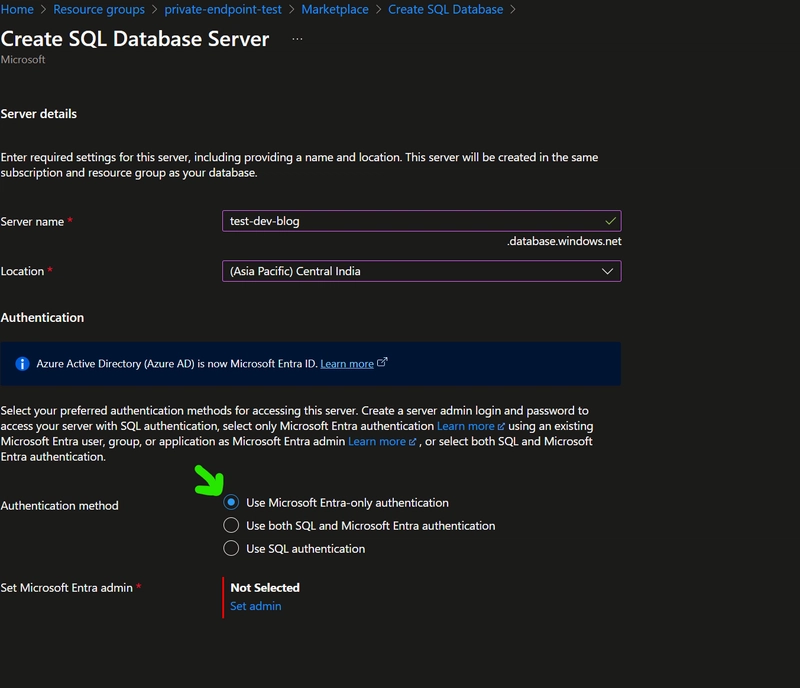
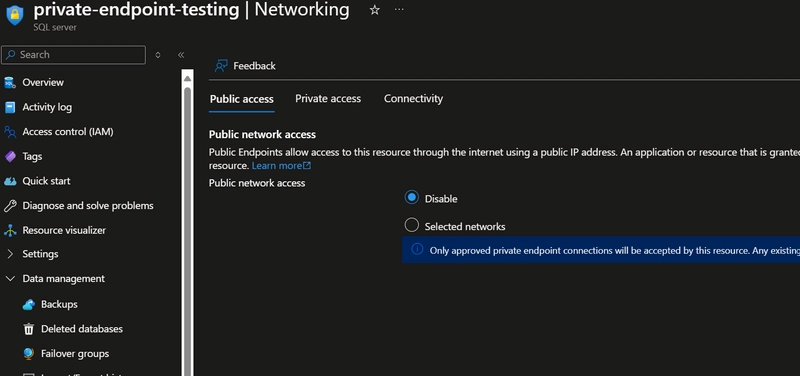
Disable Public access on the SQL Server by going to the Networking Tab
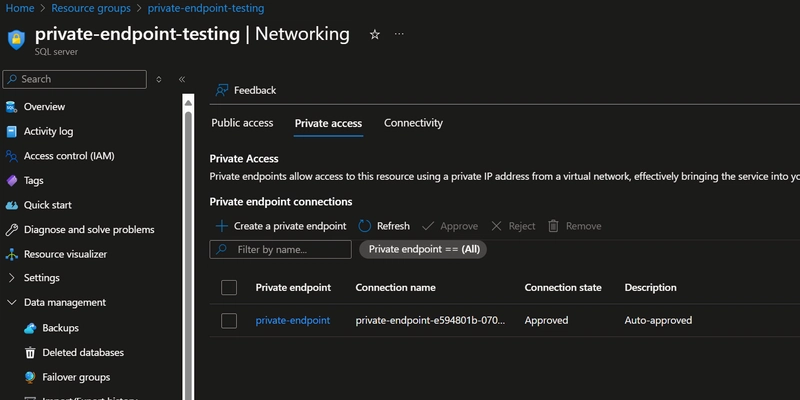
Enable private access using Private endpoints. Create a private endpoint inside the Subnet created above.
Make sure to enable Private DNS zones, so that the DNS name for the Private Endpoint can be resolved to an IP address inside the VNet. When we create Private endpoints from resource itself, the target resource gets filled automatically, here we want it to be "sqlServer"
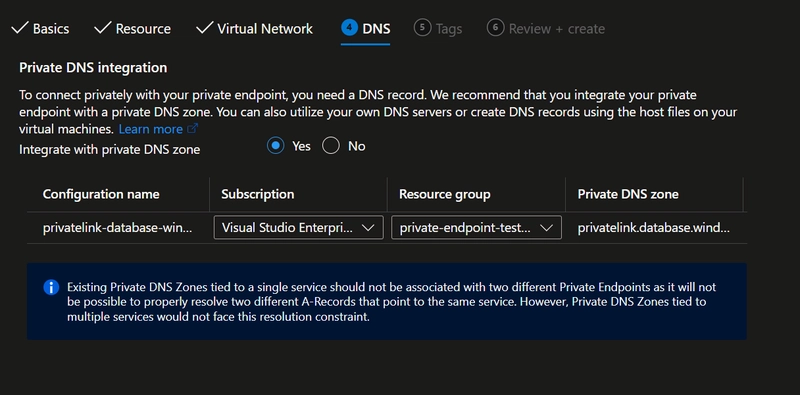
Selecting this option will create all the required resources, that are related to DNS. The private endpoint domain name can be used to connect to the service later on. Now the SQL Server can be accessed from the VNet using a Private endpoint.
Accessing the created database for Table creation
A virtual machine in the same Vnet as the Private endpoint can be used to access the SQL server. Create a virtual machine and RDP into it. Login to Azure from the VM and access the Query editor tile of the database
Accessing the DB from outside the VNet, you will get the below issue
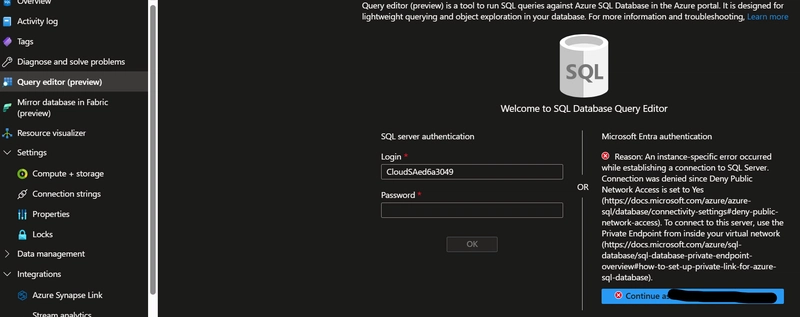
While accessing from the VM would allow the access to the database. You might need access to the query editor below while creating tables and users in the database. Now the database is ready.
Using Managed Identity to allow Web App to access the database
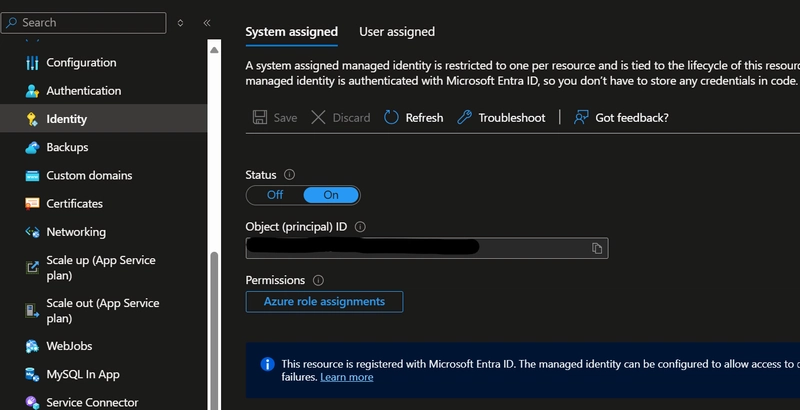
Managed Identities (MI) help us become credential free, we whitelist these MIs in a resource and other resources can use to this MI to access the resource it is whitelisted in, just like a user.
Go to the Web App resource in the portal and turn on the System assigned managed identity. This will create a MI with the same name as the Web App, bound to the lifecycle of the Web App.
Now, this MI has to be added as a user in the database, you can navigate to the query editor of the database and run the below command
CREATE USER [web-app-name] FROM EXTERNAL PROVIDER ;
ALTER ROLE db_datareader ADD MEMBER [web-app-name];
ALTER ROLE db_datawriter ADD MEMBER [web-app-name];
ALTER ROLE db_ddladmin ADD MEMBER [web-app-name];
GO
The connection string for the database would be something like this
Server=tcp:
Note the Authentication variable as "Active Directory Default". This helps us go credential free. You can save the Connection string in the Environment variables of the Web App instead of using it directly inside the code.
Enabling the Web App to access the SQL Server using Private endpoint
Now, in the above section we covered the part where we restrict access to the SQL Database based on identity. Now, we will see how to protect the SQL Server at the network level. We have enabled only private access to the server using private endpoints. But the web app does not belong to the VNet where the Private endpoint exists.
This is where we have a feature called "Vnet integration" for Web App. This allows the Web App to access resources within a given Vnet, therefore enabling access to the Private endpoint.
VNet integration directs outbound calls from the service to land into the VNet.
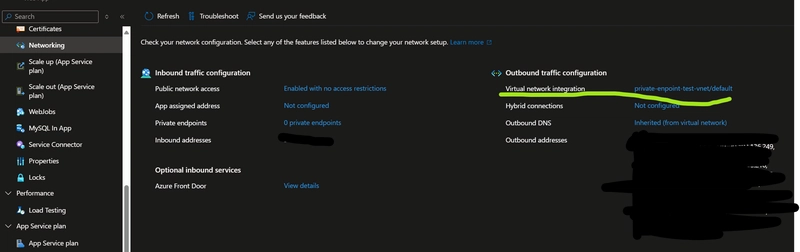
Create a VNet integration and select the VNet where the Private endpoint is created, simple as that! Now, the outbound calls from the Web app would land into the VNet and use the Private endpoint to access the database.
Yipee! We are done! I know the above can be a little overwhelming so below is a checklist you can tick when completed.
- Create a VNet and Subnets inside it
- Create a SQL Database and Server with public access disabled
- Enable Private access to the SQL Server using Private endpoint
- Create Web App and add Vnet integration to it, make sure the VNet integration is created using the same VNet where Private Endpoint is created.
- Create a MI for the Web App and add it as a user in the database
- Update the correct connection string in the code of env variables of the Web App