


![[The AI Show Episode 146]: Rise of “AI-First” Companies, AI Job Disruption, GPT-4o Update Gets Rolled Back, How Big Consulting Firms Use AI, and Meta AI App](https://www.marketingaiinstitute.com/hubfs/ep%20146%20cover.png)


![Beats Studio Pro Wireless Headphones Now Just $169.95 - Save 51%! [Deal]](https://www.iclarified.com/images/news/97258/97258/97258-640.jpg)


How to Install Foundation-Sec 8B by Cisco: The Ultimate Cybersecurity AI Model
In the fast-evolving landscape of cybersecurity, the ability to leverage AI models tailored for domain-specific intelligence is no longer a dream, it's a reality. Foundation-Sec-8B, developed by the Foundation AI team at Cisco, sets a new benchmark for open-weight, domain-specialized language models. Built on the Llama-3.1-8B backbone, this 8-billion parameter transformer model is rigorously trained on a rich corpus of cybersecurity-specific data, ranging from threat intelligence reports to incident response documentation and vulnerability databases. Foundation-Sec-8B sets itself apart with its deep understanding of core security principles across diverse domains, offering capabilities like threat mapping, vulnerability prioritization, attack simulation, and SOC workflow automation. It can power use cases such as alert triage, security configuration validation, compliance evidence extraction, and even red-team planning with nuanced contextual awareness. It is designed for secure local or cloud deployment, and empowers organizations to build privacy-preserving, AI-driven security solutions, making it ideal for environments demanding high regulatory compliance and operational control. In this article, we'll dive into the step-by-step installation and setup process of this model. By the end of this article, you'll be able to run this model either locally or on cloud. Prerequisites The minimum system requirements for running this model are: GPU: RTX A6000 Storage: 50GB (preferable) VRAM: 16GB Anaconda installed Step-by-step process to install and run Foundation-Sec 8B For the purpose of this tutorial, we’ll use a GPU-powered Virtual Machine by NodeShift since it provides high compute Virtual Machines at a very affordable cost on a scale that meets GDPR, SOC2, and ISO27001 requirements. Also, it offers an intuitive and user-friendly interface, making it easier for beginners to get started with Cloud deployments. However, feel free to use any cloud provider of your choice and follow the same steps for the rest of the tutorial. Step 1: Setting up a NodeShift Account Visit app.nodeshift.com and create an account by filling in basic details, or continue signing up with your Google/GitHub account. If you already have an account, login straight to your dashboard. Step 2: Create a GPU Node After accessing your account, you should see a dashboard (see image), now: 1) Navigate to the menu on the left side. 2) Click on the GPU Nodes option. 3) Click on Start to start creating your very first GPU node. These GPU nodes are GPU-powered virtual machines by NodeShift. These nodes are highly customizable and let you control different environmental configurations for GPUs ranging from H100s to A100s, CPUs, RAM, and storage, according to your needs. Step 3: Selecting configuration for GPU (model, region, storage) 1) For this tutorial, we’ll be using 1x RTX A6000 GPU, however, you can choose any GPU as per the prerequisites. 2) Similarly, we’ll opt for 200GB storage by sliding the bar. You can also select the region where you want your GPU to reside from the available ones. Step 4: Choose GPU Configuration and Authentication method 1) After selecting your required configuration options, you'll see the available GPU nodes in your region and according to (or very close to) your configuration. In our case, we'll choose a 1x RTX A6000 48GB GPU node with 64vCPUs/63GB RAM/200GB SSD. 2) Next, you'll need to select an authentication method. Two methods are available: Password and SSH Key. We recommend using SSH keys, as they are a more secure option. To create one, head over to our official documentation. Step 5: Choose an Image The final step is to choose an image for the VM, which in our case is Nvidia Cuda. That's it! You are now ready to deploy the node. Finalize the configuration summary, and if it looks good, click Create to deploy the node. Step 6: Connect to active Compute Node using SSH 1) As soon as you create the node, it will be deployed in a few seconds or a minute. Once deployed, you will see a status Running in green, meaning that our Compute node is ready to use! 2) Once your GPU shows this status, navigate to the three dots on the right, click on Connect with SSH, and copy the SSH details that appear. As you copy the details, follow the below steps to connect to the running GPU VM via SSH: 1) Open your terminal, paste the SSH command, and run it. 2) In some cases, your terminal may take your consent before connecting. Enter ‘yes’. 3) A prompt will request a password. Type the SSH password, and you should be connected. Output: Next, If you want to check the GPU details, run the following command in the terminal: !nvidia-smi Step 7: Set up the project environment with dependencies 1) Create a virtual environment using Anaconda. conda create -n sec python=3.11 -y && c

In the fast-evolving landscape of cybersecurity, the ability to leverage AI models tailored for domain-specific intelligence is no longer a dream, it's a reality. Foundation-Sec-8B, developed by the Foundation AI team at Cisco, sets a new benchmark for open-weight, domain-specialized language models. Built on the Llama-3.1-8B backbone, this 8-billion parameter transformer model is rigorously trained on a rich corpus of cybersecurity-specific data, ranging from threat intelligence reports to incident response documentation and vulnerability databases. Foundation-Sec-8B sets itself apart with its deep understanding of core security principles across diverse domains, offering capabilities like threat mapping, vulnerability prioritization, attack simulation, and SOC workflow automation. It can power use cases such as alert triage, security configuration validation, compliance evidence extraction, and even red-team planning with nuanced contextual awareness. It is designed for secure local or cloud deployment, and empowers organizations to build privacy-preserving, AI-driven security solutions, making it ideal for environments demanding high regulatory compliance and operational control.
In this article, we'll dive into the step-by-step installation and setup process of this model. By the end of this article, you'll be able to run this model either locally or on cloud.
Prerequisites
The minimum system requirements for running this model are:
GPU: RTX A6000
Storage: 50GB (preferable)
VRAM: 16GB
Step-by-step process to install and run Foundation-Sec 8B
For the purpose of this tutorial, we’ll use a GPU-powered Virtual Machine by NodeShift since it provides high compute Virtual Machines at a very affordable cost on a scale that meets GDPR, SOC2, and ISO27001 requirements. Also, it offers an intuitive and user-friendly interface, making it easier for beginners to get started with Cloud deployments. However, feel free to use any cloud provider of your choice and follow the same steps for the rest of the tutorial.
Step 1: Setting up a NodeShift Account
Visit app.nodeshift.com and create an account by filling in basic details, or continue signing up with your Google/GitHub account.
If you already have an account, login straight to your dashboard.
Step 2: Create a GPU Node
After accessing your account, you should see a dashboard (see image), now:
1) Navigate to the menu on the left side.
2) Click on the GPU Nodes option.

3) Click on Start to start creating your very first GPU node.

These GPU nodes are GPU-powered virtual machines by NodeShift. These nodes are highly customizable and let you control different environmental configurations for GPUs ranging from H100s to A100s, CPUs, RAM, and storage, according to your needs.
Step 3: Selecting configuration for GPU (model, region, storage)
1) For this tutorial, we’ll be using 1x RTX A6000 GPU, however, you can choose any GPU as per the prerequisites.
2) Similarly, we’ll opt for 200GB storage by sliding the bar. You can also select the region where you want your GPU to reside from the available ones.

Step 4: Choose GPU Configuration and Authentication method
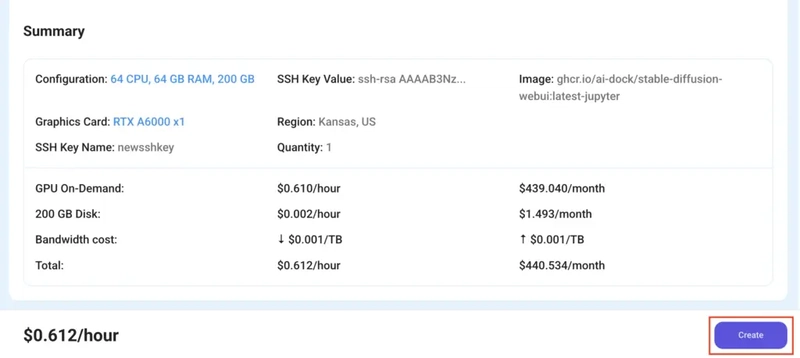
1) After selecting your required configuration options, you'll see the available GPU nodes in your region and according to (or very close to) your configuration. In our case, we'll choose a 1x RTX A6000 48GB GPU node with 64vCPUs/63GB RAM/200GB SSD.

2) Next, you'll need to select an authentication method. Two methods are available: Password and SSH Key. We recommend using SSH keys, as they are a more secure option. To create one, head over to our official documentation.

Step 5: Choose an Image
The final step is to choose an image for the VM, which in our case is Nvidia Cuda.

That's it! You are now ready to deploy the node. Finalize the configuration summary, and if it looks good, click Create to deploy the node.

Step 6: Connect to active Compute Node using SSH
1) As soon as you create the node, it will be deployed in a few seconds or a minute. Once deployed, you will see a status Running in green, meaning that our Compute node is ready to use!
2) Once your GPU shows this status, navigate to the three dots on the right, click on Connect with SSH, and copy the SSH details that appear.

As you copy the details, follow the below steps to connect to the running GPU VM via SSH:
1) Open your terminal, paste the SSH command, and run it.
2) In some cases, your terminal may take your consent before connecting. Enter ‘yes’.
3) A prompt will request a password. Type the SSH password, and you should be connected.
Output:

Next, If you want to check the GPU details, run the following command in the terminal:
!nvidia-smi
Step 7: Set up the project environment with dependencies
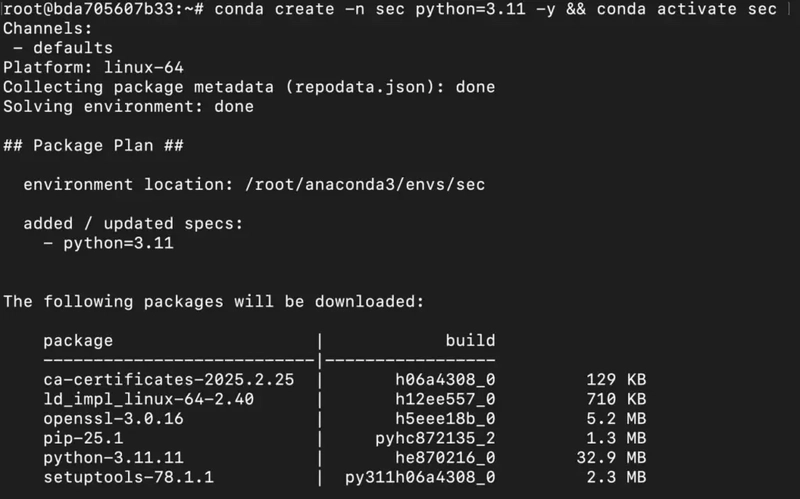
1) Create a virtual environment using Anaconda.
conda create -n sec python=3.11 -y && conda activate sec
Output:
2) Once you're inside the environment, install necessary dependencies to run the model.
pip install torch
pip install git+https://github.com/huggingface/transformers
pip install git+https://github.com/huggingface/accelerate
pip install huggingface_hub
Output:

3) Install and run jupyter notebook.
conda install -c conda-forge --override-channels notebook -y
conda install -c conda-forge --override-channels ipywidgets -y
jupyter notebook --allow-root
6) If you're on a remote machine (e.g., NodeShift GPU), you'll need to do SSH port forwarding in order to access the jupyter notebook session on your local browser.
Run the following command in your local terminal after replacing:
ssh -L 8888:localhost:8888 -p -i root@
Output:

After this copy the URL you received in your remote server:

And paste this on your local browser to access the Jupyter Notebook session.
Step 8: Download and Run the model
1) Open a Python notebook inside Jupyter.

2) Download model checkpoints.
import torch
from transformers import AutoTokenizer, AutoModelForCausalLM

# Load the model and tokenizer
tokenizer = AutoTokenizer.from_pretrained("fdtn-ai/Foundation-Sec-8B")
model = AutoModelForCausalLM.from_pretrained("fdtn-ai/Foundation-Sec-8B")
Output:

3) Finally, run the model with your desired prompt.
# Example: Matching CWE to CVE IDs
prompt="""CVE-2021-44228 is a remote code execution flaw in Apache Log4j2 via unsafe JNDI lookups (“Log4Shell”). The CWE is CWE-502.
CVE-2017-0144 is a remote code execution vulnerability in Microsoft’s SMBv1 server (“EternalBlue”) due to a buffer overflow. The CWE is CWE-119.
CVE-2014-0160 is an information-disclosure bug in OpenSSL’s heartbeat extension (“Heartbleed”) causing out-of-bounds reads. The CWE is CWE-125.
CVE-2017-5638 is a remote code execution issue in Apache Struts 2’s Jakarta Multipart parser stemming from improper input validation of the Content-Type header. The CWE is CWE-20.
CVE-2019-0708 is a remote code execution vulnerability in Microsoft’s Remote Desktop Services (“BlueKeep”) triggered by a use-after-free. The CWE is CWE-416.
CVE-2015-10011 is a vulnerability about OpenDNS OpenResolve improper log output neutralization. The CWE is"""
# Tokenize the input
inputs = tokenizer(prompt, return_tensors="pt")
# Generate the response
outputs = model.generate(
inputs["input_ids"],
max_new_tokens=3,
do_sample=True,
temperature=0.1,
top_p=0.9,
)
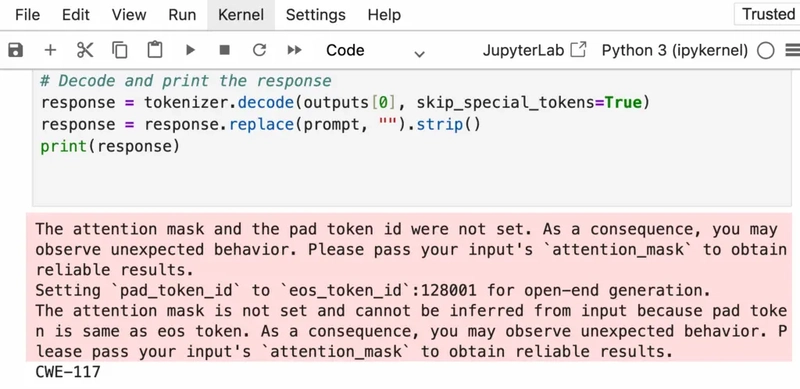
# Decode and print the response
response = tokenizer.decode(outputs[0], skip_special_tokens=True)
response = response.replace(prompt, "").strip()
print(response)
Output:
You can increase/decrease max_new_tokens according to change the length of the responses.
Conclusion
Foundation-Sec-8B combines the power of advanced language modeling with deep cybersecurity specialization, enabling precise and efficient handling of tasks like threat detection, vulnerability assessment, and red-team simulations. As organizations look to integrate this model into their security workflows, NodeShift offers a seamless deployment experience, providing scalable, secure, and cost-effective infrastructure that supports both on-prem and cloud-based installations. With NodeShift, teams can quickly spin up environments tailored for AI-powered operations, ensuring performance, compliance, and full control at every step of the deployment journey.
For more information about NodeShift:


