


![[The AI Show Episode 146]: Rise of “AI-First” Companies, AI Job Disruption, GPT-4o Update Gets Rolled Back, How Big Consulting Firms Use AI, and Meta AI App](https://www.marketingaiinstitute.com/hubfs/ep%20146%20cover.png)


![Ditching a Microsoft Job to Enter Startup Purgatory with Lonewolf Engineer Sam Crombie [Podcast #171]](https://cdn.hashnode.com/res/hashnode/image/upload/v1746753508177/0cd57f66-fdb0-4972-b285-1443a7db39fc.png?#)


![[Fixed] Gemini 2.5 Flash missing file upload for free app users](https://i0.wp.com/9to5google.com/wp-content/uploads/sites/4/2025/03/google-gemini-workspace-1.jpg?resize=1200%2C628&quality=82&strip=all&ssl=1)


![As Galaxy Watch prepares a major change, which smartwatch design to you prefer? [Poll]](https://i0.wp.com/9to5google.com/wp-content/uploads/sites/4/2024/07/Galaxy-Watch-Ultra-and-Apple-Watch-Ultra-1.jpg?resize=1200%2C628&quality=82&strip=all&ssl=1)


![Apple M4 MacBook Air Hits New All-Time Low of $824 [Deal]](https://www.iclarified.com/images/news/97288/97288/97288-640.jpg)
![An Apple Product Renaissance Is on the Way [Gurman]](https://www.iclarified.com/images/news/97286/97286/97286-640.jpg)
![Apple to Sync Captive Wi-Fi Logins Across iPhone, iPad, and Mac [Report]](https://www.iclarified.com/images/news/97284/97284/97284-640.jpg)
![Apple M4 iMac Drops to New All-Time Low Price of $1059 [Deal]](https://www.iclarified.com/images/news/97281/97281/97281-640.jpg)


![Apple's 11th Gen iPad Drops to New Low Price of $277.78 on Amazon [Updated]](https://images.macrumors.com/t/yQCVe42SNCzUyF04yj1XYLHG5FM=/2500x/article-new/2025/03/11th-gen-ipad-orange.jpeg)


Setting Up SSL on AWS Elastic Beanstalk Single Instances
Photo by Taylor Vick on Unsplash Deploying applications on AWS Elastic Beanstalk simplifies many aspects of running your web applications, but setting up SSL/TLS on single-instance environments can get a bit tricky. In this article, we’ll explore two practical approaches to implementing SSL for your Elastic Beanstalk single instances. Why SSL on Single Instances Is Challenging AWS Elastic Beanstalk single instances don’t come with built-in SSL termination like their load-balanced counterparts. When you deploy a web application in a single-instance environment, you’re essentially working with a standalone EC2 instance without the benefits of an Application Load Balancer to handle SSL termination. However, there are compelling reasons to use single instances: Cost efficiency : Avoiding load balancer costs for smaller applications Simplified architecture : Reduced complexity for development or test environments Direct instance access : Easier debugging and monitoring Lower traffic needs : Many applications don’t require the scalability of multiple instances Let’s dive into two effective solutions for enabling SSL on your Elastic Beanstalk single instances. Solution 1: Using .ebextensions with Let’s Encrypt This approach involves configuring your Elastic Beanstalk environment with custom .ebextensions scripts to automatically set up and renew SSL certificates using Let's Encrypt. Step 1: Create the .ebextensions Directory In your application’s root directory, create a .ebextensions folder if it doesn't already exist: mkdir -p .ebextensions Step 2: Create the Let’s Encrypt Configuration Script Create a configuration file that will handle the installation and setup of Let’s Encrypt: # .ebextensions/01_ssl_setup.config packages: yum: mod24_ssl: [] epel-release: [] container_commands: 10_install_certbot: command: "sudo yum install -y certbot python-certbot-apache" 20_get_certificate: command: "sudo certbot certonly --standalone --debug --non-interactive --email ${EMAIL} --agree-tos --domains ${DOMAIN} --keep-until-expiring --pre-hook \"service httpd stop\" --post-hook \"service httpd start\"" env: EMAIL: "your-email@example.com" DOMAIN: "yourdomain.com" 30_link_cert: command: "ln -sf /etc/letsencrypt/live/${DOMAIN}/cert.pem /etc/pki/tls/certs/server.crt" env: DOMAIN: "yourdomain.com" 40_link_key: command: "ln -sf /etc/letsencrypt/live/${DOMAIN}/privkey.pem /etc/pki/tls/certs/server.key" env: DOMAIN: "yourdomain.com" 50_enable_ssl_conf: command: "sed -i 's/#LoadModule ssl_module/LoadModule ssl_module/' /etc/httpd/conf.modules.d/00-ssl.conf" 60_create_ssl_conf: command: | cat > /etc/httpd/conf.d/ssl.conf Load Balancers Select your environment’s load balancer Add a listener for HTTPS (port 443) Add your SSL certificate (you can use AWS Certificate Manager for free public certificates) { "Listeners": [ { "Protocol": "HTTPS", "Port": 443, "DefaultActions": [ { "Type": "forward", "TargetGroupArn": "arn:aws:elasticloadbalancing:us-east-1:123456789012:targetgroup/awseb-AWSEB-ABCDEFGHIJ/0123456789abcdef" } ], "SslPolicy": "ELBSecurityPolicy-2016-08", "Certificates": [ { "CertificateArn": "arn:aws:acm:us-east-1:123456789012:certificate/12345678-1234-1234-1234-123456789012" } ] } ] } Step 3: Set Up CNAME Records In your DNS provider: Create a CNAME record pointing your domain to your Elastic Beanstalk environment URL For example: yourdomain.com → my-environment.elasticbeanstalk.com Step 4: Configure HTTP to HTTPS Redirect (Optional) Create a listener rule for port 80 that redirects to HTTPS: In the EC2 Console, go to the Load Balancer Add a listener for HTTP (port 80) Add a redirect action to HTTPS (port 443) How This Solution Works The load balancer handles SSL termination Traffic is encrypted between clients and the load balancer The load balancer forwards traffic to your single EC2 instance You benefit from AWS Certificate Manager’s free certificates and automatic renewals The architecture remains simple with just one instance Considerations for This Approach Cost implications : This approach adds the cost of a load balancer (approximately $16–20/month) Advantage : AWS manages certificate renewal automatically Simplified management : No need to manage SSL configuration on the instance itself Comparing the Two Approaches Which Solution Should You Choose? Choose Solution 1 (.ebextensions with Let’s Encrypt) if: Cost is a primary concern You’re comfortable managing Linux configurations You want to maintain a truly single-instance architecture Choose Solution 2 (Load Balancer with CNAME) if: You prefer managed services with less operational overhead Budget allows

Photo by Taylor Vick on Unsplash
Deploying applications on AWS Elastic Beanstalk simplifies many aspects of running your web applications, but setting up SSL/TLS on single-instance environments can get a bit tricky. In this article, we’ll explore two practical approaches to implementing SSL for your Elastic Beanstalk single instances.
Why SSL on Single Instances Is Challenging
AWS Elastic Beanstalk single instances don’t come with built-in SSL termination like their load-balanced counterparts. When you deploy a web application in a single-instance environment, you’re essentially working with a standalone EC2 instance without the benefits of an Application Load Balancer to handle SSL termination.
However, there are compelling reasons to use single instances:
- Cost efficiency : Avoiding load balancer costs for smaller applications
- Simplified architecture : Reduced complexity for development or test environments
- Direct instance access : Easier debugging and monitoring
- Lower traffic needs : Many applications don’t require the scalability of multiple instances
Let’s dive into two effective solutions for enabling SSL on your Elastic Beanstalk single instances.
Solution 1: Using .ebextensions with Let’s Encrypt
This approach involves configuring your Elastic Beanstalk environment with custom .ebextensions scripts to automatically set up and renew SSL certificates using Let's Encrypt.
Step 1: Create the .ebextensions Directory
In your application’s root directory, create a .ebextensions folder if it doesn't already exist:
mkdir -p .ebextensions
Step 2: Create the Let’s Encrypt Configuration Script
Create a configuration file that will handle the installation and setup of Let’s Encrypt:
# .ebextensions/01_ssl_setup.config
packages:
  yum:
    mod24_ssl: []
    epel-release: []

container_commands:
  10_install_certbot:
    command: "sudo yum install -y certbot python-certbot-apache"
  20_get_certificate:
    command: "sudo certbot certonly --standalone --debug --non-interactive --email ${EMAIL} --agree-tos --domains ${DOMAIN} --keep-until-expiring --pre-hook \"service httpd stop\" --post-hook \"service httpd start\""
    env:
      EMAIL: "your-email@example.com"
      DOMAIN: "yourdomain.com"
  30_link_cert:
    command: "ln -sf /etc/letsencrypt/live/${DOMAIN}/cert.pem /etc/pki/tls/certs/server.crt"
    env:
      DOMAIN: "yourdomain.com"
  40_link_key:
    command: "ln -sf /etc/letsencrypt/live/${DOMAIN}/privkey.pem /etc/pki/tls/certs/server.key"
    env:
      DOMAIN: "yourdomain.com"
  50_enable_ssl_conf:
    command: "sed -i 's/#LoadModule ssl_module/LoadModule ssl_module/' /etc/httpd/conf.modules.d/00-ssl.conf"
  60_create_ssl_conf:
    command: |
      cat > /etc/httpd/conf.d/ssl.conf << 'EOL'
      Listen 443

        ServerName ${DOMAIN}
        DocumentRoot /var/www/html
        SSLEngine on
        SSLCertificateFile /etc/pki/tls/certs/server.crt
        SSLCertificateKeyFile /etc/pki/tls/certs/server.key
        SSLCertificateChainFile /etc/letsencrypt/live/${DOMAIN}/chain.pem

          AllowOverride All
          Require all granted


      EOL
    env:
      DOMAIN: "yourdomain.com"
files:
  "/etc/cron.d/certbot-renew":
    mode: "000644"
    owner: root
    group: root
    content: |
      0 0,12 * * * root certbot renew --standalone --pre-hook "service httpd stop" --post-hook "service httpd start" --quiet
Make sure to replace your-email@example.com and yourdomain.com with your actual email and domain.
Step 3: Create a Configuration to Handle HTTP to HTTPS Redirect
# .ebextensions/02_ssl_redirect.config
files:
  "/etc/httpd/conf.d/http_redirect.conf":
    mode: "000644"
    owner: root
    group: root
    content: |

        ServerName yourdomain.com
        Redirect permanent / https://yourdomain.com/
Again, replace yourdomain.com with your actual domain.
Step 4: Deploy Your Application
Deploy your application with these .ebextensions files:
eb deploy
How This Solution Works
- The configuration installs the necessary SSL packages and Let’s Encrypt certbot
- It requests a certificate from Let’s Encrypt for your domain
- The Apache web server is configured to use the certificate
- A cron job is set up to automatically renew the certificate before expiration
- HTTP traffic is redirected to HTTPS
Potential Issues and Solutions
Port 80/443 accessibility : Ensure your security group allows inbound traffic on ports 80 and 443.
Certificate renewal failures : The pre-hook and post-hook in the cron job temporarily stop Apache during renewal to free up port 80. Monitor renewal logs at /var/log/letsencrypt/ if you encounter issues.
DNS configuration : Your domain must be correctly pointing to your Elastic Beanstalk instance’s IP address for Let’s Encrypt validation to succeed.
Solution 2: Using a Load Balancer with CNAME
This approach involves creating a single-instance environment but fronting it with a load balancer specifically for SSL termination.
Step 1: Create a Load Balanced Environment
Instead of creating a single-instance environment, create a load-balanced environment with a minimum and maximum of 1 instance:
eb create my-environment --elb-type application --single
Or through the AWS Management Console:
- Create a new environment
- Choose “Web server environment”
- Under “Platform”, select your platform of choice
- Under “Configuration presets”, select “Custom configuration”
- In the “Capacity” section, select “Load balanced”
- Set both “Min instances” and “Max instances” to 1
Step 2: Configure SSL on the Load Balancer
- Navigate to the EC2 Console > Load Balancers
- Select your environment’s load balancer
- Add a listener for HTTPS (port 443)
- Add your SSL certificate (you can use AWS Certificate Manager for free public certificates)
{
  "Listeners": [
    {
      "Protocol": "HTTPS",
      "Port": 443,
      "DefaultActions": [
        {
          "Type": "forward",
          "TargetGroupArn": "arn:aws:elasticloadbalancing:us-east-1:123456789012:targetgroup/awseb-AWSEB-ABCDEFGHIJ/0123456789abcdef"
        }
      ],
      "SslPolicy": "ELBSecurityPolicy-2016-08",
      "Certificates": [
        {
          "CertificateArn": "arn:aws:acm:us-east-1:123456789012:certificate/12345678-1234-1234-1234-123456789012"
        }
      ]
    }
  ]
}
Step 3: Set Up CNAME Records
In your DNS provider:
- Create a CNAME record pointing your domain to your Elastic Beanstalk environment URL
- For example: yourdomain.com → my-environment.elasticbeanstalk.com
Step 4: Configure HTTP to HTTPS Redirect (Optional)
Create a listener rule for port 80 that redirects to HTTPS:
- In the EC2 Console, go to the Load Balancer
- Add a listener for HTTP (port 80)
- Add a redirect action to HTTPS (port 443)
How This Solution Works
- The load balancer handles SSL termination
- Traffic is encrypted between clients and the load balancer
- The load balancer forwards traffic to your single EC2 instance
- You benefit from AWS Certificate Manager’s free certificates and automatic renewals
- The architecture remains simple with just one instance
Considerations for This Approach
Cost implications : This approach adds the cost of a load balancer (approximately $16–20/month)
Advantage : AWS manages certificate renewal automatically
Simplified management : No need to manage SSL configuration on the instance itself
Comparing the Two Approaches
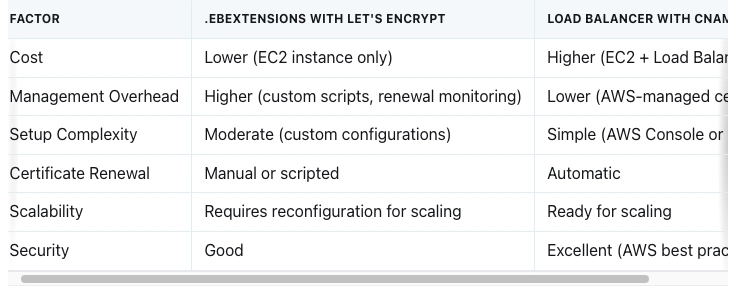
Which Solution Should You Choose?
Choose Solution 1 (.ebextensions with Let’s Encrypt) if:
- Cost is a primary concern
- You’re comfortable managing Linux configurations
- You want to maintain a truly single-instance architecture
Choose Solution 2 (Load Balancer with CNAME) if:
- You prefer managed services with less operational overhead
- Budget allows for an additional ~$20/month
- You might need to scale in the future
- You want automatic certificate renewal without custom scripts
Implementation Best Practices
Regardless of which solution you choose, follow these best practices:
Security Considerations
- Keep your Elastic Beanstalk platform updated
- Use strong SSL/TLS protocols (TLS 1.2 or higher)
- Configure security headers in your application
- Set appropriate security groups to limit access
Monitoring
- Set up CloudWatch alarms for certificate expiration (for Solution 1)
- Monitor HTTP status codes to ensure redirects are working properly
- Set up alerts for SSL/TLS failures
Documentation
Document your SSL setup thoroughly, including:
- Certificate renewal dates and processes
- DNS configuration
- Load balancer or instance configuration details
- Troubleshooting steps for common issues
Conclusion
Setting up SSL on AWS Elastic Beanstalk single instances doesn’t have to be complicated. Both approaches outlined in this article provide secure ways to serve your application over HTTPS.
The .ebextensions approach with Let’s Encrypt offers a cost-effective solution with more hands-on management, while the load balancer approach provides a more managed experience at a higher cost.
Choose the approach that best aligns with your technical comfort level, budget constraints, and operational preferences. Either way, you’ll be providing your users with the secure experience they expect and deserve.
See you in the next article!


![[Parte 2] — O que é Module Federation e que problema ele resolve?](https://media2.dev.to/dynamic/image/width%3D1000,height%3D500,fit%3Dcover,gravity%3Dauto,format%3Dauto/https:%2F%2Fdev-to-uploads.s3.amazonaws.com%2Fuploads%2Farticles%2Fo7wuszdlz8nr6tllpkva.png)
