


![[The AI Show Episode 143]: ChatGPT Revenue Surge, New AGI Timelines, Amazon’s AI Agent, Claude for Education, Model Context Protocol & LLMs Pass the Turing Test](https://www.marketingaiinstitute.com/hubfs/ep%20143%20cover.png)


.png?#)


.webp?#)
.webp?#)

.webp?#)


![[Fixed] Gemini app is failing to generate Audio Overviews](https://i0.wp.com/9to5google.com/wp-content/uploads/sites/4/2025/03/Gemini-Audio-Overview-cover.jpg?resize=1200%2C628&quality=82&strip=all&ssl=1)

![What’s new in Android’s April 2025 Google System Updates [U: 4/14]](https://i0.wp.com/9to5google.com/wp-content/uploads/sites/4/2025/01/google-play-services-3.jpg?resize=1200%2C628&quality=82&strip=all&ssl=1)


![Apple Seeds tvOS 18.5 Beta 2 to Developers [Download]](https://www.iclarified.com/images/news/97011/97011/97011-640.jpg)
![Apple Releases macOS Sequoia 15.5 Beta 2 to Developers [Download]](https://www.iclarified.com/images/news/97014/97014/97014-640.jpg)


Implementing AWS SSO Integration with Jenkins
Configuring SAML authentication to integrate AWS Single Sign-On with Jenkins, enhancing secure user access management and authentication processes. Integration of tools and platforms is an absolute must nowadays in the fast-paced world of DevOps. A good example would be the integration of AWS SSO with Jenkins, an open-source automation server that’s world-famous. AWS SSO enhances login processes by providing a unique point of authentication for AWS services and Jenkins allows automation processes to build up CI/CD Pipelines. Pairing the two gives peace of mind. This blog explains the process of integrating AWS SSO with Jenkins and emphasizes the steps and advantages while explaining the best practices. Pre-requisites A Running Jenkins Server (in any AWS account). IAM Identity Center Enabled. Let’s Begin Start by searching AWS Identity Center in the search and open this service. 2. You will be redirected to the AWS Identity Center Dashboard. Here you can see the Organization ID, AWS access portal URL and Issue URL. 3. Click Applications under the Application assignments section. 4. Once on the Applications page, click on Add Application. 5. On the configurations page, start by selecting the Application type. Under the Setup preference select “I want to select an application from the catalog”. 6. Now in the Application Catalog, search “Jenkins” and select the application and click Next. 7. On the next page, make sure to note down the details under section IAM Identity Center metadata. 8. Now scroll down and under the Application metadata section, add below details and click submit. NOTE: The URL mentioned corresponds to your Jenkins server's IP address, followed by /securityRealm/finishLogin in the path. 9. You will see that the Jenkins has been added to the Applications. 10. Now, select your Jenkins application and click on Action -> Edit Attribute Mappings. 11. Update the attributes and formats as below: 12. Now, login to you Jenkins using the Public IP of the Jenkins Server. Click Manage Jenkins. 13. Now select the Plugins. 14. Under Plugins, select the Available Plugins, then search for SAML. **Select the first SAML plugin and click **Install. 15. Once the Plugin is installed, go back to Manage Jenkins and select Security. 16. Now under Authentication, change the Security Realm type to SAML 2.0 17. Scroll down and under IdP Metadata URL add the IAM Identity Center metadata file URL from the data copied in Step 7. Once done click on Validate IdP Metadata URL. You will get a success response. 18. Scroll down, under Email attribute add as per below image and under Logout URL add the IAM Identity Center sign-out URL from Step 7. 19. Similarly to Email attribute, add group in the Group Attribute field and click Save. 20. Now, we have our AWS SSO setup for Jenkins. We just need to assign it our Users in the IAM Identity Center. Select your Application in the IAM Identity Center and click Assign Users and Groups 21. Search and select the user and click Assign. Now, your users can access this Application once they login via the SSO. Conclusion Integrating AWS SSO with Jenkins streamlines secure user access while simplifying authentication management. By leveraging SAML authentication, you can centralize identity management, enhance security with features like MFA, and reduce the overhead of managing multiple credentials. This setup ensures that your Jenkins workflows are not only secure but also aligned with best practices in modern DevOps environments. With the power of AWS SSO and Jenkins combined, your teams can focus on building, deploying, and scaling applications with peace of mind.
Configuring SAML authentication to integrate AWS Single Sign-On with Jenkins, enhancing secure user access management and authentication processes.
Integration of tools and platforms is an absolute must nowadays in the fast-paced world of DevOps. A good example would be the integration of AWS SSO with Jenkins, an open-source automation server that’s world-famous. AWS SSO enhances login processes by providing a unique point of authentication for AWS services and Jenkins allows automation processes to build up CI/CD Pipelines. Pairing the two gives peace of mind.
This blog explains the process of integrating AWS SSO with Jenkins and emphasizes the steps and advantages while explaining the best practices.
Pre-requisites
A Running Jenkins Server (in any AWS account).
IAM Identity Center Enabled.
Let’s Begin
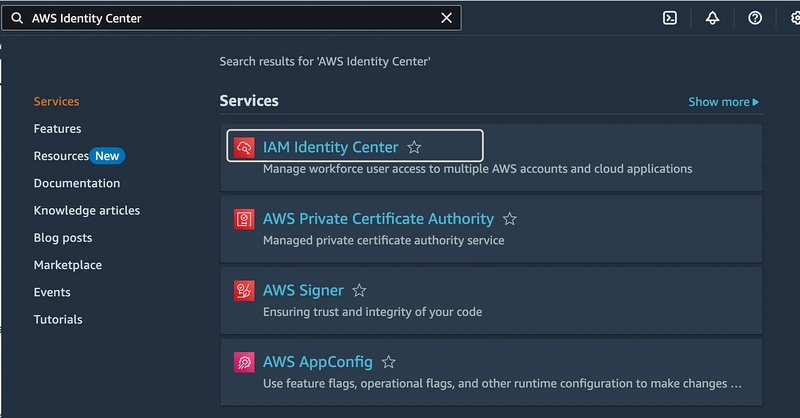
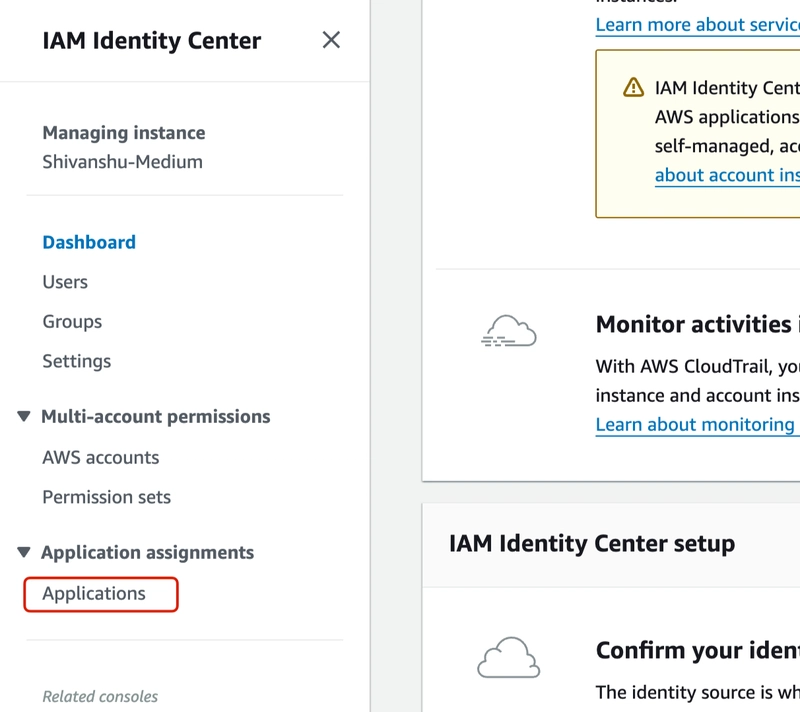
- Start by searching AWS Identity Center in the search and open this service.
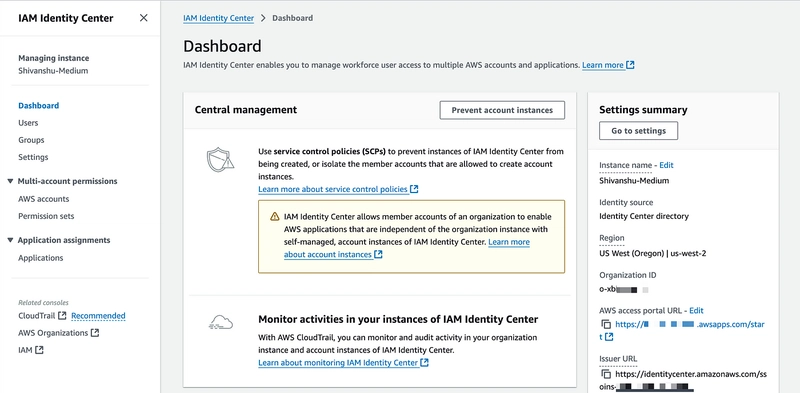
2. You will be redirected to the AWS Identity Center Dashboard. Here you can see the Organization ID, AWS access portal URL and Issue URL.
3. Click Applications under the Application assignments section.
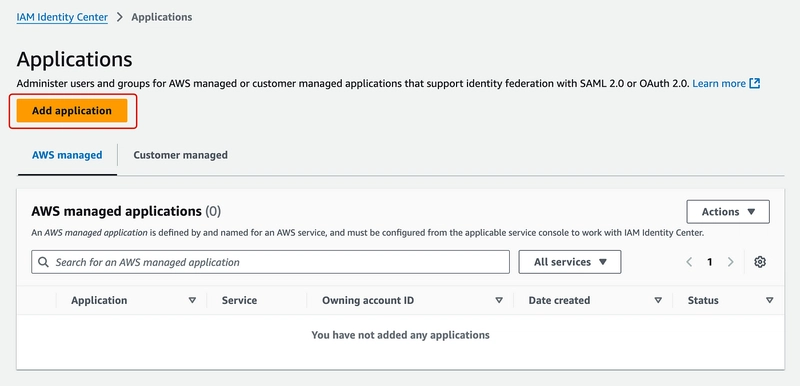
4. Once on the Applications page, click on Add Application.
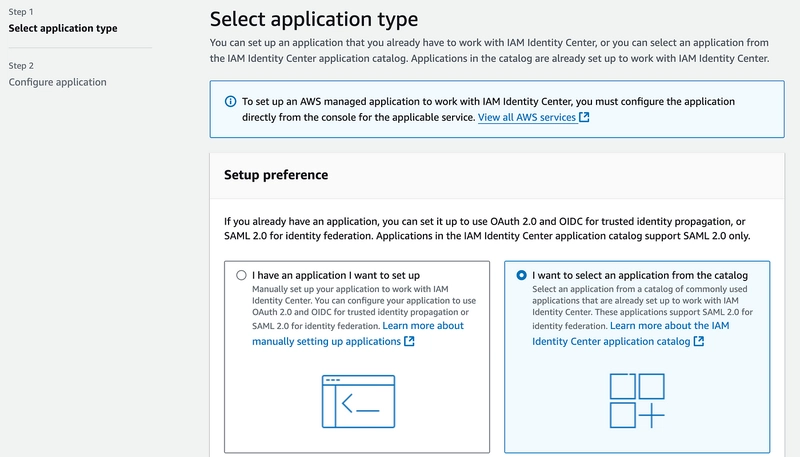
5. On the configurations page, start by selecting the Application type. Under the Setup preference select “I want to select an application from the catalog”.
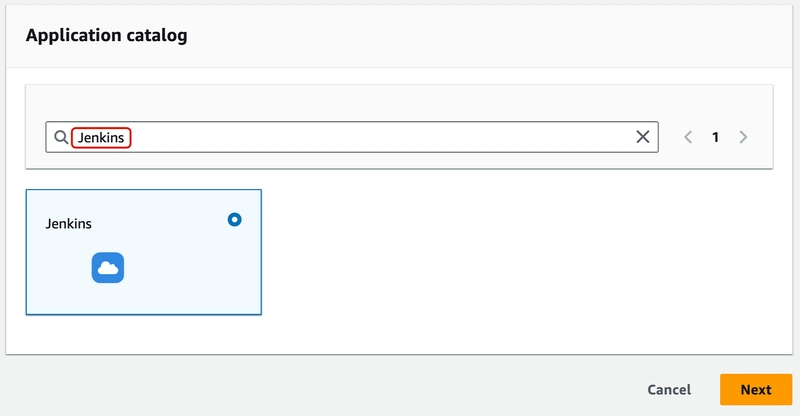
6. Now in the Application Catalog, search “Jenkins” and select the application and click Next.
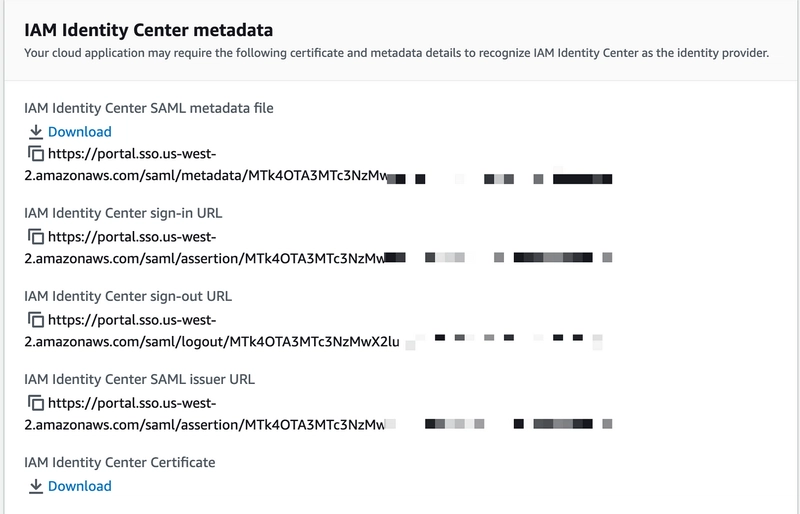
7. On the next page, make sure to note down the details under section IAM Identity Center metadata.
8. Now scroll down and under the Application metadata section, add below details and click submit.
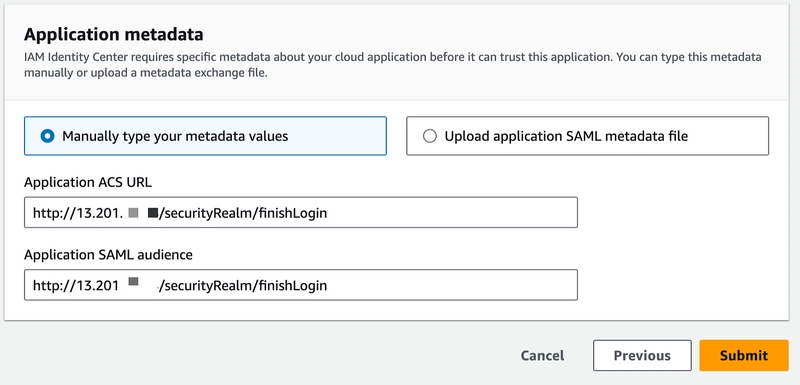
NOTE: The URL mentioned corresponds to your Jenkins server's IP address, followed by /securityRealm/finishLogin in the path.
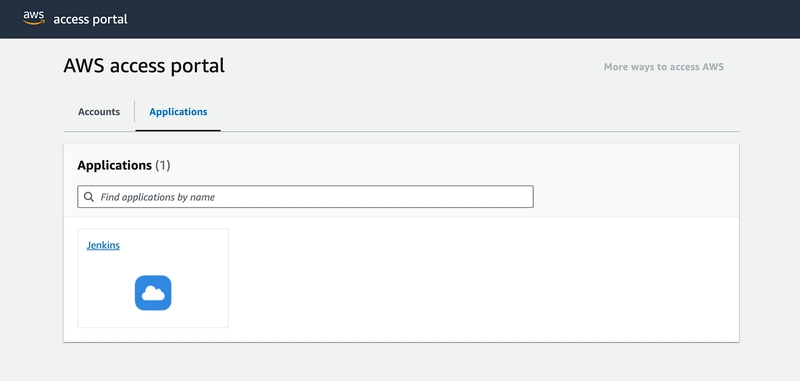
9. You will see that the Jenkins has been added to the Applications.
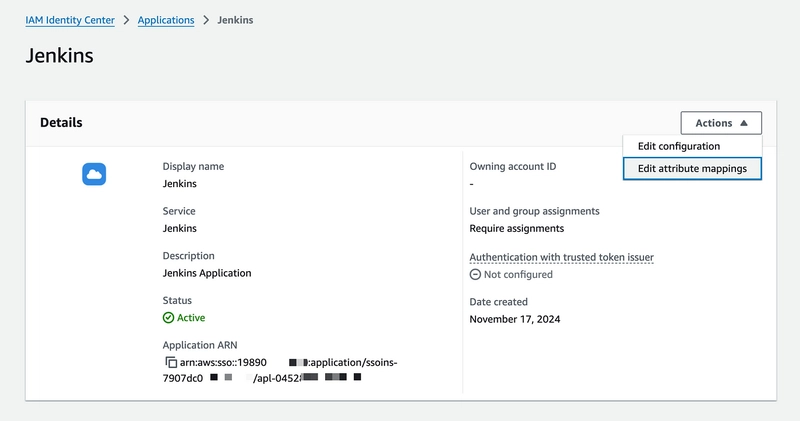
10. Now, select your Jenkins application and click on Action -> Edit Attribute Mappings.
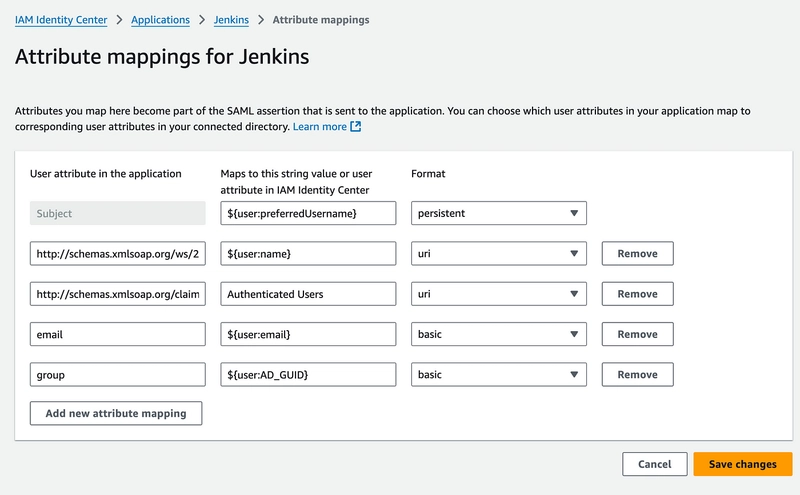
11. Update the attributes and formats as below:
12. Now, login to you Jenkins using the Public IP of the Jenkins Server.
Click Manage Jenkins.
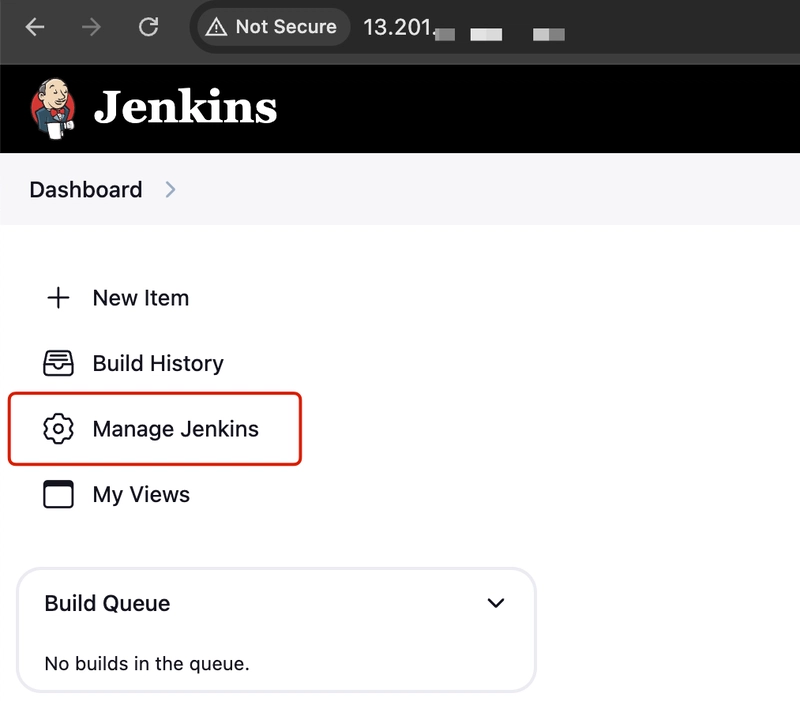
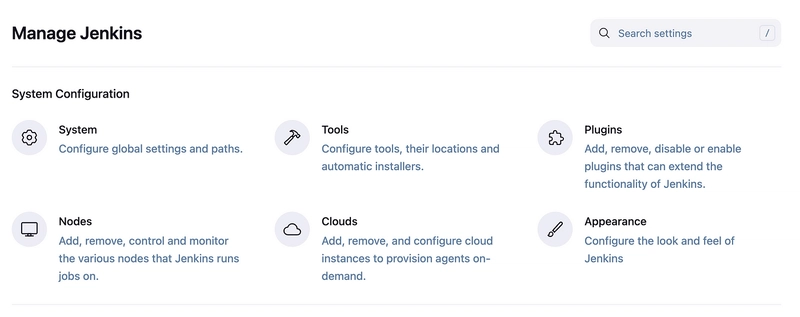
13. Now select the Plugins.
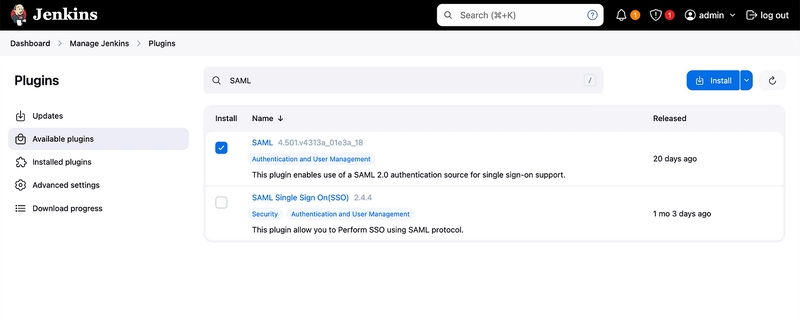
14. Under Plugins, select the Available Plugins, then search for SAML.
**Select the first SAML plugin and click **Install.
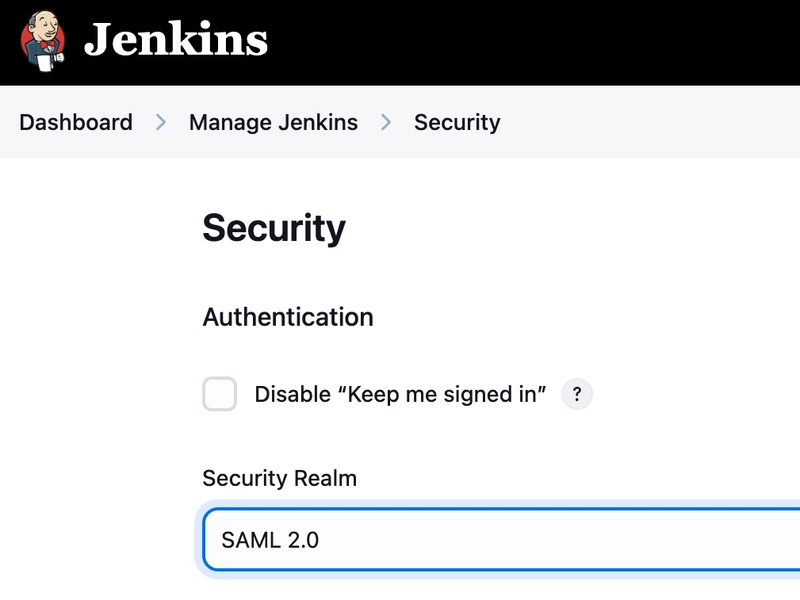
15. Once the Plugin is installed, go back to Manage Jenkins and select Security.
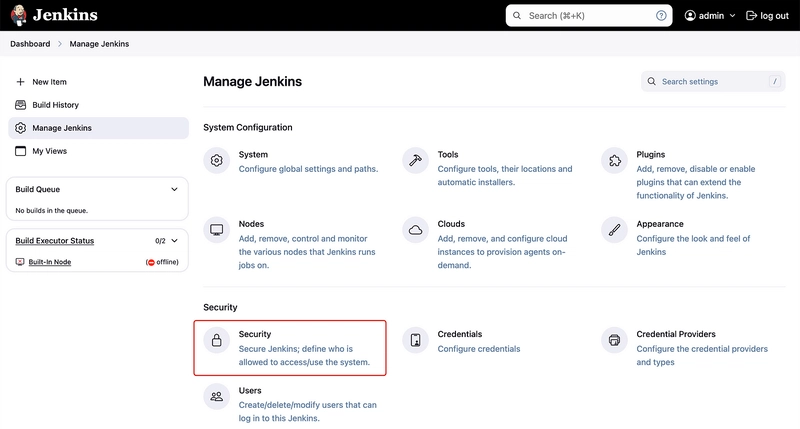
16. Now under Authentication, change the Security Realm type to SAML 2.0
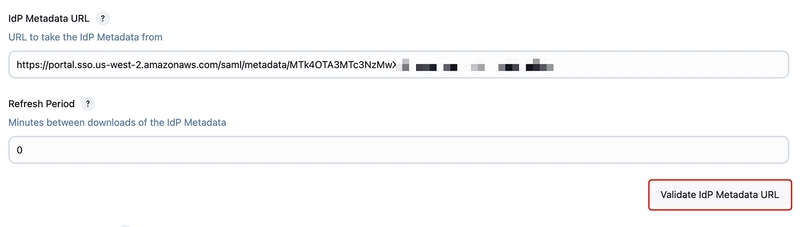
17. Scroll down and under IdP Metadata URL add the IAM Identity Center metadata file URL from the data copied in Step 7. Once done click on Validate IdP Metadata URL. You will get a success response.
18. Scroll down, under Email attribute add as per below image and under Logout URL add the IAM Identity Center sign-out URL from Step 7.
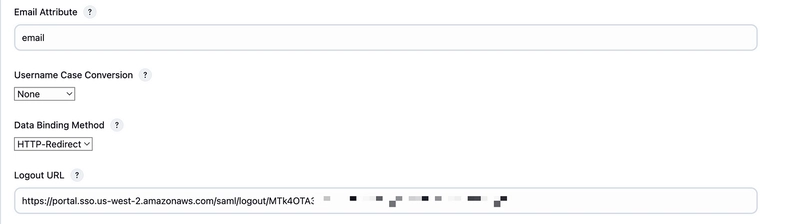
19. Similarly to Email attribute, add group in the Group Attribute field and click Save.
20. Now, we have our AWS SSO setup for Jenkins. We just need to assign it our Users in the IAM Identity Center.
Select your Application in the IAM Identity Center and click Assign Users and Groups
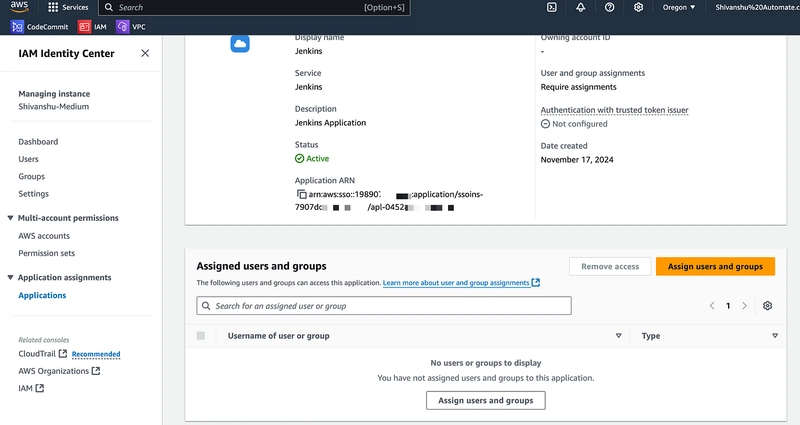
21. Search and select the user and click Assign.
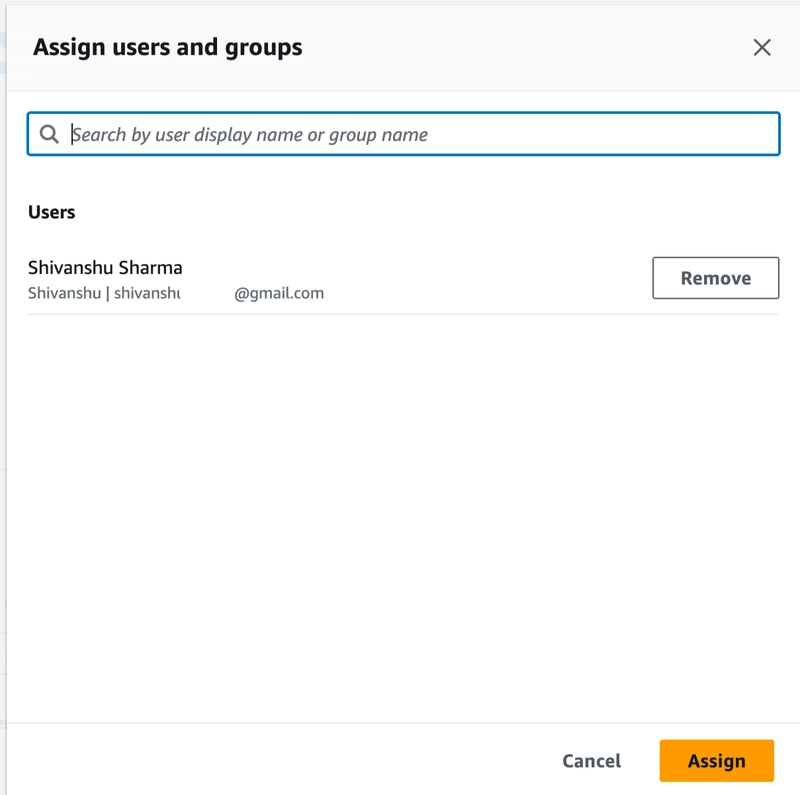
Now, your users can access this Application once they login via the SSO.
Conclusion
Integrating AWS SSO with Jenkins streamlines secure user access while simplifying authentication management. By leveraging SAML authentication, you can centralize identity management, enhance security with features like MFA, and reduce the overhead of managing multiple credentials. This setup ensures that your Jenkins workflows are not only secure but also aligned with best practices in modern DevOps environments.
With the power of AWS SSO and Jenkins combined, your teams can focus on building, deploying, and scaling applications with peace of mind.