


![[The AI Show Episode 144]: ChatGPT’s New Memory, Shopify CEO’s Leaked “AI First” Memo, Google Cloud Next Releases, o3 and o4-mini Coming Soon & Llama 4’s Rocky Launch](https://www.marketingaiinstitute.com/hubfs/ep%20144%20cover.png)


![Blue Archive tier list [April 2025]](https://media.pocketgamer.com/artwork/na-33404-1636469504/blue-archive-screenshot-2.jpg?#)


.png?#)


-Baldur’s-Gate-3-The-Final-Patch---An-Animated-Short-00-03-43.png?width=1920&height=1920&fit=bounds&quality=70&format=jpg&auto=webp#)


![Apple's Foldable iPhone May Cost Between $2100 and $2300 [Rumor]](https://www.iclarified.com/images/news/97028/97028/97028-640.jpg)
![Apple Releases Public Betas of iOS 18.5, iPadOS 18.5, macOS Sequoia 15.5 [Download]](https://www.iclarified.com/images/news/97024/97024/97024-640.jpg)
![Apple to Launch In-Store Recycling Promotion Tomorrow, Up to $20 Off Accessories [Gurman]](https://www.iclarified.com/images/news/97023/97023/97023-640.jpg)


How to Automate CI/CD with GitHub Actions and Streamline Your Workflow
CI/CD stands for Continuous Integration and Continuous Delivery. It is a system or set of processes and methodologies that help developers quickly update codebases and deploy applications. The Continuous Integration (CI) part of CI/CD means that deve...

CI/CD stands for Continuous Integration and Continuous Delivery. It is a system or set of processes and methodologies that help developers quickly update codebases and deploy applications.
The Continuous Integration (CI) part of CI/CD means that developers can always integrate or merge their changes into the shared repository without breaking anything. Continuous Delivery, on the other hand, means that the code changes are automatically prepared for release after testing and validation.
CI/CD primarily involves various stages like building, testing, staging and deployment.
Build phase: This is where the code and its dependencies are compiled into a single executable. This is the first phase of Continuous Integration, and is triggered by an event like pushing code to the repository.
Test phase: Here, the built artifacts are tested to be sure that the code runs as expected.
Staging: Here, the application is run in a production-like environment so as to be sure it is production ready.
Deployment: Here, the application is automatically deployed to the end-users.
In this article, I’m going to explain how GitHub Actions works. I’ll also talk about basic GitHub Actions concepts, and then we’ll use it to build an example CI/CD pipeline.
What is GitHub Actions?
GitHub Actions is a service or feature of the GitHub platform that lets developers create their own CI/CD workflows directly on GitHub. It runs jobs on containers hosted by GitHub. The tasks are executed as defined in a YAML file called a workflow. This workflow file has to live on the .github/workflows folder on the repository for it to work.
Basic GitHub Actions Concepts
GitHub Actions consists of events, jobs, tasks, runners, workflows, and various other features. Here is a brief explanation of the main concepts:
Events: An event is basically something that happened. With GitHub, an event can be a push (when you push your code to the repository), a pull request, or even a cron job. These events trigger the CI/CD process.
Tasks: When you use CI/CD, you want to be able to trigger an activity that should be done automatically. That activity is known as a task or step in GitHub. It could be building your code or testing it or deploying it.
Each of those tasks has to be defined by commands. A GitHub Actions task usually consists of the name, and the instructions on what to do in the form of a command which starts with - run: or an Action which starts with - uses:.
steps:
  - name: Checkout code
    uses: actions/checkout@v3

  - name: Set up Node.js
    uses: actions/setup-node@v3
    with:
      node-version: 16

  - name: Install dependencies
    run: npm install

  - name: Run tests
    run: npm test

  - name: Build project
    run: npm run build

  - name: Deploy
    run: echo "Deploy step goes here"
Runner: A GitHub runner is a server that runs your tasks. It executes what is defined in your GitHub workflow. You can use your own runners or you can use the GitHub runners.
Job: A job is a collection of steps that are being executed on the same runner. Jobs are defined in a file called the workflow.
Workflow: The GitHub workflow is a series of jobs defined in a YAML file, that are triggered upon an event. The events do not trigger individual tasks. They can only trigger workflows. Then the tasks in the jobs of the workflow are executed.
Contexts: These provide a way to access information about workflows, jobs, and environments in GitHub. They are accessed with the expression $${{ . Examples include github, env, vars, and secrets. The github context is used to access information about the workflow. For example:
$${{github.repository}} # should tell the name of the repository

$${{github.actor}}  # should tell the username of user that initially triggered the workflow
Secrets: This is used to store and access sensitive information that’s used by, and is available to, the workflow. Secrets are redacted when printed to the log. An example is $${{secrets.GITHUB_TOKEN}}.
How to Build a Simple CI/CD Pipeline
Here, we’re going to build an example workflow to deploy a simple HTML and CSS website to GitHub Pages. Follow the steps below:
Go to the sample code in my repository and fork it from here.
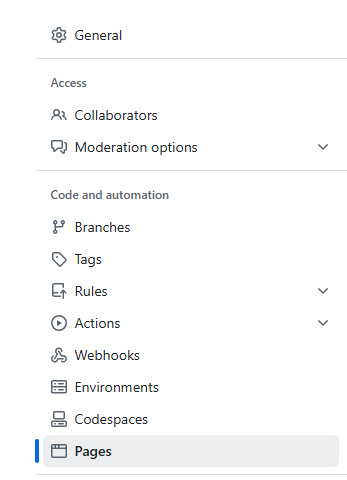
Go to the settings tab in the GitHub repository:

Go to the Pages settings:
Set the deployment source to the
mainbranch:
Go to the General Actions settings and scroll down to the bottom:

At the bottom, set the Workflow permissions to read and write:

In the GitHub repository, you can clone it to your PC or press the fullstop (.) on your keyboard to open GitHub Codespaces, the online version of VS Code.
Go to the sidebar and click on create a new file:

Create a workflows folder and file. You can call it
deploy.yaml.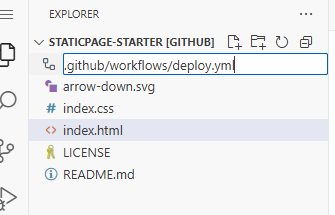
Copy this code into the file:
name: Deploy Static HTML and CSS to GitHub Pages

# Trigger the workflow on push to the main branch

on:
  push:
    branches:
      - main
# Define what operating system the job should run on
jobs:
  deploy:
    runs-on: ubuntu-latest
    permissions:
      contents: write

    steps:
    # Step 1: Checkout the repository
    - name: Checkout Code
      uses: actions/checkout@v4

    # Step 2: Check the files that have been checked out
    - name: Display files
      run: ls

    # Step 3: Deploy to GitHub Pages
    - name: Deploy
      uses: peaceiris/actions-gh-pages@v4
      with:
        github_token: ${{ secrets.GITHUB_TOKEN }}
        publish_dir: ./ # The HTML and CSS files lie in the root directory, hence that should be the publish directory
- Commit the code. You should see the job running when you go back to the repo:

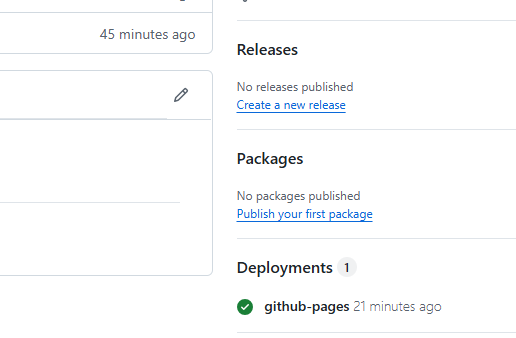
When you’re done, go back to the home page of the repository and click on the Deployments section. There, you will see the GitHub Pages link to the deployment:
When you’re done, your repository should look like this.
Conclusion
In this article, you learned about how the CI/CD process works. We also covered the basic concepts of GitHub Actions. Finally, we created an example CI/CD pipeline with GitHub Actions. If you enjoyed this article, share it with others. You can also reach me on LinkedIn or X.
![How to become a developer in your 30s with Anjana Vakil [Podcast #162]](https://cdn.hashnode.com/res/hashnode/image/upload/v1740760825697/bcf3c6af-4c0c-4ec4-8b80-d24bfe131a4d.png?#)
![From hating coding to programming satellites at age 37 with Francesco Ciulla [Podcast #165]](https://cdn.hashnode.com/res/hashnode/image/upload/v1742585568977/09b25b8e-8c92-4f4b-853f-64b7f7915980.png?#)
