


![[The AI Show Episode 146]: Rise of “AI-First” Companies, AI Job Disruption, GPT-4o Update Gets Rolled Back, How Big Consulting Firms Use AI, and Meta AI App](https://www.marketingaiinstitute.com/hubfs/ep%20146%20cover.png)


_Aleksey_Funtap_Alamy.jpg?width=1280&auto=webp&quality=80&disable=upscale#)
_Sergey_Tarasov_Alamy.jpg?width=1280&auto=webp&quality=80&disable=upscale#)


![Apple Foldable iPhone to Feature New Display Tech, 19% Thinner Panel [Rumor]](https://www.iclarified.com/images/news/97271/97271/97271-640.jpg)
![Apple Developing New Chips for Smart Glasses, Macs, AI Servers [Report]](https://www.iclarified.com/images/news/97269/97269/97269-640.jpg)
![Apple Shares New Mother's Day Ad: 'A Gift for Mom' [Video]](https://www.iclarified.com/images/news/97267/97267/97267-640.jpg)
![Apple Shares Official Trailer for 'Stick' Starring Owen Wilson [Video]](https://www.iclarified.com/images/news/97264/97264/97264-640.jpg)


HOW TO CREATE AND CONFIGURE NETWORK SECURITY GROUPS.
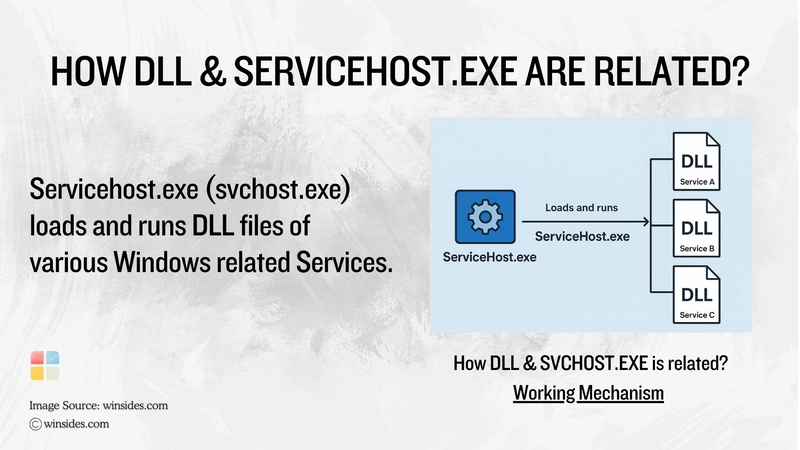
A Network Security Group (NSG) is a security feature used primarily in cloud environments—especially in Microsoft Azure—to control inbound and outbound traffic to networked resources. A Network Security Group (NSG) in Microsoft Azure is a security feature that allows you to control inbound and outbound network traffic to and from Azure resources within a virtual network. NSGs contain a list of security rules that permit or deny traffic based on various parameters such as source and destination IP addresses, ports, and protocols. SCENARIO Your organization requires the network traffic in the app-vnet to be tightly controlled. You identify these requirements. The frontend subnet has web servers that can be accessed from the internet. An Application Security Group(ASG) is required for those servers. The ASG should be associated with any virtual machine interface that is part of the group. This will allow the web servers to be easily managed. The backend subnet has database servers used by the frontend web servers. A network security group (NSG) is required to control this traffic. The NSG should be associated with any virtual machine interface that will be accessed by the web servers. Skilling tasks .Create a network security group. .Create network security group rules. .Associate a network security group to a subnet. .Create and use application security groups in network security group rules. Architecture diagram For testing, a virtual machines should be installed in the frontend subnet (VM1) and the backend subnet (VM2). Here two virtual machines will be created. STEP 1: Create VM1 In your Azure portal, search for virtual machine and click + create. creating a virtual machine is not difficult. In case you don't know how to go about it refer to my article on how to create a virtual machine. Review +create for validation, click on create for deployment and wait for deployment to be complete. STEP 2: Create VM2 Just like creating VM1,follow the same procedure in creating VM2. Review +create for validation, click on create for deployment and wait for the deployment to be complete. Here I have successfully create and deploy the two virtual machines. STEP 3: Search for and select Application security groups. Select + Create and configure the application security group. Select Review + create and then select Create for Validating and deployment. After creating Application Security Groups (ASG), associate the application security group to the network interface of the VM1. STEP 4: In the Azure portal, search for and select VM1 In the Networking blade, select Application security groups and then select Add application security groups. Select the app-frontend-asg and then select Add. Create and Associate the Network Security Group Network security groups (NSGs) * secure network traffic in a virtual network. STEP 5: In the portal search for and select Network security group. Select + Create and configure the network security group. Select Review + create then select Create and wait for the deployment to be complete. Associate the NSG with the app-vnet backend subnet. STEP 6: Go to resource or navigate to the app-vnet-nsg resource. In the Settings blade select Subnets. Select app-vnet (PRACTICE1) and then the Backend subnet. Select OK NOTE: Practice1 is a resource group I created instead of using RG1. Create Network Security Group rules A Network Security Rules (NSG) use security rules to filter inbound and outbound network traffic. STEP 7: Search and select Network Security Group. Select app-vnet-nsg from the list of network security groups. In the Settings blade, select Inbound security rules then select + Add and click on Add. Property Value Source = Any Source port ranges = * Destination = Application Security group Destination application security group =app-frontend-asg Service = SSH Action = Allow Priority = 100 Name = AllowSSH By completing this exercise, I have successfully configured secure access between frontend and backend workloads in Azure using Network Security Groups (NSGs) and Application Security Groups (ASGs).

A Network Security Group (NSG) is a security feature used primarily in cloud environments—especially in Microsoft Azure—to control inbound and outbound traffic to networked resources. A Network Security Group (NSG) in Microsoft Azure is a security feature that allows you to control inbound and outbound network traffic to and from Azure resources within a virtual network. NSGs contain a list of security rules that permit or deny traffic based on various parameters such as source and destination IP addresses, ports, and protocols.
SCENARIO
Your organization requires the network traffic in the app-vnet to be tightly controlled. You identify these requirements.
The frontend subnet has web servers that can be accessed from the internet. An Application Security Group(ASG) is required for those servers. The ASG should be associated with any virtual machine interface that is part of the group. This will allow the web servers to be easily managed.
The backend subnet has database servers used by the frontend web servers. A network security group (NSG) is required to control this traffic. The NSG should be associated with any virtual machine interface that will be accessed by the web servers.
Skilling tasks
.Create a network security group.
.Create network security group rules.
.Associate a network security group to a subnet.
.Create and use application security groups in network security group rules.
Architecture diagram
For testing, a virtual machines should be installed in the frontend subnet (VM1) and the backend subnet (VM2). Here two virtual machines will be created.
STEP 1: Create VM1
In your Azure portal, search for virtual machine and click + create.

creating a virtual machine is not difficult. In case you don't know how to go about it refer to my article on how to create a virtual machine.


Review +create for validation, click on create for deployment and wait for deployment to be complete.


STEP 2: Create VM2
Just like creating VM1,follow the same procedure in creating VM2.


Review +create for validation, click on create for deployment and wait for the deployment to be complete.

Here I have successfully create and deploy the two virtual machines.
STEP 3: Search for and select Application security groups.

Select + Create and configure the application security group.

Select Review + create and then select Create for Validating and deployment.

After creating Application Security Groups (ASG), associate the application security group to the network interface of the VM1.
STEP 4: In the Azure portal, search for and select VM1

In the Networking blade, select Application security groups and then select Add application security groups. Select the app-frontend-asg and then select Add.

Create and Associate the Network Security Group
Network security groups (NSGs) * secure network traffic in a virtual network.
STEP 5: In the portal search for and select Network security group.

Select + Create and configure the network security group.

Select Review + create then select Create and wait for the deployment to be complete.

Associate the NSG with the app-vnet backend subnet.
STEP 6: Go to resource or navigate to the app-vnet-nsg resource.

In the Settings blade select Subnets. Select app-vnet (PRACTICE1) and then the Backend subnet. Select OK
NOTE: Practice1 is a resource group I created instead of using RG1.

Create Network Security Group rules
A Network Security Rules (NSG) use security rules to filter inbound and outbound network traffic.
STEP 7: Search and select Network Security Group.

Select app-vnet-nsg from the list of network security groups.

In the Settings blade, select Inbound security rules then select + Add and click on Add.
Property Value
Source = Any
Source port ranges = *
Destination = Application Security group
Destination application security group =app-frontend-asg
Service = SSH
Action = Allow
Priority = 100
Name = AllowSSH

By completing this exercise, I have successfully configured secure access between frontend and backend workloads in Azure using Network Security Groups (NSGs) and Application Security Groups (ASGs).