


![[The AI Show Episode 145]: OpenAI Releases o3 and o4-mini, AI Is Causing “Quiet Layoffs,” Executive Order on Youth AI Education & GPT-4o’s Controversial Update](https://www.marketingaiinstitute.com/hubfs/ep%20145%20cover.png)


.png?width=1920&height=1920&fit=bounds&quality=70&format=jpg&auto=webp#)


_NicoElNino_Alamy.jpg?width=1280&auto=webp&quality=80&disable=upscale#)


![Standalone Meta AI App Released for iPhone [Download]](https://www.iclarified.com/images/news/97157/97157/97157-640.jpg)

![AirPods Pro 2 With USB-C Back On Sale for Just $169! [Deal]](https://www.iclarified.com/images/news/96315/96315/96315-640.jpg)


Essential Steps for Syncing Webflow Sites With Git Repositories
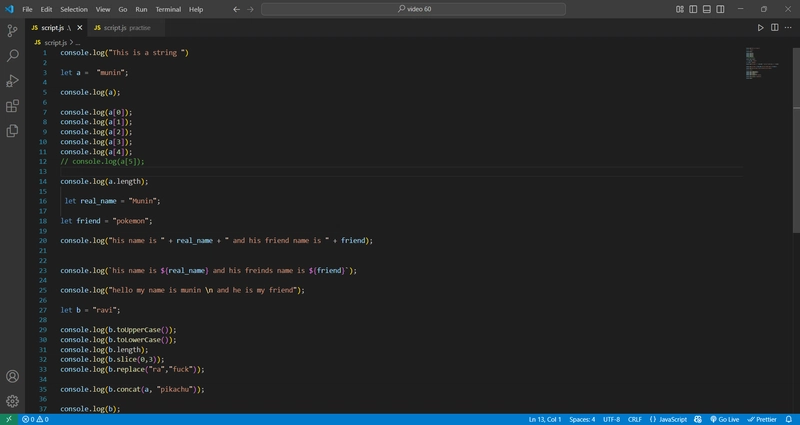
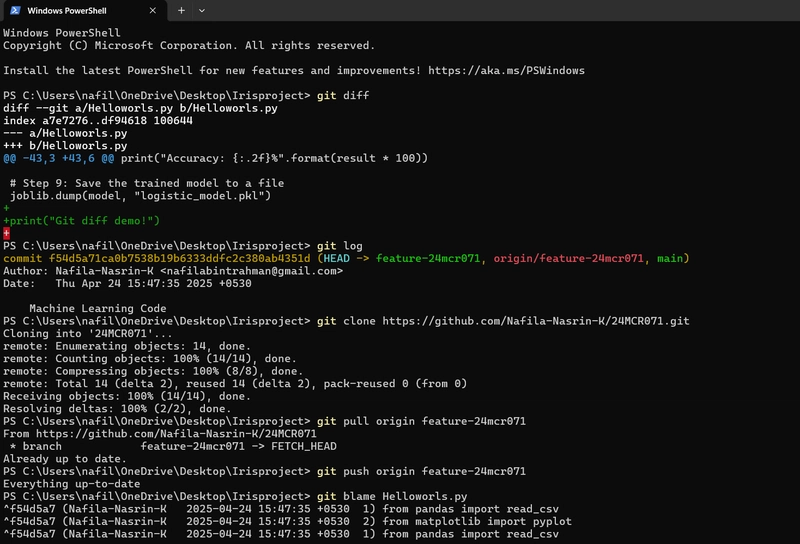
Synchronizing your Webflow-created website with a Git repository can elevate your project management, offering precise version control and collaboration capabilities essential for modern web development. Here's your go-to guide to seamlessly integrate Webflow with Git, empowering your team to work more cohesively and efficiently. Understanding the Value of Git Integration Git repositories provide a robust framework to manage multiple versions of your project codebase. By syncing your Webflow sites with Git, you automatically gain: Version Control: Track every change, revert back to previous versions, and explore differences between versions. Collaboration: Facilitate teamwork with branch management, merge strategies, and pull requests. Backup: Safeguard your code by storing it securely in the cloud. These benefits ensure higher productivity, less error-proneness, and an overall better development experience. Steps for Syncing Webflow with Git Integrating your Webflow project with Git involves several crucial steps. Here’s a step-by-step illustration of the process, enhanced by ExFlow, a tool designed to export Webflow sites efficiently. 1. Exporting Your Webflow Site First, you'll need to export your Webflow site. ExFlow, available at ExFlow.site, facilitates this by offering tailored export options, including: CSS and JS files Media and image files HTML pages Ensure to check the option to export all available elements for a complete archive of your Webflow project. 2. Setting Up Your Git Repository Create a New Repository: Go to your preferred Git service provider like GitHub or GitLab and create a new repository. Initialize: Clone your repository to your local machine. 3. Linking Your Exported Files to Git Navigate to Your Repository: Move your exported files into the directory cloned from your Git repository. Stage Changes: Use git add . to stage all changes. Commit: Make a commit with a meaningful message using git commit -m "Initial Webflow export commit". Push to Remote: Finally, push your changes with git push origin main. 4. Automating the Process with ExFlow ExFlow simplifies the managing process by offering automatic sync of exported files to Git repositories: Credentials Input: During export in ExFlow, input your repository credentials. Seamless Syncing: Allow ExFlow to handle pushing updates directly to your repository, saving time. Utilizing Advanced Features Furthermore, ExFlow supports additional synchronization options such as FTP and S3, providing a comprehensive integration solution for varying deployment needs. Manage Your Projects More Effectively With ExFlow, you can manage multiple Webflow sites, enjoying unlimited exports and maximum size support as your projects grow. With customization options, ExFlow adapts seamlessly to evolving project needs. Conclusion Syncing your Webflow site with a Git repository is a strategic step to enhancing your development workflow. With the seamless integration facilitated by ExFlow, you can efficiently manage your web projects with greater control and flexibility. Ready to take full advantage of Webflow and Git integration? Explore the capabilities of ExFlow at ExFlow.site and optimize your development processes today. Some images in this article were generated via AI tools and the article itself was proof-read with AI.

Synchronizing your Webflow-created website with a Git repository can elevate your project management, offering precise version control and collaboration capabilities essential for modern web development. Here's your go-to guide to seamlessly integrate Webflow with Git, empowering your team to work more cohesively and efficiently.
Understanding the Value of Git Integration
Git repositories provide a robust framework to manage multiple versions of your project codebase. By syncing your Webflow sites with Git, you automatically gain:
- Version Control: Track every change, revert back to previous versions, and explore differences between versions.
- Collaboration: Facilitate teamwork with branch management, merge strategies, and pull requests.
- Backup: Safeguard your code by storing it securely in the cloud.
These benefits ensure higher productivity, less error-proneness, and an overall better development experience.
Steps for Syncing Webflow with Git
Integrating your Webflow project with Git involves several crucial steps. Here’s a step-by-step illustration of the process, enhanced by ExFlow, a tool designed to export Webflow sites efficiently.
1. Exporting Your Webflow Site
First, you'll need to export your Webflow site. ExFlow, available at ExFlow.site, facilitates this by offering tailored export options, including:
- CSS and JS files
- Media and image files
- HTML pages
Ensure to check the option to export all available elements for a complete archive of your Webflow project.
2. Setting Up Your Git Repository
- Create a New Repository: Go to your preferred Git service provider like GitHub or GitLab and create a new repository.
- Initialize: Clone your repository to your local machine.
3. Linking Your Exported Files to Git
- Navigate to Your Repository: Move your exported files into the directory cloned from your Git repository.
-
Stage Changes: Use
git add .to stage all changes. -
Commit: Make a commit with a meaningful message using
git commit -m "Initial Webflow export commit". -
Push to Remote: Finally, push your changes with
git push origin main.
4. Automating the Process with ExFlow
ExFlow simplifies the managing process by offering automatic sync of exported files to Git repositories:
- Credentials Input: During export in ExFlow, input your repository credentials.
- Seamless Syncing: Allow ExFlow to handle pushing updates directly to your repository, saving time.
Utilizing Advanced Features
Furthermore, ExFlow supports additional synchronization options such as FTP and S3, providing a comprehensive integration solution for varying deployment needs.
Manage Your Projects More Effectively
With ExFlow, you can manage multiple Webflow sites, enjoying unlimited exports and maximum size support as your projects grow. With customization options, ExFlow adapts seamlessly to evolving project needs.
Conclusion
Syncing your Webflow site with a Git repository is a strategic step to enhancing your development workflow. With the seamless integration facilitated by ExFlow, you can efficiently manage your web projects with greater control and flexibility.
Ready to take full advantage of Webflow and Git integration? Explore the capabilities of ExFlow at ExFlow.site and optimize your development processes today.
Some images in this article were generated via AI tools and the article itself was proof-read with AI.