


![[The AI Show Episode 146]: Rise of “AI-First” Companies, AI Job Disruption, GPT-4o Update Gets Rolled Back, How Big Consulting Firms Use AI, and Meta AI App](https://www.marketingaiinstitute.com/hubfs/ep%20146%20cover.png)


![Ditching a Microsoft Job to Enter Startup Purgatory with Lonewolf Engineer Sam Crombie [Podcast #171]](https://cdn.hashnode.com/res/hashnode/image/upload/v1746753508177/0cd57f66-fdb0-4972-b285-1443a7db39fc.png?#)


-xl.jpg)


![As Galaxy Watch prepares a major change, which smartwatch design to you prefer? [Poll]](https://i0.wp.com/9to5google.com/wp-content/uploads/sites/4/2024/07/Galaxy-Watch-Ultra-and-Apple-Watch-Ultra-1.jpg?resize=1200%2C628&quality=82&strip=all&ssl=1)


![Apple M4 iMac Drops to New All-Time Low Price of $1059 [Deal]](https://www.iclarified.com/images/news/97281/97281/97281-640.jpg)
![Beats Studio Buds + On Sale for $99.95 [Lowest Price Ever]](https://www.iclarified.com/images/news/96983/96983/96983-640.jpg)

![New iPad 11 (A16) On Sale for Just $277.78! [Lowest Price Ever]](https://www.iclarified.com/images/news/97273/97273/97273-640.jpg)


![Apple's 11th Gen iPad Drops to New Low Price of $277.78 on Amazon [Updated]](https://images.macrumors.com/t/yQCVe42SNCzUyF04yj1XYLHG5FM=/2500x/article-new/2025/03/11th-gen-ipad-orange.jpeg)


![[Exclusive] Infinix GT DynaVue: a Prototype that could change everything!](https://www.gizchina.com/wp-content/uploads/images/2025/05/Screen-Shot-2025-05-10-at-16.07.40-PM-copy.png)


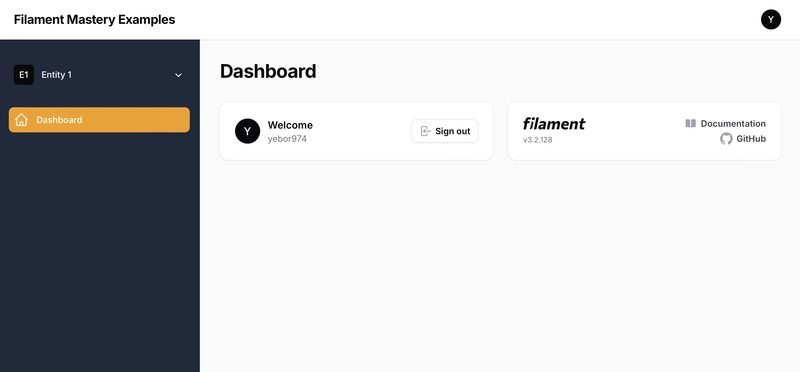
Building a Laravel Filament Multi-Tenant Panel
In modern application development, multi-tenancy is a crucial approach for SaaS solutions or applications shared across multiple entities. With Filament, a powerful administration tool for Laravel, setting up a robust and scalable multi-tenant system becomes straightforward. In this guide, we will set up a multi-tenancy panel with Filament named Member. The tenant model will be Entity, and it will include a name field. Security and role-based access will not be covered in this article but will be addressed in another one. Step 1: Preparing the Entity Model Start by creating the tenant model Entity. This model will only include a name field for simplicity. To manage users within each tenant, we will leverage the existing User model. We assume that a users table already exists. php artisan make:model Entity -m Update the migration file for the entities table: public function up(): void { Schema::create('entities', function (Blueprint $table) { $table->id(); $table->string('name'); $table->timestamps(); }); Schema::create('entity_user', function (Blueprint $table) { $table->id(); $table->unsignedBigInteger('user_id'); $table->unsignedBigInteger('entity_id'); $table->timestamps(); }); } Update your Entity and User model to add associated relationship: class Entity extends Model { public function users(): BelongToMany { return $this->belongsToMany( User::class, 'entity_user') )->withTimestamps(); } } class User extends Model { public function entities(): BelongToMany { return $this->belongsToMany( Entity::class, 'entity_user') )->withTimestamps(); } } Run the migration: php artisan migrate Step 2: Configure the User model for multi tenancy We need to define some functions in our User model to implement the FilamentUser, HasTenants, and HasDefaultTenant interfaces: use Filament\Models\Contracts\FilamentUser; use Filament\Models\Contracts\HasDefaultTenant; use Filament\Models\Contracts\HasTenants; use Illuminate\Foundation\Auth\User as Authenticatable; class User extends Authenticatable implements FilamentUser, HasTenants, HasDefaultTenant { public function entities(): BelongToMany { return $this->belongsToMany( Entity::class, 'entity_user') )->withTimestamps(); } public function canAccessTenant(Model $tenant): bool { return $this->entities->contains($tenant); } public function getTenants(Panel $panel): array|Collection { return $this->entities ?? []; } public function getDefaultTenant(Panel $panel): ?Model { return $this->entities()->first(); } } Step 3: Create a Tenant Registration page To allow users to register new tenants, we will create a registration page by extending RegisterTenant. php artisan make:filament-page RegisterTenant and choose the correct panel id (member for the example). namespace App\Filament\Member\Pages; use App\Models\Entity; use Filament\Forms\Components\TextInput; use Filament\Forms\Form; use Filament\Pages\Tenancy\RegisterTenant as BaseRegisterTenant; class RegisterTenant extends BaseRegisterTenant { public static function getLabel(): string { return 'Register your company'; } public function form(Form $form): Form { return $form ->schema([ TextInput::make('name') ->label('Name') ->required() ->maxLength(255), ]); } protected function handleRegistration(array $data): Entity { /** @var Entity $entity */ $entity = parent::handleRegistration($data); /** @var User $user */ $user = auth()->user(); $user->entities()->attach($entity->id); return $entity; } } This page allows users to register a new tenant with a simple name field. When user creates an account, he is automatically redirect to this registration process. Step 4: Creating the Tenant Entity Profile Page To allow to edit tenant profile, we will create a profile page by extending EditTenantProfile. php artisan make:filament-page EditEntityProfile and choose the correct panel id (member for the example). namespace App\Filament\Member\Pages; use App\Models\Entity; use Filament\Forms\Components\TextInput; use Filament\Forms\Form; use Filament\Pages\Tenancy\EditTenantProfile; class EditTenantProfile extends EditTenantProfile { public static function getLabel(): string { return 'Edit your company'; } public function form(Form $form): Form { return $form ->schema([ TextInput::make('name') ->label('Name') ->required(

In modern application development, multi-tenancy is a crucial approach for SaaS solutions or applications shared across multiple entities. With Filament, a powerful administration tool for Laravel, setting up a robust and scalable multi-tenant system becomes straightforward.
In this guide, we will set up a multi-tenancy panel with Filament named Member. The tenant model will be Entity, and it will include a name field.
Security and role-based access will not be covered in this article but will be addressed in another one.
Step 1: Preparing the Entity Model
Start by creating the tenant model Entity. This model will only include a name field for simplicity. To manage users within each tenant, we will leverage the existing User model. We assume that a users table already exists.
php artisan make:model Entity -m
Update the migration file for the entities table:
public function up(): void
{
    Schema::create('entities', function (Blueprint $table) {
        $table->id();
        $table->string('name');
        $table->timestamps();
    });

    Schema::create('entity_user', function (Blueprint $table) {
        $table->id();
        $table->unsignedBigInteger('user_id');
        $table->unsignedBigInteger('entity_id');
        $table->timestamps();
    });
}
Update your Entity and User model to add associated relationship:
class Entity extends Model
{
     public function users(): BelongToMany
     {
        return $this->belongsToMany(
            User::class,
            'entity_user')
        )->withTimestamps();
     }
}

class User extends Model
{
     public function entities(): BelongToMany
     {
        return $this->belongsToMany(
            Entity::class,
            'entity_user')
        )->withTimestamps();
     }
}
Run the migration:
php artisan migrate
Step 2: Configure the User model for multi tenancy
We need to define some functions in our User model to implement the FilamentUser, HasTenants, and HasDefaultTenant interfaces:
use Filament\Models\Contracts\FilamentUser;
use Filament\Models\Contracts\HasDefaultTenant;
use Filament\Models\Contracts\HasTenants;
use Illuminate\Foundation\Auth\User as Authenticatable;

class User extends Authenticatable implements FilamentUser, HasTenants, HasDefaultTenant
{
    public function entities(): BelongToMany
    {
        return $this->belongsToMany(
            Entity::class,
            'entity_user')
        )->withTimestamps();
    }

    public function canAccessTenant(Model $tenant): bool
    {
        return $this->entities->contains($tenant);
    }

    public function getTenants(Panel $panel): array|Collection
    {
        return $this->entities ?? [];
    }

    public function getDefaultTenant(Panel $panel): ?Model
    {
        return $this->entities()->first();
    }
}
Step 3: Create a Tenant Registration page
To allow users to register new tenants, we will create a registration page by extending RegisterTenant.
php artisan make:filament-page RegisterTenant
and choose the correct panel id (member for the example).
namespace App\Filament\Member\Pages;

use App\Models\Entity;
use Filament\Forms\Components\TextInput;
use Filament\Forms\Form;
use Filament\Pages\Tenancy\RegisterTenant as BaseRegisterTenant;

class RegisterTenant extends BaseRegisterTenant
{
    public static function getLabel(): string
    {
        return 'Register your company';
    }

    public function form(Form $form): Form
    {
        return $form
            ->schema([
                TextInput::make('name')
                    ->label('Name')
                    ->required()
                    ->maxLength(255),
            ]);
    }

    protected function handleRegistration(array $data): Entity
    {
        /** @var Entity $entity */
        $entity = parent::handleRegistration($data);

        /** @var User $user */
        $user = auth()->user();
        $user->entities()->attach($entity->id);

        return $entity;
    }
}
This page allows users to register a new tenant with a simple name field. When user creates an account, he is automatically redirect to this registration process.
Step 4: Creating the Tenant Entity Profile Page
To allow to edit tenant profile, we will create a profile page by extending EditTenantProfile.
php artisan make:filament-page EditEntityProfile
and choose the correct panel id (member for the example).
namespace App\Filament\Member\Pages;

use App\Models\Entity;
use Filament\Forms\Components\TextInput;
use Filament\Forms\Form;
use Filament\Pages\Tenancy\EditTenantProfile;

class EditTenantProfile extends EditTenantProfile
{
    public static function getLabel(): string
    {
        return 'Edit your company';
    }

    public function form(Form $form): Form
    {
        return $form
            ->schema([
                TextInput::make('name')
                    ->label('Name')
                    ->required(),
            ]);
    }
}
This page allows users to edit their current tenant with a simple name field.
Step 5: Add Tenant to panel
Now, we need to set panel as Tenant:
use App\Filament\Member\Pages\EditTenantProfile;
use App\Filament\Member\Pages\RegisterTenant;
use App\Models\Entity;
use Filament\Panel;

public function panel(Panel $panel): Panel
{
    return $panel
        ->default()
        ->id('member')
        ->tenant(Entity::class)
        ->tenantRegistration(RegisterTenant::class)
        ->tenantProfile(EditTenantProfile::class)
        ->tenantMenuItems([
            'register' => MenuItem::make()->label('New company'),
        ]),
        //...
}
-
->tenant(Entity::class)defines the tenant model. -
->tenantRegistration(RegisterTenant::class)defines the registration tenant page. -
->tenantProfile(EditTenantProfile::class)defines the edit tenant page. -
->tenantMenuItems([..])permits to add menu items on the tenant menu on sidebar. -
'register' => MenuItem::make()->label('New company')permits user to add more tenant entities in our config. You dont need to add this line like Edit Tenant Profile page ontenantMenuItems, they are present by default. However, you can customize label here or other criteria like authorization.