


![[The AI Show Episode 143]: ChatGPT Revenue Surge, New AGI Timelines, Amazon’s AI Agent, Claude for Education, Model Context Protocol & LLMs Pass the Turing Test](https://www.marketingaiinstitute.com/hubfs/ep%20143%20cover.png)


.png?#)


![[Fixed] Gemini app is failing to generate Audio Overviews](https://i0.wp.com/9to5google.com/wp-content/uploads/sites/4/2025/03/Gemini-Audio-Overview-cover.jpg?resize=1200%2C628&quality=82&strip=all&ssl=1)

![What’s new in Android’s April 2025 Google System Updates [U: 4/14]](https://i0.wp.com/9to5google.com/wp-content/uploads/sites/4/2025/01/google-play-services-3.jpg?resize=1200%2C628&quality=82&strip=all&ssl=1)


![Apple Seeds tvOS 18.5 Beta 2 to Developers [Download]](https://www.iclarified.com/images/news/97011/97011/97011-640.jpg)
![Apple Releases macOS Sequoia 15.5 Beta 2 to Developers [Download]](https://www.iclarified.com/images/news/97014/97014/97014-640.jpg)


Automating CS Refund Inquiries with an AI Agent: Using Agentica
Overview Recently, our in-house team developed an AI agent to automate customer service (CS) refund inquiries. This agent was built utilizing the open-source library Agentica that we developed, and it is now processing refund inquiries on behalf of our CS staff, greatly enhancing work efficiency. In this article, I will share the development process, key code examples, a productivity comparison before and after implementation, along with the trial-and-error experiences and the solutions we adopted. Background and Goals The CS team was spending a lot of time manually processing dozens of refund inquiries daily. Since refund inquiries mostly consist of repetitive questions and simple tasks, the need for automation was continuously raised. We determined that an AI agent could resolve this issue effectively. The project goals were as follows: Reduce refund processing time by over 80% Enable the CS team to focus on solving more complex issues Development Process and Code Examples Introduction to the Agentica Library Our team developed and open-sourced an open-source library called Agentica. Using this library, anyone can easily create a chat-capable agent by instantiating a simple class. If you have a TypeScript class or Swagger documentation, the LLM can automatically call the necessary functions as tool calls. For example, let’s create an agent that supports Gmail functionality: import { Agentica } from "@agentica/core"; import { GmailService } from "@wrtnlabs/connector-gmail"; import dotenv from "dotenv"; import OpenAI from "openai"; import typia from "typia"; dotenv.config(); const openai = new OpenAI({ apiKey: process.env.OPENAI_KEY }); class GmailService { async sendMail(auth: OAuth2Client, to: string, from: string, subject: string, message: string) { const gmail = google.gmail({ version: 'v1', auth }); const raw = createEmail(to, from, subject, message); try { const response = await gmail.users.messages.send({ userId: 'me', requestBody: { raw, }, }); console.log('Email sent successfully:', response.data); return response.data; } catch (error) { console.error('Error sending email:', error); throw error; } } } export const GmailAgent = new Agentica({ model: "chatgpt", vendor: { api: openai, model: "gpt-4o-mini", }, controllers: [ { name: "Gmail Connector", protocol: "class", application: typia.llm.application(), execute: new GmailService({ clientId: process.env.GMAIL_CLIENT_ID!, clientSecret: process.env.GMAIL_CLIENT_SECRET!, secret: process.env.GMAIL_REFRESH_TOKEN!, }), }, ], }); As you can see, the example code shows how easily an agent can be created using Agentica. When implemented in this way, the functions defined in the application become available for the LLM to call as tools, while the actual execution happens via the “execute” parameter. If you want to use functionalities other than Gmail, you can either implement them as classes or provide them with Swagger documentation. For instance: import { Agentica } from "@agentica/core"; import { GmailService } from "@wrtnlabs/connector-gmail"; import dotenv from "dotenv"; import OpenAI from "openai"; import typia from "typia"; dotenv.config(); const openai = new OpenAI({ apiKey: process.env.OPENAI_KEY }); class GmailService { async sendMail(auth: OAuth2Client, to: string, from: string, subject: string, message: string) { const gmail = google.gmail({ version: 'v1', auth }); const raw = createEmail(to, from, subject, message); try { const response = await gmail.users.messages.send({ userId: 'me', requestBody: { raw, }, }); console.log('Email sent successfully:', response.data); return response.data; } catch (error) { console.error('Error sending email:', error); throw error; } } } class GoogleCalenderService { async createEvent(auth: OAuth2Client){ const calendar = google.calendar({ version: 'v3', auth }); const event = { summary: 'Test Event', location: 'Online', description: 'Test event created via the Google Calendar API.', start: { dateTime: '2025-03-20T10:00:00+09:00', timeZone: 'Asia/Seoul', }, end: { dateTime: '2025-03-20T11:00:00+09:00', timeZone: 'Asia/Seoul', }, attendees: [ { email: 'attendee@example.com' }, ], reminders: { useDefault: false, overrides: [ { method: 'email', minutes: 24 * 60 }, { method: 'popup', minutes: 10 }, ], }, }; try { const response = await calendar.events.insert({ calendarId: 'primary', requestBody: event, sendUpdates: 'all', }); console.log('Event created successfully:', response.d
Overview
Recently, our in-house team developed an AI agent to automate customer service (CS) refund inquiries. This agent was built utilizing the open-source library Agentica that we developed, and it is now processing refund inquiries on behalf of our CS staff, greatly enhancing work efficiency.
In this article, I will share the development process, key code examples, a productivity comparison before and after implementation, along with the trial-and-error experiences and the solutions we adopted.
Background and Goals
The CS team was spending a lot of time manually processing dozens of refund inquiries daily. Since refund inquiries mostly consist of repetitive questions and simple tasks, the need for automation was continuously raised. We determined that an AI agent could resolve this issue effectively.
The project goals were as follows:
Reduce refund processing time by over 80%
Enable the CS team to focus on solving more complex issues
Development Process and Code Examples
Introduction to the Agentica Library
Our team developed and open-sourced an open-source library called Agentica. Using this library, anyone can easily create a chat-capable agent by instantiating a simple class. If you have a TypeScript class or Swagger documentation, the LLM can automatically call the necessary functions as tool calls.
For example, let’s create an agent that supports Gmail functionality:
import { Agentica } from "@agentica/core";
import { GmailService } from "@wrtnlabs/connector-gmail";
import dotenv from "dotenv";
import OpenAI from "openai";
import typia from "typia";

dotenv.config();

const openai = new OpenAI({ apiKey: process.env.OPENAI_KEY });

class GmailService {
  async sendMail(auth: OAuth2Client, to: string, from: string, subject: string, message: string) {
    const gmail = google.gmail({ version: 'v1', auth });
    const raw = createEmail(to, from, subject, message);

    try {
      const response = await gmail.users.messages.send({
        userId: 'me',
        requestBody: {
          raw,
        },
      });
      console.log('Email sent successfully:', response.data);
      return response.data;
    } catch (error) {
      console.error('Error sending email:', error);
      throw error;
    }
  }
}

export const GmailAgent = new Agentica({
  model: "chatgpt",
  vendor: {
    api: openai,
    model: "gpt-4o-mini",
  },
  controllers: [
    {
      name: "Gmail Connector",
      protocol: "class",
      application: typia.llm.application<GmailService, "chatgpt">(),
      execute: new GmailService({
        clientId: process.env.GMAIL_CLIENT_ID!,
        clientSecret: process.env.GMAIL_CLIENT_SECRET!,
        secret: process.env.GMAIL_REFRESH_TOKEN!,
      }),
    },
  ],
});
As you can see, the example code shows how easily an agent can be created using Agentica.
When implemented in this way, the functions defined in the application become available for the LLM to call as tools, while the actual execution happens via the “execute” parameter.
If you want to use functionalities other than Gmail, you can either implement them as classes or provide them with Swagger documentation.
For instance:
import { Agentica } from "@agentica/core";
import { GmailService } from "@wrtnlabs/connector-gmail";
import dotenv from "dotenv";
import OpenAI from "openai";
import typia from "typia";

dotenv.config();

const openai = new OpenAI({ apiKey: process.env.OPENAI_KEY });

class GmailService {
  async sendMail(auth: OAuth2Client, to: string, from: string, subject: string, message: string) {
    const gmail = google.gmail({ version: 'v1', auth });
    const raw = createEmail(to, from, subject, message);

    try {
      const response = await gmail.users.messages.send({
        userId: 'me',
        requestBody: {
          raw,
        },
      });
      console.log('Email sent successfully:', response.data);
      return response.data;
    } catch (error) {
      console.error('Error sending email:', error);
      throw error;
    }
  }
}

class GoogleCalenderService {
  async createEvent(auth: OAuth2Client){
    const calendar = google.calendar({ version: 'v3', auth });

    const event = {
      summary: 'Test Event',
      location: 'Online',
      description: 'Test event created via the Google Calendar API.',
      start: {
        dateTime: '2025-03-20T10:00:00+09:00',
        timeZone: 'Asia/Seoul',
      },
      end: {
        dateTime: '2025-03-20T11:00:00+09:00',
        timeZone: 'Asia/Seoul',
      },
      attendees: [
        { email: 'attendee@example.com' },
      ],
      reminders: {
        useDefault: false,
        overrides: [
          { method: 'email', minutes: 24 * 60 },
          { method: 'popup', minutes: 10 },
        ],
      },
    };

    try {
      const response = await calendar.events.insert({
        calendarId: 'primary',
        requestBody: event,
        sendUpdates: 'all',
      });
      console.log('Event created successfully:', response.data);
      console.log('Event link:', response.data.htmlLink);
      return response.data;
    } catch (error) {
      console.error('Error creating event:', error);
      throw error;
    }
  }
}

export const ExampleAgent = new Agentica({
  model: "chatgpt",
  vendor: {
    api: openai,
    model: "gpt-4o-mini",
  },
  controllers: [
    {
      protocol: "http",
      name: "shopping",
      application: HttpLlm.application({
        model: "chatgpt",
        document: OpenApi.convert(
          await fetch(
            "https://shopping-be.wrtn.ai/editor/swagger.json",
          ).then(r => r.json()),
        ),
      }),
      connection: {
        host: "https://shopping-be.wrtn.ai",
        headers: {
          Authorization: "Bearer *****",
        },
      },
    },
    {
      name: "Gmail Connector",
      protocol: "class",
      application: typia.llm.application<GmailService, "chatgpt">(),
      execute: new GmailService({
        clientId: process.env.GMAIL_CLIENT_ID!,
        clientSecret: process.env.GMAIL_CLIENT_SECRET!,
        secret: process.env.GMAIL_REFRESH_TOKEN!,
      }),
    },
    {
      name: "Google Calendar Connector",
      protocol: "class",
      application: typia.llm.application<GoogleCalenderService, "chatgpt">(),
      execute: new GmailService({
        clientId: process.env.GOOGLE_CALENDAR_CLIENT_ID!,
        clientSecret: process.env.GOOGLE_CALENDAR_CLIENT_SECRET!,
        secret: process.env.GOOGLE_CALENDAR_REFRESH_TOKEN!,
      }),
    },
  ],
});
For convenience, we have also created connector libraries for various functionalities. You can check out here and try them out.
For more details about Agentica, please refer to the Agentica Docs.
Now, let’s take a look at how I actually implemented the Refund CS AI Agent.
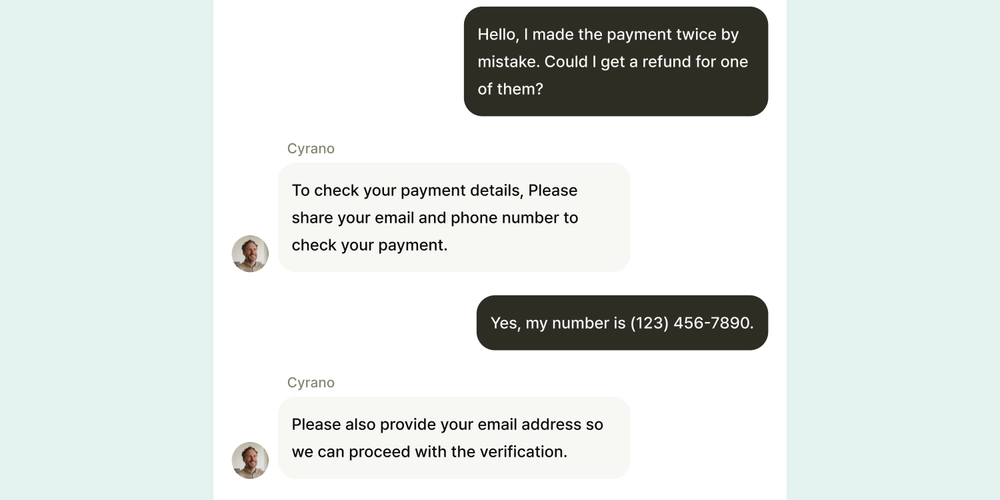
The refund process is very simple. It checks the payment history for the past 7 days, and if the payment history qualifies for a refund, it proceeds with the refund.
We built the necessary refund functionalities as an API and provided them in the form of a tool (using the Swagger documentation for Function Call) through which the Agentica library can create the Refund CS AI Agent.
export function RefundCsAgent(histories: Primitive<IAgenticaPrompt[]>) {
  const openai = new OpenAI({
    apiKey: isNotNull(
      process.env.CHATGPT_API_KEY,
      "Environment variable CHATGPT_API_KEY is not set or empty. Please define it in your environment configuration",
    ),
  });
  return new Agentica({
    provider: {
      type: "chatgpt",
      api: openai,
      model: "gpt-4o-2024-11-20",
    },
    histories: histories,
    controllers: [
      {
        protocol: "http",
        name: "Refund Connector",
        connection,
        application,
      },
    ],
  });
}

const application = HttpLlm.application({
  model: "chatgpt",
  document: OpenApi.convert(
    await fetch(
      isNotNull(
        process.env.SWAGGER_URL,
        "Environment variable SWAGGER_URL is not set or empty. Please define it in your environment configuration",
      ),
      {
        cache: "no-store",
      },
    ).then((r) => r.json()),
  ),
});

const connection: IHttpConnection = {
  host: isNotNull(
    process.env.CONNECTION_HOST,
    "Environment variable CONNECTION_HOST is not set or empty. Please define it in your environment configuration",
  ),
};
Trial and Error and the Resolution Process
During development, issues with the LLM tool call errors occurred frequently. Although the structure of the functions seemed fine, merely improving the prompt resulted in little effect. In the end, we solved the problem by simplifying the function structure and clarifying the function descriptions.
Improved Process: We reduced the process from three stages to two, thereby minimizing the chances of errors during tool selection by the LLM.
API Endpoint and Function Name Changes: We modified the endpoints and function names to be more LLM-friendly.
Simplified Function Descriptions: Instead of lengthy and complex descriptions, we shifted to delivering only the core information in a concise manner.
Productivity Comparison Before and After Application
Before the implementation, the CS team spent an average of more than 30 minutes per refund inquiry. They had to manually receive account information from users, verify whether the refund conditions were met, and then process the refund manually, which was very time-consuming.
After introducing the Refund AI Agent, refund inquiries are processed instantly, 24 hours a day—even outside of regular business hours. In other words, we were able to build a refund system that is accessible anytime, anywhere.
This resulted in approximately a 5-fold increase in productivity, enabling the CS team to handle more complex inquiries and focus on improving the overall quality of customer service.
Conclusion and Lessons Learned
The project successfully met its goals, reducing the refund inquiry processing time by over 80% compared to the previous manual process. This drastically reduced the workload of the CS team and allowed them to concentrate on solving more complex and valuable problems, while also enhancing customer satisfaction with 24/7 real-time processing.
The fast and efficient development enabled by the Agentica library shortened the project timeline, and the productivity increase (roughly 5 times higher than the manual approach) stands as a significant achievement.
One key lesson learned from this project is that the success of LLM tool calls greatly depends on the clarity and simplicity of function design and descriptions. Complex and verbose function structures tend to lead to frequent malfunctions from the LLM. Simplifying the structure and focusing on the essentials led to improved performance—a lesson that will be invaluable when designing interfaces that interact with AI in the future.
I hope my experiences help you avoid similar pitfalls and inspire more efficient, feature-rich developments. I appreciate your interest in the evolution of the Agentica library—please keep an eye on its progress. Questions are always welcome, and thank you for reading this lengthy article!