


![[The AI Show Episode 143]: ChatGPT Revenue Surge, New AGI Timelines, Amazon’s AI Agent, Claude for Education, Model Context Protocol & LLMs Pass the Turing Test](https://www.marketingaiinstitute.com/hubfs/ep%20143%20cover.png)


![QA - Best methods for getting large amount of test data into event consuming applications generated from an API application [closed]](https://cdn.sstatic.net/Sites/softwareengineering/Img/apple-touch-icon@2.png?v=1ef7363febba)


![From drop-out to software architect with Jason Lengstorf [Podcast #167]](https://cdn.hashnode.com/res/hashnode/image/upload/v1743796461357/f3d19cd7-e6f5-4d7c-8bfc-eb974bc8da68.png?#)


.png?width=1920&height=1920&fit=bounds&quality=70&format=jpg&auto=webp#)

.png?width=1920&height=1920&fit=bounds&quality=70&format=jpg&auto=webp#)


![Apple Rushes Five Planes of iPhones to US Ahead of New Tariffs [Report]](https://www.iclarified.com/images/news/96967/96967/96967-640.jpg)
![Apple Vision Pro 2 Allegedly in Production Ahead of 2025 Launch [Rumor]](https://www.iclarified.com/images/news/96965/96965/96965-640.jpg)


![3 big talking points after Daredevil Born Again episode 8: why did Daredevil save [spoiler], who really killed Foggy in the Marvel TV show, and more](https://cdn.mos.cms.futurecdn.net/FpR4EjKc9Pgn4VSqYqqoc3.jpg?#)


Add Authentication to your React App with Frontegg
This is a quick start guide with an accompanying sample app on integrating authentication into a client-side React app using Frontegg's React SDK. Is this for you? You’re looking to for an IdP, authentication, authorization, OAuth/OIDC login and SSO, user management You’re working with a client-side React app (SPA) The Frontegg React SDK is specifically designed for client-side React apps If that’s not you, you may want to see if any of the other SDKs offered here meet your needs: https://developers.frontegg.com/sdks/overview Most of what will be talked about here is abstract enough to apply to the other tech stacks as well The accompanying sample app uses Vite and their React (with Typescript) template as a starting point. Prerequisites to follow along: Sign up for Frontegg https://portal.frontegg.com/signup Download the Sample App https://github.com/akdombrowski/frontegg-vite-react-ts At least Node 20 (LTS) NodeJS Downloads Quickstart for Frontegg and React Vite React w/ Typescript and Frontegg is a minimal sample app to get started with Frontegg Authentication in a React app using Frontegg's client-side React SDK. The app is bootstrapped with Vite and their React template (with Typescript), but Frontegg's React SDK can be used in any client-side React app. Setup Frontegg Application Configuration From within the Frontegg admin dashboard, create an Application. And, make sure you configure at least these: Enter a name. Tip. Ideally, aim for a descriptive name that’s easily understandable for anyone that may end up becoming a Frontegg admin. And, if you intend to allow self-service configuration, this name will be visible to customers/users. If you only intend to use this app for testing, go ahead and get creative with it (or not). Type = Web Frontend stack = React App URL = http://localhost:5173 the url where you're app is running http://localhost:5173 is the default url in Vite development mode (a.k.a. when running npm run dev) ℹ️ Your app config in the Frontegg admin dashboard should look something like this: Optional Description Auto-assigned app Following the best practice of least privilege, the default setting is that apps need to be assigned to Users in order to login. In other words, Users are restricted from authenticating and, therefore, potentially accessing apps they aren’t “assigned”. However, to make it easier to manage, apps can be assigned to Users in different ways: Assignment Scopes User assigning apps A and B to User 1 but only app A to User 2, then User 2 will be restricted from app B Account assigning apps A and B to Account X but only app A to Account Y, then all users in Account 2 will be restricted from app B. Auto-assigned Configuring this assigns this to Accounts and Users, i.e., no one is restricted from it You can also mix and match as you see fit! Forgot to add the redirect uri Under Configurations > Authentication > Login Method in your Frontegg dashboard, add a url back to your app. For example, when running in Vite dev mode (i.e., npm run dev): http://localhost:5173/oauth/callback *Modify the hostname and port as needed if you've changed from the defaults or are running in other modes. CORS & Allowed Origins If you don't configure this, you may open your browser's console to see a bunch of 'CORS' errors that say something like: Cross-Origin Request Blocked: The Same Origin Policy disallows reading the remote resource at https://app-abc123.frontegg.com/frontegg/oauth/token. (Reason: CORS header ‘Access-Control-Allow-Origin’ missing). Status code: 204. The solution is to add your app's origin as an 'Allowed Origin' which lets Frontegg know that it's okay to share (potentially) sensitive information there. How to Configure Allowed Origins in the Frontegg Dashboard Under Configurations > Keys & domains > Domains tab > Allowed Origins section in your Frontegg dashboard, add your app's origin (the scheme, domain, and port parts of the url: e.g., http://localhost:5173 or https://example.com). Required Environment Variables These are the 3 environment variables necessary for integrating Frontegg along with where to navigate in the admin portal to find their values: VITE_FRONTEGG_BASE_URL "Keys & Domains" > "Domains" tab, in the "Frontegg Domain" section labeled as the "Domain Name" VITE_FRONTEGG_CLIENT_ID "Keys & Domains" > "General" tab, in the "API Key" section labeled as the "Client ID" VITE_FRONTEGG_APP_ID App ID's are unique per application and can be found by opening a particular Application in the Frontegg Dashboard. "Applications" > {name_of_app} > "Settings" tab labeled as the "ID" .env.Example contains the required Frontegg variables used in the app that you can use by simply swapping in your actual config values for t
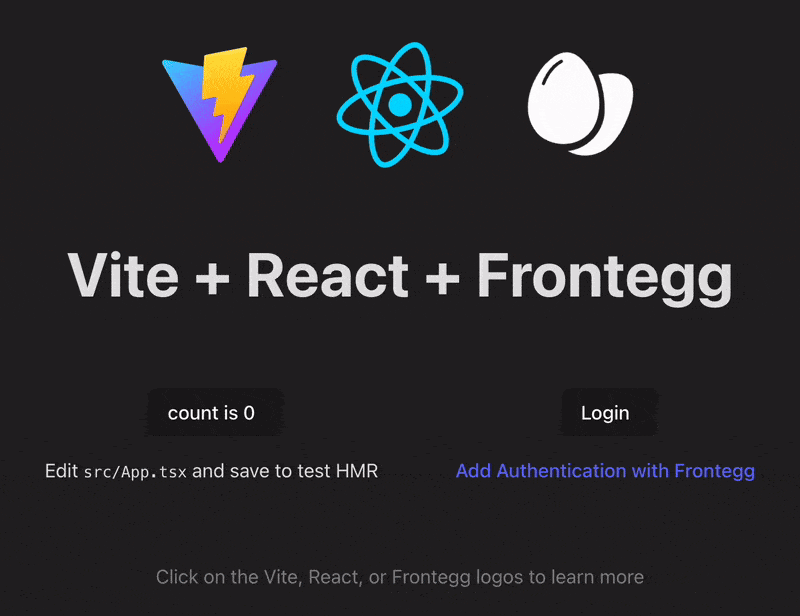
This is a quick start guide with an accompanying sample app on integrating authentication into a client-side React app using Frontegg's React SDK.
Is this for you?
- You’re looking to for an IdP, authentication, authorization, OAuth/OIDC login and SSO, user management
- You’re working with a client-side React app (SPA)
- The Frontegg React SDK is specifically designed for client-side React apps
- If that’s not you, you may want to see if any of the other SDKs offered here meet your needs:
- Most of what will be talked about here is abstract enough to apply to the other tech stacks as well
- The accompanying sample app uses Vite and their React (with Typescript) template as a starting point.
Prerequisites to follow along:
Sign up for Frontegg
Download the Sample App
At least Node 20 (LTS)
Quickstart for Frontegg and React
Vite React w/ Typescript and Frontegg is a minimal sample app to get started with Frontegg Authentication in a React app using Frontegg's client-side React SDK.
The app is bootstrapped with Vite and their React template (with Typescript), but Frontegg's React SDK can be used in any client-side React app.
Setup
Frontegg Application Configuration
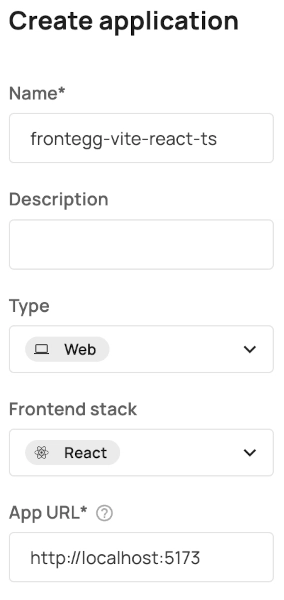
From within the Frontegg admin dashboard, create an Application.
And, make sure you configure at least these:
-
Enter a name.
- Tip.
- Ideally, aim for a descriptive name that’s easily understandable for anyone that may end up becoming a Frontegg admin. And, if you intend to allow self-service configuration, this name will be visible to customers/users.
- If you only intend to use this app for testing, go ahead and get creative with it (or not).
Type =
WebFrontend stack =
React-
App URL =
http://localhost:5173- the url where you're app is running
-
http://localhost:5173is the default url in Vite development mode (a.k.a. when runningnpm run dev) - ℹ️ Your app config in the Frontegg admin dashboard should look something like this:
Optional
- Description
-
Auto-assigned app
- Following the best practice of least privilege, the default setting is that apps need to be assigned to Users in order to login.
- In other words, Users are restricted from authenticating and, therefore, potentially accessing apps they aren’t “assigned”.
- However, to make it easier to manage, apps can be assigned to Users in different ways:
- Assignment Scopes
- User
- assigning apps A and B to User 1 but only app A to User 2, then User 2 will be restricted from app B
- Account
- assigning apps A and B to Account X but only app A to Account Y, then all users in Account 2 will be restricted from app B.
- Auto-assigned
- Configuring this assigns this to Accounts and Users, i.e., no one is restricted from it
- You can also mix and match as you see fit!
Forgot to add the redirect uri
Under Configurations > Authentication > Login Method in your Frontegg dashboard, add a url back to your app.
For example, when running in Vite dev mode (i.e., npm run dev):
http://localhost:5173/oauth/callback
*Modify the hostname and port as needed if you've changed from the defaults or are running in other modes.
CORS & Allowed Origins
If you don't configure this, you may open your browser's console to see a bunch of 'CORS' errors that say something like:
Cross-Origin Request Blocked:
The Same Origin Policy disallows reading the remote resource at
https://app-abc123.frontegg.com/frontegg/oauth/token.
(Reason: CORS header ‘Access-Control-Allow-Origin’ missing).
Status code: 204.
The solution is to add your app's origin as an 'Allowed Origin' which lets Frontegg know that it's okay to share (potentially) sensitive information there.
How to Configure Allowed Origins in the Frontegg Dashboard
Under Configurations > Keys & domains > Domains tab > Allowed Origins section in your Frontegg dashboard, add your app's origin (the scheme, domain, and port parts of the url: e.g., http://localhost:5173 or https://example.com).
Required Environment Variables
These are the 3 environment variables necessary for integrating Frontegg along with where to navigate in the admin portal to find their values:
-
VITE_FRONTEGG_BASE_URL- "Keys & Domains" > "Domains" tab, in the "Frontegg Domain" section labeled as the "Domain Name"
-
VITE_FRONTEGG_CLIENT_ID- "Keys & Domains" > "General" tab, in the "API Key" section labeled as the "Client ID"
-
VITE_FRONTEGG_APP_ID- App ID's are unique per application and can be found by opening a particular Application in the Frontegg Dashboard.
- "Applications" > {name_of_app} > "Settings" tab labeled as the "ID"
.env.Example contains the required Frontegg variables used in the app that you can use by simply swapping in your actual config values for the placeholder values.
To use the template,
-
create a copy of the file and name it
.env- Vite uses dotenv to automatically load the variables in the
.envfile\*
- Vite uses dotenv to automatically load the variables in the
replace the placeholder values with your Frontegg details:
The .env file Template
################################################################################
### FRONTEGG CONFIG ###
################################################################################
# ! The 'VITE_' prefix exposes values client-side. !
# This is necessary for Base URL, Client ID, and App ID for the Frontegg React SDK, but take care
# not to expose any secrets!
#
# The "Base URL" and "Client ID" values can be found in the Frontegg Dashboard
# under "Keys & Domains".
#
# "Keys & Domains" > "Domains" > "Domain Name"
# Under the "Domains" tab, in the "Frontegg Domain" section labeled as the "Domain Name"
VITE_FRONTEGG_BASE_URL='https://app-rndCharsHere.frontegg.com'
#
# "Keys & Domains" > "General" > "Client ID"
# Under "General" tab, in the "API Key" section labeled as the "Client ID"
VITE_FRONTEGG_CLIENT_ID='looks-like-a-rnd-uuid'
#
#
# App ID's are unique per application and can be found by opening a particular Application in the
# Frontegg Dashboard.
#
# "Applications" > {name_of_app} > "Settings" > "App ID"
# Under the "Settings" tab labeled as the "ID"
VITE_FRONTEGG_APP_ID='looks-like-a-rnd-uuid-too'
################################################################################
### FRONTEGG CONFIG ###
################################################################################
CAUTION
*The VITE_ prefix exposes environment variables client-side!