


![[The AI Show Episode 144]: ChatGPT’s New Memory, Shopify CEO’s Leaked “AI First” Memo, Google Cloud Next Releases, o3 and o4-mini Coming Soon & Llama 4’s Rocky Launch](https://www.marketingaiinstitute.com/hubfs/ep%20144%20cover.png)


![Building a tree(s) by combining XML, XSD, EXP files [closed]](https://cdn.sstatic.net/Sites/softwareengineering/Img/apple-touch-icon@2.png?v=1ef7363febba)


![GrandChase tier list of the best characters available [April 2025]](https://media.pocketgamer.com/artwork/na-33057-1637756796/grandchase-ios-android-3rd-anniversary.jpg?#)


.png?width=1920&height=1920&fit=bounds&quality=70&format=jpg&auto=webp#)


.webp?#)


![New Beats USB-C Charging Cables Now Available on Amazon [Video]](https://www.iclarified.com/images/news/97060/97060/97060-640.jpg)

![Apple M4 13-inch iPad Pro On Sale for $200 Off [Deal]](https://www.iclarified.com/images/news/97056/97056/97056-640.jpg)


Chromebook setup tips: 9 tasks I perform every time I start fresh
You’ve decided to try a Chromebook, have you? Maybe you’re sick of Windows or macOS. Or maybe your old laptop died and you wanted a budget-friendly replacement. I personally think Chromebooks are great for everyday use and exception value for the money. But to get the most out of a Chromebook, you need to set it up properly and optimize the settings to fit your specific needs and wants. After you’ve signed in with your Google account and gone through the first-boot walkthrough, there are several extra steps I recommend taking to make sure your Chromebook experience is good as it can be. Here are the key first steps any Chromebook newbie or first-timer should take, but feel free to skip any you don’t think apply to you. Find and download useful apps Dave Parrack / Foundry The first thing you have to do is get some apps on your system! And even though you could just use a bunch of browser tabs to run your favorite web services, they may be available as apps—and if they are, you may as well download and install them for convenience. Your Chromebook should come pre-installed with a handful of Google apps, including Chrome, Gmail, and YouTube. But if you want to download others, simply open the Google Play Store and search for the apps you want to install. Alternatively, scroll the popular apps, featured apps, and other app categories. Modern Chromebooks can install Android apps, so you should be able to install almost anything you see on the Google Play Store. (The only exception is if you have an older model Chromebook.) Many Chromebooks can also run Linux apps natively, but this requires more technical know-how and familiarity with the command line. As for gaming? Well, that’s a completely separate issue that’s beyond the scope of this article. I recommend checking out our guide to the pros and cons of gaming on a Chromebook. Connect your Chromebook to your Android phone Dave Parrack / Foundry ChromeOS lets you connect your Chromebook to your Android phone, which grants several awesome benefits like unlocking your Chromebook with your phone, connecting your Chromebook to your phone’s network, sending and receiving text messages from your Chromebook, and syncing your chat notifications and photos. If you skipped connecting your Chromebook to your phone during initial setup, you can always connect it later on. Just go to the system Settings > Connected devices and look for Android phone. Then, click Set up and follow the on-screen instructions. Note that ChromeOS’s settings are separate from the Chrome browser’s settings! The former can be found in the bottom-right of the ChromeOS desktop, while the latter is accessible from the three-dot menu found in the top-right of the browser itself. Set a style, wallpaper, and screensaver Dave Parrack / Foundry If you like to customize the look of the machines you use daily, know that you can change the style, wallpaper, and screensaver on your Chromebook. You can access these either by right-clicking anywhere on your desktop and selecting Wallpaper and style, or navigating to Settings > Wallpaper and style > Set your wallpaper and style. For wallpapers, you have multiple options to choose from, including Landscapes, Art, and your own images on Google Photos. You can choose to pick a solitary image to display, refresh the one you currently have set, or enable the “Change daily” option. There are a small number of styles to choose from, too, or you can opt to match your accent colors to the current wallpaper. You can also choose from light or dark settings, or have it change automatically based on the time of day as you use your Chromebook. For screensavers, you can choose an animation style, image source, and how long the screensaver will show while your device is charging. Organize your home screen shelf Dave Parrack / Foundry The ChromeOS home screen is purposely simple. Apart from the wallpaper, everything is accessible via the “shelf,” which houses an app launcher, pinned apps, pinned documents, a simple calendar, and quick access to the ChromeOS menu and settings. To make your ChromeOS experience as pleasant as possible, you should customize the shelf. The most obvious way to do so? Pin the apps you use regularly and shift their positions around in whatever way makes the most sense for you and your needs.If you right-click on the shelf, you’ll be able to choose between Always show shelf (i.e., the shelf will remain visible at all times no matter what you’re doing) and Autohide shelf (i.e., the shelf will disappear when ChromeOS deems it unnecessary to display). You can also change the shelf’s position from the bottom to either left or right sides. Tweak your privacy and security settings Dave Parrack / Foundry One thing you should definitely do on day one of owning a Chrome
You’ve decided to try a Chromebook, have you? Maybe you’re sick of Windows or macOS. Or maybe your old laptop died and you wanted a budget-friendly replacement. I personally think Chromebooks are great for everyday use and exception value for the money.
But to get the most out of a Chromebook, you need to set it up properly and optimize the settings to fit your specific needs and wants. After you’ve signed in with your Google account and gone through the first-boot walkthrough, there are several extra steps I recommend taking to make sure your Chromebook experience is good as it can be.
Here are the key first steps any Chromebook newbie or first-timer should take, but feel free to skip any you don’t think apply to you.
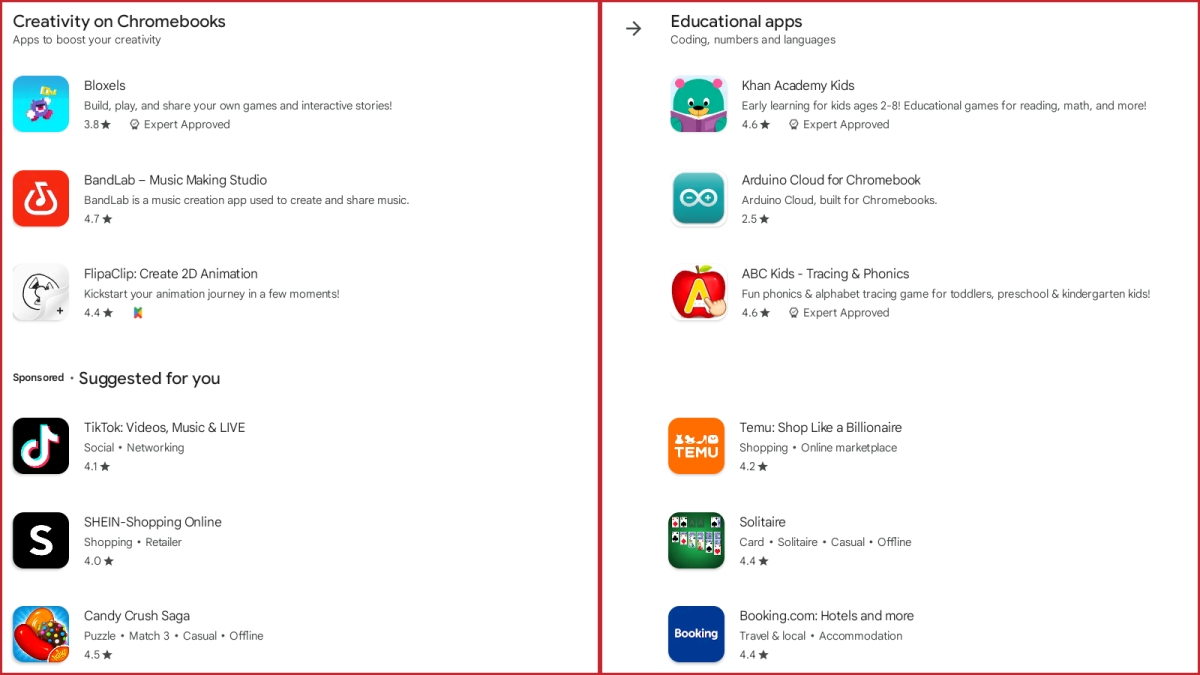
Find and download useful apps
Dave Parrack / Foundry
The first thing you have to do is get some apps on your system! And even though you could just use a bunch of browser tabs to run your favorite web services, they may be available as apps—and if they are, you may as well download and install them for convenience.
Your Chromebook should come pre-installed with a handful of Google apps, including Chrome, Gmail, and YouTube. But if you want to download others, simply open the Google Play Store and search for the apps you want to install. Alternatively, scroll the popular apps, featured apps, and other app categories.
Modern Chromebooks can install Android apps, so you should be able to install almost anything you see on the Google Play Store. (The only exception is if you have an older model Chromebook.) Many Chromebooks can also run Linux apps natively, but this requires more technical know-how and familiarity with the command line.
As for gaming? Well, that’s a completely separate issue that’s beyond the scope of this article. I recommend checking out our guide to the pros and cons of gaming on a Chromebook.
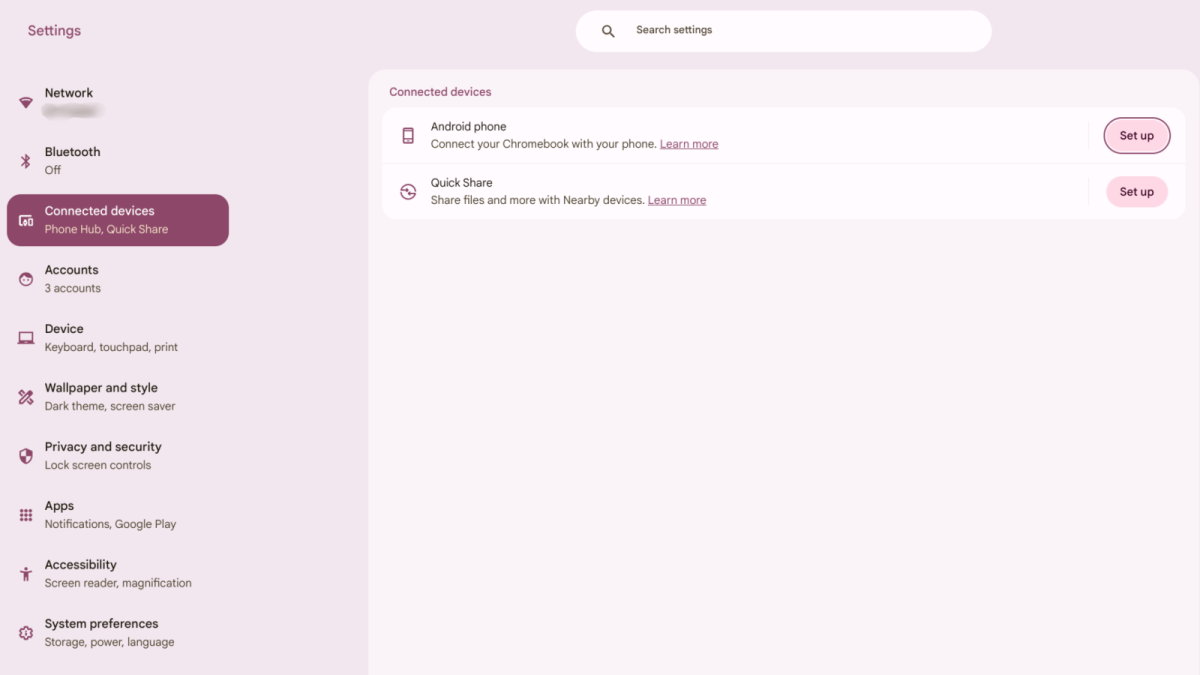
Connect your Chromebook to your Android phone
Dave Parrack / Foundry
ChromeOS lets you connect your Chromebook to your Android phone, which grants several awesome benefits like unlocking your Chromebook with your phone, connecting your Chromebook to your phone’s network, sending and receiving text messages from your Chromebook, and syncing your chat notifications and photos.
If you skipped connecting your Chromebook to your phone during initial setup, you can always connect it later on. Just go to the system Settings > Connected devices and look for Android phone. Then, click Set up and follow the on-screen instructions.
Note that ChromeOS’s settings are separate from the Chrome browser’s settings! The former can be found in the bottom-right of the ChromeOS desktop, while the latter is accessible from the three-dot menu found in the top-right of the browser itself.
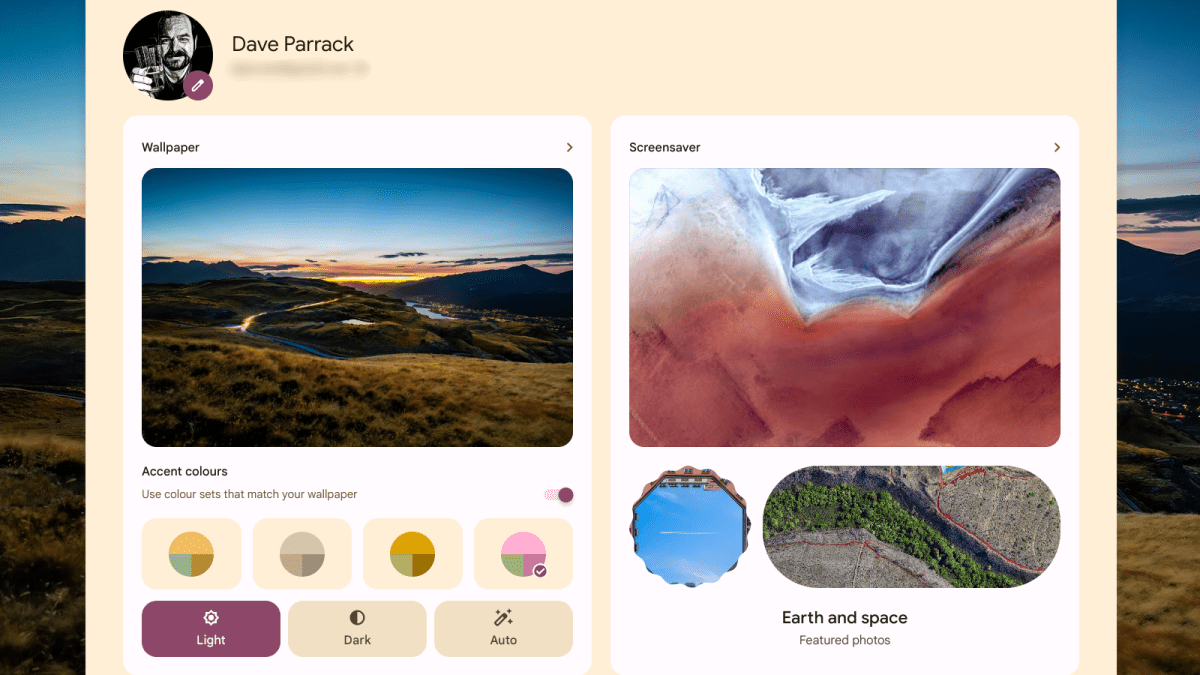
Set a style, wallpaper, and screensaver
Dave Parrack / Foundry
If you like to customize the look of the machines you use daily, know that you can change the style, wallpaper, and screensaver on your Chromebook. You can access these either by right-clicking anywhere on your desktop and selecting Wallpaper and style, or navigating to Settings > Wallpaper and style > Set your wallpaper and style.
For wallpapers, you have multiple options to choose from, including Landscapes, Art, and your own images on Google Photos. You can choose to pick a solitary image to display, refresh the one you currently have set, or enable the “Change daily” option.
There are a small number of styles to choose from, too, or you can opt to match your accent colors to the current wallpaper. You can also choose from light or dark settings, or have it change automatically based on the time of day as you use your Chromebook.
For screensavers, you can choose an animation style, image source, and how long the screensaver will show while your device is charging.
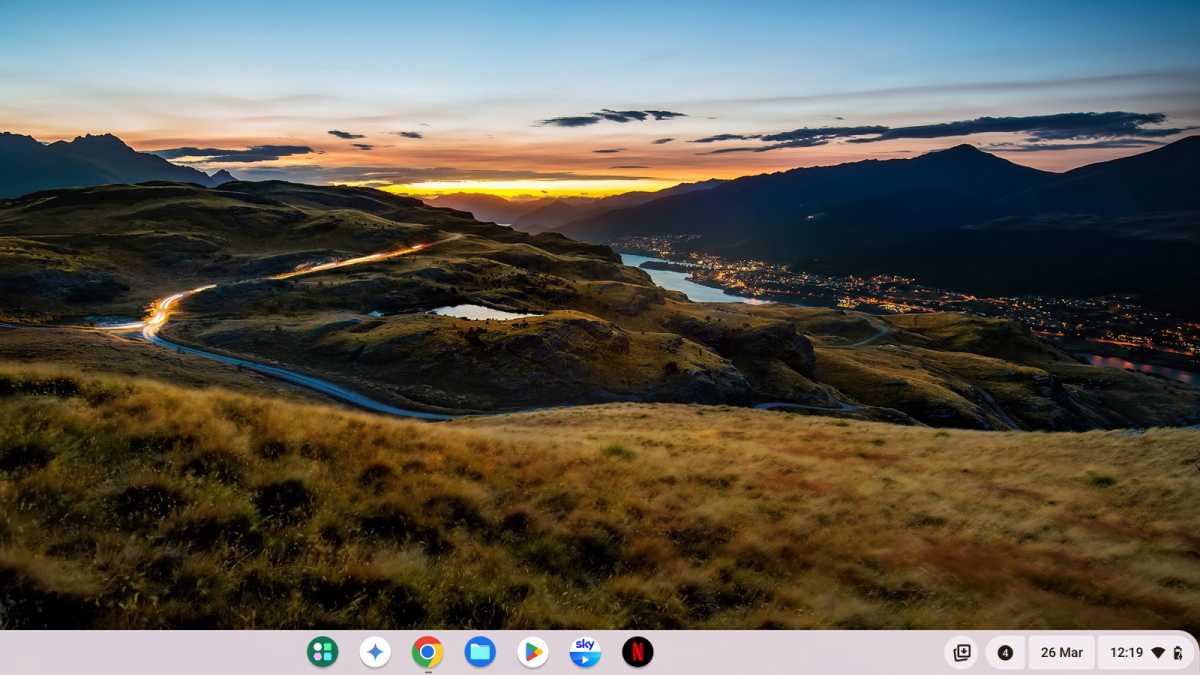
Organize your home screen shelf
Dave Parrack / Foundry
The ChromeOS home screen is purposely simple. Apart from the wallpaper, everything is accessible via the “shelf,” which houses an app launcher, pinned apps, pinned documents, a simple calendar, and quick access to the ChromeOS menu and settings.
To make your ChromeOS experience as pleasant as possible, you should customize the shelf. The most obvious way to do so? Pin the apps you use regularly and shift their positions around in whatever way makes the most sense for you and your needs.
If you right-click on the shelf, you’ll be able to choose between Always show shelf (i.e., the shelf will remain visible at all times no matter what you’re doing) and Autohide shelf (i.e., the shelf will disappear when ChromeOS deems it unnecessary to display). You can also change the shelf’s position from the bottom to either left or right sides.
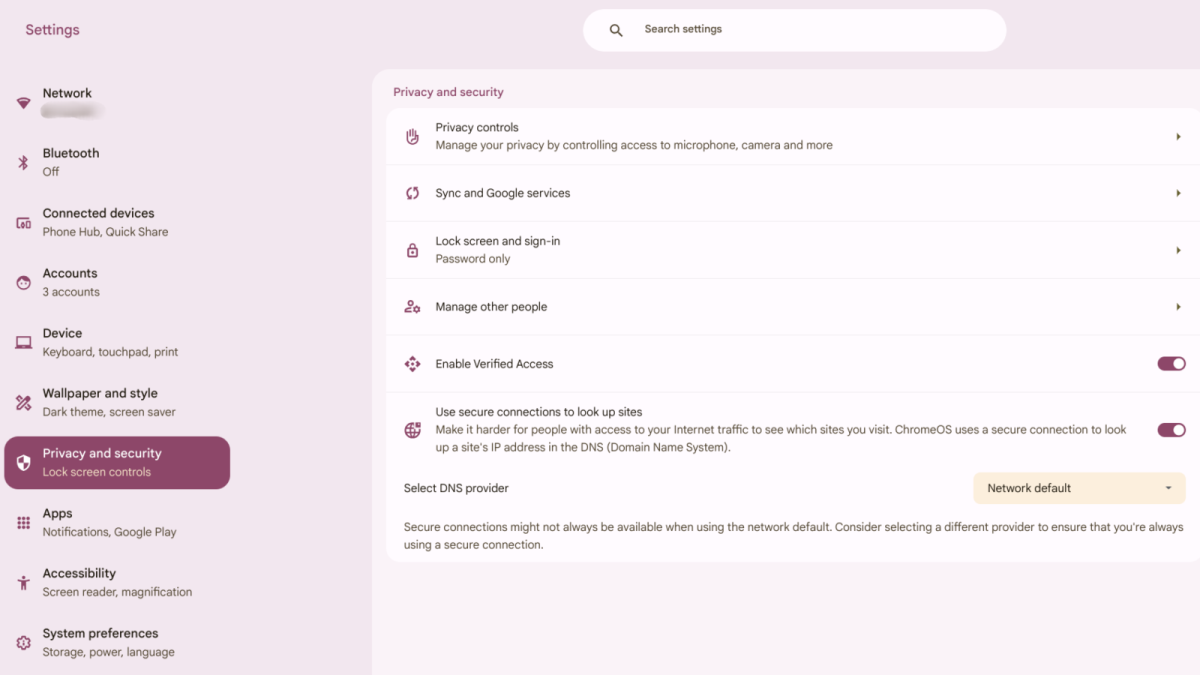
Tweak your privacy and security settings
Dave Parrack / Foundry
One thing you should definitely do on day one of owning a Chromebook is nail down your privacy and security settings. To do so, click the Settings cog from the menu in the bottom-right corner of the desktop, then click Privacy and security.
You should see the option to tweak your “Privacy controls,” review and manage “Sync and Google services,” adjust your “Lock screen and sign-in” options, and more. I recommend clicking on each of these in turn until you’re happy with your selections.
These are just some of the built-in security features that make Chromebooks so secure right out of the box.
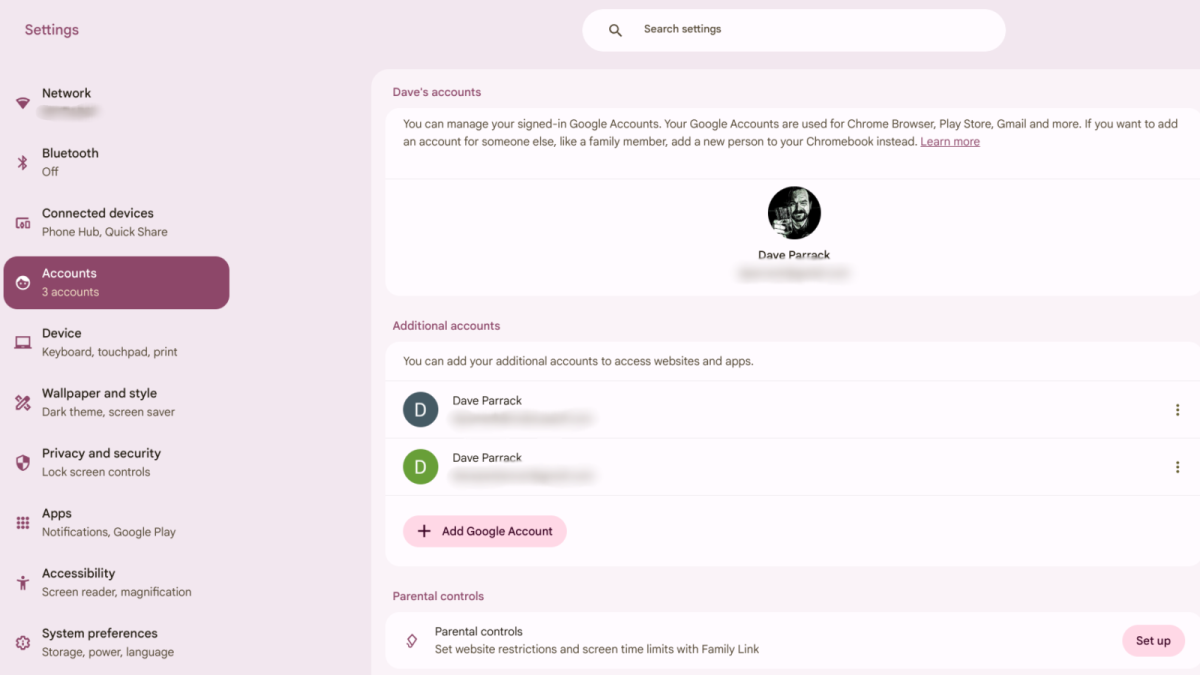
Set up additional user accounts
Dave Parrack / Foundry
By default, you’ll have one user account for your Chromebook: your main Google account. However, you can add additional accounts for yourself and/or add new people (such as family members who are going to share the device) to your Chromebook.
Adding an account for yourself is as simple as clicking Settings > Accounts, and then tapping Add Google Account. You can then switch between your various accounts (e.g., one for work and one for play to maintain work/life balance). Each account is separate with its own data, including apps, bookmarks, web services, etc.
User accounts are especially useful for children since you can enable parental controls, limiting screen time and access to websites.
Learn to use Guest browsing mode
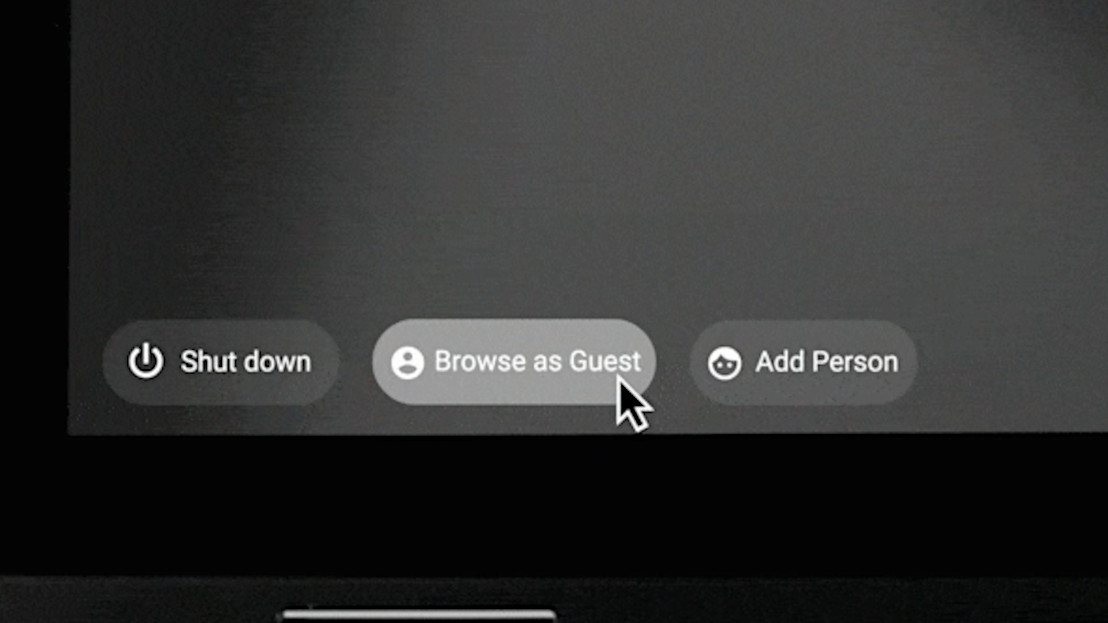
What if you want to grant someone one-time access to your Chromebook? Instead of creating a whole new account for them, you can switch over to Guest browsing mode. To do that, sign out to the login screen, then you should see Browse as Guest at the bottom.
Browsing as a guest is the best option for casual, occasional use because everything from that session gets erased as soon as they log out of Guest browsing mode. If that someone is going to be using your Chromebook weekly or even monthly, consider adding them as a user (see above).
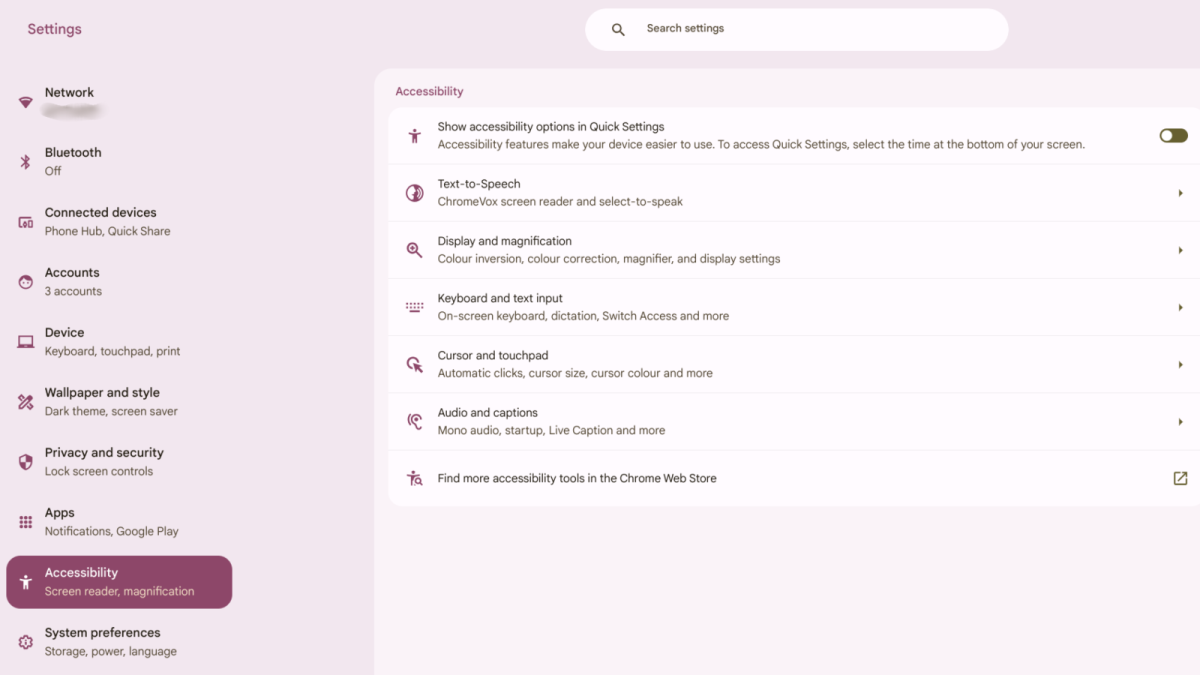
Turn on relevant accessibility features
Dave Parrack / Foundry
ChromeOS boasts a host of accessibility features in Settings > Accessibility. Features include a screen reader providing text-to-speech, a full-screen magnifier, voice dictation, and even the option to use head movements and facial expressions to control your Chromebook.
Even if you don’t have a physical condition that requires any of these accessibility features, it’s still worth exploring them in full. Some are just plain convenient and can make your device easier to use, period.
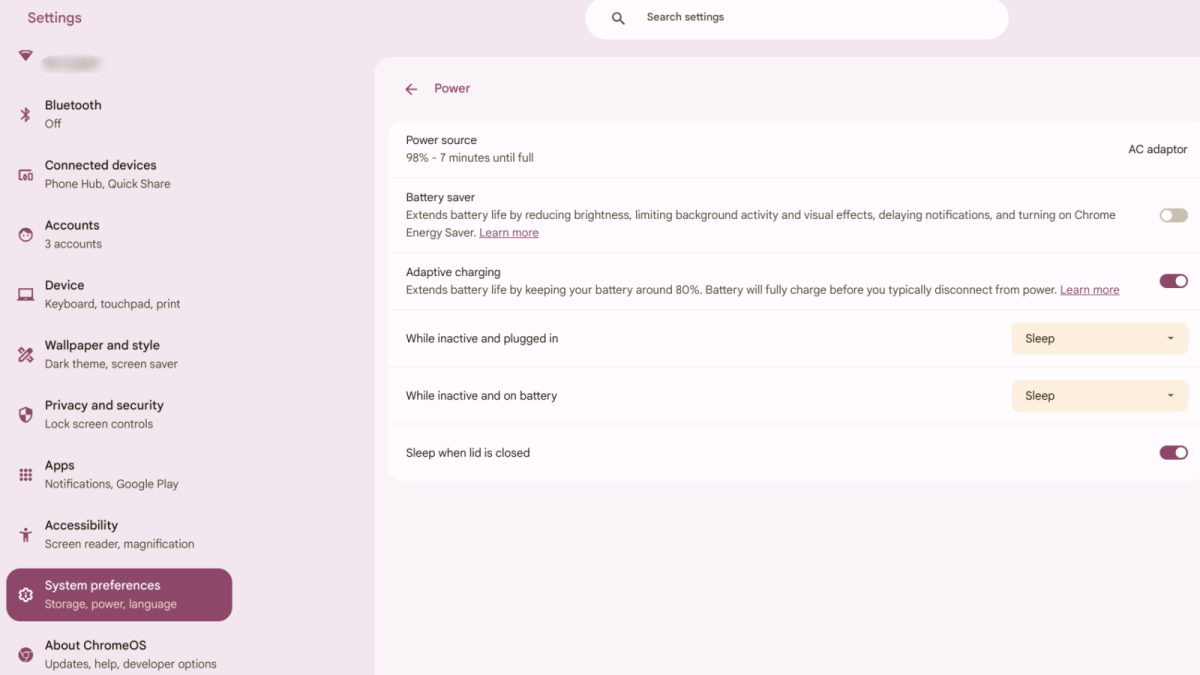
Adjust your power settings
Dave Parrack / Foundry
Last but not least is the need to adjust your power settings. To access them, click Settings > System preferences > Power. Here, you can enable or disable the “Battery saver” and “Adaptive charging” options, plus the ability to “Sleep when lid is closed.”
You can also adjust what happens under two different scenarios: “While inactive and plugged in” and “While inactive and on battery.” The options being “Sleep,” “Turn off display,” and “Keep display on.” I’ve set mine to Sleep at every opportunity to preserve my Chromebook’s battery.


