


![[The AI Show Episode 142]: ChatGPT’s New Image Generator, Studio Ghibli Craze and Backlash, Gemini 2.5, OpenAI Academy, 4o Updates, Vibe Marketing & xAI Acquires X](https://www.marketingaiinstitute.com/hubfs/ep%20142%20cover.png)


![From drop-out to software architect with Jason Lengstorf [Podcast #167]](https://cdn.hashnode.com/res/hashnode/image/upload/v1743796461357/f3d19cd7-e6f5-4d7c-8bfc-eb974bc8da68.png?#)


.png?#)


_Christophe_Coat_Alamy.jpg?#)
 (1).webp?#)


![Apple Considers Delaying Smart Home Hub Until 2026 [Gurman]](https://www.iclarified.com/images/news/96946/96946/96946-640.jpg)
![iPhone 17 Pro Won't Feature Two-Toned Back [Gurman]](https://www.iclarified.com/images/news/96944/96944/96944-640.jpg)
![Tariffs Threaten Apple's $999 iPhone Price Point in the U.S. [Gurman]](https://www.iclarified.com/images/news/96943/96943/96943-640.jpg)


3D Animation: The Ultimate Game-Changer for your Website
INTRODUCTION The emergence of 3D technology has opened new doors to innovation and creativity, transforming the digital landscape in ways previously thought impossible. While 2D websites have provided great user experiences through their simplicity and user-friendliness, web design has evolved beyond the limitations of traditional layouts. Imagine a website where you can walk through a virtual showroom, spin a 3D model of product, customize products in real-time. That’s intriguing, isn’t it? Studies have shown that people tend to retain information better when it is presented visually. Take for instance, having to compare a 2D image of a mobile phone to a 3D model. Which would convey the actual specifications and design details of the phone better? Of course, the 3D model. Several top companies, (Apple, Nike, Adidas, Audi, Tesla, Samsung among others), harness the immersive capabilities of 3D technology on their websites to showcase their products or services in an engaging manner. In this article, we’ll explore how to render a 3D model on your website and also add some basic animations to boost interactivity, you don’t want to miss out! PREREQUISITES Fundamental knowledge of ReactJs Basic CSS skill Basic GSAP (GreenSock Animation Platform) skills Basic understanding of ThreeJs RENDERING THE 3D MODEL Before diving into the rendering process, it is necessary to refresh our memories on the basics of Three.js. Canvas A canvas is a HTML element used as a rendering surface for 3D graphics. It acts as a container where Three.js renders scenes, objects, and animations. The canvas element is created and managed by the Canvas component in React Three Fiber, providing a seamless integration of Three.js into React applications. Light Just as you are unable to see in a dark room, a scene in threejs requires light to render the mesh material properly. There are three types of light in threejs; Ambient Light Gives a general, even light to the entire scene, making everything visible without creating shadows. Directional Light Acts like sunlight, shining in one direction and creating shadows, giving a realistic effect to objects. Spot light- Works like a flashlight, focusing light on specific areas or objects, and can cast shadows. Orbit Controls The OrbitControls component in React Three Fiber allows users to interact with 3D models by rotating, zooming, and panning the camera around the scene. It provides intuitive mouse and touch controls, making it easier to navigate and explore 3D environments. This component is essential for enhancing user experience by enabling smooth and responsive camera movements. It is time to render a 3D model in our application. The model used in this project was sourced from Sketchfab, a home for thousands of 3D models from different authors. Steps to Render the 3D Model 1.Download and Extract the .gltf File Download the .gltf format file and extract it to access its contents. 2.Move Files to Public Folder Move the .bin file, .gltf file, and the textures folder into your project’s public folder. 3.Rename Files for Clarity Rename your .gltf and .bin files from the default name "scene" to a more descriptive model name. 4.Update .gltf File Open the .gltf file in a text editor. Search for the buffers section and update the uri to match the renamed .bin file. Rendering the Model in a React Application Now, for the key step of rendering the model in your React application, you need to convert the .gltf file to JSX. Convert .gltf to JSX Open your terminal. Navigate to the location of the .gltf file using the cd command. Run the following command: npx gltfjsx name.gltf Replace name.gltf with the actual name of your .gltf file. This process will generate a JSX component that you can import and use in your React application to render the 3D model. This creates a new jsx file of our model, open the jsx file. After running the npx gltfjsx name.gltf command, follow these steps to edit the generated JSX file for proper integration into your React application: Add the Default Keyword to the Export Statement Open the generated JSX file in your text editor. Locate the export statement at the bottom of the file. Modify it to include the default keyword. Rename the Function to the Model Name -Locate the function definition at the beginning of the file. -Rename the function to match your model name for better clarity and maintainability. Save the Changes to render the model, you should simply call the model component within the Canvas component imported from react-three/fiber. Remember what we learnt about lighting? So we need to add lighting to our scene, we’ll add an ambient light in our project. import { Suspense } from "react"; import { Canvas } from "@react-three/fiber"; import { ContactShadows, OrbitControls } from "@react-three/drei"; import Watch from '../../public/Wat
INTRODUCTION
The emergence of 3D technology has opened new doors to innovation and creativity, transforming the digital landscape in ways previously thought impossible. While 2D websites have provided great user experiences through their simplicity and user-friendliness, web design has evolved beyond the limitations of traditional layouts. Imagine a website where you can walk through a virtual showroom, spin a 3D model of product, customize products in real-time. That’s intriguing, isn’t it?
Studies have shown that people tend to retain information better when it is presented visually. Take for instance, having to compare a 2D image of a mobile phone to a 3D model. Which would convey the actual specifications and design details of the phone better? Of course, the 3D model. Several top companies, (Apple, Nike, Adidas, Audi, Tesla, Samsung among others), harness the immersive capabilities of 3D technology on their websites to showcase their products or services in an engaging manner.
In this article, we’ll explore how to render a 3D model on your website and also add some basic animations to boost interactivity, you don’t want to miss out!
PREREQUISITES
Fundamental knowledge of ReactJs
Basic CSS skill
Basic GSAP (GreenSock Animation Platform) skills
Basic understanding of ThreeJs
RENDERING THE 3D MODEL
Before diving into the rendering process, it is necessary to refresh our memories on the basics of Three.js.
Canvas
A canvas is a HTML element used as a rendering surface for 3D graphics. It acts as a container where Three.js renders scenes, objects, and animations. The canvas element is created and managed by the Canvas component in React Three Fiber, providing a seamless integration of Three.js into React applications.
Light
Just as you are unable to see in a dark room, a scene in threejs requires light to render the mesh material properly. There are three types of light in threejs;
-
Ambient Light
- Gives a general, even light to the entire scene, making everything visible without creating shadows.
Directional Light
Acts like sunlight, shining in one direction and creating shadows, giving a realistic effect to objects.
Spot light- Works like a flashlight, focusing light on specific areas or objects, and can cast shadows.
Orbit Controls
The OrbitControls component in React Three Fiber allows users to interact with 3D models by rotating, zooming, and panning the camera around the scene. It provides intuitive mouse and touch controls, making it easier to navigate and explore 3D environments. This component is essential for enhancing user experience by enabling smooth and responsive camera movements.
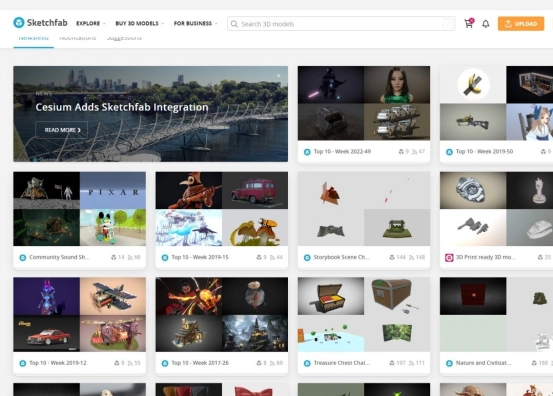
It is time to render a 3D model in our application. The model used in this project was sourced from Sketchfab, a home for thousands of 3D models from different authors.
Steps to Render the 3D Model
1.Download and Extract the .gltf File
- Download the .gltf format file and extract it to access its contents.
2.Move Files to Public Folder
- Move the .bin file, .gltf file, and the textures folder into your project’s public folder.
3.Rename Files for Clarity
Rename your .gltf and .bin files from the default name "scene" to a more descriptive model name.
4.Update .gltf File
Open the .gltf file in a text editor.
Search for the buffers section and update the uri to match the renamed .bin file.
Rendering the Model in a React Application
Now, for the key step of rendering the model in your React application, you need to convert the .gltf file to JSX.
- Convert .gltf to JSX
Open your terminal.
Navigate to the location of the .gltf file using the cd command.
Run the following command:
npx gltfjsx name.gltf
- Replace name.gltf with the actual name of your .gltf file.
This process will generate a JSX component that you can import and use in your React application to render the 3D model. This creates a new jsx file of our model, open the jsx file. After running the npx gltfjsx name.gltf command, follow these steps to edit the generated JSX file for proper integration into your React application:
- Add the Default Keyword to the Export Statement
- Open the generated JSX file in your text editor.
- Locate the export statement at the bottom of the file.
- Modify it to include the default keyword.
- Rename the Function to the Model Name
-Locate the function definition at the beginning of the file.
-Rename the function to match your model name for better clarity and maintainability.
Save the Changes to render the model, you should simply call the model component within the Canvas component imported from react-three/fiber. Remember what we learnt about lighting? So we need to add lighting to our scene, we’ll add an ambient light in our project.
import { Suspense } from "react";
import { Canvas } from "@react-three/fiber";
import { ContactShadows, OrbitControls } from "@react-three/drei";
import Watch from '../../public/Watch'

function CanvasContainer() {
  return (
    <Canvas
      camera={{
        position : [2.353582538479416, 0.6054083440896885, 3.217196497518671]
      }}
    >
      <ambientLight intensity={2.5} />
      <OrbitControls enableZoom={false}/>
      <Suspense fallback={null}>
        <Watch />
      Suspense>
      <ContactShadows
        position={[0, -2, 0]}
        opacity={0.5}
        scale={50}
        blur={1}
        far={10}
        resolution={256}
        color="#000000"
      />
    Canvas>
  );
}
export default CanvasContainer;
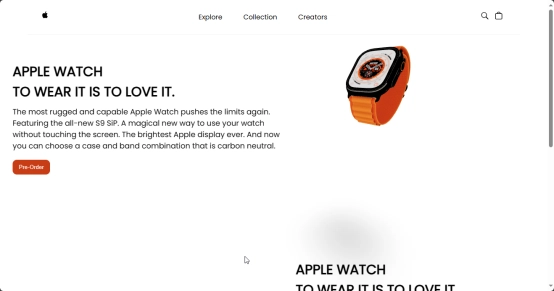
We have successfully rendered our model in our application. I’ll go a step further, styling the canvas component setting its height to a 100 viewport height.
Well done, you’ve been able to render a 3d model in react application. You’ve not come this far to back out now, so let’s keep going!
ANIMATING WITH GSAP SCROLLTRIGGER
The star of the show, GSAP scrolltrigger, is used to animate our 3D model when there’s a scroll in the application. To harness the animating capabilities of gsap, we need to import it using the following code:
import gsap from 'gsap'
import { ScrollTrigger } from 'gsap/ScrollTrigger'
gsap.registerPlugin(ScrollTrigger)
The animation code is written inside our model JSX file. Let’s carefully go through the animation process step by step:
1.Import Necessary Functions
First, ensure you import the necessary functions that we’ll be using for the animation.
2.Destructure the Camera and Scene Objects
Next, we need to destructure the camera and scene objects from the Three.js object created as the model is rendered. This is a crucial step as it forms the foundation of our animation.
3.Also, create an instance of your timeline in gsap upon which subsequent animations are applied. This helps in sequencing animation properly
const tl = gsap.timeline()
4.Animating the Model
The animation process involves tweaking the camera's position along the three axes, as well as adjusting the scene's position and rotation. Therefore, it is essential to have access to these values for effective animation.
Below is a code snippet of the process:
import React, { useRef, useLayoutEffect } from 'react';
import { gsap } from 'gsap';
import { ScrollTrigger } from 'gsap/ScrollTrigger';
import { Canvas, useThree } from '@react-three/fiber';

gsap.registerPlugin(ScrollTrigger);

function MyModel(props) {
  const group = useRef();
  const { scene, camera } = useThree();

  useLayoutEffect(() => {
    // Animation code using GSAP and ScrollTrigger
gsap.to(camera.position, {
x: 10, // Example value, adjust as needed
     y: 5, // Example value, adjust as needed
 z: 15, // Example value, adjust as needed{
      scrollTrigger: {
        trigger: '#yourElementId', // Replace with your actual element ID or class
        start: 'top top',
        end: 'bottom bottom',
        scrub: true,
      }}
    });

    gsap.to(scene.position, {
x: 10, // Example value, adjust as needed
     y: 5, // Example value, adjust as needed
 z: 15, // Example value, adjust as needed{
      scrollTrigger: {
        trigger: '#yourElementId', // Replace with your actual element ID or class
        start: 'top top',
        end: 'bottom bottom',
        scrub: true,
      }}
});
gsap.to(scene.rotation, {
x: 10, // Example value, adjust as needed
     y: 5, // Example value, adjust as needed
 z: 15, // Example value, adjust as needed{
      scrollTrigger: {
        trigger: '#yourElementId', // Replace with your actual element ID or class
        start: 'top top',
        end: 'bottom bottom',
        scrub: true,
      }}
    });
    });
  }, []);

  return (
    <group ref={group} {...props} dispose={null}>
      {/* Model nodes and materials */}
    group>
  );
}

useGLTF.preload('/path/to/model.gltf');
export default MyModel;
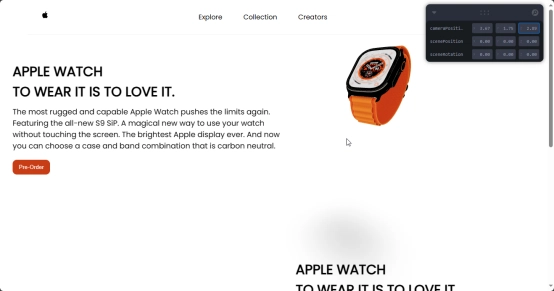
You might wonder how I got the x,y, and z values for the camera position, scene position and scene rotation that is the basis of our animation. I used useControl from Leva to obtain real-time valuees for the camera position, scene position, and scene rotation. These values were adjusted through an intuitive UI as shown in the image below. This method allowed precise control and easy fine-tuning, ensuring the desired visual outcome.
import {useControls} from 'leva'


 const {cameraPosition, scenePosition, sceneRotation} = useControls({
    cameraPosition: {
      value: {x:0, y:0, z:0},
      step: 0.05
    },
    scenePosition: {
      value: {x:0, y:0, z:0},
      step: 0.05
    },
    sceneRotation: {
      value: {x:0, y:0, z:0},
      step: 0.05
    }

  })

  useFrame(() => {
    camera.position.x = cameraPosition.x;
    camera.position.y = cameraPosition.y;
    camera.position.z = cameraPosition.z;

    scene.position.x = scenePosition.x;
    scene.position.y = scenePosition.y;
    scene.position.z = scenePosition.z;

    scene.rotation.x = sceneRotation.x;
    scene.rotation.y = sceneRotation.y;
    scene.rotation.z = sceneRotation.z;
  })
CONCLUSION
I must commend you for following till the end, well done. This article has covered a lot, from the immersive advantage of a 3D website over a traditional 2D website, to walking through the process of creating an interactive 3D animation. We looked at the technologies required to achieve this awesome animation, we also explored how to render a 3D model in react app. Finaly, we went a step further by exploring the animation process, learnt about GSAP scrolltrigger and how it is used to animate the 3D model.
In this article, we only covered the basics of 3D web animation, there’s a great deal that can be achieved by harnessing the full capabilities of 3D web animation. This is your stepping stone to building that jaw dropping 3D website, get practicing mate!


![Top 7+ SaaS Tools for Startups in 2025 [+ Key Features]](https://media2.dev.to/dynamic/image/width=800%2Cheight=%2Cfit=scale-down%2Cgravity=auto%2Cformat=auto/https%3A%2F%2Fdev-to-uploads.s3.amazonaws.com%2Fuploads%2Farticles%2Fnihp4fhf46anc5nhsbza.jpg)
