


![[The AI Show Episode 143]: ChatGPT Revenue Surge, New AGI Timelines, Amazon’s AI Agent, Claude for Education, Model Context Protocol & LLMs Pass the Turing Test](https://www.marketingaiinstitute.com/hubfs/ep%20143%20cover.png)


.png?#)


.webp?#)
.webp?#)


![[Fixed] Gemini app is failing to generate Audio Overviews](https://i0.wp.com/9to5google.com/wp-content/uploads/sites/4/2025/03/Gemini-Audio-Overview-cover.jpg?resize=1200%2C628&quality=82&strip=all&ssl=1)

![What’s new in Android’s April 2025 Google System Updates [U: 4/14]](https://i0.wp.com/9to5google.com/wp-content/uploads/sites/4/2025/01/google-play-services-3.jpg?resize=1200%2C628&quality=82&strip=all&ssl=1)


![Apple Seeds tvOS 18.5 Beta 2 to Developers [Download]](https://www.iclarified.com/images/news/97011/97011/97011-640.jpg)
![Apple Releases macOS Sequoia 15.5 Beta 2 to Developers [Download]](https://www.iclarified.com/images/news/97014/97014/97014-640.jpg)


You Can’t Have It All!
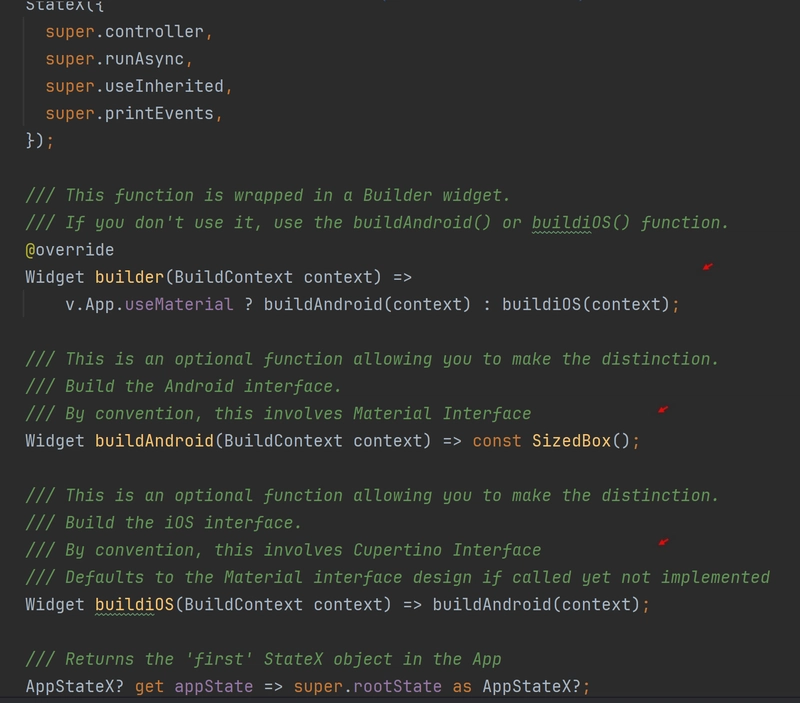
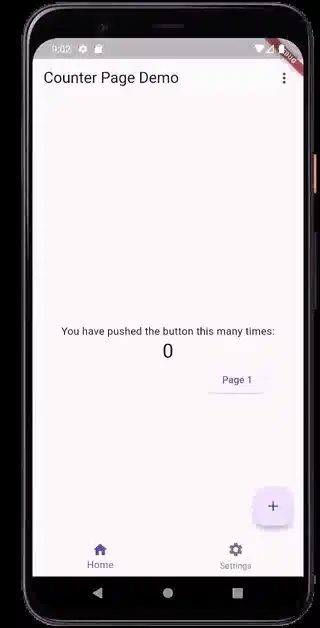
…or can you? The last article, It’s Not Flutter, brought a surge of downloads for my Fluttery Framework package. I received some great feedback, and have since then tightened up the code. It does what I always wanted Flutter itself to do: Run one codebase on more than one platform. After all, that was Flutter‘s mantra when it first came out, right? Flutter will run your app on your iPhone, on your Android, on the Web, on Windows, and on the Mac, etc — with only one codebase. However, I realized it doesn’t. Not with ease anyway. For me, it needed a few more ‘build’ functions: build(); You already know this function. It comes with Flutter. buildAndroid(); Returns a Widget for the Material interface. buildiOS(); Returns a Widget for the Cupertino interface. builder(); Runs the desired widget: CupertinoApp or MaterialApp. What’s in it for me? What’s in it for me?, you ask. There are a lot ‘State Management’ solutions out there, but what about other capabilities allowing for rapid development and for a reliable deliverable? For a production-worthy, cross-platform app, you also want the following: Multiplatform, Time to Initialize, Event Handling, and Error Handling Table Of Contents Multiplatform · It Can Do It All · Choice By Design · Change Face Time to Initialize · Startup Time · Takes Time Event Handling · The Events That Take Place · In The Beginning · The Route Taken · Page 1 and 2 · Pop Back · It’s All Flutter · To Dispose Of · Play Well With Others · Separate Lifecycles Real-World Example · Timing is Everything · Sequence of Events · It Is Eventful · The Tree Is Key · Dispose Disposable? Error Handling · The State of Error · Push for Exception · It Takes Two · Counter The Exception · My Bad · To The Top · Other Handlers · Stops And Starts · A Bad Build · Seeing Red Not · It’s A Little More Multiplatform It Can Do It All After installing Fluttery, go to the pub.dev directory on your machine and seek out its example folder for an extensive example app. Run this example app on any device you want. It can do it all. Choice By Design In Fluttery, every State object offers two additional ‘build’ functions: buildAndroid(); and buildiOS(); The first is for the Material interface design, and the second is for the Cupertino interface design. For example, implement both these functions, and your mobile app will look good on an Android device and on an iPhone. Depending on the platform it’s running on, your app will start with either the CupertinoApp widget, or it will start with the MaterialApp widget. Frankly, it’ll start up any interface design you choose. You’re free to use a third-party design as well (eg. fluent_ui) using yet another ‘build’ function, buildApp(). See below: Change Face In the video below, the example app is switching between the Material interface and Cupertino interface with just a tap—this merely demonstrates how Fluttery will readily run on any accepted platform. The Counter page displayed extends from the class, StateX. It is that class displayed in the first screenshot below. You can see the extra build() functions mentioned above. The example app even switches between version 1 and version 2 of the Material design. The second screenshot above is the builder() function for the App’s main State object (AppStateX). It is this function that is called again and again when switching between interfaces. It runs either the CupertinoApp widget or the MaterialApp widget — but only if a null comes from the function, buildApp(). See how that works? Let Fluttery worry about all this for you. Time to Initialize Startup Time When I first began working in Flutter, I saw many developers ‘initializing’ their app’s particular functions and features before the function, runApp(), is even called. These were operations that had to be completed or at least initialized before the app even displays its first screen. Ugly! Fluttery gives the State class an additional function called, initAsync(), to initialize such features. Think of it as an initState() function for asynchronous operations. Any such operations will be completed before the State object proceeds (using a FutureBuilder). The video below demonstrates this. See the ‘spinner’ going around and around in the center of the screen at startup? That could be any intense operation (eg. opening databases, accessing web services, etc.). Any operation that must be completed before the app can present the demo app. If you like, instead of a spinner, you can display a fanciful startup screen to keep your users entertained while they wait. Let Fluttery worry about all this for you. Takes Time The first screenshot above reveals that this app is not opening a database at startup. It’s simply counting to 10 before proceeding — but you get the idea. However, further into the example app, a number of somewhat unreliable web services

…or can you?
The last article, It’s Not Flutter, brought a surge of downloads for my Fluttery Framework package. I received some great feedback, and have since then tightened up the code. It does what I always wanted Flutter itself to do:
Run one codebase on more than one platform.
After all, that was Flutter‘s mantra when it first came out, right? Flutter will run your app on your iPhone, on your Android, on the Web, on Windows, and on the Mac, etc — with only one codebase. However, I realized it doesn’t. Not with ease anyway. For me, it needed a few more ‘build’ functions:
build(); You already know this function. It comes with Flutter.
buildAndroid(); Returns a Widget for the Material interface.
buildiOS(); Returns a Widget for the Cupertino interface.
builder(); Runs the desired widget: CupertinoApp or MaterialApp.
What’s in it for me?
What’s in it for me?, you ask. There are a lot ‘State Management’ solutions out there, but what about other capabilities allowing for rapid development and for a reliable deliverable? For a production-worthy, cross-platform app, you also want the following:
Multiplatform, Time to Initialize, Event Handling, and Error Handling
Table Of Contents
Multiplatform
· It Can Do It All
· Choice By Design
· Change Face
Time to Initialize
· Startup Time
· Takes Time
Event Handling
· The Events That Take Place
· In The Beginning
· The Route Taken
· Page 1 and 2
· Pop Back
· It’s All Flutter
· To Dispose Of
· Play Well With Others
· Separate Lifecycles
Real-World Example
· Timing is Everything
· Sequence of Events
· It Is Eventful
· The Tree Is Key
· Dispose Disposable?
Error Handling
· The State of Error
· Push for Exception
· It Takes Two
· Counter The Exception
· My Bad
· To The Top
· Other Handlers
· Stops And Starts
· A Bad Build
· Seeing Red Not
· It’s A Little More
Multiplatform
It Can Do It All
After installing Fluttery, go to the pub.dev directory on your machine and seek out its example folder for an extensive example app. Run this example app on any device you want. It can do it all.
Choice By Design
In Fluttery, every State object offers two additional ‘build’ functions: buildAndroid(); and buildiOS(); The first is for the Material interface design, and the second is for the Cupertino interface design. For example, implement both these functions, and your mobile app will look good on an Android device and on an iPhone. Depending on the platform it’s running on, your app will start with either the CupertinoApp widget, or it will start with the MaterialApp widget.
Frankly, it’ll start up any interface design you choose. You’re free to use a third-party design as well (eg. fluent_ui) using yet another ‘build’ function, buildApp(). See below:
](https://media2.dev.to/dynamic/image/width=800%2Cheight=%2Cfit=scale-down%2Cgravity=auto%2Cformat=auto/https%3A%2F%2Fcdn-images-1.medium.com%2Fmax%2F3206%2F1%2A09y6YIqLgGWWlX2r591RJw.png)
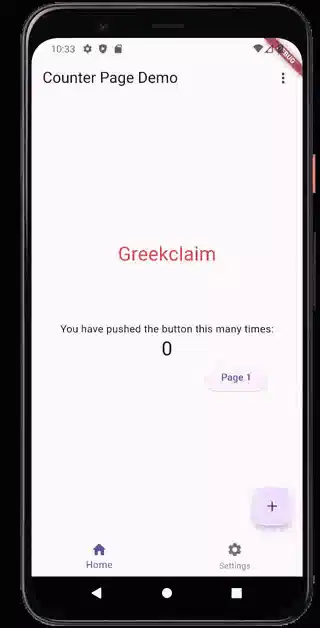
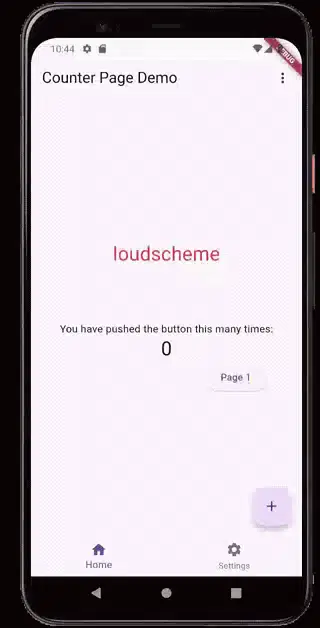
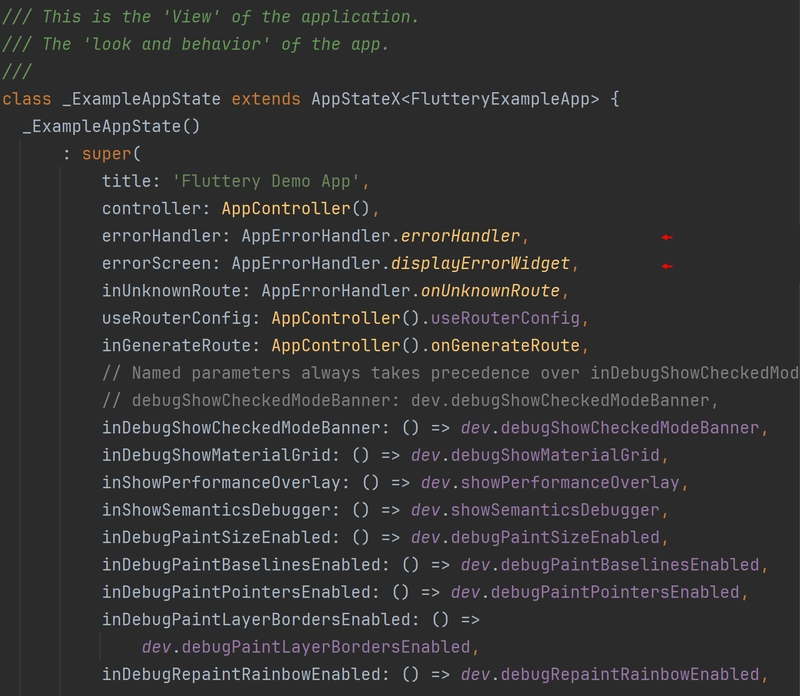
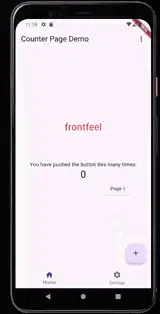
Change Face
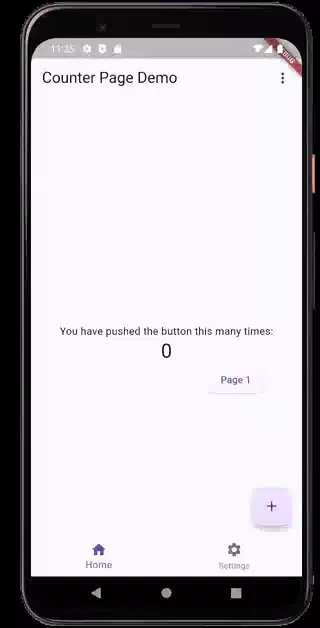
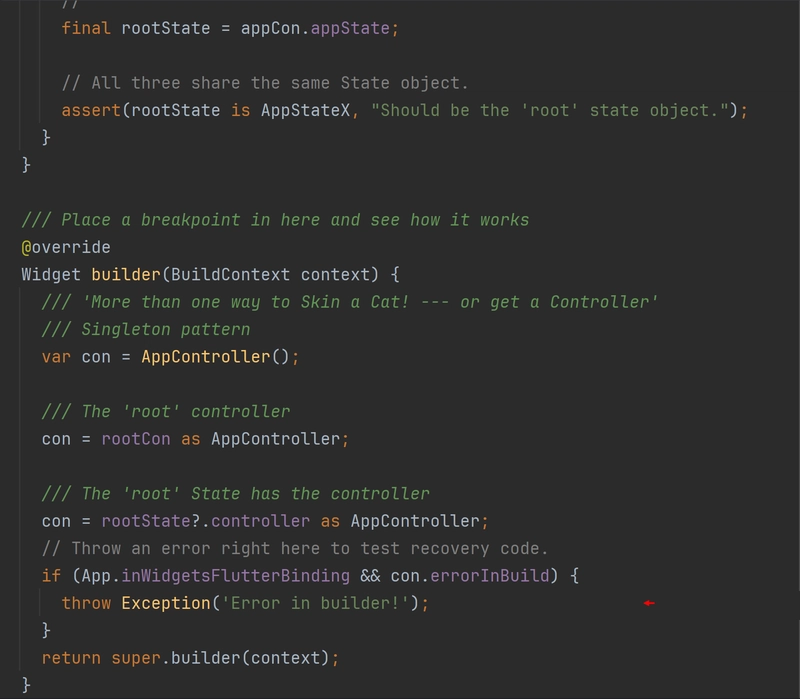
In the video below, the example app is switching between the Material interface and Cupertino interface with just a tap—this merely demonstrates how Fluttery will readily run on any accepted platform. The Counter page displayed extends from the class, StateX. It is that class displayed in the first screenshot below. You can see the extra build() functions mentioned above. The example app even switches between version 1 and version 2 of the Material design.
 and [app_statex.dart](https://github.com/AndriousSolutions/fluttery_framework/blob/28e93ebe031dc2a344e4b0ab84132a8347279141/lib/view/app_statex.dart#L553)](https://media2.dev.to/dynamic/image/width=800%2Cheight=%2Cfit=scale-down%2Cgravity=auto%2Cformat=auto/https%3A%2F%2Fcdn-images-1.medium.com%2Fmax%2F3204%2F1%2A5dF5ccsDcadWN2D7OgqqHQ.png)
The second screenshot above is the builder() function for the App’s main State object (AppStateX). It is this function that is called again and again when switching between interfaces. It runs either the CupertinoApp widget or the MaterialApp widget — but only if a null comes from the function, buildApp(). See how that works? Let Fluttery worry about all this for you.
Time to Initialize
Startup Time
When I first began working in Flutter, I saw many developers ‘initializing’ their app’s particular functions and features before the function, runApp(), is even called. These were operations that had to be completed or at least initialized before the app even displays its first screen. Ugly!
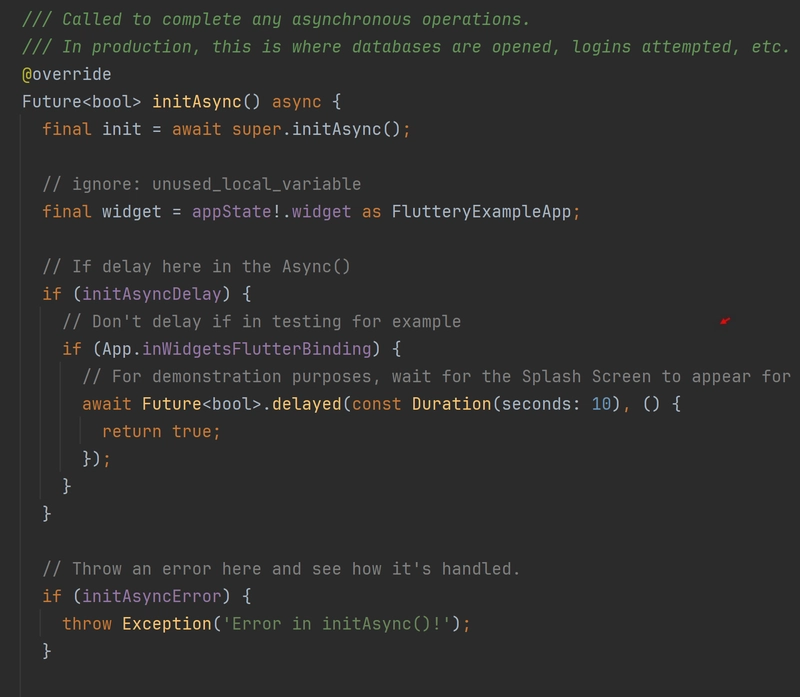
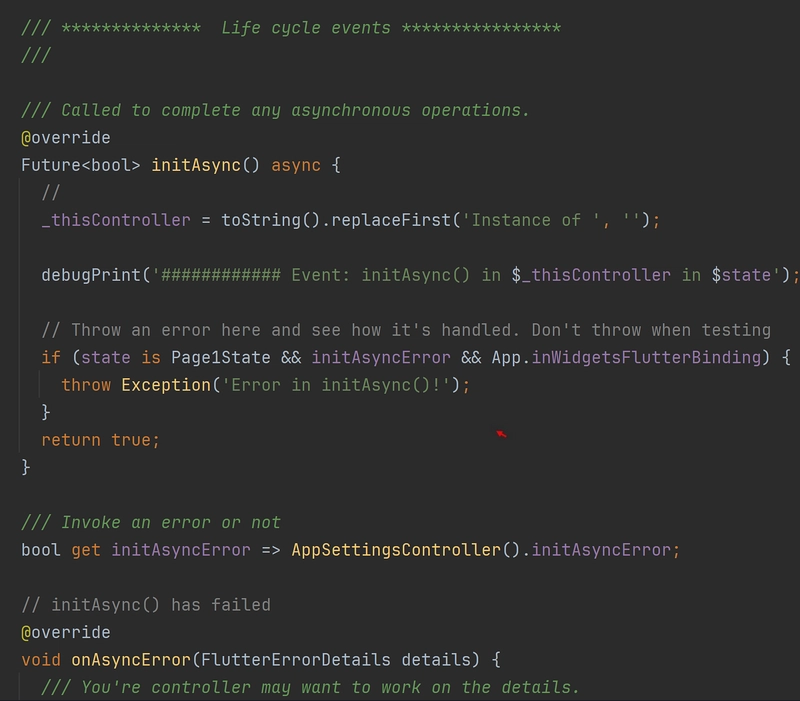
Fluttery gives the State class an additional function called, initAsync(), to initialize such features. Think of it as an initState() function for asynchronous operations. Any such operations will be completed before the State object proceeds (using a FutureBuilder). The video below demonstrates this. See the ‘spinner’ going around and around in the center of the screen at startup? That could be any intense operation (eg. opening databases, accessing web services, etc.). Any operation that must be completed before the app can present the demo app. If you like, instead of a spinner, you can display a fanciful startup screen to keep your users entertained while they wait. Let Fluttery worry about all this for you.
 and [image_api_conroller.dart](https://github.com/AndriousSolutions/fluttery_framework/blob/28e93ebe031dc2a344e4b0ab84132a8347279141/example/lib/src/main/grid_app_example/gridview/controller/image_api_controller.dart#L42)](https://media2.dev.to/dynamic/image/width=800%2Cheight=%2Cfit=scale-down%2Cgravity=auto%2Cformat=auto/https%3A%2F%2Fcdn-images-1.medium.com%2Fmax%2F3200%2F1%2AoZdaEz4vA6J-Bo-M-zVwaQ.png)
Takes Time
The first screenshot above reveals that this app is not opening a database at startup. It’s simply counting to 10 before proceeding — but you get the idea. However, further into the example app, a number of somewhat unreliable web services are being called (see the second screenshot above). Twelve initAsync() functions are utilized to display a grid of animals. You can see twelve spinners appear before pictures of animals are displayed. Note, how some of them take their sweet time to complete. Fluttery has all that built-in.
See how modular the code is? Such asynchronous code is located where it is required and executed when it is needed. That’s very nice. Fluttery even handles any errors that may occur in the initAsync() function and provides a function for you to implement when such errors occur:
void onAsyncError(FlutterErrorDetails details) {
What else do you want?
Event Handling
The Events That Take Place
You want to know what’s going on in your app. There’s so much going on in a typical Flutter app. Fluttery turns to Flutter itself to offer an array of event handlers that will address all that’s going on in your app.
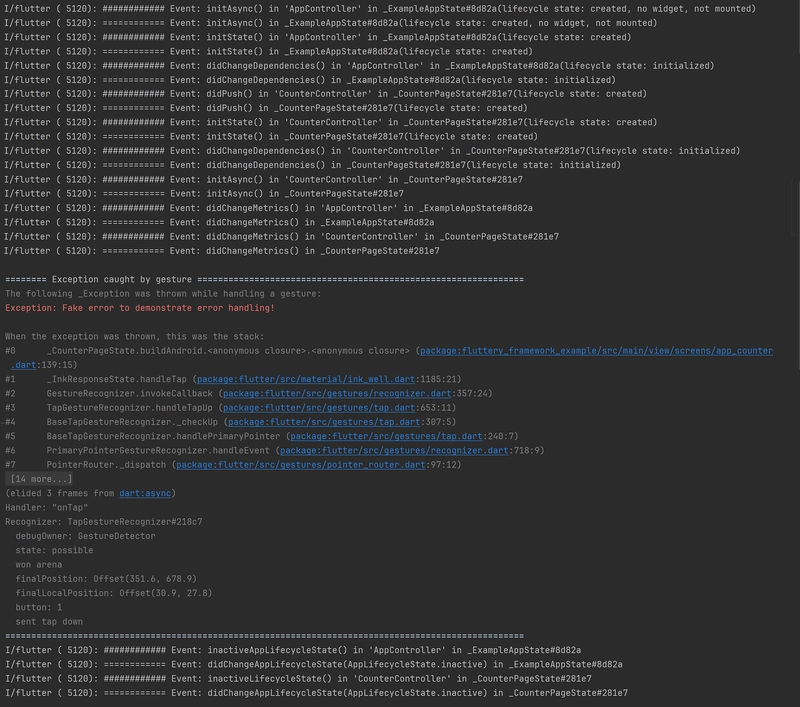
Look at the two screenshots below. They’re the result of debugPrint() functions placed throughout the example app called in Flutter’s many Event Handlers. They print out on your IDE’s console the name of the handler, the Controller, and the State object involved. I’ve placed them throughout the example app for your benefit so you can see the extent of control you have while running your app.
Those two screenshots convey the events fired when simply tapping through the example app’s screens and back again (see video). Pretty intense, right? That’s always going on in your apps — you should be aware of them. The free article below details this further.
](https://media2.dev.to/dynamic/image/width=800%2Cheight=%2Cfit=scale-down%2Cgravity=auto%2Cformat=auto/https%3A%2F%2Fcdn-images-1.medium.com%2Fmax%2F2000%2F1%2AwbCwEh0SKC7-Ui8YUmFkEg.png)
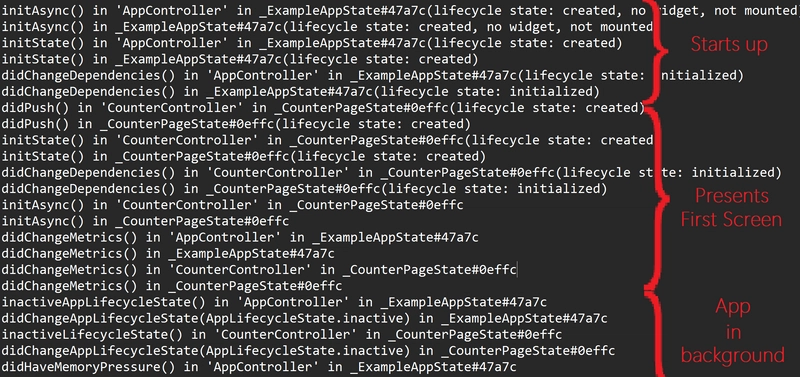
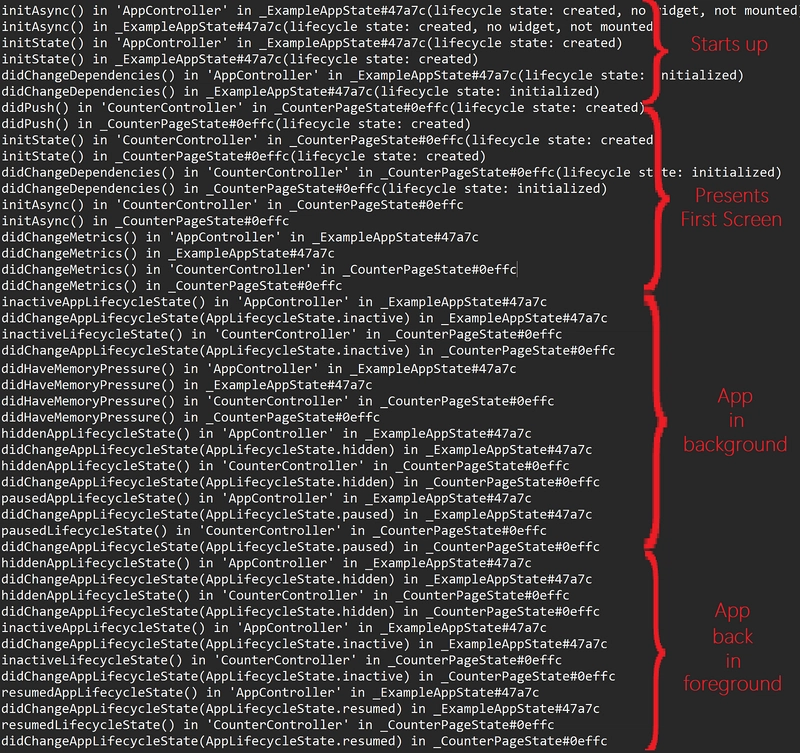
In The Beginning
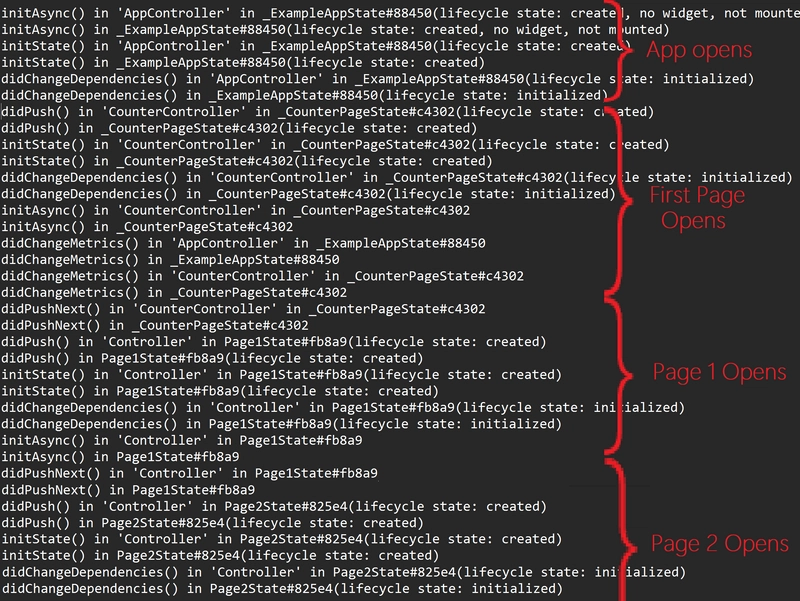
The first screenshot below displays some of the handlers represented by the debugPrint() function calls. Of course, there’s much more going on when starting up your app, but let’s see what’s conveyed here. The first State object, _ExampleAppState, is starting up accompanied by it Controller object, AppController. Note how the State object fires its Controller object’s event handlers before its own — very important.
This order of events is an exception at startup as the remaining screens will call the initState() function first then the initAsync() function. It’s unique at startup because that’s when you would initialize the many functions and features you want to accompany your app.

](https://media2.dev.to/dynamic/image/width=800%2Cheight=%2Cfit=scale-down%2Cgravity=auto%2Cformat=auto/https%3A%2F%2Fcdn-images-1.medium.com%2Fmax%2F3212%2F1%2AOf8ghwAye9EuK7xVg5K-XQ.png)
The Route Taken
See how Fluttery highlights when a Route is taken moving from one screen to another? The home screen, of course, is opened at startup, and that’s represented by the didPush() function. Even before the State object’s initState() function is called, its didPush() function is called — very useful.

The list of didChangeMetrics() functions in the screenshot below tells you the interface is finalizing its components’ size and position. Things will soon settle down, and the app will then wait for user input — and it gets it right away. The current Controller and State object notes we’re pushing onto another screen with the function call, didPushNext(). Think of this event as, “We’re now leaving ‘CounterController’ and _CounterPageState and pushing to the ‘next’ screen. Act accordingly.”

I haven’t ‘reinvented the wheel’ here. This is all coming from Flutter. I simply consolidated these capabilities into my ‘framework package’ called, Fluttery.
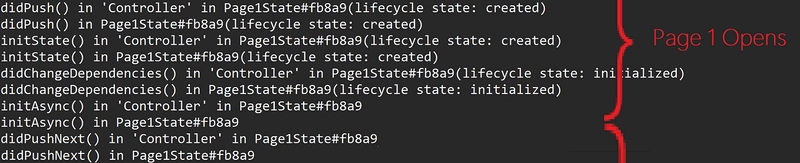
Page 1 and 2
We’re arriving on Page 1 in the next screenshot below. Even before its State object’s initState() function is called, its Controller’s and then its own didPush() function is called. Very nice. What follows, of course, are their initState(), their didChangeDependencies(), and their initAsync() functions before Page 1 is displayed. After all that, we can tell we’re moving off Page 1 with the didPushNext() function calls. See how this works? We go all the way to Page 3 in this exercise.
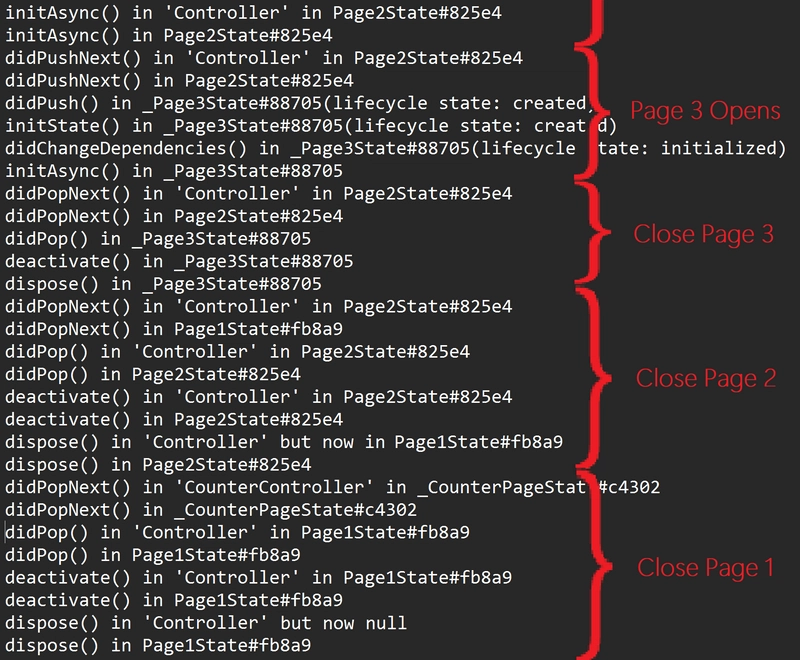
Pop Back
In the next few screenshots, let’s start heading back from Page 3 back to the home screen. With Fluttery, you can run code when such events happen. For example, you can restart features when returning to previous screens, or validate data retrieved when leaving a screen, etc. You can control the processes involved when switching between your app’s screens.
It’s All Flutter
Please, take a look at the screenshot below. If you know Flutter, you’ll know what’s happening in the sequence of events displayed there. This involves Page 3 in the example app. Now, its State object doesn’t have an accompanying Controller object, but that’s perfectly fine. No law says you need to use them. You can see it ran its initAsync() function (only to call debugPrint() mind you), but then Page 2 calls its didPopNext() function? Flutter’s telling you we’re coming back to Page 2 — act accordingly.
What follows then is very interesting. The State object in Page 3 calls its didPop(), its deactivate(), and its dispose() in that order. Page 3 is closing and being cleared from memory — and you have the handlers available to address when a State object is shutting down. That’s very very nice. Particularly with how unreliable the dispose() function can be. More on that next.

To Dispose Of
The next screenshot has Page 2 closed and cleared from memory. We see its accompanying controller named ‘Controller’ is calling its event handlers as well. However, note the oddity in the Controller’s dispose() function.

Page 1 and Page 2 share a controller named ‘Controller.’ It has retreated to its previous and first associated State object, Page1State. That’s because we don’t want any reference to a State object that’s about to ‘go away’ from memory — if and when it calls its dispose() function. ‘If and when?’, you say? More on that shortly.
In the final screenshot below, Page 1 is now being cleared from memory. There should be no reference to its only State object by the time this dispose() function is called. At this point, the controller should have no associated State object, and so it returns null below. Makes sense?

Play Well With Others
Now, as much as you would like it to be the case, yours will not be the only app running on your user’s device. There are also event handlers for when your user moves off your app (placing it in the background) only to return from some other app at some point later. You should handle such situations as well.
Let’s look at the video below. Tapping Android’s ‘Recents’ button will place the example app in the background. Another tap on the app itself returns it to the foreground. You will want to handle the events that occur during this time. You have the handlers to do it. Please, tap on the screenshots below for a closer look.
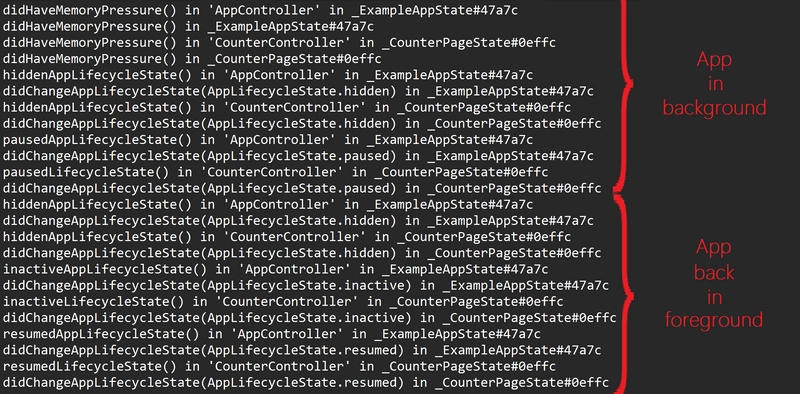
Separate Lifecycles
These are handlers you haven’t seen before. Note the order they are called. They’re fired ‘from the ground up’ up to the currently displayed screen running the State object, _CounterPageState.

Returning to the app, the last screen’s controller and State object are the last objects to fire their ‘resumed’ event handlers. See below.

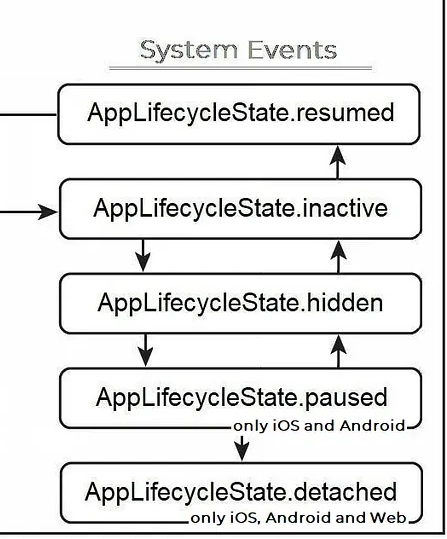
Below, the event handlers are all listed together. You can see these ‘system’ event handlers behave a little differently than those you’ll encounter in Flutter itself. They are dependent on the particular platform the app is running on — some don’t exist depending on the platform. Notice your app returns to the foreground only after running the ‘hidden’ and ‘inactive’ functions once again. Finally, the function, resumedLifecycleState() is called in the Controller and the didChangeAppLifecycleState() function with the parameter value, AppLifecycleState.resumed, is called in the State object. Fluttery is doing this all for you. Event handling is very important.
Real-World Example
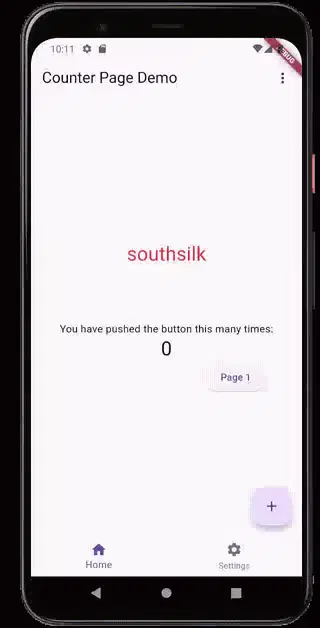
Timing is Everything
Let’s give you a real-world example of its importance. When this example app starts, there’s a ‘word-pair’ displayed in red and placed in the center of the screen. To produce these pairs, a Timer is calling the package, english_words, at a steady interval. It’s always running in the background. Granted, it’s not taking up too much resources, but imagine a more substantial process always running in the background — one running in your own app. You should have some control over these background processes.
In the video below, when we tap off the first screen to Page 1 screen, the Timer is stopped. It would be a waste running this process in the background when it is no longer needed. The first screenshot shows the event handlers involved. Note, the second screenshot handles a different scenario altogether. The second scenario shows the Timer initialized at startup and turned off when the app closes using the ‘deactivate’ event. By the way, when is the ‘activate’ event triggered? I’ll tell you soon. Hint: Widget tree.
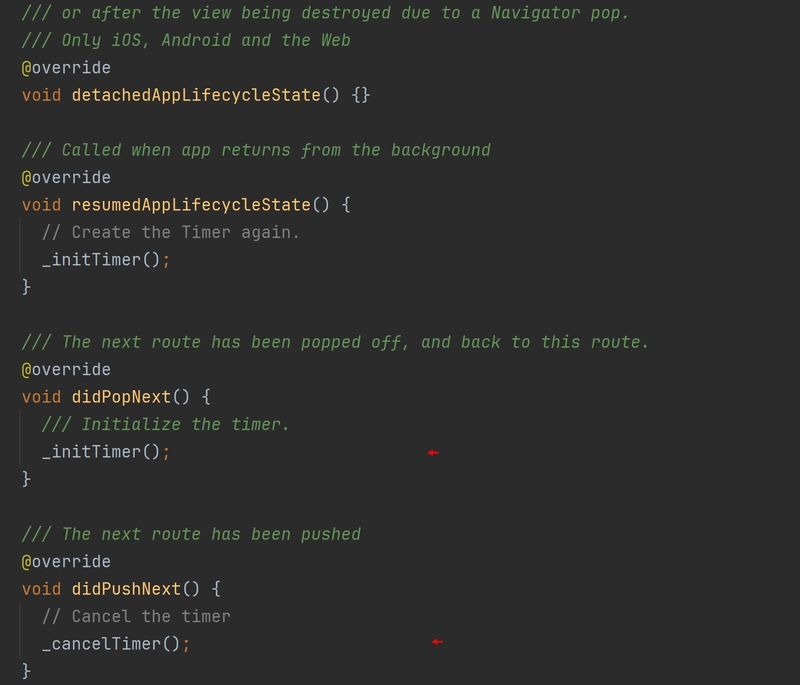
 and [english_words_timer.dart](https://github.com/AndriousSolutions/fluttery_framework/blob/28e93ebe031dc2a344e4b0ab84132a8347279141/example/lib/src/app/controller/english_words_timer.dart#L55)](https://media2.dev.to/dynamic/image/width=800%2Cheight=%2Cfit=scale-down%2Cgravity=auto%2Cformat=auto/https%3A%2F%2Fcdn-images-1.medium.com%2Fmax%2F3200%2F1%2ABRjk9CLQLklyuV1Ex2VlbQ.png)
In the first screenshot above, the didPushNext() method is triggered when the ‘Page 1’ button is pressed. Again, this is all about routes. You’re about to leave this first screen being ‘pushed to the next screen.’ Hence, the Timer is stopped with the function call, _cancelTimer(). Note in the video we return from Page 1 almost immediately (i.e. The ‘next screen’ is popped almost immediately). That means the didPopNext() function back in the first screen is fired and initializes the Timer again with _initTimer(). See how that works?
Sequence of Events
Revisiting Android’s ‘Recents’ button, when placing this example app in the background, a whole different sequence of events occurs below. In the first screenshot, you see the three event handlers involved. They're listed in the order they are fired in the controller, EnglishWords Timer. In the second screenshot of that very same controller, you see the event handler, resumedAppLifecycleState(). Again, it’s called when the example app is returned to the foreground. See how that all works? It’s how Flutter works. Fluttery just gives you the functions to work with it.
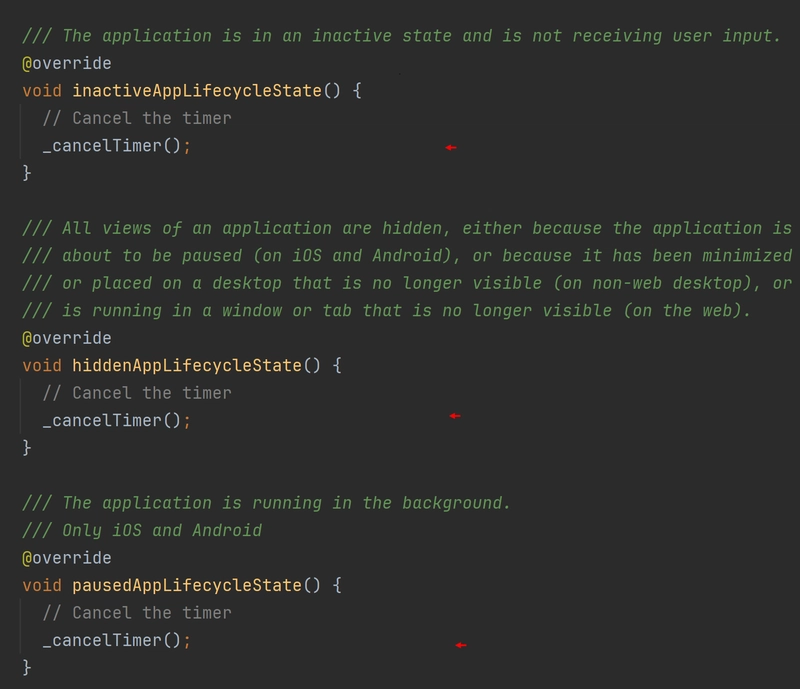
and [english_words_timer.dart](https://github.com/AndriousSolutions/fluttery_framework/blob/28e93ebe031dc2a344e4b0ab84132a8347279141/example/lib/src/app/controller/english_words_timer.dart#L114)](https://media2.dev.to/dynamic/image/width=800%2Cheight=%2Cfit=scale-down%2Cgravity=auto%2Cformat=auto/https%3A%2F%2Fcdn-images-1.medium.com%2Fmax%2F3204%2F1%2ASDGzRwaoAsEobaVgKZeQTg.png)
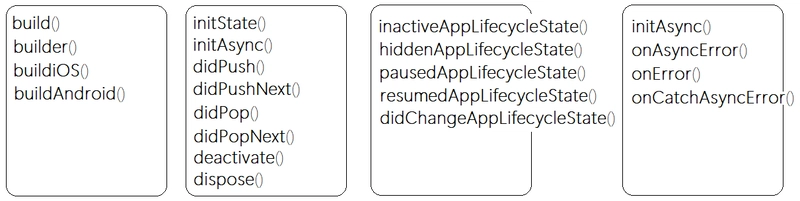
It Is Eventful
Back in that video, the _cancelTimer() function is called a total of five times. That’s because, as you’ve seen in the graphic below, Flutter will go back through those event handlers when bringing the app back into focus. That’s just the way it is. I involved all three methods here to demonstrate this. In truth, I would have only placed the _cancelTimer()method in the inactiveAppLifecycleState() method — for a total of two calls. The method, resumedAppLifecycleState(), is then called going back so to initialize the Timer again. Perfect.
The Tree Is Key
Now, back to the ‘activate’ event. Know that a State object’s deactivate() event handler is triggered in two instances: when their widget is closing and when their widget is moved around the Widget tree. The Widget tree makes Flutter fast. Widgets are moved around the tree to improve performance. When a widget is ‘reinserted’ into the Widget tree, its State object’s activate() event handler is called — restarting the Timer in our case. See how that works?
Dispose Disposable?
This is all because I don’t trust the dispose() function. I need to call the _cancelTimer()routine and stop the Timer. However, I usually don’t use the dispose() method to do this. It’s unreliable to run any mission-critical operations and or release any substantial resources. You see, it’s to the Virtual Machine’s (VM) (i.e. Flutter Engine) discretion to call a State object’s dispose() function as part of its garbage collection responsibilities. You will have no idea when that happens. Due to some memory constraints, it’s not called at all — at least not when you may want to. The deactivate() method is more reliable and is more consistent. I use the deactivate() method, but that means I also use the activate() method — in case the Widget is moved around the Widget tree — the Timer must be initialized in our case. That’s just the way it is.
What else do you want?
Error Handling
Error handling is paramount. Your app is going to fail for any number of reasons, and you must have the code to address it. Your app must fail gracefully and close vulnerable resources before crashing. Your error handling should report and or log the problem with pertinent information. If the situation permits, maybe your app can even recover and continue on. Granted, recovery is the exception, but Fluttery offers the possibility.
The State of Error
Every State object has the onError() function. An error thrown in a Fluttery app will involve a State object if the code that errored was working ‘in’ that State object. The State object’s onError() function is called:
void onError(FlutterErrorDetails detials) {
Push for Exception
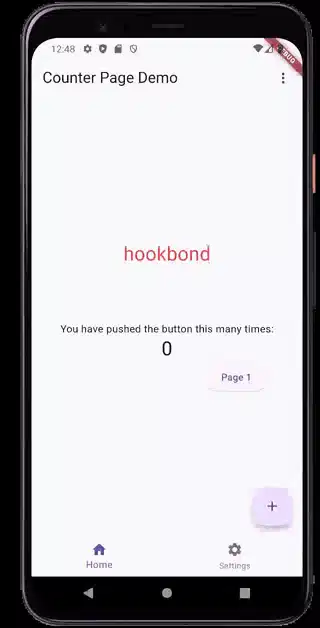
In the video below, the example app throws an Exception with every tap on the ‘Counter’ button (+), but you’d never know it. The Exception is still reported and logged by its Error Handler, but the State object’s onError() function recognizes this particular Exception, and attempts to increment the counter regardless.
A very very simple scenario, where the Exception is anticipated (i.e. it’s explicitly thrown). However, Fluttery allows you to take into account such scenarios. You may have situations in your app where the typical process will encounter anticipated exceptions —and possibly you’re then able to overcome them.
It Takes Two
In Flutter, there are two types of ‘errors.’ In Flutter itself, with certain bits of code, an exception is anticipated to occur from time to time. Such code is likely called within a try-catch statement to indeed catch such exceptions. In the catch clause, an Exception object is instantiated and ‘handled’ accordingly.
The other type of error is considered ‘an error on the part of the developer.’ However, even an unanticipated issue must be addressed. For such failures, it’s preferred the Error class and its subclasses be used.
An Error object represents a program failure that the programmer should have avoided. — Google Search.
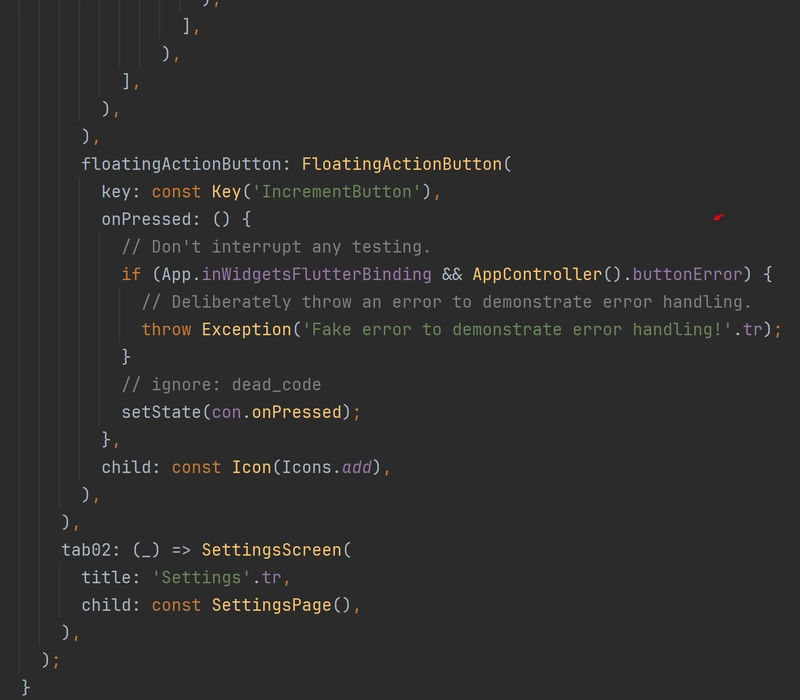
Counter The Exception
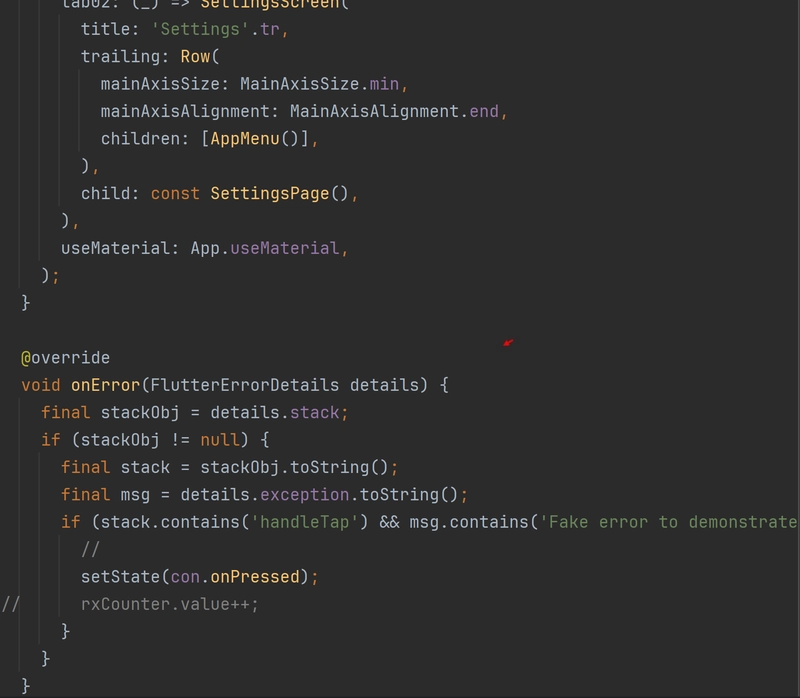
In the first screenshot above, when switched on, the State object, _CounterPageState, explicitly throws, Exception('Fake error to demonstrate error handling'). The next screenshot is of that State object’s onError() routine. It is seeking out that specific problem and addressing it accordingly.
My Bad
Now, ‘handle your errors’ does not mean ‘ignore them completely.’ That’s a no, no. I’m sure you could find a way, but I wouldn’t ignore any errors or exceptions. Even with the ‘Counter’ button problem seemingly ‘handled,’ the example app’s error handler doesn’t neglect to record and report the problem as well. See the console screenshot below:
To The Top
Again, every State object has an onError() function. An exception will be sent to the State object that the troublesome code was likely working with. Regardless, the App’s first State object’s onError() routine is always called. Being the ‘head honcho’ of State objects in your app, the AppStateX object is notified of all exceptions or errors that may occur in your app.

 and [app.dart](https://github.com/AndriousSolutions/fluttery_framework/blob/28e93ebe031dc2a344e4b0ab84132a8347279141/example/lib/src/app/view/app.dart#L244)](https://media2.dev.to/dynamic/image/width=800%2Cheight=%2Cfit=scale-down%2Cgravity=auto%2Cformat=auto/https%3A%2F%2Fcdn-images-1.medium.com%2Fmax%2F3192%2F1%2AT9RBrj5y-IKszfs4wMvL0g.png)
Above is the screenshot of State object, _CounterPageState, again. It fires its onError() routine with every tap of the button. The second screenshot is of the AppStateX object, _ExampleAppState, displaying its onError() routine. It takes in that particular exception as well. Broadcasting errors to the ‘governing part’ of an app is just good practice. For example, when working with a team of developers, one programmer can’t just hide their errors while developing some remote screen somewhere—all errors are sent to the App’s ‘main’ State object as well.
Other Handlers
With Fluttery, you’re free to utilize other third-party error handlers like Firebase Crashlytics, Catcher 2, etc. These products will notify you directly about a problem right then and there. You can then be more proactive when addressing such issues.
Below is a screenshot of what an App’s initAsync() function could contain, for example, when setting up Firebase Crashlytics as its Error Handler and reporting system.
](https://media2.dev.to/dynamic/image/width=800%2Cheight=%2Cfit=scale-down%2Cgravity=auto%2Cformat=auto/https%3A%2F%2Fcdn-images-1.medium.com%2Fmax%2F2800%2F1%2ALISuSrp1I2YaFnkvsf8EEA.png)
Stops And Starts
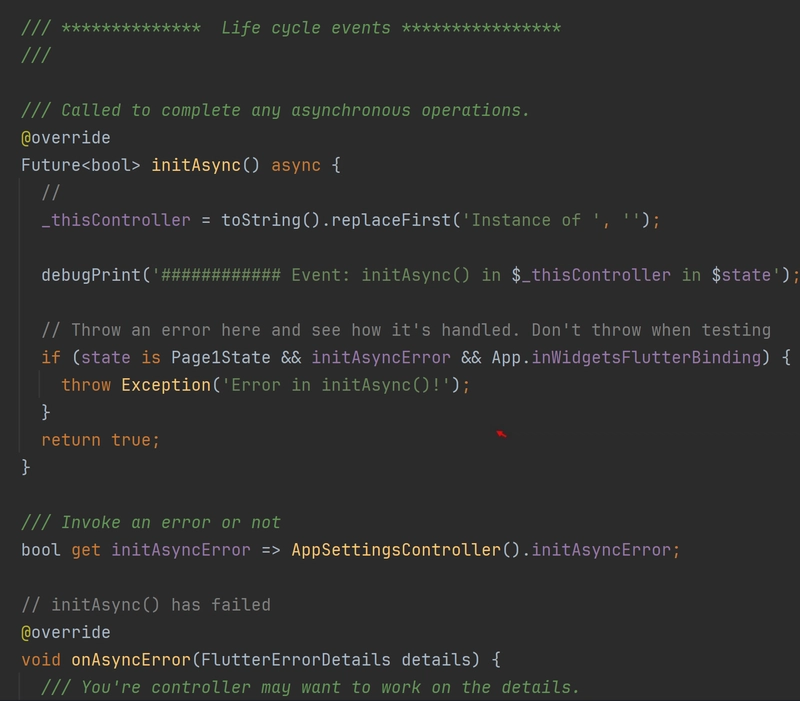
Fluttery provides an important capability to your apps. Again, it allows your app to perform extensive and complicated operations asynchronously using the function, initAsync(). Every State object in Fluttery has one so as to localize such operations to run when and where they’re required.
These operations are likely critical and must be completed successfully for your app to proceed. The need for error handling during such operations will be of great importance. A handler to log, report, and possibly even recover from errors in the function, initAsync(), may prove very helpful to you.
In the video below, an initAsync() function explicitly throws an Exception (if permitted) when the ‘Page 1’ button is tapped. The first screenshot has the Exception thrown, while the second screenshot introduces you to the onCatchAsyncError() function. Note, that specific Exceptions are anticipated in this function and will return true when encountered. Consequently, the ‘Page 1’ screen appears seemingly without incident.
 and [app.dart](https://github.com/AndriousSolutions/fluttery_framework/blob/28e93ebe031dc2a344e4b0ab84132a8347279141/example/lib/src/app/view/app.dart#L226)](https://media2.dev.to/dynamic/image/width=800%2Cheight=%2Cfit=scale-down%2Cgravity=auto%2Cformat=auto/https%3A%2F%2Fcdn-images-1.medium.com%2Fmax%2F3000%2F1%2AQzEyTd4L3nBJsZllUjqPqA.png)
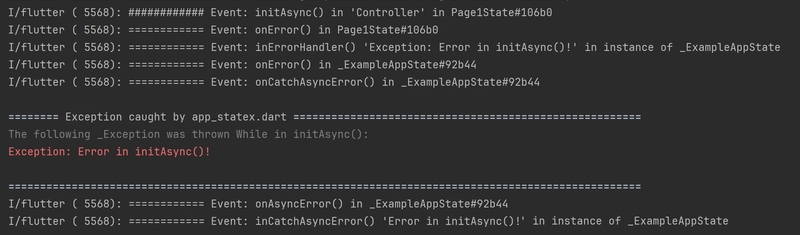
However, they are still Exceptions, and so error handlers log it accordingly. Note below, a console lists the debugPrint() function outputs indicating the many handlers involved.
The exception occurred in ‘Page 1’ and so its onError() is called. The app’s main State object, _ExampleAppState, will then call its onError() function. Being an ‘Asynchronous’ error, its onCatchAsyncError() function is then called. That’s the second screenshot above, and because it returns, true, the ‘Page 1’ screen appears.
Now, below is what happens if it returns false (see the second screenshot below). The screen, Page 1, fails outright and the good old ‘Red Screen of Doom’ is instead displayed. If running in Production, it turns out to be an ugly, ‘Grey Screen of Doom.’
 and [app.dart](https://github.com/AndriousSolutions/fluttery_framework/blob/28e93ebe031dc2a344e4b0ab84132a8347279141/example/lib/src/app/view/app.dart#L226)](https://media2.dev.to/dynamic/image/width=800%2Cheight=%2Cfit=scale-down%2Cgravity=auto%2Cformat=auto/https%3A%2F%2Fcdn-images-1.medium.com%2Fmax%2F3000%2F1%2AxpGszAkSzJE2c6aaV2nVig.png)
Now, what’s stopping you from always returning true when errors occur in an initAsync() function? Remember, these operations are likely critical and must be completed successfully. Frankly, if you ignore such errors, that’s on you. They’re still reported to the ‘main’ State object in your app.
A Bad Build
In the video below, another exception occurs in a ‘build’ function obligated to return a Widget. It occurs when moving to Page 2. The first screenshot below displays the throw statement involved.
In the second screenshot below, you can see in Flutter itself, the build() function is called in a try-catch statement. When an error occurs right in a build() function, something has to be displayed, and so the ErrorWidget.builder() produces the good old ‘Red Screen of Doom.’
 and [framework.dart](https://github.com/flutter/flutter/blob/7d56be4c8de814022357633179a816b51ffca4b8/packages/flutter/lib/src/widgets/framework.dart#L5708)](https://media2.dev.to/dynamic/image/width=800%2Cheight=%2Cfit=scale-down%2Cgravity=auto%2Cformat=auto/https%3A%2F%2Fcdn-images-1.medium.com%2Fmax%2F3206%2F1%2A5GoxbZ7q2gZ_G8DkLtTELg.png)
Seeing Red Not
As you see in the first screenshot below, from the very beginning, the App’s State object, _ExampleAppState, has been using Fluttery’s standard Error Handler: AppErrorHandler.errorHandler
Of course, you’re free to assign your own Error Handler.
You’re also free to assign your own ‘Error Widget Builder’ to display a screen when a build() function fails. In the first screenshot below, Fluttery offers a more helpful and more aesthetically pleasing screen using the parameter value, AppErrorHandler.displayErrorWidget.The videos below have the same two errors that were tripped above. This time, however, you’re not seeing red.
It’s A Little More
There you have it. The Fluttery State class has a little more functionality (i.e. a few more functions) to supply ‘a little more’ of what I feel is required for a production-worthy, cross-platform app:
Multiplatform, Time to Initialize, Event Handling, and Error Handling
Further information is in the ‘Little More’ series of free articles (see below). I feel you’re going to want this. It’s all comes from Flutter. Just consolidated into one package: Fluttery Framework
](https://media2.dev.to/dynamic/image/width=800%2Cheight=%2Cfit=scale-down%2Cgravity=auto%2Cformat=auto/https%3A%2F%2Fcdn-images-1.medium.com%2Fmax%2F2000%2F1%2AZ1mI65H_X_RWvNH93hydGg.gif)
Cheers.
![]()