


![[The AI Show Episode 146]: Rise of “AI-First” Companies, AI Job Disruption, GPT-4o Update Gets Rolled Back, How Big Consulting Firms Use AI, and Meta AI App](https://www.marketingaiinstitute.com/hubfs/ep%20146%20cover.png)


![How to make Developer Friends When You Don't Live in Silicon Valley, with Iraqi Engineer Code;Life [Podcast #172]](https://cdn.hashnode.com/res/hashnode/image/upload/v1747360508340/f07040cd-3eeb-443c-b4fb-370f6a4a14da.png?#)


-(1).jpg?width=1920&height=1920&fit=bounds&quality=70&format=jpg&auto=webp#)


.jpg?#)


.png?width=1920&height=1920&fit=bounds&quality=70&format=jpg&auto=webp#)


![What’s new in Android’s May 2025 Google System Updates [U: 5/19]](https://i0.wp.com/9to5google.com/wp-content/uploads/sites/4/2025/01/google-play-services-1.jpg?resize=1200%2C628&quality=82&strip=all&ssl=1)


![Apple's iPhone Shift to India Accelerates With $1.5 Billion Foxconn Investment [Report]](https://www.iclarified.com/images/news/97357/97357/97357-640.jpg)
![Apple Releases iPadOS 17.7.8 for Older Devices [Download]](https://www.iclarified.com/images/news/97358/97358/97358-640.jpg)


How to Set Up GitLab CI/CD for Deploying Frontend Apps to Vercel
Deploying your frontend app to Vercel using GitLab CI/CD offers an efficient and automated solution for continuous delivery. In this guide, we'll walk you through the process of setting up a GitLab CI/CD pipeline that deploys your app to Vercel every time you push changes. This automation ensures your application is always live and up-to-date, reducing manual intervention and errors in your deployment workflow. In this guide, we'll cover the entire setup process, from configuring your GitLab pipeline to setting up environment variables like the Vercel API token. You'll also learn how to write the deployment script that ensures seamless deployment every time. By the end of this article, you’ll have a fully functional deployment pipeline that integrates seamlessly with Vercel. Prerequisites Before you proceed with setting up GitLab CI/CD for deploying the frontend app to Vercel, make sure you have the following: A GitLab Account: You’ll need an active GitLab account to create repositories and configure CI/CD pipelines. A Vercel Account: You need a Vercel account to deploy the application to their platform. Additionally, to fully understand how the application works and to set up the GitLab CI/CD pipeline, it's recommended that you first read through the article A Practical Guide to Deploying Frontend Apps on Vercel Using GitHub Actions. This article explains the application structure, key components, and Dockerfile setup, which will make this guide much easier to follow. Once you’re familiar with the application and have the necessary accounts, you can proceed with setting up the CI/CD pipeline in GitLab to deploy the frontend app to Vercel. Table of Contents GitLab CI/CD Workflow Configuration for Vercel Deployment Setting Up the Vercel API Token in GitLab Deploying and Testing the Frontend Application Conclusion GitLab CI/CD Workflow Configuration for Vercel Deployment To begin, create a .gitlab-ci.yml file in the root directory of your repository. This file will define the stages and jobs for the CI/CD pipeline. Paste the following code into the .gitlab-ci.yml file: stages: - build - deploy .standard-rules: rules: - if: $CI_COMMIT_BRANCH == $CI_DEFAULT_BRANCH frontend-build-job: stage: build image: node:23 script: - cd frontend - npm install - npm run build frontend-deploy-job: stage: deploy image: node:23 script: - npx vercel --prod --token $VERCEL_TOKEN --yes --cwd frontend Breakdown of the Configuration: stages: Defines the different stages of the pipeline: build and deploy. These stages determine the order in which the jobs will run. .standard-rules: Specifies that the pipeline will only run when changes are pushed to the default branch ($CI_DEFAULT_BRANCH), typically the main branch. This ensures that the pipeline triggers only on the main development branch. frontend-build-job: stage: This job belongs to the build stage. image: Uses the node:23 Docker image to run the job. script: In this job, the pipeline installs the dependencies and runs the build process for your frontend application. cd frontend: Navigates to the frontend directory. npm install: Installs the necessary dependencies. npm run build: Builds the production application. frontend-deploy-job: stage: This job belongs to the deploy stage. image: Again, uses the node:23 Docker image. script: Deploys the application to Vercel using the Vercel CLI. npx vercel --prod --token $VERCEL_TOKEN --yes --cwd frontend: Deploys the frontend application to Vercel in production mode using the Vercel API token stored in GitLab’s CI/CD settings. The --yes flag auto-approves the deployment process. This configuration ensures that when you push changes to the main branch, the application will automatically be built and deployed to Vercel. Setting Up the Vercel API Token in GitLab To deploy your frontend app to Vercel, you must set up your Vercel API token in GitLab CI/CD. Here's how to do it: Obtain the Vercel API Token: For detailed instructions on obtaining your Vercel API token, please refer to this section of this previous article where we walk through the process step by step. You'll need to log into your Vercel account, access the Account Settings, navigate to Tokens, and create a new token for your project. Add the API Token to GitLab CI/CD: In your GitLab repository, go to Settings and select CI / CD from the dropdown. In the CI / CD settings page, scroll down to the Variables section. Click Expand to reveal the variables input area. Click the Add Variable button. In the Key field, enter VERCEL_TOKEN (this is the environment variable name that your GitLab CI/CD pipeline will use). In the Value field, paste the Vercel API token you obtained earlier. Set the Variable Type to "Masked" and "Protected" to ensure the token is securely stored and not exposed in logs. Click Add Variable to save the t
Deploying your frontend app to Vercel using GitLab CI/CD offers an efficient and automated solution for continuous delivery. In this guide, we'll walk you through the process of setting up a GitLab CI/CD pipeline that deploys your app to Vercel every time you push changes. This automation ensures your application is always live and up-to-date, reducing manual intervention and errors in your deployment workflow.
In this guide, we'll cover the entire setup process, from configuring your GitLab pipeline to setting up environment variables like the Vercel API token. You'll also learn how to write the deployment script that ensures seamless deployment every time. By the end of this article, you’ll have a fully functional deployment pipeline that integrates seamlessly with Vercel.
Prerequisites
Before you proceed with setting up GitLab CI/CD for deploying the frontend app to Vercel, make sure you have the following:
- A GitLab Account: You’ll need an active GitLab account to create repositories and configure CI/CD pipelines.
- A Vercel Account: You need a Vercel account to deploy the application to their platform.
Additionally, to fully understand how the application works and to set up the GitLab CI/CD pipeline, it's recommended that you first read through the article A Practical Guide to Deploying Frontend Apps on Vercel Using GitHub Actions. This article explains the application structure, key components, and Dockerfile setup, which will make this guide much easier to follow.
Once you’re familiar with the application and have the necessary accounts, you can proceed with setting up the CI/CD pipeline in GitLab to deploy the frontend app to Vercel.
Table of Contents
- GitLab CI/CD Workflow Configuration for Vercel Deployment
- Setting Up the Vercel API Token in GitLab
- Deploying and Testing the Frontend Application
- Conclusion
GitLab CI/CD Workflow Configuration for Vercel Deployment
To begin, create a .gitlab-ci.yml file in the root directory of your repository. This file will define the stages and jobs for the CI/CD pipeline. Paste the following code into the .gitlab-ci.yml file:
stages:
  - build
  - deploy

.standard-rules:
  rules:
    - if: $CI_COMMIT_BRANCH == $CI_DEFAULT_BRANCH

frontend-build-job:
  stage: build
  image: node:23
  script:
    - cd frontend
    - npm install
    - npm run build

frontend-deploy-job:
  stage: deploy
  image: node:23
  script:
    - npx vercel --prod --token $VERCEL_TOKEN --yes --cwd frontend
Breakdown of the Configuration:
-
stages: Defines the different stages of the pipeline:
buildanddeploy. These stages determine the order in which the jobs will run. -
.standard-rules: Specifies that the pipeline will only run when changes are pushed to the default branch (
$CI_DEFAULT_BRANCH), typically themainbranch. This ensures that the pipeline triggers only on the main development branch. -
frontend-build-job:
-
stage: This job belongs to the
buildstage. -
image: Uses the
node:23Docker image to run the job. - script: In this job, the pipeline installs the dependencies and runs the build process for your frontend application.
-
cd frontend: Navigates to thefrontenddirectory. -
npm install: Installs the necessary dependencies. -
npm run build: Builds the production application.
-
stage: This job belongs to the
-
frontend-deploy-job:
-
stage: This job belongs to the
deploystage. -
image: Again, uses the
node:23Docker image. - script: Deploys the application to Vercel using the Vercel CLI.
-
npx vercel --prod --token $VERCEL_TOKEN --yes --cwd frontend: Deploys the frontend application to Vercel in production mode using the Vercel API token stored in GitLab’s CI/CD settings. The--yesflag auto-approves the deployment process.
-
stage: This job belongs to the
This configuration ensures that when you push changes to the main branch, the application will automatically be built and deployed to Vercel.
Setting Up the Vercel API Token in GitLab
To deploy your frontend app to Vercel, you must set up your Vercel API token in GitLab CI/CD. Here's how to do it:
-
Obtain the Vercel API Token:
- For detailed instructions on obtaining your Vercel API token, please refer to this section of this previous article where we walk through the process step by step. You'll need to log into your Vercel account, access the Account Settings, navigate to Tokens, and create a new token for your project.
-
Add the API Token to GitLab CI/CD:
- In your GitLab repository, go to Settings and select CI / CD from the dropdown.
- In the CI / CD settings page, scroll down to the Variables section.
- Click Expand to reveal the variables input area.
- Click the Add Variable button.
- In the Key field, enter
VERCEL_TOKEN(this is the environment variable name that your GitLab CI/CD pipeline will use). - In the Value field, paste the Vercel API token you obtained earlier.
- Set the Variable Type to "Masked" and "Protected" to ensure the token is securely stored and not exposed in logs.
- Click Add Variable to save the token.
Now, your Vercel API token is securely stored in GitLab CI/CD and will be used during the pipeline's execution to deploy your frontend app to Vercel.
Deploying and Testing the Frontend Application
Now that you've set up your GitLab CI/CD pipeline and configured the Vercel API token, it's time to deploy your frontend app to Vercel and monitor the progress.
-
Push Changes to GitLab:
- Commit and push your changes to the main branch of your GitLab repository. This action will trigger the pipeline defined in the
.gitlab-ci.ymlfile.
- Commit and push your changes to the main branch of your GitLab repository. This action will trigger the pipeline defined in the
-
Monitor the Pipeline:
- To keep track of the deployment process, navigate to the CI / CD section of your GitLab repository.
- Click on Builds under the CI / CD section, where you'll be able to see the status of the pipeline and any running jobs.
- Alternatively, you can click on the CI/CD icon at the top of the repository's page to quickly access the list of running and past jobs.
- The pipeline consists of two stages: build and deploy. The frontend-build-job will handle installing dependencies and building the project, while the frontend-deploy-job will deploy it to Vercel using the Vercel API token.
-
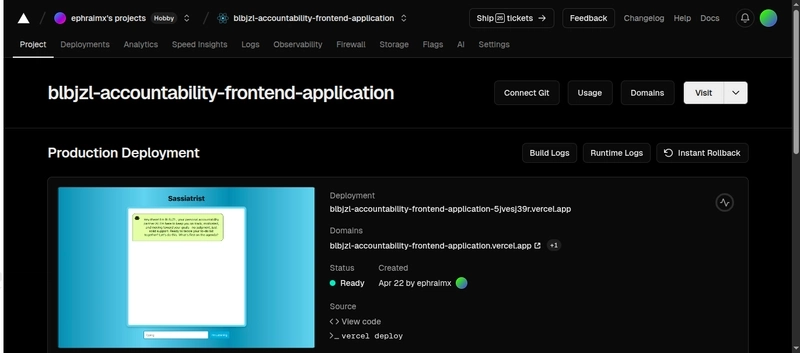
Access the Vercel Dashboard:
- Once the pipeline completes successfully, your app will be deployed to Vercel. You can monitor the status of the deployment in real-time on the Vercel dashboard.
- To view your deployed app, simply visit the URL provided by Vercel. This is the same URL that you would use to view your frontend application in production.
-
What to Expect:
- The deployment process will complete, and you should be able to see your frontend app running smoothly on Vercel. You'll also be able to monitor logs and any errors directly from the Vercel dashboard.
- If you encounter any issues during the deployment, you can check the build logs in GitLab for troubleshooting.
This is the process of deploying and testing your frontend app on Vercel using GitLab CI/CD. You can now push updates to the main branch, and each push will trigger an automatic deployment to Vercel.
Conclusion
Congratulations! You've successfully set up GitLab CI/CD to automate the deployment of your frontend app to Vercel. By following this guide, you've learned how to configure the .gitlab-ci.yml file, set up the Vercel API token, and deploy your application with ease.
With the power of CI/CD, you now have a streamlined process for continuous deployment, ensuring that every change made to your codebase is automatically reflected in your live app. This not only improves productivity but also allows for faster iterations and seamless updates.
If you found this guide helpful, make sure to follow me on LinkedIn to stay updated with my latest posts and tutorials. You can also check out more of my work on my portfolio.
Keep experimenting, keep deploying, and happy coding!