


![[The AI Show Episode 146]: Rise of “AI-First” Companies, AI Job Disruption, GPT-4o Update Gets Rolled Back, How Big Consulting Firms Use AI, and Meta AI App](https://www.marketingaiinstitute.com/hubfs/ep%20146%20cover.png)


![Honor 400 series officially launching on May 22 as design is revealed [Video]](https://i0.wp.com/9to5google.com/wp-content/uploads/sites/4/2025/05/honor-400-series-announcement-1.png?resize=1200%2C628&quality=82&strip=all&ssl=1)


![Beats Studio Pro Wireless Headphones Now Just $169.95 - Save 51%! [Deal]](https://www.iclarified.com/images/news/97258/97258/97258-640.jpg)


Getting Started with minikube for Kubernetes
Minikube is a lightweight tool that runs a full Kubernetes cluster on your local machine. It's ideal for developers who want to test applications, simulate production behavior, or learn Kubernetes without using cloud resources. Whether you’re developing microservices, testing Ingress routing, or deploying with Helm, Minikube provides a fast, isolated environment with full Kubernetes features. Key Features: Installs and manages Kubernetes components Supports single-node and multi-node clusters Offers both CLI and web-based access Enables custom profiles and driver selection Hardware Requirements Minikube provisions local resources for cluster nodes. Minimum recommended per node: CPU: 2 cores Memory: 2 GB (4–8 GB recommended) Storage: 20 GB Internet: Required for initial setup and image downloads Ensure your system has enough resources for both Minikube and any workloads. Software Requirements Minikube requires a supported Type-2 hypervisor or container runtime. It uses these to isolate Kubernetes from your host OS. OS Hypervisors Container Runtimes Linux VirtualBox, KVM2, QEMU Docker, Podman macOS VirtualBox, HyperKit, VMware Fusion, Parallels Docker, Podman Windows VirtualBox, Hyper-V, VMware Workstation, QEMU Docker, Podman Note: On Linux, you can use --driver=none to run Minikube directly on the host. This bypasses isolation and requires root access. Create and Manage Clusters Run the following to create your first cluster: minikube start This command: Detects or uses the specified driver Creates a VM or container with: 2 CPUs 6 GB memory 20 GB storage Bootstraps Kubernetes using kubeadm Installs Docker as the default container runtime Creates a default profile to track cluster state To create a multi-node cluster: minikube start \--profile custom-cluster \--nodes 3 \--kubernetes-version=v1.28.1 \--driver=docker Use the --profile flag to create and manage multiple clusters. Cluster Profiles Minikube uses profiles to store cluster configuration. By default, all commands apply to the default profile. To work with a custom profile: minikube stop \--profile custom-cluster minikube start \# Uses the default profile Use --profile in commands to manage multiple environments. Enable Autocompletion (Optional) Autocompletion enhances your CLI experience. For example, in Bash: source

Minikube is a lightweight tool that runs a full Kubernetes cluster on your local machine. It's ideal for developers who want to test applications, simulate production behavior, or learn Kubernetes without using cloud resources. Whether you’re developing microservices, testing Ingress routing, or deploying with Helm, Minikube provides a fast, isolated environment with full Kubernetes features.
Key Features:
- Installs and manages Kubernetes components
- Supports single-node and multi-node clusters
- Offers both CLI and web-based access
- Enables custom profiles and driver selection
Hardware Requirements
Minikube provisions local resources for cluster nodes. Minimum recommended per node:
- CPU: 2 cores
- Memory: 2 GB (4–8 GB recommended)
- Storage: 20 GB
- Internet: Required for initial setup and image downloads
Ensure your system has enough resources for both Minikube and any workloads.
Software Requirements
Minikube requires a supported Type-2 hypervisor or container runtime. It uses these to isolate Kubernetes from your host OS.
| OS | Hypervisors | Container Runtimes |
|---|---|---|
| Linux | VirtualBox, KVM2, QEMU | Docker, Podman |
| macOS | VirtualBox, HyperKit, VMware Fusion, Parallels | Docker, Podman |
| Windows | VirtualBox, Hyper-V, VMware Workstation, QEMU | Docker, Podman |
Note: On Linux, you can use --driver=none to run Minikube directly on the host. This bypasses isolation and requires root access.
Create and Manage Clusters
Run the following to create your first cluster:
minikube start
This command:
- Detects or uses the specified driver
- Creates a VM or container with:
- 2 CPUs
- 6 GB memory
- 20 GB storage
- Bootstraps Kubernetes using
kubeadm - Installs Docker as the default container runtime
- Creates a default profile to track cluster state
To create a multi-node cluster:
minikube start \--profile custom-cluster \--nodes 3 \--kubernetes-version=v1.28.1 \--driver=docker
Use the --profile flag to create and manage multiple clusters.
Cluster Profiles
Minikube uses profiles to store cluster configuration. By default, all commands apply to the default profile. To work with a custom profile:
minikube stop \--profile custom-cluster
minikube start  \# Uses the default profile
Use --profile in commands to manage multiple environments.
Enable Autocompletion (Optional)
Autocompletion enhances your CLI experience. For example, in Bash:
source <(minikube completion bash)
Accessing Minikube
kubectl (CLI)
Minikube includes a bundled version of kubectl:
minikube kubectl \-- get pods
However, for convenience, install kubectl separately. It automatically detects your Minikube cluster.
Kubernetes Dashboard (Web UI)
To use the web-based UI:
addons enable metrics-server
minikube addons enable dashboard
minikube dashboard
This opens a browser UI for inspecting deployments, pods, and logs.
Kubernetes API Access
The API server is the entry point to the cluster. You can access it via:
- kubectl and CLI tools
- Web Dashboard
- Custom automation using HTTP API calls
Use kubectl proxy to expose the API server:
kubectl proxy
This opens access at http://localhost:8001/.
To explore the API: curl http://localhost:8001/api/v1
To run the proxy in the background:
kubectl proxy &
Access Without a Proxy
To access the Kubernetes API directly, use an authentication token or certificate credentials.
For example, you must generate a token and grant access:
export TOKEN=$(kubectl create token default)
export APISERVER=$(kubectl config view \--minify \-o jsonpath='{.clusters\[0\].cluster.server}')
curl $APISERVER \--header "Authorization: Bearer $TOKEN" \--insecure
Deploy and Access an NGINX Application Using the Minikube Dashboard
You’ll use the nginx container image from Docker Hub.
- Start Minikube: To launch your local Kubernetes cluster, run:
-
minikube start
-
- Verify the status:
-
minikube status
-
- Launch the Dashboard :Start the web-based Kubernetes Dashboard:
minikube dashboard
This command opens the dashboard in your default browser. By default, it connects to the default namespace, where all operations occur unless you change the context.
Note: If you reboot your machine or log out and log back in, rerun the minikube dashboard command to reopen the dashboard.
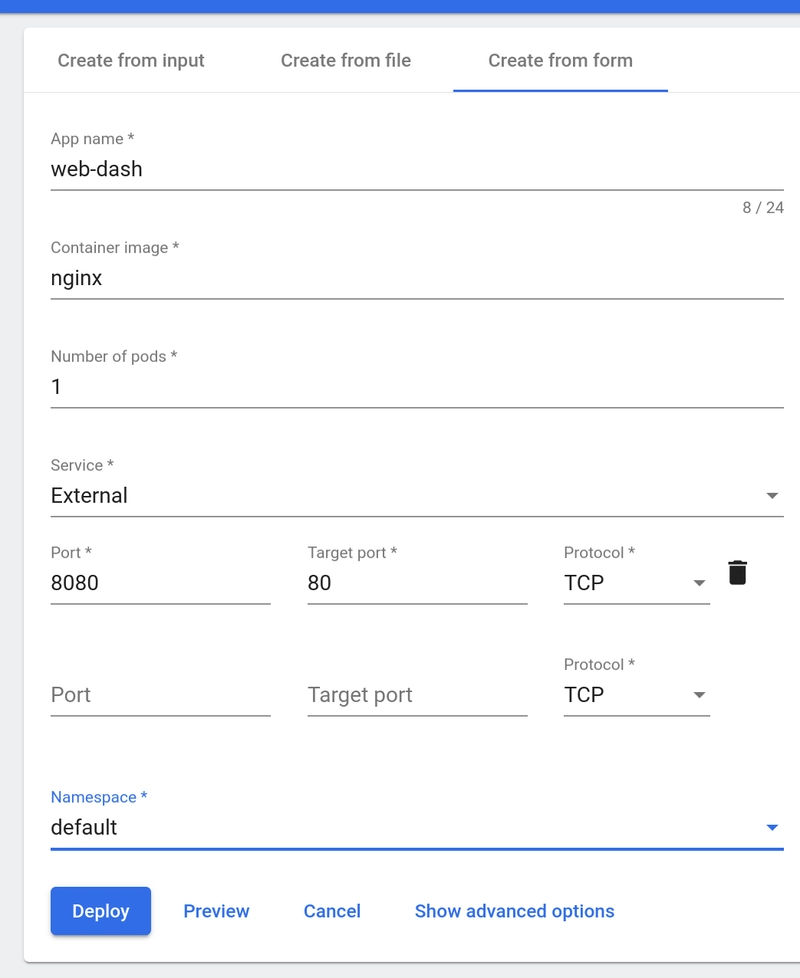
Deploying an Application - Accessing the Dashboard
To deploy the NGINX application:
- In the Dashboard, select Deploy.
- Choose Show Advanced Options to set:
- Labels
- Namespace
- Resource Requests
- Use nginx as the container image.
- Select Deploy.
The deployment creates:
- A Deployment resource (for example, web-dash)
- A ReplicaSet (e.g., web-dash-74d8bd488f)
- A Pod (e.g., web-dash-74d8bd488f-dwbzz)
Note: Resource names are unique and may vary in your cluster. The naming pattern follows Kubernetes conventions.
Use the left navigation panel to explore the Deployment, ReplicaSet, and Pod resources.
You can:
- View properties by selecting resource names.
- Scale the deployment from the vertical three-dots menu.
- Delete individual Pods and observe them automatically recreated.
- Delete the deployment to remove all Pods.
Once we create the web-dash Deployment, we can use the resource navigation panel from the left side of the Dashboard to display details of Deployments, ReplicaSets, and Pods in the default Namespace.

Access the Application
To access the application: get the Minikube IP
minikube ip
In your browser, go to http://192.168.99.100:\. Replace Minikube opens the application in your browser. You should see the default NGINX welcome page.
We can see the Nginx welcome page, displayed by the webserver application running inside the Pods created. Our requests could be served by either one of the three endpoints logically grouped by the Service since the Service acts as a Load Balancer in front of its endpoints.
Minikube includes the NGINX Ingress Controller as a built-in add-on. To enable it, run:
minikube addons enable ingress After enabling the Ingress Controller, deploy your Ingress resource using:
Probes monitor and manage container health. If a container becomes unresponsive, the kubelet uses probes to take action (e.g., restart the container).
Rather than restarting it manually, we can use a Liveness Probe. Liveness Probe checks on an application's health, and if the health check fails, kubelet restarts the affected container automatically.
Use Liveness Probes to detect and recover from unresponsive applications.
Supported types:
Liveness Probe (Exec) Simulate file removal after startup to trigger restarts. Until the container reports "ready," the Pod will not receive traffic from a Service.
Startup Probe (HTTP)
Use Startup Probes for applications that take a long time to initialize. They prevent premature liveness and readiness checks.
Enable Ingress for Routing

Apply an Ingress manifest:
kubectl apply \-f virtual-host-ingress.yaml
Add entries to
/etc/hosts:
192.168.99.100 blue.example.com green.example.com
Deploy an Ingress Resource
kubectl create \-f virtual-host-ingress.yaml
Configure Liveness, Readiness, and Startup Probes
Liveness Probes
livenessProbe:
  exec:
    command: \["cat", "/tmp/healthy"\]
  initialDelaySeconds: 15
  periodSeconds: 5
startupProbe:
  httpGet:
    path: /startup
    port: 8080
  failureThreshold: 30
  periodSeconds: 10 `