


![[The AI Show Episode 146]: Rise of “AI-First” Companies, AI Job Disruption, GPT-4o Update Gets Rolled Back, How Big Consulting Firms Use AI, and Meta AI App](https://www.marketingaiinstitute.com/hubfs/ep%20146%20cover.png)


_Aleksey_Funtap_Alamy.jpg?width=1280&auto=webp&quality=80&disable=upscale#)
_Sergey_Tarasov_Alamy.jpg?width=1280&auto=webp&quality=80&disable=upscale#)


![Apple Foldable iPhone to Feature New Display Tech, 19% Thinner Panel [Rumor]](https://www.iclarified.com/images/news/97271/97271/97271-640.jpg)
![Apple Developing New Chips for Smart Glasses, Macs, AI Servers [Report]](https://www.iclarified.com/images/news/97269/97269/97269-640.jpg)
![Apple Shares New Mother's Day Ad: 'A Gift for Mom' [Video]](https://www.iclarified.com/images/news/97267/97267/97267-640.jpg)
![Apple Shares Official Trailer for 'Stick' Starring Owen Wilson [Video]](https://www.iclarified.com/images/news/97264/97264/97264-640.jpg)


Creating and Connecting to a Linux Virtual Machine Scale Set (VMSS) on Azure
Azure Virtual Machine Scale Sets (VMSS) are a great solution for managing and scaling a large number of identical virtual machines in Azure. With VMSS, you can automatically scale your infrastructure based on demand, ensuring high availability and load balancing for your applications. In this guide, we'll go through the steps to create a Linux VMSS, configure it, and connect to the individual instances using SSH. Table of Contents What is a Virtual Machine Scale Set (VMSS)? Create a Linux VMSS in Azure Generate SSH Keys Connect to an Instance in the VMSS Using SSH Scaling and Load Balancing Troubleshooting Spot VMs: Cost-effective but Preemptible What is a Virtual Machine Scale Set (VMSS)? A Virtual Machine Scale Set is an Azure resource that allows you to deploy and manage a set of identical virtual machines. VMSS makes it easier to: Automatically scale VM instances up or down based on load. Ensure high availability across multiple availability zones. Simplify management by handling updates and upgrades to multiple VMs at once. With VMSS, you can quickly set up a fleet of identical VMs that are load-balanced and auto-scalable, which is perfect for web applications and services that need to scale dynamically. Create a Linux VMSS in Azure Let’s walk through the steps of creating a Linux Virtual Machine Scale Set in Azure. Step 1: Log in to Azure Portal First, log in to the Azure Portal with your Microsoft account. Step 2: Create a Virtual Machine Scale Set In the Azure Portal, click “Create a resource” from the sidebar. Search for Virtual Machine Scale Set. Click Create to start the setup process. Step 3: Configure the Basic Settings In the Basics tab: Subscription: Select your subscription. Resource Group: Create a new one or select an existing group. Region: Choose the region where you want to deploy the scale set (e.g., East US). VMSS Name: Name your VMSS (e.g., MyLinuxVMSS). Availability zone: You can choose none or any zone you want Orchestration mode: Uniform- This means Azure will automatically create and manage identical virtual machines for you, based on a single configuration. It's easier to use and perfect when you want all VMs to be the same. Security type: Standard Scaling options- Manual, also configure scaling options to enable predictive auto scaling. It doesn’t make any scaling changes—it just helps you visualize what auto scaling might look like in the future. Scale-In Policy-Choose how Azure decides which VM instances to delete first when scaling in (reducing the number of VMs). You can prioritize based on the newest, oldest, or custom rules. Image: Choose Ubuntu 20.04 LTS (or any other Linux distribution you prefer). Instance Size: Choose an appropriate size (e.g., Standard B1ms for testing). Instance count:2 or any size you want Authentication Type: Choose SSH public key. Username: Create a user (e.g., azureuser). SSH Public Key: You’ll add this later after generating the key pair. Step 4: Configure the Disk Settings In the Disks tab: OS Disk Type: Choose Standard SSD or Premium SSD, depending on your requirements. Data Disks: You can also add data disks if your VMSS requires additional storage. Leave everything at default Step 5: Configure the VMSS Networking In the Networking tab: Virtual Network: Select Default or create a new network. Subnet: Select Default or create a new subnet. Network Interface Card (NIC): Make sure to set your NIC properly to connect the VM instances to the network. Public IP: Choose Enabled to ensure each VM instance has a public IP for external access. Allow selected ports: Make sure to allow SSH (port 22) for secure access and HTTP (port 80) for web traffic. This ensures that SSH connections to manage your VMs and HTTP traffic for the web server are allowed. Load Balancer: Choose Azure Load Balancer to distribute traffic evenly across all VM instances for better performance and availability. Click Create a new load balancer, give it a name (e.g., MyVMSSLoadBalancer). Set the IP type to Public. Choose TCP for Protocol to handle traffic. Click Create to set up the load balancer. This will ensure that incoming traffic is distributed evenly to your VM instances, improving your application’s scalability and reliability. Step 6: Review + Create Review the configuration and click Create to deploy the Virtual Machine Scale Set. Azure will start the deployment, and it will take a few minutes to set up the resources. Go to Instances and view your two virtual machines Connect to an Instance in the VMSS Using SSH Now that the scale set is deployed, let’s connect to an instance using SSH. Step 1: Find the Public IP Address of Your VMSS Under Instances, you’ll see a list of your VM instances. Find the Public IP address of one of the instances. Step 2: SSH into the
Azure Virtual Machine Scale Sets (VMSS) are a great solution for managing and scaling a large number of identical virtual machines in Azure. With VMSS, you can automatically scale your infrastructure based on demand, ensuring high availability and load balancing for your applications. In this guide, we'll go through the steps to create a Linux VMSS, configure it, and connect to the individual instances using SSH.
Table of Contents
- What is a Virtual Machine Scale Set (VMSS)?
- Create a Linux VMSS in Azure
- Generate SSH Keys
- Connect to an Instance in the VMSS Using SSH
- Scaling and Load Balancing
- Troubleshooting
- Spot VMs: Cost-effective but Preemptible
What is a Virtual Machine Scale Set (VMSS)?
A Virtual Machine Scale Set is an Azure resource that allows you to deploy and manage a set of identical virtual machines. VMSS makes it easier to:
Automatically scale VM instances up or down based on load.
Ensure high availability across multiple availability zones.
Simplify management by handling updates and upgrades to multiple VMs at once.
With VMSS, you can quickly set up a fleet of identical VMs that are load-balanced and auto-scalable, which is perfect for web applications and services that need to scale dynamically.
Create a Linux VMSS in Azure
Let’s walk through the steps of creating a Linux Virtual Machine Scale Set in Azure.
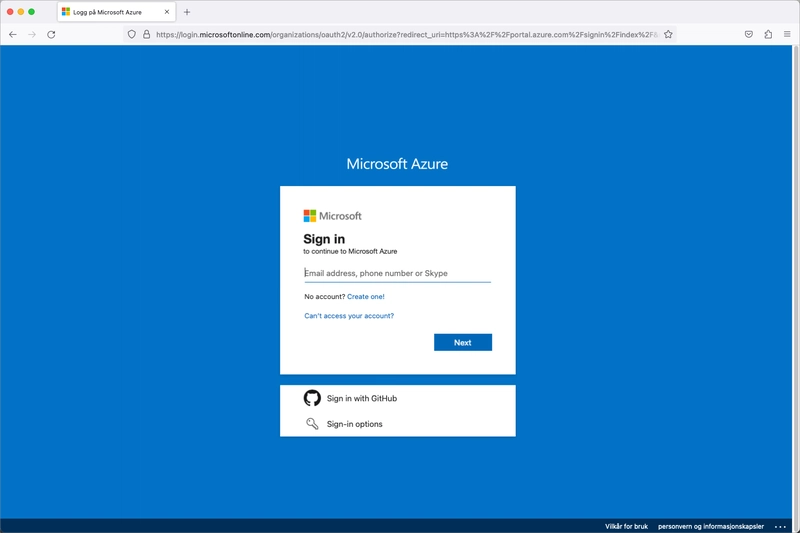
Step 1: Log in to Azure Portal
First, log in to the Azure Portal with your Microsoft account.
Step 2: Create a Virtual Machine Scale Set
In the Azure Portal, click “Create a resource” from the sidebar.
Search for Virtual Machine Scale Set.
Click Create to start the setup process.


Step 3: Configure the Basic Settings
In the Basics tab:
Subscription: Select your subscription.
Resource Group: Create a new one or select an existing group.
Region: Choose the region where you want to deploy the scale set (e.g., East US).
VMSS Name: Name your VMSS (e.g., MyLinuxVMSS).
Availability zone: You can choose none or any zone you want
Orchestration mode: Uniform- This means Azure will automatically create and manage identical virtual machines for you, based on a single configuration. It's easier to use and perfect when you want all VMs to be the same.
Security type: Standard
Scaling options- Manual, also configure scaling options to enable predictive auto scaling. It doesn’t make any scaling changes—it just helps you visualize what auto scaling might look like in the future. Scale-In Policy-Choose how Azure decides which VM instances to delete first when scaling in (reducing the number of VMs).
You can prioritize based on the newest, oldest, or custom rules.
Image: Choose Ubuntu 20.04 LTS (or any other Linux distribution you prefer).
Instance Size: Choose an appropriate size (e.g., Standard B1ms for testing).
Instance count:2 or any size you want
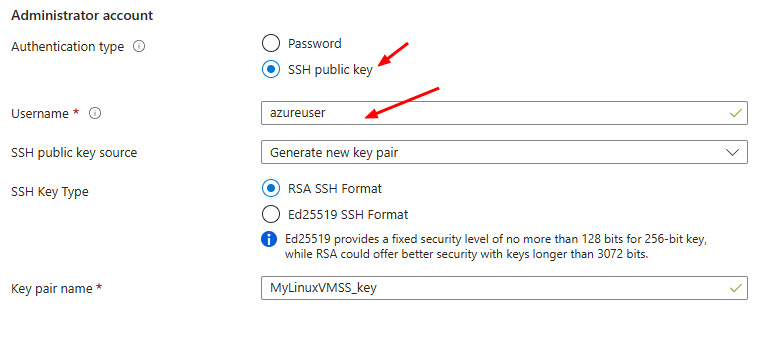
Authentication Type: Choose SSH public key.
Username: Create a user (e.g., azureuser).
SSH Public Key: You’ll add this later after generating the key pair.


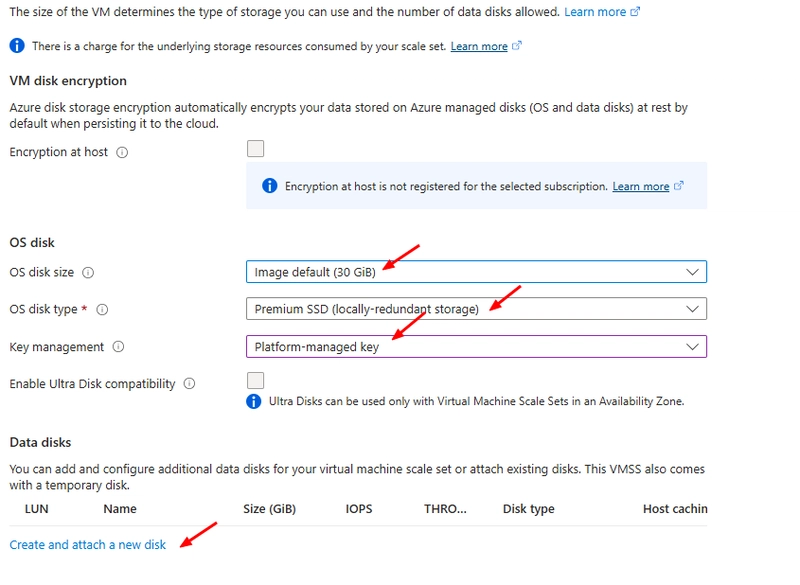
Step 4: Configure the Disk Settings
In the Disks tab:
OS Disk Type: Choose Standard SSD or Premium SSD, depending on your requirements.
Data Disks: You can also add data disks if your VMSS requires additional storage.
Leave everything at default
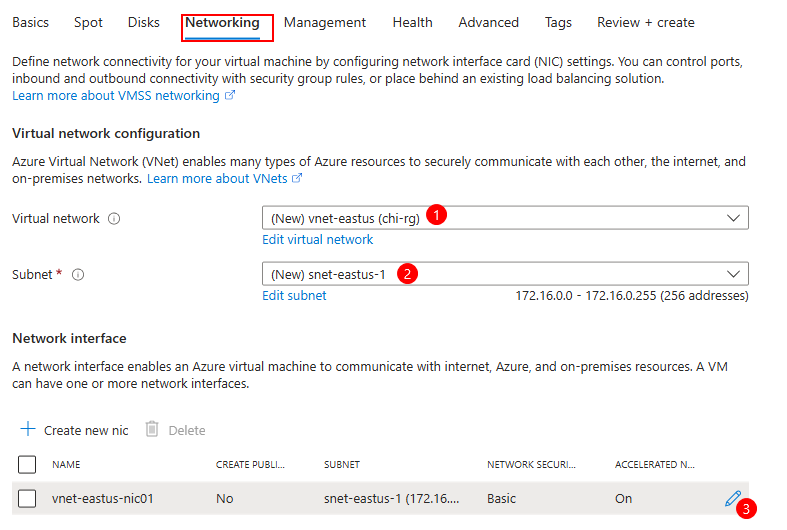
Step 5: Configure the VMSS Networking
In the Networking tab:
Virtual Network: Select Default or create a new network.
Subnet: Select Default or create a new subnet.
Network Interface Card (NIC): Make sure to set your NIC properly to connect the VM instances to the network.
Public IP: Choose Enabled to ensure each VM instance has a public IP for external access.
Allow selected ports: Make sure to allow SSH (port 22) for secure access and HTTP (port 80) for web traffic.
This ensures that SSH connections to manage your VMs and HTTP traffic for the web server are allowed.
Load Balancer:
Choose Azure Load Balancer to distribute traffic evenly across all VM instances for better performance and availability.
Click Create a new load balancer, give it a name (e.g., MyVMSSLoadBalancer).
Set the IP type to Public.
Choose TCP for Protocol to handle traffic.
Click Create to set up the load balancer.
This will ensure that incoming traffic is distributed evenly to your VM instances, improving your application’s scalability and reliability.


Step 6: Review + Create
Review the configuration and click Create to deploy the Virtual Machine Scale Set. Azure will start the deployment, and it will take a few minutes to set up the resources.


Go to Instances and view your two virtual machines


Connect to an Instance in the VMSS Using SSH
Now that the scale set is deployed, let’s connect to an instance using SSH.
Step 1: Find the Public IP Address of Your VMSS
Under Instances, you’ll see a list of your VM instances.
Find the Public IP address of one of the instances.

Step 2: SSH into the Instance
Use the following SSH command to connect to the instance.
ssh -i ~/.ssh/myVMSSKey azureuser@


To connect to all instances within the Virtual Machine Scale Set (VMSS), you can use the frontend IP address of the load balancer. This ensures that traffic is evenly distributed across all VM instances in the scale set.

Use the following SSH command to connect to all instances.
ssh -i C:\Users\hp\Downloads\MyLinuxVMSS_key.pem azureuser@20.169.225.135 -p 50000

Extra
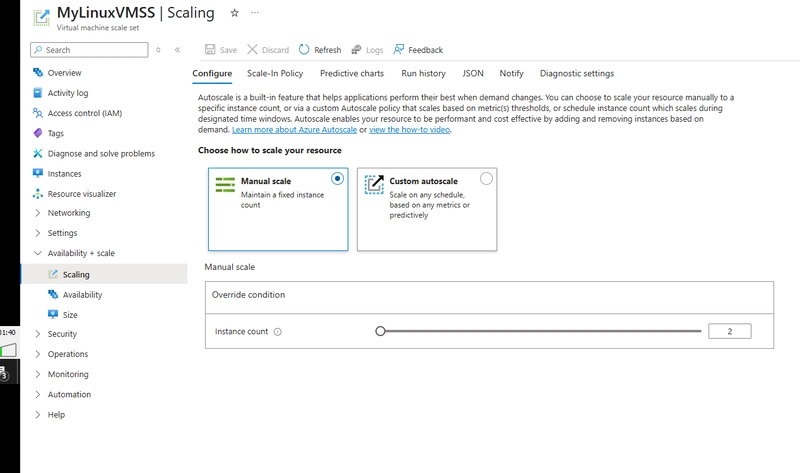
Autoscaling
You can enable autoscaling to automatically adjust the number of VM instances based on CPU usage, memory usage, or other metrics.
Spot VMs: Cost-effective but Preemptible
Spot VMs are preemptible virtual machines that offer significant cost savings compared to regular VMs in Azure. However, they come with a risk: they can be terminated by Azure when there is high demand for capacity. Spot VMs are ideal for workloads that are flexible and can tolerate interruptions.
Key Features of Spot VMs:
Cost-effective: Up to 90% cheaper than regular VMs.
Interruptible: Azure can terminate these VMs with little notice when resources are in high demand.
Best for flexible workloads: Suitable for jobs like batch processing or testing, where occasional interruptions are acceptable.
By leveraging Spot VMs, you can save significantly on Azure compute costs, but it's important to plan workloads that can tolerate interruptions and be terminated without affecting your overall application.