


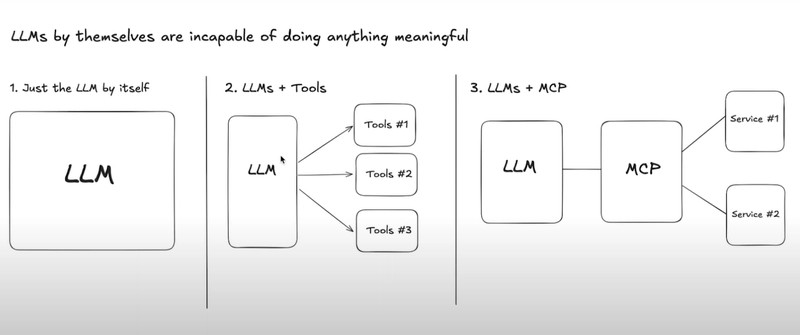
![[The AI Show Episode 145]: OpenAI Releases o3 and o4-mini, AI Is Causing “Quiet Layoffs,” Executive Order on Youth AI Education & GPT-4o’s Controversial Update](https://www.marketingaiinstitute.com/hubfs/ep%20145%20cover.png)


_Andreas_Prott_Alamy.jpg?width=1280&auto=webp&quality=80&disable=upscale#)


![Severance-inspired keyboard could cost up to $699 – have your say [Video]](https://i0.wp.com/9to5mac.com/wp-content/uploads/sites/6/2025/05/Severance-inspired-keyboard-could-cost-up-to-699-%E2%80%93-have-your-say-Video.jpg?resize=1200%2C628&quality=82&strip=all&ssl=1)


![Google Home app fixes bug that repeatedly asked to ‘Set up Nest Cam features’ for Nest Hub Max [U]](https://i0.wp.com/9to5google.com/wp-content/uploads/sites/4/2022/08/youtube-premium-music-nest-hub-max.jpg?resize=1200%2C628&quality=82&strip=all&ssl=1)


Sharding with SpringBoot
Understanding Database Sharding Imagine your application has grown so popular that a single database server can’t handle all your data efficiently. Sharding is like splitting your database into multiple smaller pieces (called “shards”), where each shard: Lives on a different server Contains the same table structure Holds only a portion of your total data For example, with customer data: Shard 1 might contain customers with IDs 1–1000 Shard 2 might contain customers with IDs 1001–2000 Why We Need Sharding Performance: Queries run faster because each database has less data to search through Scalability: You can keep adding more shards as your data grows Availability: If one shard goes down, the others remain available Common Sharding Strategies The way you divide your data affects how you’ll retrieve it: Hash-Based Sharding A hash function determines which shard contains the data (e.g., customerID % numberOfShards). This evenly distributes data but makes range queries difficult. Range-Based Sharding Data is split based on ranges of a key value (e.g., customers A-M in Shard 1, N-Z in Shard 2). Good for range queries but can lead to uneven distribution. Directory-Based Sharding Uses a lookup table that maps keys to specific shards. More flexible but adds an extra lookup step. Implementing Sharding in Spring Boot Let’s explore three approaches to implement sharding in Spring Boot, from simplest to most advanced. Approach 1: Custom Shard Routing (AbstractRoutingDataSource) This approach gives you direct control over which shard to query. Step 1: Configure Multiple Data Sources @Configuration public class DataSourceConfig { // Configuration properties for each shard @Bean @ConfigurationProperties("app.datasource.shard1") public DataSourceProperties shard1Properties() { return new DataSourceProperties(); } @Bean @ConfigurationProperties("app.datasource.shard2") public DataSourceProperties shard2Properties() { return new DataSourceProperties(); } // Create actual connections to each database shard @Bean public DataSource shard1DataSource() { return shard1Properties().initializeDataSourceBuilder().build(); } @Bean public DataSource shard2DataSource() { return shard2Properties().initializeDataSourceBuilder().build(); } // Create a routing datasource that will switch between shards @Bean public DataSource routingDataSource() { Map dataSources = new HashMap(); dataSources.put("shard1", shard1DataSource()); dataSources.put("shard2", shard2DataSource()); ShardRoutingDataSource routingDataSource = new ShardRoutingDataSource(); routingDataSource.setTargetDataSources(dataSources); routingDataSource.setDefaultTargetDataSource(shard1DataSource()); // Fallback shard return routingDataSource; } // Set up transaction management @Bean public PlatformTransactionManager transactionManager() { return new DataSourceTransactionManager(routingDataSource()); } // Configure the entity manager factory for JPA @Bean public LocalContainerEntityManagerFactoryBean entityManagerFactory(EntityManagerFactoryBuilder builder) { return builder .dataSource(routingDataSource()) .packages("com.example.model") // Your entity package .persistenceUnit("shardedPersistenceUnit") .build(); } // Make this our primary DataSource that the application will use @Primary @Bean public DataSource dataSource() { // LazyConnectionDataSourceProxy improves performance by only // connecting to the database when actually needed return new LazyConnectionDataSourceProxy(routingDataSource()); } } Step 2: Create a Custom Routing DataSource This class extends Spring’s built-in routing capability to decide which shard to use: public class ShardRoutingDataSource extends AbstractRoutingDataSource { // ThreadLocal variable to store current shard for each thread/request private static final ThreadLocal currentShard = new ThreadLocal(); // Set which shard to use public static void setCurrentShard(String shardId) { currentShard.set(shardId); } // Get the current shard to use public static String getCurrentShard() { return currentShard.get(); } // Clean up after we're done - important to prevent memory leaks! public static void clearCurrentShard() { currentShard.remove(); } @Override protected Object determineCurrentLookupKey() { // This method asks our ThreadLocal which shard to use right now return getCurrentShard(); } } Step 3: Create a Shard Selection Strategy This service determines which shard should contain a particular piece of data: @Service public class ShardingService {

Understanding Database Sharding
Imagine your application has grown so popular that a single database server can’t handle all your data efficiently. Sharding is like splitting your database into multiple smaller pieces (called “shards”), where each shard:
- Lives on a different server
- Contains the same table structure
- Holds only a portion of your total data
For example, with customer data:
Shard 1 might contain customers with IDs 1–1000
Shard 2 might contain customers with IDs 1001–2000
Why We Need Sharding
Performance: Queries run faster because each database has less data to search through
Scalability: You can keep adding more shards as your data grows
Availability: If one shard goes down, the others remain available
Common Sharding Strategies
The way you divide your data affects how you’ll retrieve it:
Hash-Based Sharding
A hash function determines which shard contains the data (e.g., customerID % numberOfShards). This evenly distributes data but makes range queries difficult.Range-Based Sharding
Data is split based on ranges of a key value (e.g., customers A-M in Shard 1, N-Z in Shard 2). Good for range queries but can lead to uneven distribution.Directory-Based Sharding
Uses a lookup table that maps keys to specific shards. More flexible but adds an extra lookup step.
Implementing Sharding in Spring Boot
Let’s explore three approaches to implement sharding in Spring Boot, from simplest to most advanced.
Approach 1: Custom Shard Routing (AbstractRoutingDataSource)
This approach gives you direct control over which shard to query.
Step 1: Configure Multiple Data Sources
@Configuration
public class DataSourceConfig {

    // Configuration properties for each shard
    @Bean
    @ConfigurationProperties("app.datasource.shard1")
    public DataSourceProperties shard1Properties() {
        return new DataSourceProperties();
    }

    @Bean
    @ConfigurationProperties("app.datasource.shard2")
    public DataSourceProperties shard2Properties() {
        return new DataSourceProperties();
    }

    // Create actual connections to each database shard
    @Bean
    public DataSource shard1DataSource() {
        return shard1Properties().initializeDataSourceBuilder().build();
    }

    @Bean
    public DataSource shard2DataSource() {
        return shard2Properties().initializeDataSourceBuilder().build();
    }

    // Create a routing datasource that will switch between shards
    @Bean
    public DataSource routingDataSource() {
        Map dataSources = new HashMap<>();
        dataSources.put("shard1", shard1DataSource());
        dataSources.put("shard2", shard2DataSource());

        ShardRoutingDataSource routingDataSource = new ShardRoutingDataSource();
        routingDataSource.setTargetDataSources(dataSources);
        routingDataSource.setDefaultTargetDataSource(shard1DataSource()); // Fallback shard

        return routingDataSource;
    }

    // Set up transaction management
    @Bean
    public PlatformTransactionManager transactionManager() {
        return new DataSourceTransactionManager(routingDataSource());
    }

    // Configure the entity manager factory for JPA
    @Bean
    public LocalContainerEntityManagerFactoryBean entityManagerFactory(EntityManagerFactoryBuilder builder) {
        return builder
                .dataSource(routingDataSource())
                .packages("com.example.model") // Your entity package
                .persistenceUnit("shardedPersistenceUnit")
                .build();
    }

    // Make this our primary DataSource that the application will use
    @Primary
    @Bean
    public DataSource dataSource() {
        // LazyConnectionDataSourceProxy improves performance by only
        // connecting to the database when actually needed
        return new LazyConnectionDataSourceProxy(routingDataSource());
    }
}
Step 2: Create a Custom Routing DataSource
This class extends Spring’s built-in routing capability to decide which shard to use:
public class ShardRoutingDataSource extends AbstractRoutingDataSource {
    // ThreadLocal variable to store current shard for each thread/request
    private static final ThreadLocal currentShard = new ThreadLocal<>();

    // Set which shard to use
    public static void setCurrentShard(String shardId) {
        currentShard.set(shardId);
    }

    // Get the current shard to use
    public static String getCurrentShard() {
        return currentShard.get();
    }

    // Clean up after we're done - important to prevent memory leaks!
    public static void clearCurrentShard() {
        currentShard.remove();
    }

    @Override
    protected Object determineCurrentLookupKey() {
        // This method asks our ThreadLocal which shard to use right now
        return getCurrentShard();
    }
}
Step 3: Create a Shard Selection Strategy
This service determines which shard should contain a particular piece of data:
@Service
public class ShardingService {

    /**
     * Determines which shard contains data for a given customer ID
     *
     * @param customerId The customer ID to look up
     * @return The shard key (e.g., "shard1" or "shard2")
     */
    public String determineShardKey(Long customerId) {
        // This is a simple example using the modulo operator
        // If customerId is odd, use shard1; if even, use shard2
        return "shard" + (customerId % 2 + 1);

        // In real applications, you might use more sophisticated strategies:
        // - Hash-based: using a hash function on the ID
        // - Range-based: specific ID ranges go to specific shards
        // - Geography-based: users from different regions go to different shards
    }
}
Step 4: Using the Sharding System in a Repository
@Repository
public class CustomerRepository {

    @Autowired
    private JdbcTemplate jdbcTemplate; // Spring's helper for database queries

    @Autowired
    private ShardingService shardingService;

    /**
     * Find a customer by their ID
     *
     * @param customerId The customer to look up
     * @return The customer information
     */
    public Customer findById(Long customerId) {
        try {
            // Step 1: Figure out which shard has this customer
            String shardKey = shardingService.determineShardKey(customerId);

            // Step 2: Tell our system to use that shard
            ShardRoutingDataSource.setCurrentShard(shardKey);

            // Step 3: Run the query (it will automatically go to the right shard)
            return jdbcTemplate.queryForObject(
                "SELECT * FROM customers WHERE id = ?",
                new Object[]{customerId},
                (resultSet, rowNum) -> {
                    Customer customer = new Customer();
                    customer.setId(resultSet.getLong("id"));
                    customer.setName(resultSet.getString("name"));
                    customer.setEmail(resultSet.getString("email"));
                    // Set other fields...
                    return customer;
                }
            );
        } finally {
            // Step 4: Always clean up the shard selection when done
            ShardRoutingDataSource.clearCurrentShard();
        }
    }
}
Step 5: A Simple Controller Example
@RestController
@RequestMapping("/api/customers")
public class CustomerController {
@Autowired
    private CustomerRepository customerRepository;

    @GetMapping("/{id}")
    public ResponseEntity getCustomer(@PathVariable Long id) {
        try {
            Customer customer = customerRepository.findById(id);
            return ResponseEntity.ok(customer);
        } catch (EmptyResultDataAccessException e) {
            return ResponseEntity.notFound().build();
        }
    }
}
Step 6: Configuration in application.properties
# Shard 1 Database Connection Info
app.datasource.shard1.url=jdbc:mysql://shard1-database-server:3306/customers_db
app.datasource.shard1.username=db_user
app.datasource.shard1.password=db_password
app.datasource.shard1.driver-class-name=com.mysql.cj.jdbc.Driver

# Shard 2 Database Connection Info
app.datasource.shard2.url=jdbc:mysql://shard2-database-server:3306/customers_db
app.datasource.shard2.username=db_user
app.datasource.shard2.password=db_password
app.datasource.shard2.driver-class-name=com.mysql.cj.jdbc.Driver
Approach 2: Using Apache ShardingSphere
For more complex sharding scenarios, Apache ShardingSphere provides a comprehensive solution that abstracts much of the complexity.
Step 1: Add Dependencies
    org.apache.shardingsphere
    shardingsphere-jdbc-spring-boot-starter
    5.3.0


    org.apache.shardingsphere
    shardingsphere-transaction-xa-core
    5.3.0

Step 2: Configure ShardingSphere in application.yml
spring:
  shardingsphere:
    mode:
      type: Standalone
      repository:
        type: JDBC
    datasource:
      names: ds0, ds1
      ds0:
        type: com.zaxxer.hikari.HikariDataSource
        driverClassName: com.mysql.cj.jdbc.Driver
        jdbcUrl: jdbc:mysql://localhost:3306/shard0
        username: root
        password: password
        maxPoolSize: 10
      ds1:
        type: com.zaxxer.hikari.HikariDataSource
        driverClassName: com.mysql.cj.jdbc.Driver
        jdbcUrl: jdbc:mysql://localhost:3307/shard1
        username: root
        password: password
        maxPoolSize: 10
    rules:
      sharding:
        default-database-strategy:
          standard:
            sharding-column: customer_id
            sharding-algorithm-name: database-inline
        sharding-algorithms:
          database-inline:
            type: INLINE
            props:
              algorithm-expression: ds${customer_id % 2}
        tables:
          customers:
            actual-data-nodes: ds${0..1}.customers
          orders:
            actual-data-nodes: ds${0..1}.orders
            database-strategy:
              standard:
                sharding-column: customer_id
                sharding-algorithm-name: database-inline
            key-generate-strategy:
              column: order_id
              key-generator-name: snowflake
        key-generators:
          snowflake:
            type: SNOWFLAKE
    props:
      sql-show: true # Log sharded SQL for debugging
Step 3: Use Standard JPA Repositories
With ShardingSphere, you can use standard Spring Data repositories:
@Entity
@Table(name = "customers")
public class Customer {
    @Id
    private Long id;
    private String name;
    private String email;
    // Getters and setters
}
@Repository
public interface CustomerRepository extends JpaRepository {
    // Regular JPA methods - ShardingSphere handles the routing
    List findByNameContaining(String nameFragment);
}
Step 4: Service Layer with Transaction Management
ShardingSphere supports distributed transactions using XA:
@Service
public class CustomerOrderService {

    @Autowired
    private CustomerRepository customerRepository;

    @Autowired
    private OrderRepository orderRepository;

    // This transaction will automatically be distributed across shards
    @Transactional(rollbackFor = Exception.class)
    public void createCustomerWithOrder(Customer customer, Order order) {
        customerRepository.save(customer);
        order.setCustomerId(customer.getId());
        orderRepository.save(order);
    }
}
Step 5: ShardingSphere’s Built-in Query Pagination
ShardingSphere automatically handles cross-shard pagination for you:
@Service
public class CustomerService {

    @Autowired
    private CustomerRepository customerRepository;

    public Page findAllCustomers(int page, int size) {
        // ShardingSphere automatically merges and orders results from all shards
        return customerRepository.findAll(PageRequest.of(page, size, Sort.by("id")));
    }
}
ShardingSphere Architecture Overview
ShardingSphere provides several key components:
ShardingSphere-JDBC: A client-side solution that intercepts JDBC calls and routes them to the appropriate shards
ShardingSphere-Proxy: A server-side database proxy that you can connect to like a regular database
ShardingSphere-Sidecar: Service mesh integration (for cloud-native deployments)
For most Spring Boot applications, ShardingSphere-JDBC is the preferred approach.
Approach 3: Using a Data Virtualization Layer
For complex environments with multiple data source types beyond just SQL databases, a data virtualization platform can provide a unified view.
Data Virtualization Architecture
A typical data virtualization setup includes:
Data Source Connectors: Connect to various data sources (SQL, NoSQL, API, etc.)
Query Engine: Optimizes and routes queries to appropriate data sources
Caching Layer: Improves performance by caching frequently accessed data
Virtual Database Layer: Presents a unified view through standard interfaces (JDBC, ODBC)
Step 1: Set Up a Data Virtualization Platform
Popular options include:
- Denodo Platform
- Dremio
- IBM Data Virtualization Manager
- Red Hat JBoss Data Virtualization
Step 2: Define Virtual Views
In your virtualization platform, define virtual views that combine data from multiple shards.
For example, in Denodo:
CREATE VIEW global_customers AS
    SELECT * FROM shard1_customers
    UNION ALL
    SELECT * FROM shard2_customers;
Step 3: Connect Spring Boot to the Virtualization Layer
@Configuration
public class DataVirtualizationConfig {

    @Bean
    @ConfigurationProperties("spring.datasource")
    public DataSource virtualDataSource() {
        return DataSourceBuilder.create().build();
    }

    @Bean
    public JdbcTemplate jdbcTemplate() {
        return new JdbcTemplate(virtualDataSource());
    }
}
Step 4: Use Standard JPA or JDBC to Query Virtual Views
@Repository
public class VirtualizedCustomerRepository {

    @Autowired
    private JdbcTemplate jdbcTemplate;

    public List findAllCustomers(int page, int size) {
        return jdbcTemplate.query(
            "SELECT * FROM global_customers ORDER BY id LIMIT ? OFFSET ?",
            new Object[]{size, page * size},
            customerRowMapper
        );
    }
}
Advantages of Data Virtualization
- Provides a unified view across disparate data sources
- Abstracts away the complexity of sharding from application code
- Enables real-time data integration without ETL processes
- Supports complex data transformations and advanced query capabilities
Transaction Management in Sharded Environments
Transaction management becomes challenging in sharded environments because traditional database transactions only work within a single database.
Single-Shard Transactions
These work just like regular database transactions:
@Transactional
public void updateCustomerDetails(Long customerId, String newName) {
    // ShardingContextHolder.setCurrentShard is handled by an aspect
    customerRepository.updateName(customerId, newName);
    auditRepository.logNameChange(customerId, newName);
    // Both operations occur in the same shard and form a single transaction
}
Cross-Shard Transaction Patterns
- Two-Phase Commit (2PC) The traditional approach for distributed transactions:
Prepare Phase: Each shard is asked if it can commit
Commit Phase: If all shards agree, they all commit; otherwise, all rollback
ShardingSphere supports 2PC using the XA protocol:
@Service
public class CrossShardService {

    // ShardingSphere handles the 2PC under the hood
    @ShardingSphereTransactionType(TransactionType.XA)
    @Transactional
    public void transferBetweenCustomers(Long fromCustomerId, Long toCustomerId, BigDecimal amount) {
        // These might be in different shards, but XA handles it
        accountRepository.deductBalance(fromCustomerId, amount);
        accountRepository.addBalance(toCustomerId, amount);
    }
}
- Saga Pattern A sequence of local transactions with compensating actions for failures:
@Service
public class SagaTransactionService {

    @Autowired
    private AccountRepository accountRepository;

    @Autowired
    private TransferRepository transferRepository;

    // Not a @Transactional method - we manage the transaction flow manually
    public boolean transferWithSaga(Long fromId, Long toId, BigDecimal amount) {
        // Step 1: Record the transfer intent
        Long transferId = recordTransferIntent(fromId, toId, amount);

        try {
            // Step 2: Deduct from source account (Shard 1)
            if (!deductFromAccount(fromId, amount, transferId)) {
                return false; // Failed at step 2
            }

            // Step 3: Add to destination account (Shard 2)
            if (!addToAccount(toId, amount, transferId)) {
                // Compensating transaction for step 2
                refundAccount(fromId, amount, transferId);
                return false; // Failed at step 3
            }

            // Step 4: Mark transfer as complete
            markTransferComplete(transferId);
            return true;

        } catch (Exception e) {
            // Handle unexpected errors, apply compensating transactions
            handleSagaFailure(transferId, fromId, toId, amount);
            return false;
        }
    }

    // Methods to implement each step and compensating actions...
}
- Eventual Consistency with Event-Based Approach Using events for asynchronous processing across shards:
@Service
public class EventBasedTransactionService {

    @Autowired
    private AccountRepository accountRepository;

    @Autowired
    private ApplicationEventPublisher eventPublisher;

    @Transactional // Local transaction in a single shard
    public void initiateTransfer(Long fromId, BigDecimal amount, Long toId) {
        // Deduct from source account
        accountRepository.deductBalance(fromId, amount);

        // Publish event for the second part of the transaction
        eventPublisher.publishEvent(new FundsTransferredEvent(fromId, toId, amount));
    }

    @EventListener
    @Transactional // Will run in the appropriate shard based on toId
    public void handleFundsTransfer(FundsTransferredEvent event) {
        // Add to destination account
        accountRepository.addBalance(event.getToId(), event.getAmount());
    }
}
Transaction Isolation in Sharded Environments
Be aware of limitations:
- No global read consistency across shards
- Potential for partial failures in distributed transactions
- Transaction isolation only applies within a single shard
Approach Comparison: Pros and Cons
Approach: AbstractRoutingDataSource
Pros:
- Complete control over routing
- No extra dependencies
- Easier to understand and debug
- Works with any SQL database
Cons:
- Manual implementation of cross-shard operations
- No built-in support for distributed transactions
- Cross-shard pagination is complex
- More boilerplate code
Approach: Apache ShardingSphere
Pros:
- Handles cross-shard queries automatically
- Built-in distributed transaction support
- SQL parser with query optimization
- Supports various sharding algorithms
- Transparent to application code
Cons:
- Additional dependency
- Learning curve for configuration
- Less flexibility for custom routing logic
- Performance overhead for query parsing
Approach: Data Virtualization
Pros:
- Unified view across multiple data sources
- Can integrate non-SQL data sources
- Query optimization across sources
- Application completely unaware of sharding
Cons:
- Usually requires commercial licenses
- Higher infrastructure complexity
- Potential bottleneck for performance
- Limited transaction capabilities across sources
Best Practices:
Start Simple: Begin with the AbstractRoutingDataSource approach before moving to more complex solutions
Add Logging: Log which shard is being accessed for each query during development
Create Unit Tests: Verify your sharding logic with tests against each shard
Choose Smart Shard Keys: Select keys that distribute data evenly and minimize cross-shard queries
Keep Related Data Together: Try to keep related data on the same shard to avoid complex cross-shard operations
Use Transactions Carefully: Be aware of the limitations of transactions across shards
Plan for Growth: Design your sharding strategy to accommodate adding more shards in the future
Handle Errors Gracefully: Always include robust error handling for shard routing failures
Implement Circuit Breakers: Use patterns like Circuit Breaker for resilience against shard failures
Monitor Shard Distribution: Track the data distribution across shards to detect imbalances
Next Steps for Learning
- Start with a simple two-shard setup as shown here
- Add logging to see which shard is being used for each query
- Create unit tests that verify your sharding logic
- Practice implementing cross-shard queries
- Experiment with different sharding strategies
How did I write this post:
Prompt 1: You are an experienced software developer. Can you explain me how would implement fetching of data from sharded databases in SpringBoot for SQL database?
And a few more refinements using other LLM Tools.