


![[The AI Show Episode 148]: Microsoft’s Quiet AI Layoffs, US Copyright Office’s Bombshell AI Guidance, 2025 State of Marketing AI Report, and OpenAI Codex](https://www.marketingaiinstitute.com/hubfs/ep%20148%20cover%20%281%29.png)


![[The AI Show Episode 146]: Rise of “AI-First” Companies, AI Job Disruption, GPT-4o Update Gets Rolled Back, How Big Consulting Firms Use AI, and Meta AI App](https://www.marketingaiinstitute.com/hubfs/ep%20146%20cover.png)


![Laid off but not afraid with X-senior Microsoft Dev MacKevin Fey [Podcast #173]](https://cdn.hashnode.com/res/hashnode/image/upload/v1747965474270/ae29dc33-4231-47b2-afd1-689b3785fb79.png?#)


_MEGHzTK.png?width=1920&height=1920&fit=bounds&quality=70&format=jpg&auto=webp#)
-1-52-screenshot.png?width=1920&height=1920&fit=bounds&quality=70&format=jpg&auto=webp#)


![T-Mobile Starlink beta’s list of eligible devices reduced, some phones no longer allowed [UPDATED]](https://m-cdn.phonearena.com/images/article/170719-two/T-Mobile-Starlink-betas-list-of-eligible-devices-reduced-some-phones-no-longer-allowed-UPDATED.jpg?#)


_David_Hall_-Alamy.jpg?width=1280&auto=webp&quality=80&disable=upscale#)
_Andriy_Popov_Alamy_Stock_Photo.jpg?width=1280&auto=webp&quality=80&disable=upscale#)


-xl.jpg)


![Xiaomi Tops Wearables Market as Apple Slips to Second in Q1 2025 [Chart]](https://www.iclarified.com/images/news/97417/97417/97417-640.jpg)


![Apple Shares Official Trailer for Season 2 of 'The Buccaneers' [Video]](https://www.iclarified.com/images/news/97414/97414/97414-640.jpg)


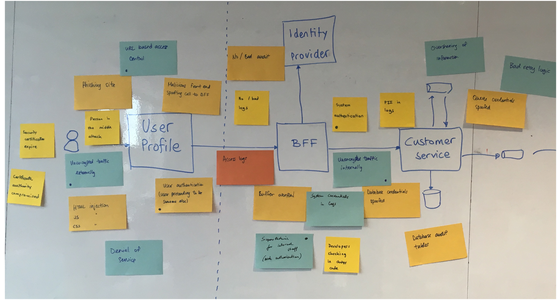
How to Host a Static Website on Azure Blob Storage
Hosting a static website on Azure Blob Storage is a simple, cost-effective way to make your web content accessible globally. In this tutorial, I'll show you how to deploy a static website using Azure Blob Storage, starting with a sample website I downloaded and edited using VS Code. Table of Contents Prerequisites Prepare Your Static Website Create an Azure Storage Account Enable Static Website Hosting Upload Website Files Access Your Website Troubleshooting Tips Conclusion Prerequisites Before we get started, make sure you have: An active Azure account. Visual Studio Code installed. A sample static website ready to deploy. Firstly, you download the sample static website from Luther, unzip the file, and saved it to a preferred location on your local machine. Prepare Your Static Website Using VS Code, open the sample website files and make the necessary edits on index.html. Edit the White parts like name and intro and then Save. Run the website by selecting Run without debugging in VS Code to open the website in your browser and verify the content. Once you’re satisfied, we’ll proceed to deploy the site to Azure. Make sure your website works locally before deploying it on Azure Create an Azure Storage Account Log in to the Azure Portal and create a new Storage Account: Click Create a resource > Storage > Storage account. Fill in the required fields: subscription, resource group, storage account name, region, etc. Review and create the storage account. Fill in the Basics tab Enable Static Website Hosting Once the storage account is created: Navigate to your storage account by going to resource. In the left sidebar, under Settings, select Static website or on the right side under capabilities. Enable Static website hosting. Specify your index document name (index.html) and error document path (error.html). Save your changes. Azure will automatically create a $web container to store your website files. Type in index.html — This is the main page of your website. Type in error.html — This page will be displayed if a user tries to access a URL that doesn’t exist on your site.** Copy the Primary endpoint URL and open it in your browser. At this point, you won’t see any website content because the files haven’t been uploaded yet. Next, we’ll upload our web files to Azure to make the site live Upload Website Files Next, upload your local website files to the $web container: In your storage account, go to Containers. Open the $web container. Click Upload and select all your website files and folders (e.g., index.html, error.html, CSS files, images). Upload them to Azure. Access Your Website After uploading, go back to the Static website page in the Azure Portal. Copy the Primary endpoint URL and paste it into your browser. Your static website should now be live and accessible from anywhere in the world! Example URL format: https://portfoliowebsite123.z13.web.core.windows.net/index.html Now everyone can see it, Bingo!!!!! Troubleshooting Tips No content showing? Ensure your files are correctly uploaded in the $web container. Page not found errors? Check your index and error document names in the static website settings. File paths broken? Make sure all relative links in your HTML files are correct. Cache issues? Try clearing your browser cache or open the page in an incognito window. Conclusion Hosting static websites on Azure Blob Storage is fast, affordable, and scalable. By following these steps, you can quickly get your site online without managing a web server.

Hosting a static website on Azure Blob Storage is a simple, cost-effective way to make your web content accessible globally. In this tutorial, I'll show you how to deploy a static website using Azure Blob Storage, starting with a sample website I downloaded and edited using VS Code.
Table of Contents
- Prerequisites
- Prepare Your Static Website
- Create an Azure Storage Account
- Enable Static Website Hosting
- Upload Website Files
- Access Your Website
- Troubleshooting Tips
- Conclusion
Prerequisites
Before we get started, make sure you have:
An active Azure account.
Visual Studio Code installed.
A sample static website ready to deploy.
Firstly, you download the sample static website from Luther, unzip the file, and saved it to a preferred location on your local machine.
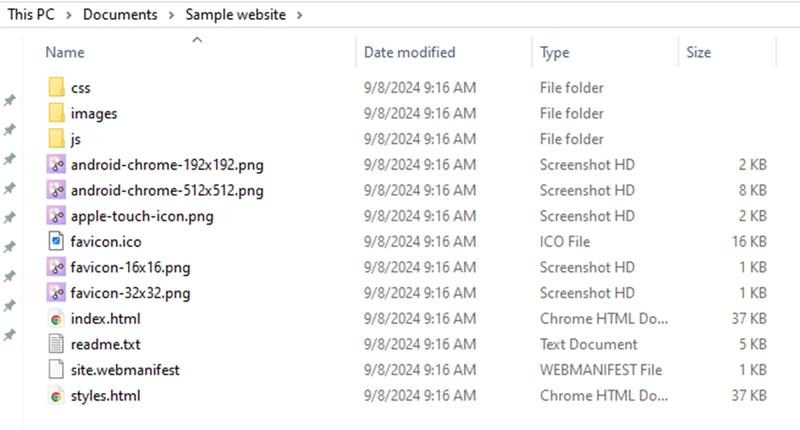
Prepare Your Static Website
Using VS Code, open the sample website files and make the necessary edits on index.html.


Edit the White parts like name and intro and then Save.

Run the website by selecting Run without debugging in VS Code to open the website in your browser and verify the content. Once you’re satisfied, we’ll proceed to deploy the site to Azure.

Make sure your website works locally before deploying it on Azure
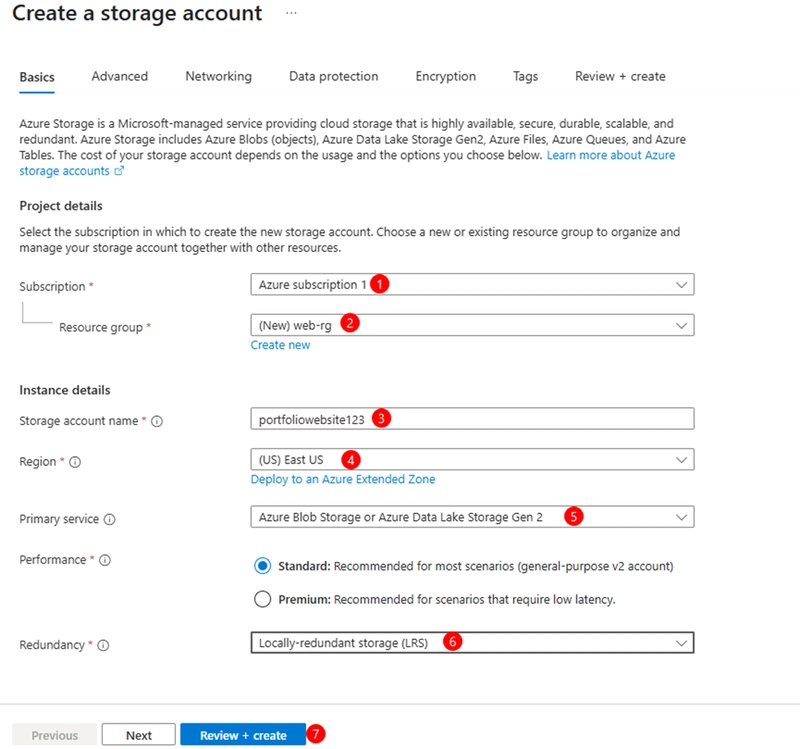
Create an Azure Storage Account
Log in to the Azure Portal and create a new Storage Account:
Click Create a resource > Storage > Storage account.
Fill in the required fields: subscription, resource group, storage account name, region, etc.
Review and create the storage account.


Fill in the Basics tab
Enable Static Website Hosting
Once the storage account is created:
Navigate to your storage account by going to resource.
In the left sidebar, under Settings, select Static website or on the right side under capabilities.
Enable Static website hosting.
Specify your index document name (index.html) and error document path (error.html).
Save your changes.
Azure will automatically create a $web container to store your website files.

Type in index.html — This is the main page of your website.
Type in error.html — This page will be displayed if a user tries to access a URL that doesn’t exist on your site.**


Copy the Primary endpoint URL and open it in your browser. At this point, you won’t see any website content because the files haven’t been uploaded yet. Next, we’ll upload our web files to Azure to make the site live

Upload Website Files
Next, upload your local website files to the $web container:
In your storage account, go to Containers.
Open the $web container.
Click Upload and select all your website files and folders (e.g., index.html, error.html, CSS files, images).
Upload them to Azure.


Access Your Website
After uploading, go back to the Static website page in the Azure Portal.
Copy the Primary endpoint URL and paste it into your browser.
Your static website should now be live and accessible from anywhere in the world!
Example URL format:
https://portfoliowebsite123.z13.web.core.windows.net/index.html

Now everyone can see it, Bingo!!!!!
Troubleshooting Tips
No content showing? Ensure your files are correctly uploaded in the $web container.
Page not found errors? Check your index and error document names in the static website settings.
File paths broken? Make sure all relative links in your HTML files are correct.
Cache issues? Try clearing your browser cache or open the page in an incognito window.
Conclusion
Hosting static websites on Azure Blob Storage is fast, affordable, and scalable. By following these steps, you can quickly get your site online without managing a web server.


