


![[The AI Show Episode 144]: ChatGPT’s New Memory, Shopify CEO’s Leaked “AI First” Memo, Google Cloud Next Releases, o3 and o4-mini Coming Soon & Llama 4’s Rocky Launch](https://www.marketingaiinstitute.com/hubfs/ep%20144%20cover.png)


![Is This Programming Paradigm New? [closed]](https://miro.medium.com/v2/resize:fit:1200/format:webp/1*nKR2930riHA4VC7dLwIuxA.gif)


-Classic-Nintendo-GameCube-games-are-coming-to-Nintendo-Switch-2!-00-00-13.png?width=1920&height=1920&fit=bounds&quality=70&format=jpg&auto=webp#)


![New iPhone 17 Dummy Models Surface in Black and White [Images]](https://www.iclarified.com/images/news/97106/97106/97106-640.jpg)


![Hands-On With 'iPhone 17 Air' Dummy Reveals 'Scary Thin' Design [Video]](https://www.iclarified.com/images/news/97100/97100/97100-640.jpg)


From Concept to Cloud: Building with Cursor and the Heroku MCP Server
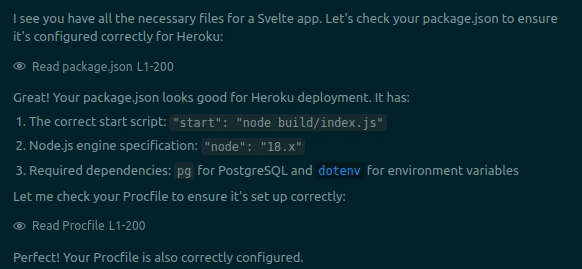
I’ve been experimenting with Cursor as a development tool, and it’s been surprisingly helpful in my day-to-day workflow. It’s not just that it writes code — it understands context, offers suggestions in the right moments, and even anticipates what I’m about to do next. When I saw the announcement about the Heroku MCP Server, I got curious. Could I use Cursor to go beyond just writing code — and actually build and deploy an app to Heroku — primarily via chat prompts and responses? I decided to try it out. In this post, I’ll walk through how I used Cursor to build a simple SvelteKit app and deploy it to Heroku, powered by the new MCP integration. Would it work? Was it smooth? I thought I would test drive it to see. Come along for the ride. What is the Model Context Protocol (MCP)? MCP is an open standard that lets LLMs interact with external tools in a structured, programmatic way. Instead of just generating code or text based on context, MCP support lets your AI system take real actions — like make API calls or execute commands — based on what you ask. In practice, this turns Cursor into more than just an AI-enhanced code editor. With MCP support, Cursor becomes a command center. I could potentially spin up cloud infrastructure, query databases, or scaffold new projects — all through prompts in the chat. The Heroku MCP Server introduces this capability for the Heroku platform. That means I can ask Cursor to do things like create a Heroku app, scale dynos, or attach add-ons — without ever leaving my editor or opening a terminal. Using Cursor to build my SvelteKit app I wanted Cursor to take a shot at building a to-do list as a single-page application using SvelteKit, backed by PostgreSQL. This should be simple enough for Cursor, and it would save me time, since I have little experience with Svelte. These are the steps I took. Open Cursor to a new project folder I started with an empty folder in ~/project. I had a blank canvas and was ready (for Cursor) to get to work. Describe the task I explained to Cursor what I wanted to do. To give it a little help with Svelte, I pointed it to Svelte’s LLM-friendly documentation. I would like to build a “Todo List” single page application using Svelte/SvelteKit. The documentation for Svelte can be found here: https://svelte.dev/llms-full.txt My application needs to handle listing to-dos, adding to-dos, marking to-dos as complete/incomplete, and deleting to-dos. It should be backed by a Postgres database. Eventually, I will deploy this application to Heroku with a Postgres add-on. But I also want to test it locally. I have a local instance of Postgres running. So, I can either give you local db credentials, or you can use the connection string from Heroku once the add-on is running. Please create my application in the current folder. This was the response, so I gave Cursor a little guidance as to my preferences. Cursor worked through creating the app and adding the necessary dependencies. When it hit speed bumps (like command line options that were outdated), it worked through them. Let it code! It was time for Cursor to begin implementing the application. At this point, it had only been about two minutes since I opened Cursor to get started. In a matter of seconds, Cursor generated the code and saved the files necessary for my application. Set up local database Next, Cursor gave me next steps related to setting up my database. I told Cursor that I would want some help with this. Please give me the commands to create that database and run the schema. And also, create the .env file for me. My local postgres database runs on localhost, port 5432. The username is postgres and the password is postgres. I probably need source control too. Please initialize a git repo for my project too. Cursor set up my .env file and gave me the psql commands I needed. Initialize a git repository Cursor continued on, setting up source control for my project. Test application locally Next, Cursor told me it was ready for me to test on a local development server. Really? All the coding was done and I was ready to test? I clicked Run command. Then, I opened my browser to http://localhost:5173 to test out the app. It worked. Listing, adding, marking as complete, and deleting. So, Cursor had finished building my app. It had been about five minutes since I started. We’re ready to deploy to Heroku. And now, we get to use Cursor with Heroku’s MCP Server. Deploying to Heroku with help from Cursor Getting up and running with Heroku is already pretty easy. I was ready to see how Heroku task automation with Cursor could enhance my productivity even more. Set up Cursor to use Heroku’s MCP Server To connect Cursor with Heroku’s MCP Server, I needed to go through a few simple steps… Step 1: Obtain a Heroku authorization token From a term
I’ve been experimenting with Cursor as a development tool, and it’s been surprisingly helpful in my day-to-day workflow. It’s not just that it writes code — it understands context, offers suggestions in the right moments, and even anticipates what I’m about to do next.
When I saw the announcement about the Heroku MCP Server, I got curious. Could I use Cursor to go beyond just writing code — and actually build and deploy an app to Heroku — primarily via chat prompts and responses? I decided to try it out.
In this post, I’ll walk through how I used Cursor to build a simple SvelteKit app and deploy it to Heroku, powered by the new MCP integration. Would it work? Was it smooth? I thought I would test drive it to see. Come along for the ride.
What is the Model Context Protocol (MCP)?
MCP is an open standard that lets LLMs interact with external tools in a structured, programmatic way. Instead of just generating code or text based on context, MCP support lets your AI system take real actions — like make API calls or execute commands — based on what you ask.
In practice, this turns Cursor into more than just an AI-enhanced code editor. With MCP support, Cursor becomes a command center. I could potentially spin up cloud infrastructure, query databases, or scaffold new projects — all through prompts in the chat.
The Heroku MCP Server introduces this capability for the Heroku platform. That means I can ask Cursor to do things like create a Heroku app, scale dynos, or attach add-ons — without ever leaving my editor or opening a terminal.
Using Cursor to build my SvelteKit app
I wanted Cursor to take a shot at building a to-do list as a single-page application using SvelteKit, backed by PostgreSQL. This should be simple enough for Cursor, and it would save me time, since I have little experience with Svelte. These are the steps I took.
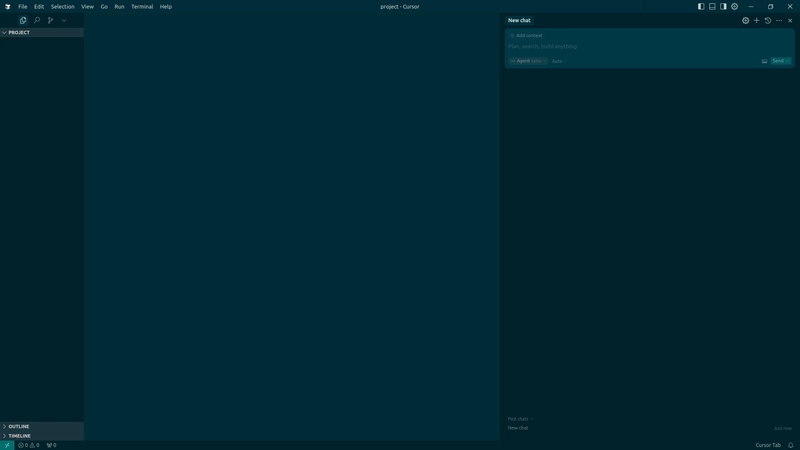
Open Cursor to a new project folder
I started with an empty folder in ~/project. I had a blank canvas and was ready (for Cursor) to get to work.
Describe the task
I explained to Cursor what I wanted to do. To give it a little help with Svelte, I pointed it to Svelte’s LLM-friendly documentation.
I would like to build a “Todo List” single page application using Svelte/SvelteKit. The documentation for Svelte can be found here: https://svelte.dev/llms-full.txt
My application needs to handle listing to-dos, adding to-dos, marking to-dos as complete/incomplete, and deleting to-dos.
It should be backed by a Postgres database.
Eventually, I will deploy this application to Heroku with a Postgres add-on. But I also want to test it locally. I have a local instance of Postgres running. So, I can either give you local db credentials, or you can use the connection string from Heroku once the add-on is running.
Please create my application in the current folder.
This was the response, so I gave Cursor a little guidance as to my preferences.
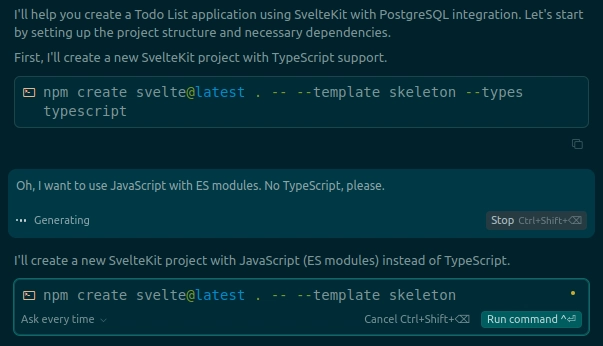
Cursor worked through creating the app and adding the necessary dependencies. When it hit speed bumps (like command line options that were outdated), it worked through them.
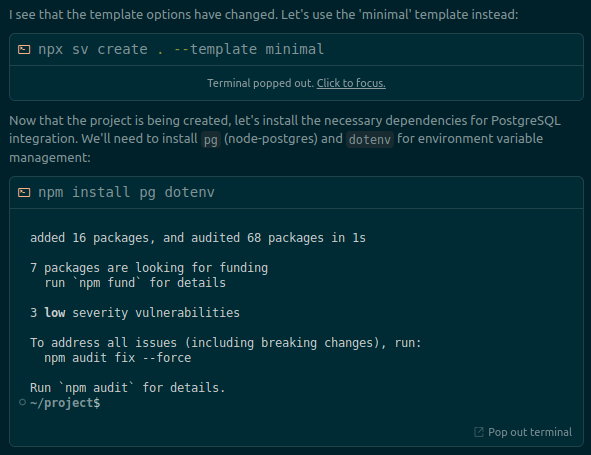
Let it code!
It was time for Cursor to begin implementing the application. At this point, it had only been about two minutes since I opened Cursor to get started.
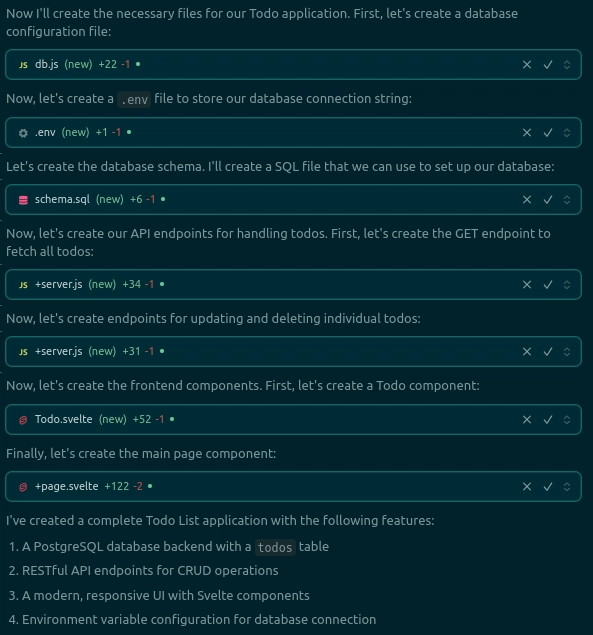
In a matter of seconds, Cursor generated the code and saved the files necessary for my application.
Set up local database
Next, Cursor gave me next steps related to setting up my database.

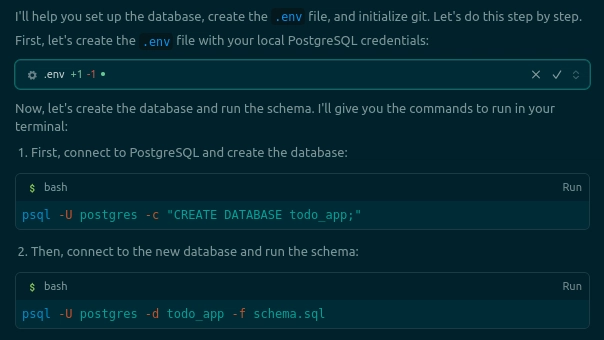
I told Cursor that I would want some help with this.
Please give me the commands to create that database and run the schema. And also, create the .env file for me. My local postgres database runs on localhost, port 5432. The username is postgres and the password is postgres.
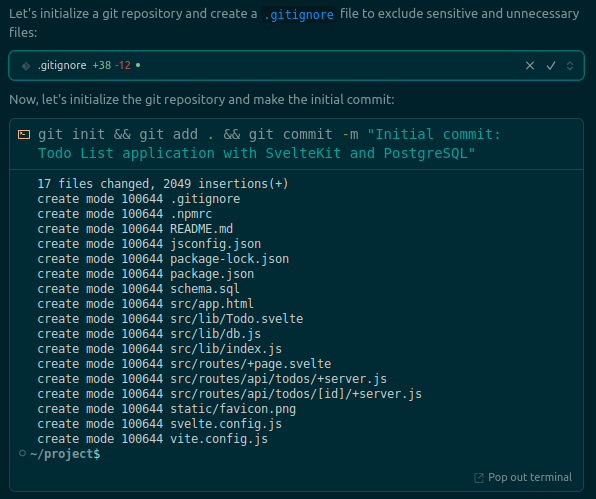
I probably need source control too. Please initialize a git repo for my project too.
Cursor set up my .env file and gave me the psql commands I needed.
Initialize a git repository
Cursor continued on, setting up source control for my project.
Test application locally
Next, Cursor told me it was ready for me to test on a local development server.

Really? All the coding was done and I was ready to test? I clicked Run command.
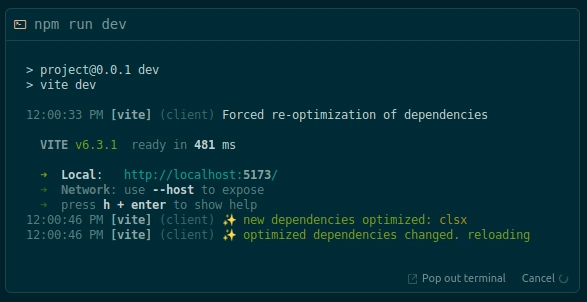
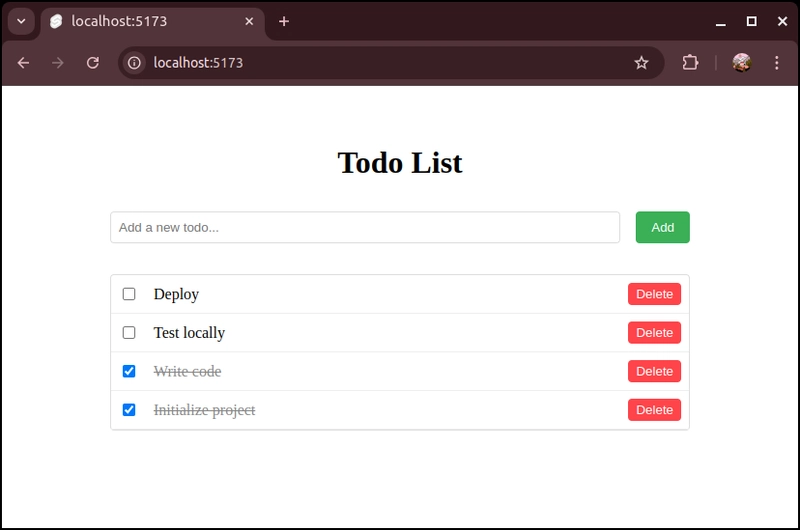
Then, I opened my browser to http://localhost:5173 to test out the app. It worked. Listing, adding, marking as complete, and deleting.
So, Cursor had finished building my app. It had been about five minutes since I started. We’re ready to deploy to Heroku. And now, we get to use Cursor with Heroku’s MCP Server.
Deploying to Heroku with help from Cursor
Getting up and running with Heroku is already pretty easy. I was ready to see how Heroku task automation with Cursor could enhance my productivity even more.
Set up Cursor to use Heroku’s MCP Server
To connect Cursor with Heroku’s MCP Server, I needed to go through a few simple steps…
Step 1: Obtain a Heroku authorization token
From a terminal, I made sure I was authenticated with the Heroku CLI. Then I ran the following command:
$ heroku authorizations:create

Creating OAuth Authorization... done
Client:
ID:          03aff7da-87a9-4f9b-9400-5387164390e9
Description: Long-lived user authorization
Scope:       global
Token:       HRKU-1a2b3c4d-5e6f-7890-abcd-abc123def456
Updated at:  Thu Apr 17 2025 12:04:14 GMT-0700 (Mountain Standard Time) (less than a minute ago)
This would be the only time that I needed to do this in a terminal. I could use this authorization token for all future Cursor projects.
Step 2: Create a mcp.json file
In my project folder, I created a subfolder called .cursor. In that folder, I created a file called mcp.json with the following contents:
{
  "mcpServers": {
    "heroku": {
      "command": "npx -y @heroku/mcp-server",
      "env": {
        "HEROKU_API_KEY": "HRKU-1a2b3c4d-5e6f-7890-abcd-abc123def456"
      }
    }
  }
}
Step 3: Enable the new MCP server
As soon as I saved .cursor/mcp.json, Cursor detected it.
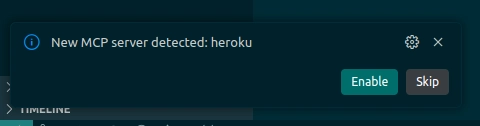
I clicked Enable.
Use Cursor to build and deploy app
With Cursor configured, I just needed to tell it to get to work.
Please deploy my app the Heroku. You can call it
my-svelte-todo-list\.

That’s a promising start. I clicked Run tool.
Next, Cursor would add the Postgres add-on. There was a bit of a hiccup here. Cursor didn’t have the right name for the lowest-tier add-on plan, but it quickly solved its problem and continued moving forward.

With the Postgres add-on up and running, I nudged Cursor to move ahead.
You’ve created the app and the Postgres database. Help me initialize the database and then deploy the code.
Cursor used the MCP tool to connect to my Postgres add-on — in the Heroku CLI, that would have been heroku pg:psql—and to create a table.

Next, Cursor checked that everything was set up to deploy my app.
Then, Cursor noticed that there was no Heroku remote set up for my git repository. So, it helped with that.
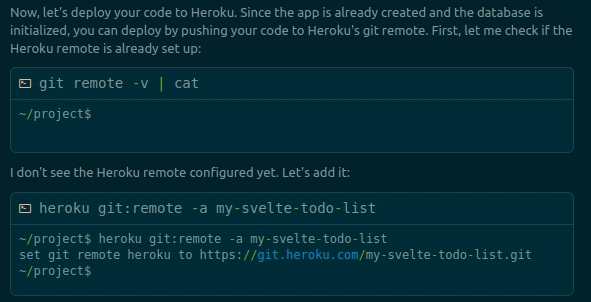
Notice that Cursor needed to run a bash command to set up the remote. It looks like heroku git:remote isn’t one of the available tools in the Heroku MCP Server (yet).
I was almost ready for Cursor to deploy. But if Cursor was going to use an MCP tool (deploy_to_heroku) instead of have me issue a git push heroku main command, then my project would need an app.json file. I reminded Cursor of this:
I think I also need an app.json file so that I can deploy to Heroku (with the Heroku MCP tool).
Cursor created the file.

Now, Cursor was ready to deploy to Heroku with the MCP tool.

After a few seconds, this is what Cursor told me:

Successful deployment? Just like that? I went to my Heroku app URL to be sure.
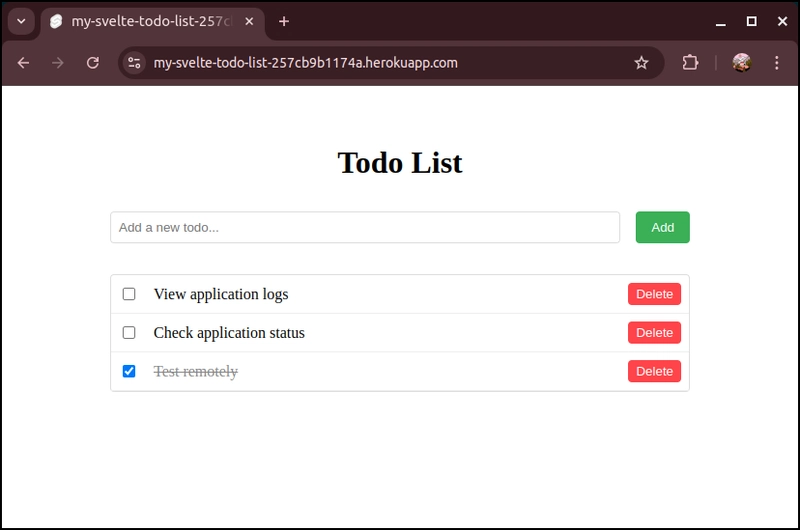
Yes! Successful deployment!
Other things that Cursor can do with the Heroku MCP Server
Cursor said the deployment was successful, but asked if there were other things I wanted it to do.
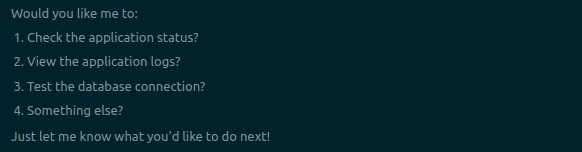
Hmm, check application status or view the logs? Ok, sure.
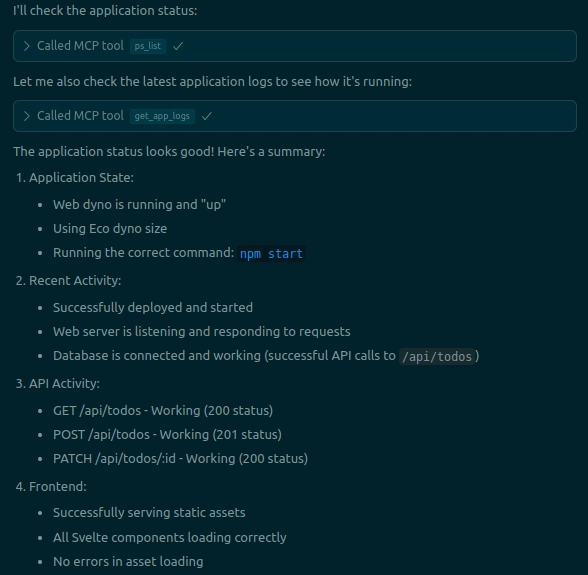
Cursor used the MCP tools to check on my dyno and summarize recent logs. Nice!
Final thoughts: A new way to build
Cursor didn’t just help me scaffold a project or write a frontend for a framework I have little experience with. It carried my entire project from concept to cloud. That was pretty sweet. Heroku already makes deployment straightforward, but using Cursor and the MCP Server made the whole experience feel nearly automated.
This wasn’t just about saving time. It was about shifting how I interact with tools I already know and trust. The idea that I can go from “I want to build…” to “It’s live!” without switching contexts is exciting — and something worth exploring further on more ambitious projects.
Happy coding!