![Epic Games: Fortnite is offline for Apple devices worldwide after app store rejection [updated]](https://helios-i.mashable.com/imagery/articles/00T6DmFkLaAeJiMZlCJ7eUs/hero-image.fill.size_1200x675.v1747407583.jpg)


![[The AI Show Episode 146]: Rise of “AI-First” Companies, AI Job Disruption, GPT-4o Update Gets Rolled Back, How Big Consulting Firms Use AI, and Meta AI App](https://www.marketingaiinstitute.com/hubfs/ep%20146%20cover.png)


.png?width=1920&height=1920&fit=bounds&quality=70&format=jpg&auto=webp#)


-xl-(1)-xl-xl.jpg)


![‘Apple in China’ book argues that the iPhone could be killed overnight [Updated]](https://i0.wp.com/9to5mac.com/wp-content/uploads/sites/6/2025/05/Apple-in-China-review.jpg?resize=1200%2C628&quality=82&strip=all&ssl=1)


![What’s new in Android’s May 2025 Google System Updates [U: 5/16]](https://i0.wp.com/9to5google.com/wp-content/uploads/sites/4/2025/01/google-play-services-1.jpg?resize=1200%2C628&quality=82&strip=all&ssl=1)


![iPhone 17 Air Could Get a Boost From TDK's New Silicon Battery Tech [Report]](https://www.iclarified.com/images/news/97344/97344/97344-640.jpg)
![Vision Pro Owners Say They Regret $3,500 Purchase [WSJ]](https://www.iclarified.com/images/news/97347/97347/97347-640.jpg)
![Apple Showcases 'Magnifier on Mac' and 'Music Haptics' Accessibility Features [Video]](https://www.iclarified.com/images/news/97343/97343/97343-640.jpg)
![Sony WH-1000XM6 Unveiled With Smarter Noise Canceling and Studio-Tuned Sound [Video]](https://www.iclarified.com/images/news/97341/97341/97341-640.jpg)


![Apple Stops Signing iPadOS 17.7.7 After Reports of App Login Issues [Updated]](https://images.macrumors.com/t/DoYicdwGvOHw-VKkuNvoxYs3pfo=/1920x/article-new/2023/06/ipados-17.jpg)

![Apple Pay, Apple Card, Wallet and Apple Cash Currently Experiencing Service Issues [Update: Fixed]](https://images.macrumors.com/t/RQPLZ_3_iMyj3evjsWnMLVwPdyA=/1600x/article-new/2023/11/apple-pay-feature-dynamic-island.jpg)


Documentation of components in React with TypeScript using Storybook (version 8)
Introduction Portuguese version: Documentação de componentes em React com Typescript usando Storybook (versão 8) Previously, I wrote an article about components documentation using storybook when the version was below 8. Due to some changes introduced in version 8 and my deeper understanding of the library, I’m now writing an updated version in this article. Storybook is a lib that allows, among other things, the documentation of components in isolation, parallel to the application. In this article, I will present a way to customize component documentation. I hope this will help bring visibility to some of the options available when using this library. The following steps will be followed: setup: storybook configuration stories: definition of the main scenarios for the components to be documented mdx: documentation of the components, incorporating the customizations defined in the stories example: an example of component documentation will be presented Each component will have its own mdx and stories file. Setup To add storybook to a React application with the initial configurations, you need to run the following command in the terminal: npx storybook init. This command will detect the project’s dependencies and may ask some questions during the process. Some examples: whether you're using webpack or vite in the project whether it's for documentation or testing In this case, choose the option that corresponds to your project, and for documentation, specify that when prompted. Note: some libraries use rollup instead of vite or webpack. In a library I use for learning, which uses rollup, I chose the vite option and it works fine, but you need to add two additional libraries: yarn add vite @storybook/builder-vite --dev Stories For each component, a *.stories.tsx file will be created, where the most important customization scenarios to be documented will be defined, following this structure: import React from "react"; import type { Meta, StoryObj } from "@storybook/react"; import Component from "./Component"; const meta: Meta = { title: "Component", component: Component, argTypes: {}, }; export default meta; type Story = StoryObj; export const Default: Story = { args: {}, render: (args) => ( ), }; export const Scenario1: Story = { args: {}, render: (args) => ( ), }; // Scenario2 // Scenario3 From the imports of @storybook/react: Meta: define the metadata for the component to be documented. In this case, the component itself is passed in component, and the title that will appear in the sidebar is specified in title StoryObj: allows you to define the customization scenarios of the component to be displayed in the documentation, corresponding to the definitions of Default, Scenario1, Scenario2... mentioned above For each defined scenario, an entry will be created in the sidebar, within the "folder" named according to the title defined in the Meta, with the following structure: Component Default Scenario 1 Scenario 2 Scenario 3 In Default, the component is rendered with its default properties. In the args: {} of Scenario1 above, no props were passed in, with the goal of showing the component’s base behavior on its initial render using default values. In the two other renderings inside Scenario1, the props1 prop is varied. The purpose of this scenario is to demonstrate in the documentation what happens to the component when this prop changes. MDX It will be the component documentation, where the scenarios present in the *.stories.tsx file will be included, and texts will be defined to explain the main functionalities of the component, following this structure: import { Canvas, Controls, Meta, Story } from '@storybook/blocks'; import * as Stories from './Component.stories'; # Component Component description. ## Predefined properties ### Scenario 1 Description of the use of props1. ## Custom properties // ### Scenario 2 // ### Scenario 3 It's a file that mixes markdown with javaScript. From the imports of @storybook/blocks: Canvas: this will create a box where the components from the scenario defined in the *.stories file will be displayed. It includes an option called Show code that reveals the code to use the displayed component: Controls: will display a table with the name of all the props available for the component, their descriptions (including the types of the props), whether they have a default value, and a section where you can modify the component's props to see the changes in real time. Putting it all together: This sets up Controls to affect the component coming from Stories.Default. And above, that component is rendered using , so with each prop change, you’ll be able to see how the component gets customized in real time: Meta: defines where the associated stories file for the documentation is located, coming from the im

Introduction
Portuguese version: Documentação de componentes em React com Typescript usando Storybook (versão 8)
Previously, I wrote an article about components documentation using storybook when the version was below 8. Due to some changes introduced in version 8 and my deeper understanding of the library, I’m now writing an updated version in this article.
Storybook is a lib that allows, among other things, the documentation of components in isolation, parallel to the application.
In this article, I will present a way to customize component documentation. I hope this will help bring visibility to some of the options available when using this library. The following steps will be followed:
- setup: storybook configuration
- stories: definition of the main scenarios for the components to be documented
- mdx: documentation of the components, incorporating the customizations defined in the stories
- example: an example of component documentation will be presented
Each component will have its own mdx and stories file.
Setup
To add storybook to a React application with the initial configurations, you need to run the following command in the terminal: npx storybook init.
This command will detect the project’s dependencies and may ask some questions during the process. Some examples:
- whether you're using
webpackorvitein the project - whether it's for documentation or testing
In this case, choose the option that corresponds to your project, and for documentation, specify that when prompted.
Note: some libraries use rollup instead of vite or webpack. In a library I use for learning, which uses rollup, I chose the vite option and it works fine, but you need to add two additional libraries:
yarn add vite @storybook/builder-vite --dev
Stories
For each component, a *.stories.tsx file will be created, where the most important customization scenarios to be documented will be defined, following this structure:
import React from "react";
import type { Meta, StoryObj } from "@storybook/react";
import Component from "./Component";

const meta: Meta<typeof Component> = {
  title: "Component",
  component: Component,
  argTypes: {},
};

export default meta;

type Story = StoryObj<typeof Component>;

export const Default: Story = {
  args: {},
  render: (args) => (
    <Component {...args} />
  ),
};

export const Scenario1: Story = {
  args: {},
  render: (args) => (
    <>
      <Component {...args} />
      <Component {...args} props1="option1" />
      <Component {...args} props1="option2" />
    </>
  ),
};

// Scenario2
// Scenario3
From the imports of @storybook/react:
- Meta: define the metadata for the component to be documented. In this case, the component itself is passed in
component, and the title that will appear in the sidebar is specified intitle - StoryObj: allows you to define the customization scenarios of the component to be displayed in the documentation, corresponding to the definitions of
Default,Scenario1,Scenario2... mentioned above
For each defined scenario, an entry will be created in the sidebar, within the "folder" named according to the title defined in the Meta, with the following structure:
- Component
- Default
- Scenario 1
- Scenario 2
- Scenario 3
In Default, the component is rendered with its default properties.
In the args: {} of Scenario1 above, no props were passed in, with the goal of showing the component’s base behavior on its initial render using default values.
In the two other renderings inside Scenario1, the props1 prop is varied. The purpose of this scenario is to demonstrate in the documentation what happens to the component when this prop changes.
MDX
It will be the component documentation, where the scenarios present in the *.stories.tsx file will be included, and texts will be defined to explain the main functionalities of the component, following this structure:
import { Canvas, Controls, Meta, Story } from '@storybook/blocks';
import * as Stories from './Component.stories';

<Meta of={Stories} />

# Component

Component description.

<Canvas of={Stories.Default} withToolbar />

<Controls of={Stories.Default} />

## Predefined properties

### Scenario 1

Description of the use of props1.

<Canvas of={Stories.Scenario1} withToolbar />

## Custom properties

// ### Scenario 2

// ### Scenario 3
It's a file that mixes markdown with javaScript. From the imports of @storybook/blocks:
- Canvas: this will create a box where the components from the scenario defined in the
*.storiesfile will be displayed. It includes an option calledShow codethat reveals the code to use the displayed component:
- Controls: will display a table with the name of all the props available for the component, their descriptions (including the types of the props), whether they have a default value, and a section where you can modify the component's props to see the changes in real time. Putting it all together:
<Canvas of={Stories.Default} withToolbar />

<Controls of={Stories.Default} />
This sets up Controls to affect the component coming from Stories.Default. And above, that component is rendered using , so with each prop change, you’ll be able to see how the component gets customized in real time:

- Meta: defines where the associated stories file for the documentation is located, coming from the import
import * as Stories from './Component.stories';
Example
I will present a simple example of documentation based on what has been provided above. Starting with the creation of a component defined in Tag.tsx:
import React from "react";
import styled from "styled-components";

export interface TagProps {
  text?: string;
  backgroundColor?: string;
  type?: "default" | "success" | "alert" | "error";
}

export interface StyledTagProps {
  $backgroundColor?: string;
  $type?: "default" | "success" | "alert" | "error";
}

export const StyledTag = styled.div<StyledTagProps>`
  border: none;
  padding: 10px 12px;
  background-color: ${(props) =>
    props.$backgroundColor
      ? props.$backgroundColor
      : props.$type === "error"
        ? "#e97451"
        : props.$type === "alert"
          ? "#f8de7e"
          : props.$type === "success"
            ? "#50c878"
            : props.$type === "default"
            && "#d3d3d3"};
  pointer-events: none;
  border-radius: 5px;
  width: fit-content;
`;

const Tag = ({
  text="Tag",
  backgroundColor,
  type="default",
}: TagProps) => (
  <StyledTag
    $type={type}
    $backgroundColor={backgroundColor}
  >
    <span>{text}</span>
  </StyledTag>
);

export default Tag;
It is a Tag component with a predefined type property, meaning that the app itself defines the associated css based on the given type. The possible values are default, error, alert and success.
It also has a customizable backgroundColor property, allowing users to choose any color they want.
In the example, the css is defined using a lib called styled-components, but the documentation is indifferent to how the css is defined. Types are defined for both the component's props and the related to styled component.
Now, a specific component for documentation, StorybookContainer, will be created. This component will be responsible for centering the scenario components inside the Canvas of the mdx file, with a small spacement between them. In the file StorybookContainer.tsx:
import React from "react";
import styled from "styled-components";

export interface StorybookContainerProps {
  children: React.ReactNode;
}

export const StyledStorybookContainer = styled.div`
  display: flex;
  align-items: center;
  justify-content: center;
  gap: 10px;
`;

const StorybookContainer = ({ children }: StorybookContainerProps) => (
  <StyledStorybookContainer>
    {children}
  </StyledStorybookContainer>
);

export default StorybookContainer;
The file Tag.stories.tsx will be created with the Default and two scenarios to be presented in the documentation:
import React from "react";
import type { Meta, StoryObj } from "@storybook/react";
import Tag from "./Tag";
import StorybookContainer from "../StorybookContainer/StorybookContainer";

const meta: Meta<typeof Tag> = {
  title: "Tag",
  component: Tag,
  argTypes: {},
};

export default meta;

type Story = StoryObj<typeof Tag>;

export const Default: Story = {
  args: {},
  render: (args) => (
    <StorybookContainer>
      <Tag {...args} />
    </StorybookContainer>
  ),
};

export const PredefinedType: Story = {
  args: {},
  render: (args) => (
    <StorybookContainer>
      <Tag {...args} />
      <Tag {...args} type="success" />
      <Tag {...args} type="alert" />
      <Tag {...args} type="error" />
    </StorybookContainer>
  ),
};

export const BackgroundColor: Story = {
  args: {
    backgroundColor: "#d3d3d3",
  },
  render: (args) => (
    <StorybookContainer>
      <Tag {...args} />
      <Tag {...args} backgroundColor="#89cff0" />
      <Tag {...args} backgroundColor="#f0aa89" />
    </StorybookContainer>
  ),
};
Two scenarios were defined in the file to show how the component changes with variations in the type props (which is a predefined property in the app) and how the component changes with variations in the backgroundColor props (which is customizable, as the user can specify any color they want to use).
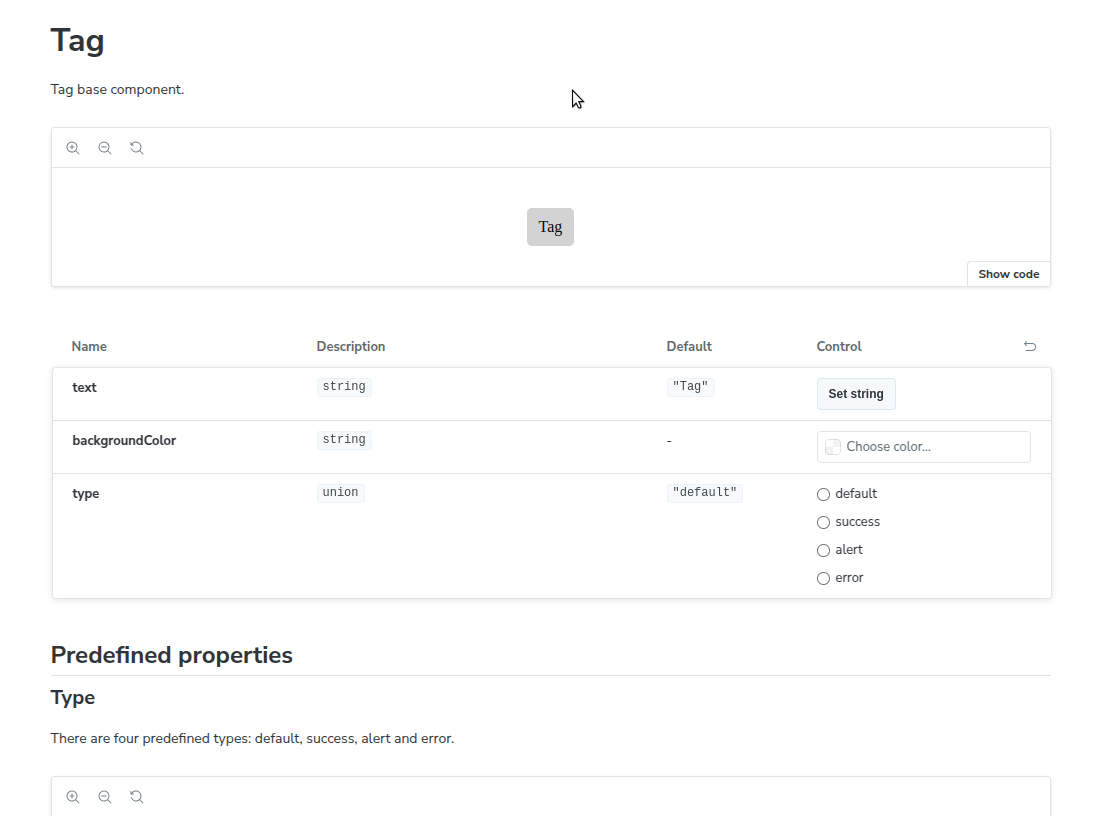
Finally, the documentation file for the Tag component, Tag.mdx, will be created, where the two scenarios defined in the stories file will be displayed:
import { Canvas, Controls, Meta } from "@storybook/blocks";
import * as Stories from "./Tag.stories";

<Meta of={Stories} />

# Tag

Tag base component.

<Canvas of={Stories.Default} withToolbar />

<Controls of={Stories.Default} />

## Predefined properties

### Type

There are four predefined types: default, success, alert and error.

<Canvas of={Stories.PredefinedType} withToolbar />

## Custom properties

### Background Color

Tag background color can be modified.

<Canvas of={Stories.BackgroundColor} withToolbar />
This is where the component being displayed will be described, along with a table that allows you to control its props, thanks to the inclusion of type prop (a predefined property), and another scenario will be shown by varying the backgroundColor prop (a customizable property).
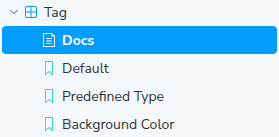
Finally, run yarn storybook in the terminal.
The sidebar will look like this:
And the documentation will look like this:
Conclusion
The idea of this article was to introduce a component documentation lib that allows customizing documentation using an mdx file in various ways, utilizing the blocks provided by the lib. A way for writing this documentation file was presented, but given the many possibilities offered by the lib, I will include some links in the references for those who want to delve deeper into the subject.
References
Stories File
Blocks
Controls Block
Canvas Block
Meta Block
Stories Block
MDX File