![Epic Games: Fortnite is offline for Apple devices worldwide after app store rejection [updated]](https://helios-i.mashable.com/imagery/articles/00T6DmFkLaAeJiMZlCJ7eUs/hero-image.fill.size_1200x675.v1747407583.jpg)


![[The AI Show Episode 146]: Rise of “AI-First” Companies, AI Job Disruption, GPT-4o Update Gets Rolled Back, How Big Consulting Firms Use AI, and Meta AI App](https://www.marketingaiinstitute.com/hubfs/ep%20146%20cover.png)


.png?width=1920&height=1920&fit=bounds&quality=70&format=jpg&auto=webp#)


-xl-(1)-xl-xl.jpg)


![How to upgrade the M4 Mac mini SSD and save hundreds [Video]](https://i0.wp.com/9to5mac.com/wp-content/uploads/sites/6/2025/05/M4-Mac-mini-SSD-Upgrade-Tutorial-2TB.jpg?resize=1200%2C628&quality=82&strip=all&ssl=1)
![‘Apple in China’ book argues that the iPhone could be killed overnight [Updated]](https://i0.wp.com/9to5mac.com/wp-content/uploads/sites/6/2025/05/Apple-in-China-review.jpg?resize=1200%2C628&quality=82&strip=all&ssl=1)


![What’s new in Android’s May 2025 Google System Updates [U: 5/16]](https://i0.wp.com/9to5google.com/wp-content/uploads/sites/4/2025/01/google-play-services-1.jpg?resize=1200%2C628&quality=82&strip=all&ssl=1)


![iPhone 17 Air Could Get a Boost From TDK's New Silicon Battery Tech [Report]](https://www.iclarified.com/images/news/97344/97344/97344-640.jpg)
![Vision Pro Owners Say They Regret $3,500 Purchase [WSJ]](https://www.iclarified.com/images/news/97347/97347/97347-640.jpg)
![Apple Showcases 'Magnifier on Mac' and 'Music Haptics' Accessibility Features [Video]](https://www.iclarified.com/images/news/97343/97343/97343-640.jpg)
![Sony WH-1000XM6 Unveiled With Smarter Noise Canceling and Studio-Tuned Sound [Video]](https://www.iclarified.com/images/news/97341/97341/97341-640.jpg)


![Apple Stops Signing iPadOS 17.7.7 After Reports of App Login Issues [Updated]](https://images.macrumors.com/t/DoYicdwGvOHw-VKkuNvoxYs3pfo=/1920x/article-new/2023/06/ipados-17.jpg)


CSS Dotted Background
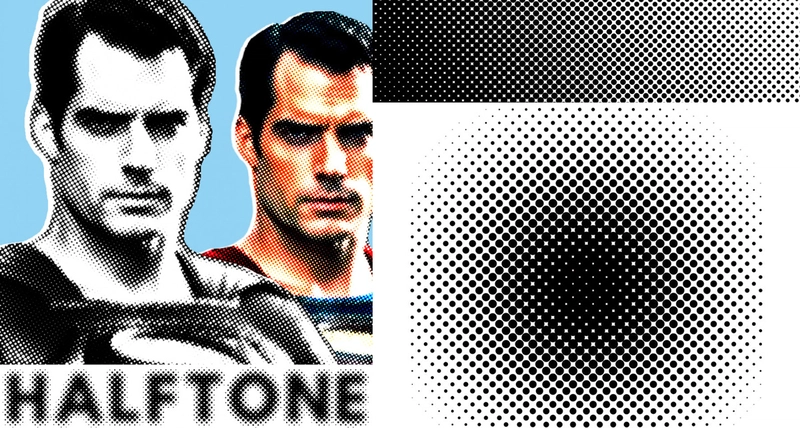
READ ORIGINAL HERE: CSS Dotted Background This tutorial breaks down how to create a CSS dotted pattern using SVG to achieve a halftone dotted CSS background. Halftoning is a reprographic technique that simulates continuous-tone imagery through the use of a dotted grid background, varying in size or spacing to generate a gradient-like effect. We’ll create this dot background CSS effect by combining gradients, patterns, and SVG filters to craft a stunning dots background CSS. The Full SVG Code (for Reference) Important: The main SVG element in the code above is styled to be hidden (style="position:absolute; top:-9999px; left:-9999px; opacity:0; pointer-events:none;"). This is because its sole purpose is to define the filter components (gradients, patterns, and the filter itself). The actual visual effect will be applied to a separate HTML element using CSS: filter: url(#blendAndThresholdFilter). Creating a dotted CSS background is a common design requirement, ranging from simple repeating dots background CSS to more complex visual effects. For a basic dotted grid background, CSS offers straightforward solutions using background-image with radial-gradient and background-repeat. You can easily generate a uniform css dotted pattern this way, giving your elements a clean, geometric look. This approach is excellent for static, repeating dot background css where all dots are of the same size and spacing. However, achieving a true halftone effect—where dot sizes vary to simulate a gradient or an image’s tonal values—presents a greater challenge with pure dotted CSS. While CSS has powerful gradient and masking capabilities, dynamically varying the size of individual dots in a grid based on an underlying intensity map (as true halftone requires) pushes the boundaries of what’s easily manageable with CSS alone. The complexity arises in making each “dot” in the background dots CSS individually responsive to a larger gradient or image pattern. Let’s Break It Down: Step by Step Step 1: The Radial Gradient – A Single Soft Dot First, we define a . This gradient will form the basis of each individual “dot” in our halftone pattern. It transitions from semi-transparent black (stop-opacity:0.5) at 5% from the center to fully transparent black (stop-opacity:0) at the edge (100% radius). This creates a soft-edged, circular spot. Visualizing the Circle Pattern: Step 2: The Circle Pattern – A Grid of Soft Dots Next, we use a element to repeat our radial gradient in a grid. The pattern tile is 20×20 units (width="20" height="20"). Inside this tile, we place a circle of radius 10 (r="10") at the center (cx="10" cy="10"), filling it with the radial gradient we just defined (fill="url(#radialBlackToTransparent)"). patternUnits="userSpaceOnUse" means the width and height are absolute coordinate values. Visualizing the CSS Dotted Background Circle Pattern Step 3: The Linear Gradient – The Intensity Mask Now, we define a . This gradient will control the overall intensity or density of the halftone dots across the image. It transitions vertically (x1="0%" y1="0%" x2="0%" y2="100%") from semi-transparent black (stop-opacity:0.5) at the top to fully transparent black (stop-opacity:0) at the bottom. This gradient will later be multiplied with our dot pattern. Where this gradient is darker, the dots will appear more prominent. ``` Visualizing the Linear Gradient: (adsbygoogle=window.adsbygoogle||[]).push({}); Step 4: Blending the Pattern and Linear GradientThis is where SVG filters () come into play. We need to combine our dot pattern and the linear gradient. Filters operate on image data. So, first, we need to “render” our pattern and linear gradient into image sources that the filter can use. We do this by creating hidden elements filled with them: ```xml Inside the : : Loads the rendered circles pattern as an image input named “circlesInput”. : Loads the rendered linear gradient as an image input named “overlayInput”. : This is the key step. It takes “circlesInput” and “overlayInput” and blends them using the multiply mode. The multiply blend mode multiplies the color channel values of the two inputs. Since both our inputs are shades of black (grayscale) and transparent, multiplying them will result in darker areas where both inputs are dark/opaque, and lighter/transparent areas where either input is light/transparent. Effectively, the linear gradient modulates the opacity of the dots. Dots will be more opaque (and thus appear stronger) where the linear gradient is darker (top), and fainter where the linear gradient is transparent (bottom). ```xml ``` Visualizing the Multiply Blend: (This shows the result of the multiply blend. Notice how the dots are stronger at the top.)Step 5: The Threshold – Creating Hard Dots The blended image from Step 4 still has soft, semi-transparent dots. To

READ ORIGINAL HERE: CSS Dotted Background
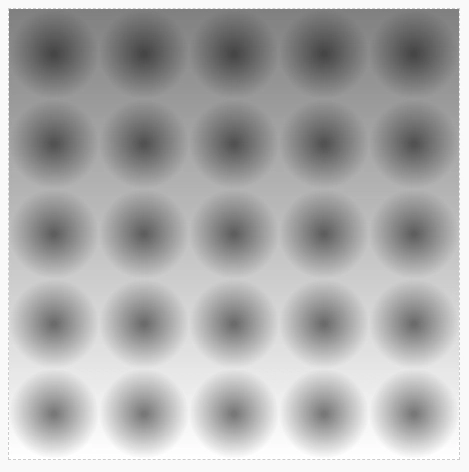
This tutorial breaks down how to create a CSS dotted pattern using SVG to achieve a halftone dotted CSS background. Halftoning is a reprographic technique that simulates continuous-tone imagery through the use of a dotted grid background, varying in size or spacing to generate a gradient-like effect. We’ll create this dot background CSS effect by combining gradients, patterns, and SVG filters to craft a stunning dots background CSS.
The Full SVG Code (for Reference)
Important: The main SVG element in the code above is styled to be hidden (
style="position:absolute; top:-9999px; left:-9999px; opacity:0; pointer-events:none;"). This is because its sole purpose is to define the filter components (gradients, patterns, and the filter itself). The actual visual effect will be applied to a separate HTML element using CSS:filter: url(#blendAndThresholdFilter).
Creating a dotted CSS background is a common design requirement, ranging from simple repeating dots background CSS to more complex visual effects. For a basic dotted grid background, CSS offers straightforward solutions using background-image with radial-gradient and background-repeat. You can easily generate a uniform css dotted pattern this way, giving your elements a clean, geometric look. This approach is excellent for static, repeating dot background css where all dots are of the same size and spacing.
However, achieving a true halftone effect—where dot sizes vary to simulate a gradient or an image’s tonal values—presents a greater challenge with pure dotted CSS. While CSS has powerful gradient and masking capabilities, dynamically varying the size of individual dots in a grid based on an underlying intensity map (as true halftone requires) pushes the boundaries of what’s easily manageable with CSS alone. The complexity arises in making each “dot” in the background dots CSS individually responsive to a larger gradient or image pattern.
Let’s Break It Down: Step by Step
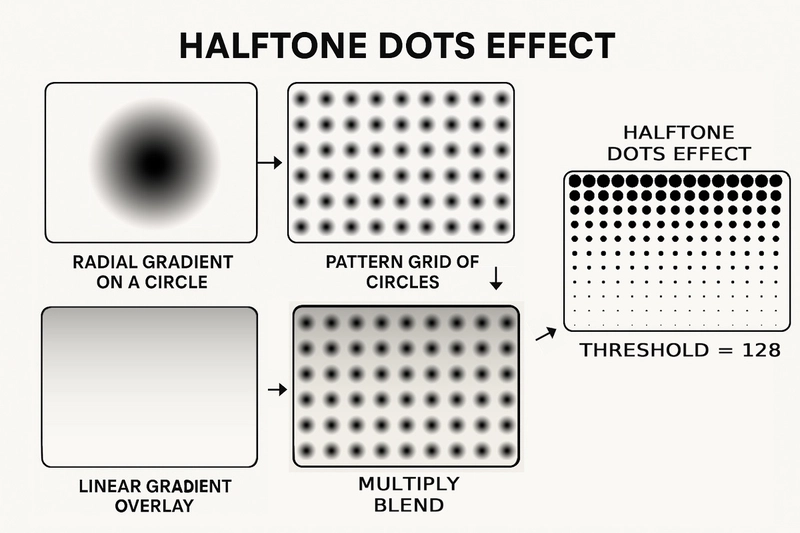
Step 1: The Radial Gradient – A Single Soft Dot
First, we define a stop-opacity:0.5) at 5% from the center to fully transparent black (stop-opacity:0) at the edge (100% radius). This creates a soft-edged, circular spot.
 id="radialBlackToTransparent" cx="50%" cy="50%" r="50%" fx="50%" fy="50%">
   offset="5%" style="stop-color:black; stop-opacity:0.5" />
   offset="100%" style="stop-color:black; stop-opacity:0" />
Visualizing the Circle Pattern:
Step 2: The Circle Pattern – A Grid of Soft Dots
Next, we use a element to repeat our radial gradient in a grid. The pattern tile is 20×20 units (width="20" height="20"). Inside this tile, we place a circle of radius 10 (r="10") at the center (cx="10" cy="10"), filling it with the radial gradient we just defined (fill="url(#radialBlackToTransparent)"). patternUnits="userSpaceOnUse" means the width and height are absolute coordinate values.
 id="circlesPattern" x="0" y="0" width="20" height="20" patternUnits="userSpaceOnUse">
   cx="10" cy="10" r="10" fill="url(#radialBlackToTransparent)" />
Visualizing the CSS Dotted Background Circle Pattern

Step 3: The Linear Gradient – The Intensity Mask
Now, we define a x1="0%" y1="0%" x2="0%" y2="100%") from semi-transparent black (stop-opacity:0.5) at the top to fully transparent black (stop-opacity:0) at the bottom. This gradient will later be multiplied with our dot pattern. Where this gradient is darker, the dots will appear more prominent.
<linearGradient id="linearBlackToTransparent" x1="0%" y1="0%" x2="0%" y2="100%">
<stop offset="0%" style="stop-color:black; stop-opacity:0.5" />
<stop offset="100%" style="stop-color:black; stop-opacity:0" />
</linearGradient>```
style="text-align: center;">Visualizing the Linear Gradient: loading="lazy" decoding="async" class="aligncenter size-full wp-image-4762" src="https://www.coding-dude.com/wp/wp-content/uploads/2025/05/css-linear-gradient-pattern.png" alt="css linear gradient pattern" width="471" height="441" srcset="https://www.coding-dude.com/wp/wp-content/uploads/2025/05/css-linear-gradient-pattern.png 471w, https://www.coding-dude.com/wp/wp-content/uploads/2025/05/css-linear-gradient-pattern-300x281.png 300w" sizes="(max-width: 471px) 100vw, 471px"> class="9db0862b9cf2e44f8d962262c5a80491" data-index="2" style="float: none; margin:10px 0 10px 0; text-align:center;"> async="" src="//pagead2.googlesyndication.com/pagead/js/adsbygoogle.js">
class="adsbygoogle" style="display:block" data-ad-client="ca-pub-3421619882899259" data-ad-slot="9789071689" data-ad-format="auto">
Step 4: Blending the Pattern and Linear Gradient
This is where SVG filters (<filter>) come into play. We need to combine our dot pattern and the linear gradient. Filters operate on image data. So, first, we need to “render” our pattern and linear gradient into image sources that the filter can use. We do this by creating hidden elements filled with them:
```xml
<rect id="circlesSourceLayer" width="100%" height="100%" fill="url(#circlesPattern)" />
<rect id="overlaySourceLayer" width="100%" height="100%" fill="url(#linearBlackToTransparent)" />
Inside the
-
-
-
multiplymode.- The
multiplyblend mode multiplies the color channel values of the two inputs. - Since both our inputs are shades of black (grayscale) and transparent, multiplying them will result in darker areas where both inputs are dark/opaque, and lighter/transparent areas where either input is light/transparent.
- Effectively, the linear gradient modulates the opacity of the dots. Dots will be more opaque (and thus appear stronger) where the linear gradient is darker (top), and fainter where the linear gradient is transparent (bottom).
- The
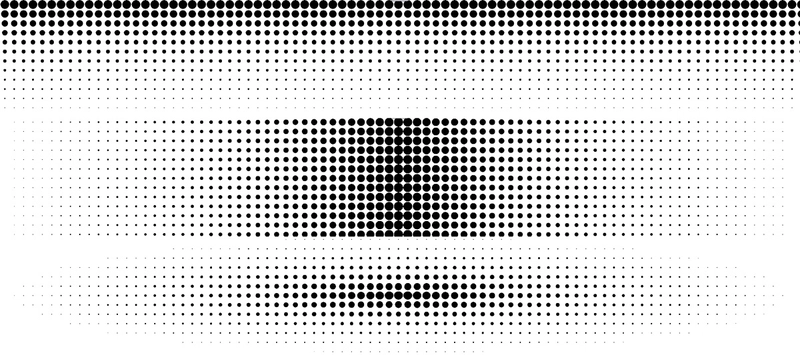
Visualizing the Multiply Blend:
 (This shows the result of the multiply blend. Notice how the dots are stronger at the top.)
Step 5: The Threshold – Creating Hard Dots
The blended image from Step 4 still has soft, semi-transparent dots. To get the classic halftone look, we need to convert these soft dots into hard-edged, fully opaque (or fully transparent) dots. This is done using a threshold operation. We use to achieve this. The matrix provided:
values="
  1 0 0 0 0
  0 1 0 0 0
  0 0 1 0 0
  0 0 0 255 -128"
This matrix operates on the RGBA (Red, Green, Blue, Alpha) channels of each pixel from the “multiplied” result. Let’s look at the rows:
- R’ = 1*R + 0*G + 0*B + 0*A + 0 (Red channel remains unchanged)
- G’ = 0*R + 1*G + 0*B + 0*A + 0 (Green channel remains unchanged)
- B’ = 0*R + 0*G + 1*B + 0*A + 0 (Blue channel remains unchanged)
- A’ = 0*R + 0*G + 0*B + 255*A – 128 (Alpha channel is transformed)
The critical part is the alpha channel transformation: A_new = 255 * A_old - 128. (Note: A_old is typically normalized 0-1, so it’s actually more like `A_new_normalized = (255 * A_old_normalized – 128) / 255`). What this effectively does:
- If a pixel’s original alpha (A_old) value (from the “multiplied” image) is greater than 0.5 (or 128 when scaled to 0-255 range), then
255*A_old - 128will be a positive value, resulting in an opaque pixel (A_new will be clamped to 1, or 255). - If a pixel’s original alpha is less than or equal to 0.5, then
255*A_old - 128will be zero or negative, resulting in a transparent pixel (A_new will be clamped to 0).
So, any pixel with an opacity greater than 50% becomes fully opaque black (since R,G,B were black), and any pixel with opacity 50% or less becomes fully transparent. This creates the hard-edged dots characteristic of halftone.
<feColorMatrix type="matrix"
  values="
    1 0 0 0 0
    0 1 0 0 0
    0 0 1 0 0
    0 0 0 255 -128"
  result="thresholded" />
The visual for this step is essentially the final result, as it’s the last operation in the filter chain.
For these more sophisticated halftone effects, developers often look beyond basic CSS or combine it with other technologies like SVG, as we’ve explored.
If you’re looking for ready-made solutions or tools to help, a halftone generator can be an excellent resource for quickly creating custom patterns.
Understanding the principles behind a halftone gradient is also crucial for a deeper appreciation of the effect, and for high-quality, scalable results, exploring vector halftone techniques is highly recommended.
These resources can complement your CSS efforts, especially when aiming for dynamic and detailed halftone dotted backgrounds. Alternatively, there are high quality premade halftone pattern Photoshop addons that you can download for free online.
Putting It All Together: The Filter Chain Diagram
Here’s a diagram showing how these elements combine within the SVG filter to create the CSS dotted background halftone effect:
The filterUnits="userSpaceOnUse" attribute on the element means that all coordinates and lengths within the filter are interpreted in the current user coordinate system (the coordinate system of the element the filter is applied to). The x="0" y="0" width="100%" height="100%" on the and elements define the region to which the filter effect applies and from which the images are sourced, relative to the target element’s bounding box.
If you take a close look at how the SVG filter is composed, you will notice that you can change the halftone dotted background effect by changing the linear gradient. Change the direction, add different stops or even switch to a radial gradient and you will get different halftone effects.
The Final Result
The defined SVG id="blendAndThresholdFilter" can then be applied to any HTML element using the CSS filter property. For example, . The content of the div will be replaced by the output of the SVG filter.
In the provided code snippet at the top of the tutorial, the main
element is hidden. It only serves as a container for the. The actual effect is shown by applying the filter to the
Live Demo of the Final Effect: