


![[The AI Show Episode 143]: ChatGPT Revenue Surge, New AGI Timelines, Amazon’s AI Agent, Claude for Education, Model Context Protocol & LLMs Pass the Turing Test](https://www.marketingaiinstitute.com/hubfs/ep%20143%20cover.png)


![From drop-out to software architect with Jason Lengstorf [Podcast #167]](https://cdn.hashnode.com/res/hashnode/image/upload/v1743796461357/f3d19cd7-e6f5-4d7c-8bfc-eb974bc8da68.png?#)


![QA - Best methods for getting large amount of test data into event consuming applications generated from an API application [closed]](https://cdn.sstatic.net/Sites/softwareengineering/Img/apple-touch-icon@2.png?v=1ef7363febba)


-11.11.2024-4-49-screenshot.png?width=1920&height=1920&fit=bounds&quality=70&format=jpg&auto=webp#)


_jvphoto_Alamy.jpg?#)


.png?#)


![Apple Debuts Official Trailer for 'Murderbot' [Video]](https://www.iclarified.com/images/news/96972/96972/96972-640.jpg)
![Alleged Case for Rumored iPhone 17 Pro Surfaces Online [Image]](https://www.iclarified.com/images/news/96969/96969/96969-640.jpg)

![Apple Rushes Five Planes of iPhones to US Ahead of New Tariffs [Report]](https://www.iclarified.com/images/news/96967/96967/96967-640.jpg)


Create User-Friendly Contact Forms with HTML: A Beginner's Guide
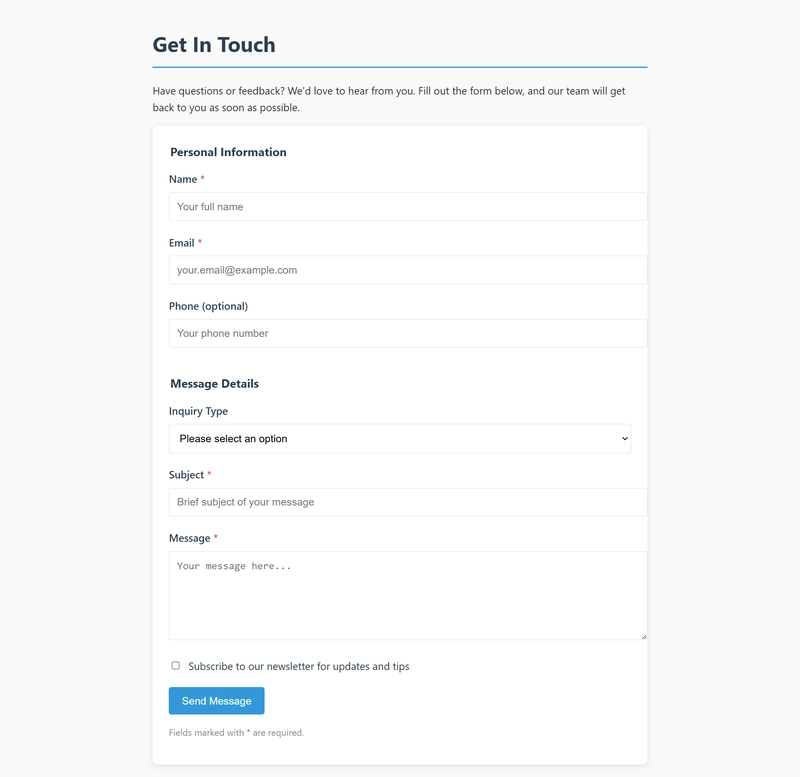
Introduction Have you ever wondered how websites collect visitor information through those neat contact forms? Whether it's a simple feedback form or a comprehensive job application, HTML forms are the backbone of interactive web experiences. In this guide, we'll walk through creating your very own contact form from scratch—no previous coding experience required! By the end of this tutorial, you'll have built a fully functional contact form and gained an understanding of the essential HTML elements that make forms work. So let's dive in and start building! What Are HTML Forms? At their core, HTML forms are the primary way websites collect information from visitors. Every time you fill out an online survey, submit a comment on a blog, or make an online purchase, you're interacting with an HTML form. The Basic Structure All HTML forms are built using the element, which serves as a container for various input elements: Submit Let's break down the key attributes: action: Specifies where the form data should be sent when submitted method: Defines how the data is sent (usually get or post) Planning Your Contact Form Before writing any code, let's decide what information we want to collect. A typical contact form includes: Name Email address Subject Message Submit button We might also want to include optional fields like phone number or a dropdown for the type of inquiry. Building the Form Step by Step Let's create our contact form piece by piece: Step 1: Set Up the Basic Form Structure First, we'll create the container for our form: Contact Us Contact Us Send Message The action="#" is a placeholder. In a real website, this would be replaced with the URL of a server-side script that processes the form data. Step 2: Add Text Input Fields Now, let's add input fields for name, email, and subject: Name: Email: Subject: Send Message Step 3: Add a Textarea for the Message The message requires a multi-line input field, so we'll use a element: Message: Step 4: Add a Dropdown Menu for Inquiry Type Let's add a dropdown menu to categorize the type of inquiry: Inquiry Type: General Question Technical Support Billing Issue Other Step 5: Add a Checkbox for Newsletter Subscription We can also add a checkbox to ask if the user wants to subscribe to a newsletter: Subscribe to our newsletter The Complete Contact Form Putting it all together, here's our complete contact form: Contact Us /* Basic styling to make the form look better */ body { font-family: Arial, sans-serif; line-height: 1.6; max-width: 600px; margin: 0 auto; padding: 20px; } form div { margin-bottom: 15px; } label { display: block; margin-bottom: 5px; } input[type="text"], input[type="email"], select, textarea { width: 100%; padding: 8px; border: 1px solid #ddd; border-radius: 4px; } button { background-color: #4CAF50; color: white; padding: 10px 15px; border: none; border-radius: 4px; cursor: pointer; } button:hover { background-color: #45a049; } Contact Us Please fill out this form to get in touch with our team. We'll respond as soon as possible! Name: Email: Phone (optional): Inquiry Type: General Question Technical Support Billing Issue Other Subject: Message: Subscribe to our newsletter Send Message I've added some basic CSS styling to make the form look better, but the functionality comes from the HTML elements. Understanding Form Input Types HTML5 introduced several specialized input types that make forms more user-friendly and validate data automatically: Text Inputs Other Input Types Form Validation HTML5 provides built-in form validation through attributes: Required Fields The required attribute ensures the user fills out a field before submittin
Introduction
Have you ever wondered how websites collect visitor information through those neat contact forms? Whether it's a simple feedback form or a comprehensive job application, HTML forms are the backbone of interactive web experiences. In this guide, we'll walk through creating your very own contact form from scratch—no previous coding experience required!
By the end of this tutorial, you'll have built a fully functional contact form and gained an understanding of the essential HTML elements that make forms work. So let's dive in and start building!
What Are HTML Forms?
At their core, HTML forms are the primary way websites collect information from visitors. Every time you fill out an online survey, submit a comment on a blog, or make an online purchase, you're interacting with an HTML form.
The Basic Structure
All HTML forms are built using the element, which serves as a container for various input elements:
 action="/submit-form" method="post">

     type="submit">Submit
Let's break down the key attributes:
-
action: Specifies where the form data should be sent when submitted -
method: Defines how the data is sent (usuallygetorpost)
Planning Your Contact Form
Before writing any code, let's decide what information we want to collect. A typical contact form includes:
- Name
- Email address
- Subject
- Message
- Submit button
We might also want to include optional fields like phone number or a dropdown for the type of inquiry.
Building the Form Step by Step
Let's create our contact form piece by piece:
Step 1: Set Up the Basic Form Structure
First, we'll create the container for our form:
 lang="en">

     charset="UTF-8">
     name="viewport" content="width=device-width, initial-scale=1.0">
    </span>Contact Us<span class="nt">


    Contact Us

     action="#" method="post">


         type="submit">Send Message