


![[The AI Show Episode 146]: Rise of “AI-First” Companies, AI Job Disruption, GPT-4o Update Gets Rolled Back, How Big Consulting Firms Use AI, and Meta AI App](https://www.marketingaiinstitute.com/hubfs/ep%20146%20cover.png)


![Ditching a Microsoft Job to Enter Startup Purgatory with Lonewolf Engineer Sam Crombie [Podcast #171]](https://cdn.hashnode.com/res/hashnode/image/upload/v1746753508177/0cd57f66-fdb0-4972-b285-1443a7db39fc.png?#)


-xl.jpg)


![As Galaxy Watch prepares a major change, which smartwatch design to you prefer? [Poll]](https://i0.wp.com/9to5google.com/wp-content/uploads/sites/4/2024/07/Galaxy-Watch-Ultra-and-Apple-Watch-Ultra-1.jpg?resize=1200%2C628&quality=82&strip=all&ssl=1)


![Beats Studio Buds + On Sale for $99.95 [Lowest Price Ever]](https://www.iclarified.com/images/news/96983/96983/96983-640.jpg)

![New iPad 11 (A16) On Sale for Just $277.78! [Lowest Price Ever]](https://www.iclarified.com/images/news/97273/97273/97273-640.jpg)


![Apple's 11th Gen iPad Drops to New Low Price of $277.78 on Amazon [Updated]](https://images.macrumors.com/t/yQCVe42SNCzUyF04yj1XYLHG5FM=/2500x/article-new/2025/03/11th-gen-ipad-orange.jpeg)


![[Exclusive] Infinix GT DynaVue: a Prototype that could change everything!](https://www.gizchina.com/wp-content/uploads/images/2025/05/Screen-Shot-2025-05-10-at-16.07.40-PM-copy.png)


![T-Mobile discontinues a free number feature but a paid alternative exists [UPDATED]](https://m-cdn.phonearena.com/images/article/170235-two/T-Mobile-discontinues-a-free-number-feature-but-a-paid-alternative-exists-UPDATED.jpg?#)


A2A Protocol Implementation
The Agent2Agent (A2A) Protocol is gaining popularity in the developer community. In my previous blog, Communication is All You Need, I introduced the A2A protocol and outlined its key features. At its core, A2A enables: Agent Discovery Inter-Agent Communication Before diving into the implementation, let's quickly recap what A2A is all about: A2A is an open protocol that standardizes how agents in a multi-agent framework discover each other, communicate, and collaborate to perform tasks autonomously without human intervention. In this blog, we’ll walk through the implementation of the A2A protocol to understand how agent discovery and communication work in practice. We'll be using Google's official A2A demo repository for our setup and examples. Prerequisites Install UV Google API Key Implementation There are two parts in the implementation. Just like how every website has a frontend and backend running on different servers with the frontend passing user queries to the backend, A2A follows a similar model. In A2A: We first run an agent (similar to a backend server) that becomes discoverable by an A2A client (similar to a frontend interface). To implement and experiment with the A2A protocol, we'll use Google’s official A2A repository. Clone it from here: git clone https://github.com/google/A2A.git cd A2A Hello world agent Before diving into complex implementations, let’s test a simple “Hello World” agent to check if everything is set up correctly. Location: A2A/a2a-python-sdk/examples/helloworld A) Navigate to the directory cd a2a-python-sdk/examples/helloworld B) Run the main script This deploys the agent card and serves incoming requests on port 9999 (or another port if 9999 is in use): uv run main.py This will: Download required dependencies Run the agent on port 9999 C) Access the deployed agent Open your browser and go to: http://localhost:9000 You will see details about the deployed agent like below: { "authentication": { "schemes": [ "public" ] }, "capabilities": {}, "defaultInputModes": [ "text" ], "defaultOutputModes": [ "text" ], "description": "Just a hello world agent", "name": "Hello World Agent", "skills": [ { "description": "just returns hello world", "examples": [ "hi", "hello world" ], "id": "hello_world", "name": "Returns hello world", "tags": [ "hello world" ] } ], "url": "http://localhost:9999/", "version": "1.0.0" } D) Test the agent with test_client.py Open a new terminal and: cd a2a-python-sdk/examples/helloworld uv run test_client.py You will receive responses like: {'id': '1793ca2bc70045a5a458b75f2dea2b5c', 'jsonrpc': '2.0', 'result': {'messageId': '873a4f05-1220-430c-984e-610cbe16d4b6', 'parts': [{'text': 'Hello World', 'type': 'text'}], 'role': 'agent'}} Received an instance of Message, getTask and cancelTask are not applicable for invocation {'id': '33565729ffb344f29c946523437a1ef1', 'jsonrpc': '2.0', 'result': {'final': False, 'messageId': 'ed73f6bf-0dee-45a9-b921-9d4341603941', 'parts': [{'text': 'Hello ', 'type': 'text'}], 'role': 'agent'}} {'id': '33565729ffb344f29c946523437a1ef1', 'jsonrpc': '2.0', 'result': {'final': True, 'messageId': 'e9fed38b-3a8e-45a2-9836-4781a7d7f2a1', 'parts': [{'text': 'World', 'type': 'text'}], 'role': 'agent'}} On the agent terminal, you'll observe: INFO: 127.0.0.1:51504 - "GET /.well-known/agent.json HTTP/1.1" 200 OK INFO: 127.0.0.1:51504 - "POST / HTTP/1.1" 200 OK INFO: 127.0.0.1:51504 - "POST / HTTP/1.1" 200 OK What happened behind the scenes ? As discussed in the previous blog, during Agent Discovory: When test_client.py runs, it first fetches the agent's metadata at GET /.well-known/agent.json (similar to OpenID Connect authentication protocol). After discovering the agent and its capabilities, it sends a query: how much is 10 USD in INR?, defined here in the source. It sends two requests with the same question: First expects a single JSON output. Second expects a streamed output. The Hello World agent, configured to always return "Hello World", replies accordingly: Single Response: { "id": "1793ca2bc70045a5a458b75f2dea2b5c", "jsonrpc": "2.0", "result": { "messageId": "873a4f05-1220-430c-984e-610cbe16d4b6", "parts": [{"text": "Hello World", "type": "text"}], "role": "agent" } } Streamed Response: { "id": "33565729ffb344f29c946523437a1ef1", "jsonrpc": "2.0", "result": { "final": False, "messageId": "ed73f6bf-0dee-45a9-b921-9d4341603941", "parts": [{"text": "Hello ", "type": "text"}], "role": "agent" } } { "id": "33565729ff

The Agent2Agent (A2A) Protocol is gaining popularity in the developer community. In my previous blog, Communication is All You Need, I introduced the A2A protocol and outlined its key features. At its core, A2A enables:
- Agent Discovery
- Inter-Agent Communication
Before diving into the implementation, let's quickly recap what A2A is all about:
A2A is an open protocol that standardizes how agents in a multi-agent framework discover each other, communicate, and collaborate to perform tasks autonomously without human intervention.
In this blog, we’ll walk through the implementation of the A2A protocol to understand how agent discovery and communication work in practice.
We'll be using Google's official A2A demo repository for our setup and examples.
Prerequisites
Implementation
There are two parts in the implementation. Just like how every website has a frontend and backend running on different servers with the frontend passing user queries to the backend, A2A follows a similar model.
In A2A:
- We first run an agent (similar to a backend server) that becomes discoverable by an A2A client (similar to a frontend interface).
To implement and experiment with the A2A protocol, we'll use Google’s official A2A repository. Clone it from here:
git clone https://github.com/google/A2A.git
cd A2A
Hello world agent
Before diving into complex implementations, let’s test a simple “Hello World” agent to check if everything is set up correctly.
Location: A2A/a2a-python-sdk/examples/helloworld
A) Navigate to the directory
cd a2a-python-sdk/examples/helloworld
B) Run the main script
This deploys the agent card and serves incoming requests on port 9999 (or another port if 9999 is in use):
uv run main.py
This will:
- Download required dependencies
- Run the agent on port 9999
C) Access the deployed agent
Open your browser and go to:
http://localhost:9000
You will see details about the deployed agent like below:
{
    "authentication": {
        "schemes": [
            "public"
        ]
    },
    "capabilities": {},
    "defaultInputModes": [
        "text"
    ],
    "defaultOutputModes": [
        "text"
    ],
    "description": "Just a hello world agent",
    "name": "Hello World Agent",
    "skills": [
        {
            "description": "just returns hello world",
            "examples": [
                "hi",
                "hello world"
            ],
            "id": "hello_world",
            "name": "Returns hello world",
            "tags": [
                "hello world"
            ]
        }
    ],
    "url": "http://localhost:9999/",
    "version": "1.0.0"
}
D) Test the agent with test_client.py
- Open a new terminal and:
cd a2a-python-sdk/examples/helloworld
uv run test_client.py
- You will receive responses like:
{'id': '1793ca2bc70045a5a458b75f2dea2b5c', 'jsonrpc': '2.0', 'result': {'messageId': '873a4f05-1220-430c-984e-610cbe16d4b6', 'parts': [{'text': 'Hello World', 'type': 'text'}], 'role': 'agent'}}

Received an instance of Message, getTask and cancelTask are not applicable for invocation

{'id': '33565729ffb344f29c946523437a1ef1', 'jsonrpc': '2.0', 'result': {'final': False, 'messageId': 'ed73f6bf-0dee-45a9-b921-9d4341603941', 'parts': [{'text': 'Hello ', 'type': 'text'}], 'role': 'agent'}}
{'id': '33565729ffb344f29c946523437a1ef1', 'jsonrpc': '2.0', 'result': {'final': True, 'messageId': 'e9fed38b-3a8e-45a2-9836-4781a7d7f2a1', 'parts': [{'text': 'World', 'type': 'text'}], 'role': 'agent'}}
- On the agent terminal, you'll observe:
INFO:     127.0.0.1:51504 - "GET /.well-known/agent.json HTTP/1.1" 200 OK
INFO:     127.0.0.1:51504 - "POST / HTTP/1.1" 200 OK
INFO:     127.0.0.1:51504 - "POST / HTTP/1.1" 200 OK
What happened behind the scenes ?
- As discussed in the previous blog, during Agent Discovory:
When test_client.py runs, it first fetches the agent's metadata at
GET /.well-known/agent.json(similar to OpenID Connect authentication protocol).After discovering the agent and its capabilities, it sends a query:
how much is 10 USD in INR?, defined here in the source.-
It sends two requests with the same question:
- First expects a single JSON output.
- Second expects a streamed output.
The Hello World agent, configured to always return "Hello World", replies accordingly:
Single Response:
{
  "id": "1793ca2bc70045a5a458b75f2dea2b5c",
  "jsonrpc": "2.0",
  "result": {
    "messageId": "873a4f05-1220-430c-984e-610cbe16d4b6",
    "parts": [{"text": "Hello World", "type": "text"}],
    "role": "agent"
  }
}
Streamed Response:
{
  "id": "33565729ffb344f29c946523437a1ef1",
  "jsonrpc": "2.0",
  "result": {
    "final": False,
    "messageId": "ed73f6bf-0dee-45a9-b921-9d4341603941",
    "parts": [{"text": "Hello ", "type": "text"}],
    "role": "agent"
  }
}
{
  "id": "33565729ffb344f29c946523437a1ef1",
  "jsonrpc": "2.0",
  "result": {
    "final": True,
    "messageId": "e9fed38b-3a8e-45a2-9836-4781a7d7f2a1",
    "parts": [{"text": "World", "type": "text"}],
    "role": "agent"
  }
}
In shot, How A2A Architecture Works ?
- Deploy the agent, making it available at:
https:///.well-known/agent.json - Discover the agent and retrieve its metadata & capabilities.
- Query the agent based on its exposed skills.
Langgraph agent for currency change
This agent is designed to convert currency from one unit to another. To do this, it requires a GOOGLE_API_KEY to access the necessary APIs.
- Close both the terminal, and start a new one.
A) Navigate to the directory
a2a-python-sdk/examples/langgraph
B) Set Up the API Key
Save your GOOGLE_API_KEY to a .env file:
echo "GOOGLE_API_KEY=your-api-key" > .env
C) Run the Currency Agent
Now, start the agent on the default port (10000) by running:
uv run __main__.py
D) Test the Agent
In a new terminal, run the test_client.py to send predefined queries to the currency agent:
uv run test_client.py
- You will see response like below for client:
Connecting to agent at http://localhost:10000...
Connection successful.
--- Single Turn Request Response ---
{"id":...

---Query Task---
--- Query Task Response ---
{"id":...

--- Single Turn Streaming Request ---
--- Streaming Chunk ---
{"id":...

--- Multi-Turn Request ---
--- Multi-Turn: First Turn Response ---
{"id":...

--- Multi-Turn: Second Turn (Input Required) ---
--- Multi-Turn: Second Turn Response ---
{"id":..
- On the agent terminal, you'll observe:
INFO:     ::1:53855 - "GET /.well-known/agent.json HTTP/1.1" 200 OK
INFO:     ::1:53855 - "POST / HTTP/1.1" 200 OK
INFO:     ::1:53855 - "POST / HTTP/1.1" 200 OK
INFO:     ::1:53855 - "POST / HTTP/1.1" 200 OK
INFO:     ::1:53855 - "POST / HTTP/1.1" 200 OK
INFO:     ::1:53855 - "POST / HTTP/1.1" 200 OK
Multi-Turn Request Flow
One interesting aspect is the Multi-Turn Request process. For example:
-
The query
how much is 100 USD?is sent, but since the target currency isn't specified, the agent responds with:"Please specify which currency you would like to convert to. For example, you can say 'how much is 100 USD in EUR?'"
-
You respond with
in GBP, and the agent asks for further clarification:"Could you please specify which currency you would like to convert from and to? I also need to know the date for the exchange rate you want to use. If you want the latest exchange rate, just say 'latest'."
Note: The
test_client.pydoes not continue this conversation by default. You can extend this behavior by modifying therun_multi_turn_testfunction in the script.
We have seen how to access agents from the CLI and run predefined queries. But what if you want to query the agents on your own? In this guide, we will explore how to query agents using the UI present in the repository at A2A/demo/ui folder. The UI allows you to interact with the agents before deploying them to production.
UI for Agent2Agent Protocol
The UI allows you to test agents locally before they are deployed. However, there's a caveat: the UI does not automatically detect running agents. You need to manually register the agents you wish to interact with via the agents page.
- To get started, close all the opened terminals.
A) Change Directory to UI
cd demo/ui
B) Set Up the API Key
Save your GOOGLE_API_KEY to a .env file:
echo "GOOGLE_API_KEY=your-api-key" > .env
C) Run the Agents
Before starting the UI, run the agents you wish to query to avoid connection errors. The agents are located inside A2A/samples/python/agents/ directory.
For this demo, we will use the following agents:
- Hello World Agent:
A2A/a2a-python-sdk/examples/helloworld - Currency Exchange Agent:
A2A/a2a-python-sdk/examples/langgraph - Expense Reimbursement Agent:
A2A/samples/python/agents/google_adk
Run each agent in a separate terminal using the following command:
uv run .py
Note : If you are not using a Mac, you might experience UI lag due to polling frequency. Follow the steps below to improve the responsiveness of the UI.
D) Start the UI
uv run main.py
This will launch the UI on port 12000. Visit the following URL to access the UI: http://localhost:12000 or http://0.0.0.0:12000
E) Resolving UI Lag on Non-Mac Systems
If the UI is unresponsive, this is likely due to the polling frequency set to 1 second by default. To fix this:
- Once the UI loads, click on the "Disable" button at the top-right corner to disable auto-refresh. This will stop the polling and reduce the lag.
- Wait for the polling to stop, as seen in the terminal.
Note : If you navigate between pages using the URL directly, the polling frequency will reset. Always navigate using the UI to keep the polling frequency at the correct rate.
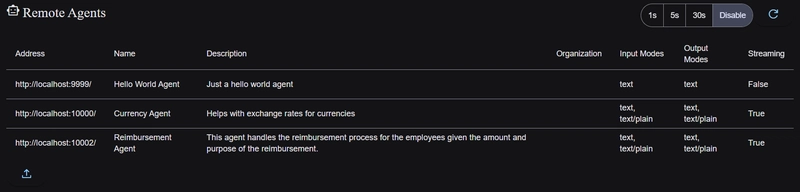
F) Register Agents to the UI
Since the UI does not automatically discover running agents, you will need to manually register them.
- Visit the "agents" tab from the sidebar.
- Add a new agent by inserting the URL where it is listening, for example:
- Register all agents you want to interact with.
G) Interact with Agents
Head to the "conversation" tab to start interacting with the registered agents.
- Start a new conversation and send a query to an agent.
- The UI will automatically refresh after each query, but since polling is disabled, you need to manually refresh the page to see the response.

- Here's an example of interacting with the Currency Exchange Rate Agent:
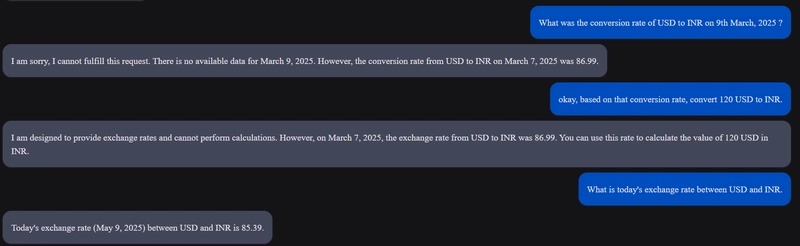
- The real magic of the Agent-to-Agent Protocol happens in the terminal, where the main agent delegates tasks to sub-agents and returns the results when they are available.
Conclusion
In this blog, we explored how to interact with agents using the Agent-to-Agent (A2A) Protocol, both through CLI and the UI. We demonstrated how to set up agents, run predefined queries, and use the UI to manually register and communicate with agents, allowing for seamless interaction. By understanding and leveraging the A2A Protocol, you can easily integrate multiple agents to work together and streamline complex tasks. This opens up new possibilities for building robust, scalable agent-based systems for various use cases.


