


![[The AI Show Episode 143]: ChatGPT Revenue Surge, New AGI Timelines, Amazon’s AI Agent, Claude for Education, Model Context Protocol & LLMs Pass the Turing Test](https://www.marketingaiinstitute.com/hubfs/ep%20143%20cover.png)


.png?width=1920&height=1920&fit=bounds&quality=70&format=jpg&auto=webp#)


.png?#)


.webp?#)


![[Fixed] Gemini app is failing to generate Audio Overviews](https://i0.wp.com/9to5google.com/wp-content/uploads/sites/4/2025/03/Gemini-Audio-Overview-cover.jpg?resize=1200%2C628&quality=82&strip=all&ssl=1)

![What’s new in Android’s April 2025 Google System Updates [U: 4/14]](https://i0.wp.com/9to5google.com/wp-content/uploads/sites/4/2025/01/google-play-services-3.jpg?resize=1200%2C628&quality=82&strip=all&ssl=1)


![Apple Seeds tvOS 18.5 Beta 2 to Developers [Download]](https://www.iclarified.com/images/news/97011/97011/97011-640.jpg)
![Apple Releases macOS Sequoia 15.5 Beta 2 to Developers [Download]](https://www.iclarified.com/images/news/97014/97014/97014-640.jpg)


Managing EC2 Instances with the AWS CLI
As a Cloud or DevOps engineer, proficiency and automation are key to managing a cloud infrastructure. While the AWS Management Console is visually appealing and user-friendly, if there is a high workload it may get cumbersome managing dozens or more of instances. The AWS CLI is a great tool for managing AWS Services directly from the command line. In this article, I’ll walk you through how to manage EC2 instances using the AWS CLI. We’ll cover commands to launch, list, and terminate instances, explain their syntax, and discuss why CLI management is a valuable for your workflow. Index Why use the AWS CLI Instead of the Management Console? 1. Set Up AWS CLI on Amazon Linux 2. Launch and EC2 Instance 3. List All EC2 Instances 4. Delete or Terminate an EC2 Instance 5. Business Use Case: CLI Over Console 6. Summary Why use the AWS CLI Instead of the Management Console? While the AWS Management Console is great for small workloads, as the cloud environment scales, using AWS CLI has significant advantages: Efficiency: Perform complex actions in seconds, without navigating through multiple console screens. Automation: Easily integrate CLI commands into scripts for tasks that need to be repeated. Scalability: Manage multiple resources at once, like starting or stopping dozens of instances with a single command. Flexibility: Access AWS from anywhere with a terminal, and there is no need to rely on a web interface. 1. Set Up AWS CLI on Amazon Linux Before diving into the EC2 commands, ensure that AWS CLI is installed and configured on your Amazon Linux machine. Install AWS CLI Amazon Linux generally comes with AWS CLI pre-installed. If not, you can install it: Configure AWS CLI After installation, configure your AWS credentials: You'll need to provide: AWS Access Key ID AWS Secret Access Key Default region (e.g., use-east-1) Output format (none) 2. Launch an EC2 Instance Start off by launching a new EC2 instance Command: aws ec2 run-instances --image-id ami-00c1e19c6845d02f0 --count 1 --instance-type t2.micro --key-name us-east-kp6 --security-group-ids sg-00df97ec3b4d8bc5f --subnet-id subnet-0386d618164fbad2f --tag-specifications 'ResourceType=instance,Tags=[{Key=Name,Value=WebServer1}]' For this command, you will need the AMI image id, key pair, security group id and the subnet id. You can get these from an existing EC2 instance or you can run these commands in the AWS CLI: aws ec2 describe-images --owners amazon --filters "Name=name,Values=amzn2-ami-hvm-*" --query "Images[*].[ImageId,Name]" --output table aws ec2 describe-security-groups --query "SecurityGroups[*].[GroupId,GroupName]" --output table aws ec2 describe-subnets --query "Subnets[*][SubnetId,AvailabilityZone]" --output table Explanation: --image-id: The AMI ID to use for the instance. Replace AMI ID with your desired AMI. --count: The number of instances to launch (set to 1 for a single instance). --instance-type: The instance type (e.g., t2.micro for general-purpose usage). --key-name: The name of your key pair for SSH access. --security-group-ids: The security group(s) to associate with the instance. --subnet-id: The subnet where the instance will be launched. --tag-specifications: Assign tags to the instance (e.g., Name=MyInstance). Assigning tags to instances is important because if you are working with multiple servers, tagging makes it easy to search for an instance. Use Case: You’re provisioning a new web server or application instance and need it up and running quickly. This command handles everything from specifying the AMI to tagging the instance for easy identification. 3. List All EC2 Instances After launching instances, you can review what's running on your account using the command below: Command: aws ec2 describe-instances --query "Reservations[*].Instances[*].[InstanceId,State.Name,Tags[?Key=='Name'].Value|[0]]" --output table Explanation: --describe-instances: Retrieves details of all EC2 instances. --query: Filters and formats the output to show Instance ID, state, and name tag. --output: Specifies the format for output (table is used here for readability) Use Case: This command gives you a summary of all your instances, and also to check their status. 4. Delete or Terminate an EC2 Instance When an instance is no longer needed, terminate it to save costs. Command: aws ec2 terminate-instances --instance-ids i-0123456789abcdef0 Explanation: --terminate-instances: Permanently deletes the specified instance(s). --instance-ids: The ID of the instance you want to terminate. Replace instance ID in the command with the actual instance ID. Use Case: You’ve created a temporary testing environment and now need to clean it up. Terminating instances ensures you’re not billed unnecessarily. 5. Business Use Case: CLI Over Console Here's why DevOps engineers love the AWS CLI for managing EC2 instances: Faster Provisioning: Scripts

As a Cloud or DevOps engineer, proficiency and automation are key to managing a cloud infrastructure. While the AWS Management Console is visually appealing and user-friendly, if there is a high workload it may get cumbersome managing dozens or more of instances. The AWS CLI is a great tool for managing AWS Services directly from the command line.
In this article, I’ll walk you through how to manage EC2 instances using the AWS CLI. We’ll cover commands to launch, list, and terminate instances, explain their syntax, and discuss why CLI management is a valuable for your workflow.
Index
- Why use the AWS CLI Instead of the Management Console?
1. Set Up AWS CLI on Amazon Linux
2. Launch and EC2 Instance
3. List All EC2 Instances
4. Delete or Terminate an EC2 Instance
5. Business Use Case: CLI Over Console
6. Summary
Why use the AWS CLI Instead of the Management Console?
While the AWS Management Console is great for small workloads, as the cloud environment scales, using AWS CLI has significant advantages:
Efficiency: Perform complex actions in seconds, without navigating through multiple console screens.
Automation: Easily integrate CLI commands into scripts for tasks that need to be repeated.
Scalability: Manage multiple resources at once, like starting or stopping dozens of instances with a single command.
Flexibility: Access AWS from anywhere with a terminal, and there is no need to rely on a web interface.
1. Set Up AWS CLI on Amazon Linux
Before diving into the EC2 commands, ensure that AWS CLI is installed and configured on your Amazon Linux machine.
Install AWS CLI
Amazon Linux generally comes with AWS CLI pre-installed. If not, you can install it:
Configure AWS CLI
After installation, configure your AWS credentials:

You'll need to provide:
- AWS Access Key ID
- AWS Secret Access Key
- Default region (e.g., use-east-1)
- Output format (none)
2. Launch an EC2 Instance
Start off by launching a new EC2 instance
Command:
aws ec2 run-instances --image-id ami-00c1e19c6845d02f0 --count 1 --instance-type t2.micro --key-name us-east-kp6 --security-group-ids sg-00df97ec3b4d8bc5f --subnet-id subnet-0386d618164fbad2f --tag-specifications 'ResourceType=instance,Tags=[{Key=Name,Value=WebServer1}]'
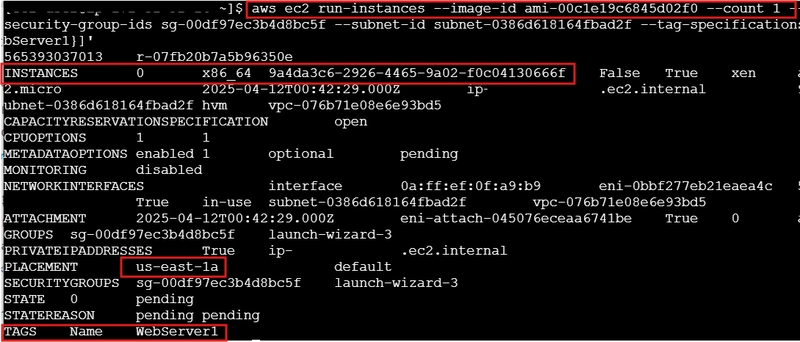
For this command, you will need the AMI image id, key pair, security group id and the subnet id. You can get these from an existing EC2 instance or you can run these commands in the AWS CLI:
aws ec2 describe-images --owners amazon --filters "Name=name,Values=amzn2-ami-hvm-*" --query "Images[*].[ImageId,Name]" --output tableaws ec2 describe-security-groups --query "SecurityGroups[*].[GroupId,GroupName]" --output tableaws ec2 describe-subnets --query "Subnets[*][SubnetId,AvailabilityZone]" --output table
Explanation:
--image-id: The AMI ID to use for the instance. Replace AMI ID with your desired AMI.
--count: The number of instances to launch (set to 1 for a single instance).
--instance-type: The instance type (e.g., t2.micro for general-purpose usage).
--key-name: The name of your key pair for SSH access.
--security-group-ids: The security group(s) to associate with the instance.
--subnet-id: The subnet where the instance will be launched.
--tag-specifications: Assign tags to the instance (e.g., Name=MyInstance).
Assigning tags to instances is important because if you are working with multiple servers, tagging makes it easy to search for an instance.
Use Case:
You’re provisioning a new web server or application instance and need it up and running quickly. This command handles everything from specifying the AMI to tagging the instance for easy identification.
3. List All EC2 Instances
After launching instances, you can review what's running on your account using the command below:
Command:
aws ec2 describe-instances --query "Reservations[*].Instances[*].[InstanceId,State.Name,Tags[?Key=='Name'].Value|[0]]" --output table

Explanation:
--describe-instances: Retrieves details of all EC2 instances.
--query: Filters and formats the output to show Instance ID, state, and name tag.
--output: Specifies the format for output (table is used here for readability)
Use Case:
This command gives you a summary of all your instances, and also to check their status.
4. Delete or Terminate an EC2 Instance
When an instance is no longer needed, terminate it to save costs.
Command:
aws ec2 terminate-instances --instance-ids i-0123456789abcdef0

Explanation:
--terminate-instances: Permanently deletes the specified instance(s).
--instance-ids: The ID of the instance you want to terminate. Replace instance ID in the command with the actual instance ID.
Use Case:
You’ve created a temporary testing environment and now need to clean it up. Terminating instances ensures you’re not billed unnecessarily.
5. Business Use Case: CLI Over Console
Here's why DevOps engineers love the AWS CLI for managing EC2 instances:
Faster Provisioning: Scripts can be used to launch multiple instances at once, saving hours compared to the manual console process.
Automation: Integrate CLI commands into CI/CD pipelines for automated deployments.
Cost Optimization: Quickly identify and terminate idle or underutilized instances, helping businesses save on AWS costs.
Consistency: Scripts ensure repeatable, error-free infrastructure deployment.
Imagine a scenario where your team needs to deploy a testing environment with 10 instances. A script can be written that launches them in seconds. Another script terminates them when done, saving time, reducing errors, and simplifying the workflow of the DevOps engineer.
6. Summary
Managing EC2 instances via the AWS CLI is a must-have skill for DevOps engineers. Not only does it streamline repetitive tasks, but it also opens the door to powerful automation. With commands like run-instances, describe-instances, and terminate-instances, you can manage your infrastructure more effectively while minimizing costs and errors.
Connect with me on LinkedIn to comment or share your experiences with using the AWS CLI.
#30DaysLinuxChallenge #RedHatEnterpriseLinux
#CloudWhistler #CloudEngineer #Linux
#DevOps #RedHat #OpenSource
#CloudComputing #WomenInTech