


![[The AI Show Episode 144]: ChatGPT’s New Memory, Shopify CEO’s Leaked “AI First” Memo, Google Cloud Next Releases, o3 and o4-mini Coming Soon & Llama 4’s Rocky Launch](https://www.marketingaiinstitute.com/hubfs/ep%20144%20cover.png)


.jpg?#)


_NicoElNino_Alamy.png?width=1280&auto=webp&quality=80&disable=upscale#)


![Apple Shares New Ad for iPhone 16: 'Trust Issues' [Video]](https://www.iclarified.com/images/news/97125/97125/97125-640.jpg)

![At Least Three iPhone 17 Models to Feature 12GB RAM [Kuo]](https://www.iclarified.com/images/news/97122/97122/97122-640.jpg)


Install Red Hat Developer Hub with AI Software Templates on OpenShift
As AI-based applications become increasingly prevalent, organizations are seeking ways to standardize and accelerate the development of intelligent software. Red Hat Developer Hub (RHDH), built on Backstage, offers internal developer platforms that make this possible through a curated experience. With the addition of AI Software Templates, RHDH provides a structured approach to bootstrapping AI-driven applications with minimal manual effort. This blog explores what AI Software Templates are, how to install them, using the redhat-ai-dev/ai-rhdh-installer, with OpenShift GitOps, Pipelines, and specifically on an OpenShift cluster. What are Software Templates? Software Templates in RHDH are YAML-defined blueprints that scaffold entire projects, including: Source code repositories GitOps repositories CI/CD pipelines (e.g., Tekton) Deployment configurations Templates use the Backstage Scaffolder engine and can be customized to support different languages, frameworks, or domains. What are AI Software Templates? AI Software Templates are specialized software templates that: Scaffold AI-based applications (e.g., RAG chatbots, audio-to-text models, object detection apps) Integrate LLM inference servers like llama.cpp and vLLM Include GitOps support for deploying to OpenShift Use Tekton pipelines for building and deploying containerized AI services Connect with vector databases like ChromaDB These templates are fully integrated into the RHDH UI via the "Create" menu, offering a guided experience for users to generate ready-to-deploy AI apps. Architecture Overview At a high level: The user selects an AI Template via the RHDH UI. Parameters are collected (e.g., GitHub repo, model server choice). The template executes steps like: fetch:template, publish:github, catalog:register, and argocd:create-resources. Two repositories are created: the app source and GitOps manifests. Apps are deployed via Argo CD and managed through GitOps flows. Prerequisites Before getting started, ensure you have the following: A running OpenShift 4.15+ cluster Access to the OpenShift web console and oc CLI A GitHub Organization where you can install GitHub Apps A Quay.io account (optional, for image publishing) Helm installed: brew install helm or from https://helm.sh yq v4+ installed (see note below) Note: The installer requires yq v4+, but Fedora/RHEL may ship yq v3. Use this to install v4+: sudo curl -L https://github.com/mikefarah/yq/releases/latest/download/yq_linux_amd64 -o /usr/bin/yq sudo chmod +x /usr/bin/yq Clone the AI Installer Repo git clone https://github.com/redhat-ai-dev/ai-rhdh-installer.git cd ai-rhdh-installer Create a GitHub App for RHDH RHDH integrates with GitHub via a GitHub App. Follow APP-SETUP.md or these summarized steps: Go to GitHub Developer Settings => GitHub Apps Click "New GitHub App" Use these values: Callback URL: https:///api/auth/github/handler/frame Webhook URL: same as above Permissions: Contents: Read & write Issues: Read & write Metadata: Read-only Webhooks: Read & write Subscribe to events: push, pull_request Save and generate a private key (.pem file) In your GitHub App settings, under "General", make sure: Request user authorization (OAuth) is checked Create private.env with Secrets Copy the template: cp default-private.env private.env Fill it with your secrets (escape PEM with \n): export GITHUB__APP__ID='123456' export GITHUB__APP__CLIENT__ID='Iv1...' export GITHUB__APP__CLIENT__SECRET='...' export GITHUB__APP__WEBHOOK__URL='https:///api/auth/github/handler/frame' export GITHUB__APP__WEBHOOK__SECRET='secret' export GITHUB__APP__PRIVATE_KEY='-----BEGIN RSA PRIVATE KEY-----\n...' export GITOPS__GIT_TOKEN='ghp_...' # Optional if pushing images export QUAY__DOCKERCONFIGJSON='' export QUAY__API_TOKEN='' You can generate the escaped PEM with: cat your-key.pem awk '{printf "%s\\n", $0}' your-key.pem Then source: source private.env Install RHDH and Dependencies helm upgrade --install ai-rhdh ./chart --namespace ai-rhdh --create-namespace Create a GitOps Repo The installer doesn’t explicitly tell you this, but you must create a GitOps repo manually for Argo CD and RHDH integration to work. Create it in your GitHub org: https://github.com//rhdh-ai-gitops Then, create the required secret in OpenShift: oc create secret generic rhdh-argocd-secret \ --from-literal=url=https://github.com//rhdh-ai-gitops \ --from-literal=token=$GITOPS__GIT_TOKEN \ -n ai-rhdh Edit your argocd-config ConfigMap: oc edit configmap argocd-config -n ai-rhdh Replace the URL line with your actual Argo CD route and remember to have applied the token, for example: argocd: username: ${ARGOCD_USER} password: ${ARGOCD_PASSWORD} waitCycles: 25 appLocatorMethods: - ty
As AI-based applications become increasingly prevalent, organizations are seeking ways to standardize and accelerate the development of intelligent software. Red Hat Developer Hub (RHDH), built on Backstage, offers internal developer platforms that make this possible through a curated experience. With the addition of AI Software Templates, RHDH provides a structured approach to bootstrapping AI-driven applications with minimal manual effort.
This blog explores what AI Software Templates are, how to install them, using the redhat-ai-dev/ai-rhdh-installer, with OpenShift GitOps, Pipelines, and specifically on an OpenShift cluster.
What are Software Templates?
Software Templates in RHDH are YAML-defined blueprints that scaffold entire projects, including:
- Source code repositories
- GitOps repositories
- CI/CD pipelines (e.g., Tekton)
- Deployment configurations
Templates use the Backstage Scaffolder engine and can be customized to support different languages, frameworks, or domains.
What are AI Software Templates?
AI Software Templates are specialized software templates that:
- Scaffold AI-based applications (e.g., RAG chatbots, audio-to-text models, object detection apps)
- Integrate LLM inference servers like
llama.cppandvLLM - Include GitOps support for deploying to OpenShift
- Use Tekton pipelines for building and deploying containerized AI services
- Connect with vector databases like ChromaDB
These templates are fully integrated into the RHDH UI via the "Create" menu, offering a guided experience for users to generate ready-to-deploy AI apps.
Architecture Overview
At a high level:
- The user selects an AI Template via the RHDH UI.
- Parameters are collected (e.g., GitHub repo, model server choice).
-
The template executes steps like:
fetch:template,publish:github,catalog:register, andargocd:create-resources. - Two repositories are created: the app source and GitOps manifests.
- Apps are deployed via Argo CD and managed through GitOps flows.
Prerequisites
Before getting started, ensure you have the following:
- A running OpenShift 4.15+ cluster
- Access to the OpenShift web console and oc CLI
- A GitHub Organization where you can install GitHub Apps
- A Quay.io account (optional, for image publishing)
- Helm installed: brew install helm or from https://helm.sh
- yq v4+ installed (see note below)
Note: The installer requires yq v4+, but Fedora/RHEL may ship yq v3. Use this to install v4+:
sudo curl -L https://github.com/mikefarah/yq/releases/latest/download/yq_linux_amd64 -o /usr/bin/yq
sudo chmod +x /usr/bin/yq
Clone the AI Installer Repo
git clone https://github.com/redhat-ai-dev/ai-rhdh-installer.git
cd ai-rhdh-installer
Create a GitHub App for RHDH
RHDH integrates with GitHub via a GitHub App. Follow APP-SETUP.md or these summarized steps:
- Go to GitHub Developer Settings => GitHub Apps
- Click "New GitHub App"
- Use these values:
- Callback URL: https://
/api/auth/github/handler/frame - Webhook URL: same as above
- Permissions:
- Contents: Read & write
- Issues: Read & write
- Metadata: Read-only
- Webhooks: Read & write
- Subscribe to events: push, pull_request
- Callback URL: https://
- Save and generate a private key (.pem file)
In your GitHub App settings, under "General", make sure: Request user authorization (OAuth) is checked
Create private.env with Secrets
Copy the template:
cp default-private.env private.env
Fill it with your secrets (escape PEM with \n):
export GITHUB__APP__ID='123456'
export GITHUB__APP__CLIENT__ID='Iv1...'
export GITHUB__APP__CLIENT__SECRET='...'
export GITHUB__APP__WEBHOOK__URL='https:///api/auth/github/handler/frame'
export GITHUB__APP__WEBHOOK__SECRET='secret'
export GITHUB__APP__PRIVATE_KEY='-----BEGIN RSA PRIVATE KEY-----\n...'

export GITOPS__GIT_TOKEN='ghp_...'

# Optional if pushing images
export QUAY__DOCKERCONFIGJSON=''
export QUAY__API_TOKEN=''
You can generate the escaped PEM with:
cat your-key.pem
awk '{printf "%s\\n", $0}' your-key.pem
Then source:
source private.env
Install RHDH and Dependencies
helm upgrade --install ai-rhdh ./chart --namespace ai-rhdh --create-namespace
Create a GitOps Repo
The installer doesn’t explicitly tell you this, but you must create a GitOps repo manually for Argo CD and RHDH integration to work.
Create it in your GitHub org:
https://github.com//rhdh-ai-gitops
Then, create the required secret in OpenShift:
oc create secret generic rhdh-argocd-secret \
  --from-literal=url=https://github.com//rhdh-ai-gitops \
  --from-literal=token=$GITOPS__GIT_TOKEN \
  -n ai-rhdh
Edit your argocd-config ConfigMap:
oc edit configmap argocd-config -n ai-rhdh
Replace the URL line with your actual Argo CD route and remember to have applied the token, for example:
argocd:
  username: ${ARGOCD_USER}
  password: ${ARGOCD_PASSWORD}
  waitCycles: 25
  appLocatorMethods:
    - type: 'config'
      instances:
        - name: default
          url: https://ai-rhdh-argocd-server-ai-rhdh.apps.ci-ln-4x2hc1b-72292.origin-ci-int-gce.dev.rhcloud.com
          token: ${ARGOCD_API_TOKEN}
Configure developer-hub-app-config??
Ensure the following is added to your ConfigMap (e.g. developer-hub-app-config):
app-config.extra.yaml: |-
  app:
    baseUrl: https://

  backend:
    baseUrl: https://
    cors:
      origin: https://

  auth:
    environment: production
    providers:
      github:
        production:
          clientId: ${GITHUB__APP__CLIENT__ID}
          clientSecret: ${GITHUB__APP__CLIENT__SECRET}
          signIn:
            resolver:
              githubUserId:
                resolver: github
Remember to add your github token for example:
integrations:
  github:
    - host: github.com
      token: ${GITHUB_TOKEN}
Create a GitHub App Secret and Inject it
source private.env

oc create secret generic backstage-env-ai-rh-developer-hub \
  --from-literal=GITHUB__APP__ID=$GITHUB__APP__ID \
  --from-literal=GITHUB__APP__CLIENT__ID=$GITHUB__APP__CLIENT__ID \
  --from-literal=GITHUB__APP__CLIENT__SECRET=$GITHUB__APP__CLIENT__SECRET \
  --from-literal=GITHUB__APP__WEBHOOK__SECRET=$GITHUB__APP__WEBHOOK__SECRET \
  --from-literal=GITHUB__APP__WEBHOOK__URL=$GITHUB__APP__WEBHOOK__URL \
  --from-literal=GITHUB__APP__PRIVATE_KEY="$GITHUB__APP__PRIVATE_KEY" \
  --from-literal=GITOPS__GIT_TOKEN="$GITOPS__GIT_TOKEN" \
  --dry-run=client -o yaml | oc apply -f - -n ai-rhdh

oc set env deployment/backstage-ai-rh-developer-hub \
  --from=secret/backstage-env-ai-rh-developer-hub -n ai-rhdh

# Restart Backstage deployment:
oc rollout restart deployment/backstage-ai-rh-developer-hub -n ai-rhdh
Run the Configuration Script
source private.env
bash ./configure.sh
This script configures:
- Argo CD connection
- Tekton Pipelines + Chains
- GitHub integration for auth + GitOps
- RHDH environment variables and plugins
Restart RHDH Deployment (if login fails)
If you see this error:
No auth provider registered for 'github'
Restart the RHDH pod to pick up the config:
oc rollout restart deployment/backstage-ai-rh-developer-hub -n ai-rhdh
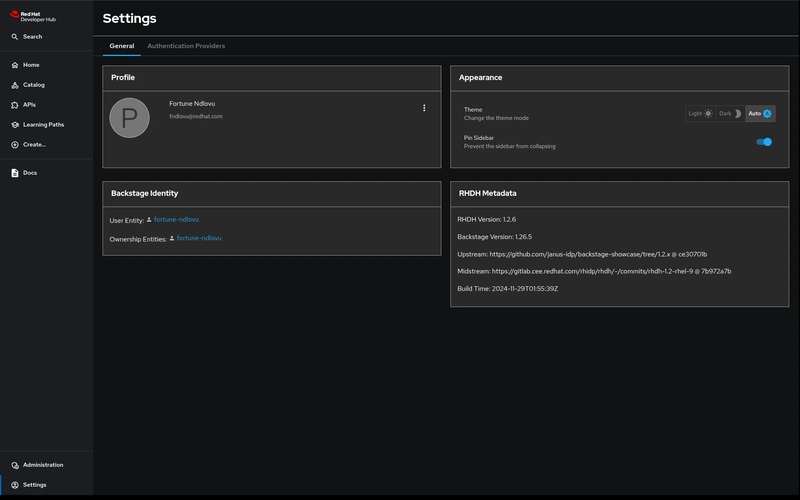
Log in and Use the Portal
Open your RHDH route URL and log in via GitHub.
Let’s Register Existing AI Templates
Now that we are logged in with GitHub navigate to ‘Create’ and register an existing component. Using this url:
https://github.com/redhat-ai-dev/ai-lab-template/blob/release-v0.9.x/all.yaml
When a user selects "Register an existing component" in the Red Hat Developer Hub UI and enters the all.yaml catalog link (https://github.com/redhat-ai-dev/ai-lab-template/blob/release-v0.9.x/all.yaml), the following steps are executed behind the scenes:
1. Catalog Processor Kicks In
RHDH uses Backstage’s Software Catalog processors to analyze the contents of the provided YAML URL.
- It scans
all.yaml, which is a composite entity containing multipleLocationentries pointing to individual template files:-
template:rag -
template:chatbot -
template:object-detection - etc.
-
2. Each Location is Followed
For each Location entry, RHDH:
- Resolves the GitHub raw URL
- Fetches and parses the individual
template.yamlfiles (e.g.,templates/rag/template.yaml) - Validates that they conform to the
Templatekind spec (scaffolder.backstage.io/v1beta3)
3. Entities are Previewed
The UI shows a preview of the discovered entities before import:
- All valid templates are listed
- Users confirm and click Import
4. Entities Are Registered in the Catalog
Once imported:
- Each
template.yamlbecomes a first-class Catalog entity of kindTemplate - They appear under the Create menu
- Templates are tagged and categorized using their
metadata.tagsandspec.type
5. Templates Are Now Usable
Developers can now:
- Click Create > Choose Template
- Fill out the dynamic UI form (built from the
parametersin the YAML) - Execute the full scaffolding + GitOps pipeline defined in
steps
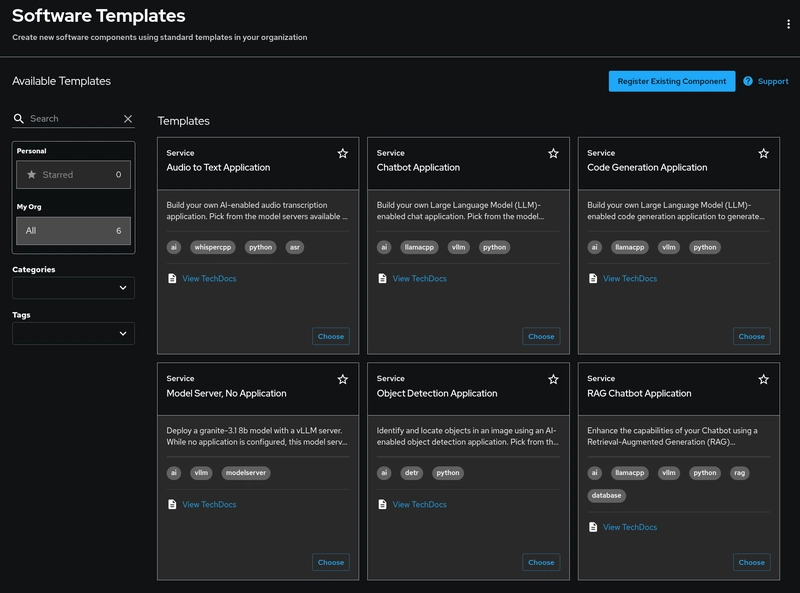
Once the Ai templates are registered and visible in your RHDH UI, you can, do the following:
Go to Create > Choose Template
Locate and select the RAG Chatbot Application template.
Fill in the Form Fields
You'll be prompted to enter several pieces of information:
Section 1: Application Information
- Name: Unique name for your app (e.g., rag-apr22-25)
- Owner: Owner of the component (e.g., user:guest)
- Model Server: Choose from llama.cpp, vLLM, or Existing model server
- Model Name: (if applicable) select or provide the name of the LLM model (e.g., instructlab/granite-7b-lab)
Section 2: Application Repository Information
- Git host type (GitHub or GitLab)
- Repository owner (GitHub org/user)
- Name of the repo and the default branch
Section 3: Deployment Information
- Image registry and organization
- Image name
- OpenShift namespace to deploy into
- Optionally deploy to OpenShift AI via a checkbox
Click "Next", Review, and Submit
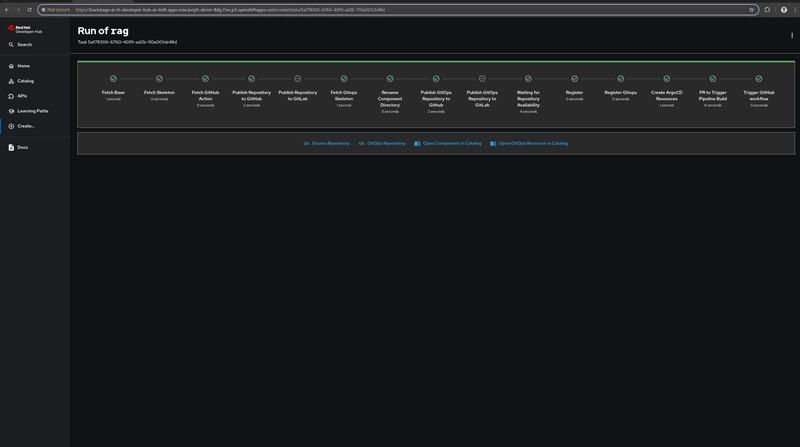
Red Hat Developer Hub orchestrates a powerful sequence of automation behind the scenes. The selected AI Software Template, defined as a Backstage scaffolder YAML, begins executing a series of templated actions: it fetches the base application and GitOps skeleton, publishes the source and GitOps repositories to GitHub (or GitLab), and registers both components into the RHDH Software Catalog. At this point, these entities are now discoverable and manageable via the RHDH UI. Simultaneously, Tekton pipelines are configured to handle application builds, and Argo CD resources are created to continuously deploy the application to OpenShift using GitOps principles. The entire lifecycle from scaffolding and repository creation to deployment and catalog registration is completed in minutes, providing a seamless developer experience with enterprise-grade automation.
Once your AI Software Template has scaffolded the application and deployed it via GitOps, this may take a moment. You can navigate to the CI tab of your catalog component in Red Hat Developer Hub. Here, you’ll see PipelineRuns powered by Tekton:
- These runs clone the source repo
- Build and push the container image
- Update your GitOps repo with the new image reference
You can also view Argo CD syncing the deployment in real time.
In OpenShift, go to the Topology view, find your app, and click its Route. This will open the deployed app in a browser. Try asking the chatbot questions. You may get a vague or inaccurate answer. That’s expected; it hasn’t been taught about the topic in question yet. Upload Custom Knowledge. Ask the same question again. The Chatbot now gives a more accurate, context-aware response.
Additional Resources