


![[The AI Show Episode 144]: ChatGPT’s New Memory, Shopify CEO’s Leaked “AI First” Memo, Google Cloud Next Releases, o3 and o4-mini Coming Soon & Llama 4’s Rocky Launch](https://www.marketingaiinstitute.com/hubfs/ep%20144%20cover.png)


![Architecture for TypeScript backend with multiple entry points or apps [closed]](https://cdn.sstatic.net/Sites/softwareengineering/Img/apple-touch-icon@2.png?v=1ef7363febba)
![Is This Programming Paradigm New? [closed]](https://miro.medium.com/v2/resize:fit:1200/format:webp/1*nKR2930riHA4VC7dLwIuxA.gif)


-Classic-Nintendo-GameCube-games-are-coming-to-Nintendo-Switch-2!-00-00-13.png?width=1920&height=1920&fit=bounds&quality=70&format=jpg&auto=webp#)


![M4 MacBook Air Drops to New All-Time Low of $912 [Deal]](https://www.iclarified.com/images/news/97108/97108/97108-640.jpg)
![New iPhone 17 Dummy Models Surface in Black and White [Images]](https://www.iclarified.com/images/news/97106/97106/97106-640.jpg)


How to Sync Users Logged in by Google and GitHub to Your Database With Neon Auth for Free
Manually keeping your database in sync with external authentication providers can be a complex task. You often need webhooks, extra tables, and custom code just to handle user signups and profile updates. Neon Auth solves this problem by automatically synchronizing user data to your Postgres database in near real-time. No extra code. No fuss. And it's free. Today I want to show you how I used Neon Auth to synchronize users logged in by Google and GitHub to my Postgres database. On my website: antondevtips.com I share .NET and Architecture best practices. Subscribe to my newsletter to improve your .NET skills. Download the source code for this newsletter for free. How Neon Auth Simplifies User Synchronization to the Database When you rely on external providers like Stack Auth for user authentication, you typically face synchronization challenges: Where do you store user data? Manual synchronization methods implementation like webhooks, polling, or login-time sync This process might look as follows: Neon Auth addresses these headaches by linking your authentication provider directly with your Neon PostgreSQL database. As users log in or update their accounts, the changes automatically propagate into your database: no custom code, no separate webhooks needed. Key Benefits: Provision and manage your auth projects from the Neon Console. Automated syncing of user profiles into the neon_auth.users_sync table. Access your user data like any other table: simplifying relationships, queries, and maintenance. With Neon Auth user synchronization is a breeze: Setting Up Neon Auth First, sign in or create your free account in Neon. Follow these steps: Create a project and navigate to the Auth Tab, click on "Setup instructions": Download the sample Next.js Frontend Application you can use for authentication. Open a frontend application in an IDE of your choice (for example, VS Code or Rider). Ensure you have NodeJS 18+ installed. Copy authentication details from the Neon and paste them into the .env.local file: # Stack Auth keys NEXT_PUBLIC_STACK_PROJECT_ID= NEXT_PUBLIC_STACK_PUBLISHABLE_CLIENT_KEY= STACK_SECRET_SERVER_KEY= # For the `neondb_owner` role. DATABASE_URL= Run the following commands in the terminal in the application root directory: npm install npm run dev Open the link http://localhost:3000 link in your web browser, and in a few seconds you will see the following page: Click "Sign Up" button and authorize with either Google or GitHub: After a successful authentication you will see your profile loaded: Navigate to the Neon Console and check the users_sync table: Our setup is ready. How Neon Auth Works When you enable Neon Auth, it creates a dedicated neon_auth schema in your database. In this schema, you'll find a users_sync table that automatically mirrors user profiles from the connected auth provider. The flow looks like this: Users authenticate via Google, GitHub in Stack Auth. The user's profile (ID, email, name, timestamps, etc.) lives in the auth provider. Neon Auth syncs that data into neon_auth.users_sync for you. users_sync table has the following structure: id: Unique ID of the user email: Primary email address name: The user's display name raw_json: Full user profile in JSON created_at: Timestamp of user signup updated_at: Timestamp of user's last update (nullable) deleted_at: Timestamp of user deletion (nullable) Here is the raw JSON from my auth by GitHub: { "id": "[guid_here]", "display_name": "Anton Martyniuk", "has_password": false, "is_anonymous": false, "primary_email": "[email_here]", "selected_team": null, "auth_with_email": false, "client_metadata": null, "oauth_providers": [ { "id": "github", "email": "[email_here]", "account_id": "[id_here]" } ], "server_metadata": null, "otp_auth_enabled": false, "selected_team_id": null, "profile_image_url": "https://avatars.githubusercontent.com/u/[id_here]?v=4", "requires_totp_mfa": false, "signed_up_at_millis": 1111, "passkey_auth_enabled": false, "last_active_at_millis": 1111, "primary_email_verified": true, "client_read_only_metadata": null, "primary_email_auth_enabled": true } As you can see, passwords and other sensitive information is not synced to Neon. These data stay private within Auth providers. With Neon Auth, there's no need to create and manage your own users table or implement webhook handlers for synchronization. Neon Auth simplifies this process by handling user synchronization for you, making it easier to build applications that depend on user data. You can directly reference the neon_auth.users_sync table in your schema and queries, with updates to user profiles automatically reflected, eliminating the need for you to write synchronization code. However, since the neon_auth.users_sync table is updated asynchronously, there may be a slight delay (typicall
Manually keeping your database in sync with external authentication providers can be a complex task.
You often need webhooks, extra tables, and custom code just to handle user signups and profile updates.
Neon Auth solves this problem by automatically synchronizing user data to your Postgres database in near real-time.
No extra code. No fuss. And it's free.
Today I want to show you how I used Neon Auth to synchronize users logged in by Google and GitHub to my Postgres database.
On my website: antondevtips.com I share .NET and Architecture best practices.
Subscribe to my newsletter to improve your .NET skills.
Download the source code for this newsletter for free.
How Neon Auth Simplifies User Synchronization to the Database
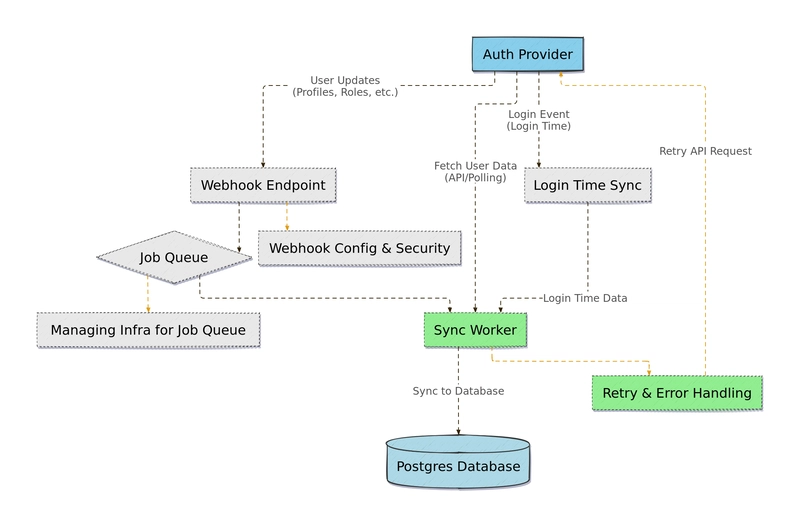
When you rely on external providers like Stack Auth for user authentication, you typically face synchronization challenges:
- Where do you store user data?
- Manual synchronization methods implementation like webhooks, polling, or login-time sync
This process might look as follows:
Neon Auth addresses these headaches by linking your authentication provider directly with your Neon PostgreSQL database.
As users log in or update their accounts, the changes automatically propagate into your database: no custom code, no separate webhooks needed.
Key Benefits:
- Provision and manage your auth projects from the Neon Console.
- Automated syncing of user profiles into the
neon_auth.users_synctable. - Access your user data like any other table: simplifying relationships, queries, and maintenance.
With Neon Auth user synchronization is a breeze:

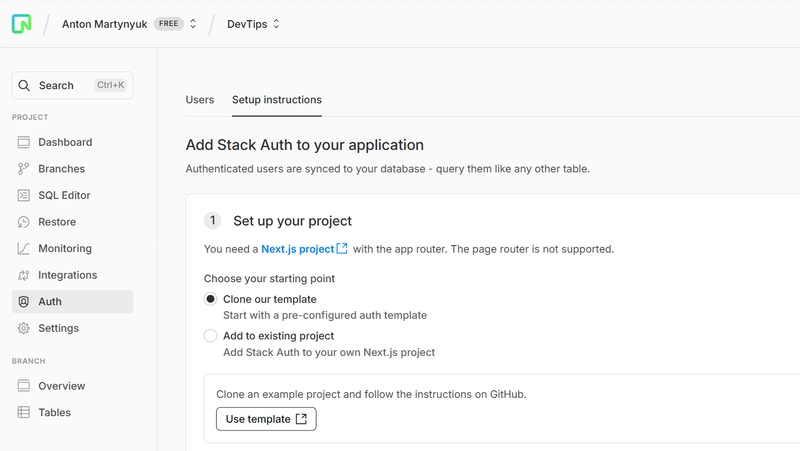
Setting Up Neon Auth
First, sign in or create your free account in Neon.
Follow these steps:
Create a project and navigate to the Auth Tab, click on "Setup instructions":
Download the sample Next.js Frontend Application you can use for authentication.
Open a frontend application in an IDE of your choice (for example, VS Code or Rider). Ensure you have NodeJS 18+ installed.
Copy authentication details from the Neon and paste them into the
.env.localfile:
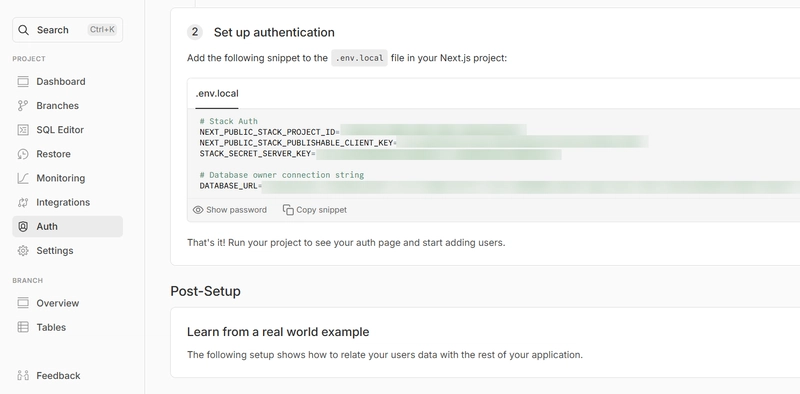
# Stack Auth keys
NEXT_PUBLIC_STACK_PROJECT_ID=
NEXT_PUBLIC_STACK_PUBLISHABLE_CLIENT_KEY=
STACK_SECRET_SERVER_KEY=

# For the `neondb_owner` role.
DATABASE_URL=
- Run the following commands in the terminal in the application root directory:
npm install
npm run dev
Open the link
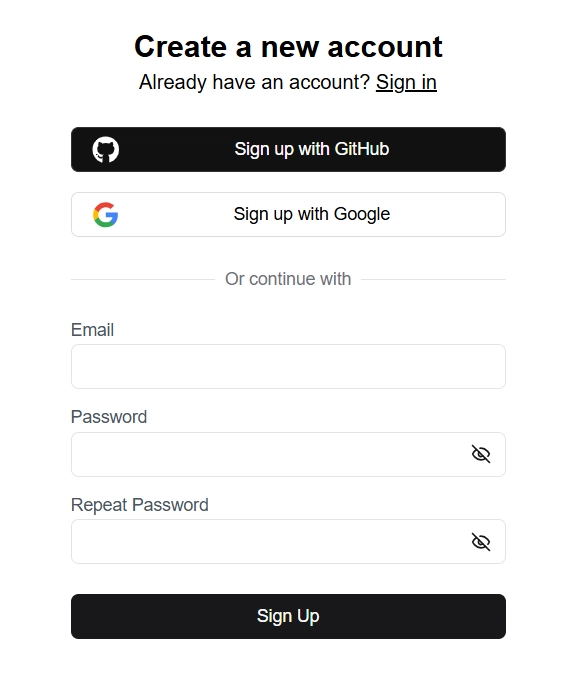
http://localhost:3000link in your web browser, and in a few seconds you will see the following page:

Click "Sign Up" button and authorize with either Google or GitHub:
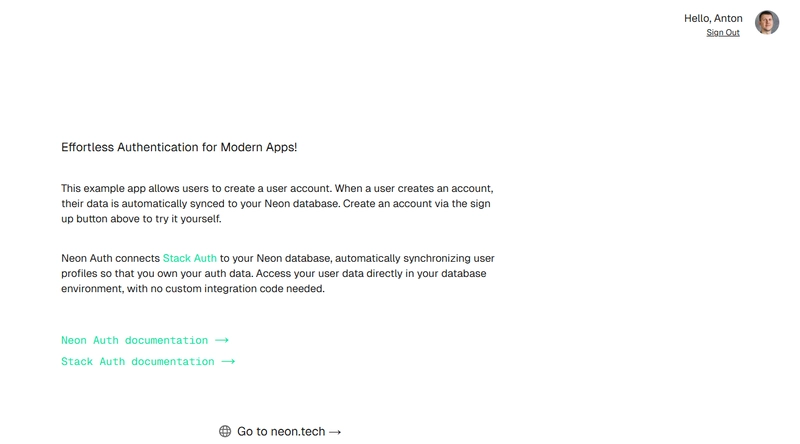
After a successful authentication you will see your profile loaded:
- Navigate to the Neon Console and check the
users_synctable: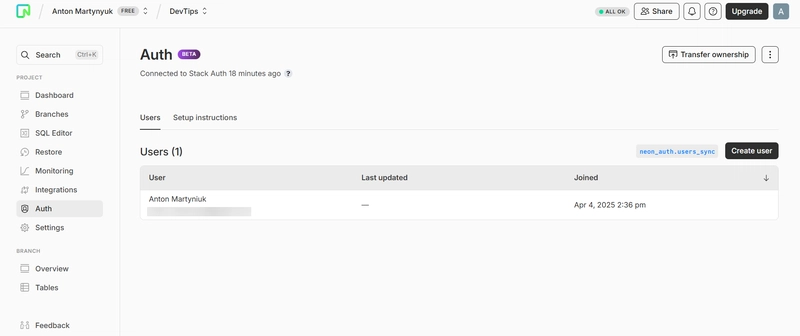
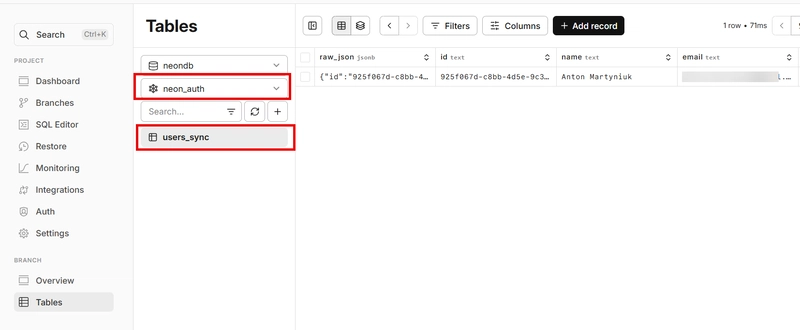
Our setup is ready.
How Neon Auth Works
When you enable Neon Auth, it creates a dedicated neon_auth schema in your database.
In this schema, you'll find a users_sync table that automatically mirrors user profiles from the connected auth provider.
The flow looks like this:
- Users authenticate via Google, GitHub in Stack Auth.
- The user's profile (ID, email, name, timestamps, etc.) lives in the auth provider.
- Neon Auth syncs that data into
neon_auth.users_syncfor you.
users_sync table has the following structure:
- id: Unique ID of the user
- email: Primary email address
- name: The user's display name
- raw_json: Full user profile in JSON
- created_at: Timestamp of user signup
- updated_at: Timestamp of user's last update (nullable)
- deleted_at: Timestamp of user deletion (nullable)
Here is the raw JSON from my auth by GitHub:
{
  "id": "[guid_here]",
  "display_name": "Anton Martyniuk",
  "has_password": false,
  "is_anonymous": false,
  "primary_email": "[email_here]",
  "selected_team": null,
  "auth_with_email": false,
  "client_metadata": null,
  "oauth_providers": [
    {
      "id": "github",
      "email": "[email_here]",
      "account_id": "[id_here]"
    }
  ],
  "server_metadata": null,
  "otp_auth_enabled": false,
  "selected_team_id": null,
  "profile_image_url": "https://avatars.githubusercontent.com/u/[id_here]?v=4",
  "requires_totp_mfa": false,
  "signed_up_at_millis": 1111,
  "passkey_auth_enabled": false,
  "last_active_at_millis": 1111,
  "primary_email_verified": true,
  "client_read_only_metadata": null,
  "primary_email_auth_enabled": true
}
As you can see, passwords and other sensitive information is not synced to Neon.
These data stay private within Auth providers.
With Neon Auth, there's no need to create and manage your own users table or implement webhook handlers for synchronization.
Neon Auth simplifies this process by handling user synchronization for you, making it easier to build applications that depend on user data.
You can directly reference the neon_auth.users_sync table in your schema and queries, with updates to user profiles automatically reflected, eliminating the need for you to write synchronization code.
However, since the neon_auth.users_sync table is updated asynchronously, there may be a slight delay (typically less than 1 second) before a user's data appears in the table.
Keep this delay in mind when deciding whether to use foreign keys in your schema.
Now let's build a .NET Application that works with Neon users.
Building a .NET Application with Neon Users
I have built a Products API web application that has the following entities:
- Product
- ProductCart
- ProductCartItem
This application lets you manage products and create a shopping cart with multiple items.
I want to connect this application with real users.
With Neon Auth providing users it has never been easier.
Let's create a User entity:
public class User
{
    public string Id { get; set; } = string.Empty;
    public string Name { get; set; } = string.Empty;
    public string Email { get; set; } = string.Empty;

    public DateTime? CreatedAt { get; set; }
    public DateTime? UpdatedAt { get; set; }
    public DateTime? DeletedAt { get; set; }

    public string RawJson { get; set; } = string.Empty;
}
Here is how it maps to the users_sync table:
public class UserConfiguration : IEntityTypeConfiguration<User>
{
    public void Configure(EntityTypeBuilder<User> builder)
    {
        builder.ToTable("users_sync", options => options.ExcludeFromMigrations());

        builder.HasKey(u => u.Id);

        builder.Property(u => u.RawJson)
            .IsRequired()
            .HasColumnType("jsonb");

        builder.Property(u => u.Id)
            .HasColumnName("id")
            .IsRequired();

        builder.Property(u => u.Name)
            .HasColumnName("name")
            .IsRequired();

        builder.Property(u => u.Email)
            .HasColumnName("email")
            .IsRequired();

        builder.Property(u => u.CreatedAt)
            .HasColumnName("created_at")
            .IsRequired();

        builder.Property(u => u.UpdatedAt)
            .HasColumnName("updated_at");

        builder.Property(u => u.DeletedAt)
            .HasColumnName("deleted_at");

        builder.Property(u => u.Id)
            .HasMaxLength(255);

        builder.Property(u => u.Email)
            .HasMaxLength(255);

        builder.HasIndex(u => u.Email).IsUnique();
    }
}
Note that I am calling options.ExcludeFromMigrations()) to exclude users entity from migrations as this table is already created by Neon Auth.
I have connected ProductCart entity to the Users:
public class ProductCartConfiguration : IEntityTypeConfiguration<ProductCart>
{
    public void Configure(EntityTypeBuilder<ProductCart> builder)
    {
        builder.HasKey(pc => pc.Id);

        builder.Property(pc => pc.Id)
            .ValueGeneratedOnAdd();

        builder.HasOne(pc => pc.User)
            .WithMany()
            .HasForeignKey(pc => pc.UserId)
            .OnDelete(DeleteBehavior.Cascade);

        builder.Property(pc => pc.CreatedOn);
    }
}
Here is an API endpoints to create a product cart for the online store with our connected user:
POST http://localhost:5001/product-carts
Content-Type: application/json

{
  "userId": "b5efd1d4-f8fa-4cd9-8c9f-2cbb4ea4f165",
  "productCartItems": [
    {
      "productId": "019600db-3612-785a-be46-4ce312597393",
      "quantity": 2
    }
  ]
}
If you want to learn more about Neon Auth - check their documentation.
Summary
Neon Auth revolutionizes how you manage user data from external providers by automatically syncing profiles into your Postgres database.
Rather than coding your own user tables and sync logic, you simply rely on the neon_auth.users_sync table for up-to-date emails, names, IDs, and more.
From there, you can join or reference these user records in your own schema — just like any normal table.
Key Takeaways:
- Saves time and complexity by eliminating manual webhooks and user tables.
- Provides near real-time user synchronization for a consistent view of who's using your app.
- Integrates with the Neon Console for easy provisioning, management, and future expansions.
Want to cut down on your auth integration overhead?
Give Neon Auth a try and see how much simpler life can be when user profiles just sync automatically.
Get started with Neon for free.
Disclaimer: this newsletter is sponsored by Neon.
On my website: antondevtips.com I share .NET and Architecture best practices.
Subscribe to my newsletter to improve your .NET skills.
Download the source code for this newsletter for free.