


![[The AI Show Episode 148]: Microsoft’s Quiet AI Layoffs, US Copyright Office’s Bombshell AI Guidance, 2025 State of Marketing AI Report, and OpenAI Codex](https://www.marketingaiinstitute.com/hubfs/ep%20148%20cover%20%281%29.png)


![[The AI Show Episode 146]: Rise of “AI-First” Companies, AI Job Disruption, GPT-4o Update Gets Rolled Back, How Big Consulting Firms Use AI, and Meta AI App](https://www.marketingaiinstitute.com/hubfs/ep%20146%20cover.png)


![Laid off but not afraid with X-senior Microsoft Dev MacKevin Fey [Podcast #173]](https://cdn.hashnode.com/res/hashnode/image/upload/v1747965474270/ae29dc33-4231-47b2-afd1-689b3785fb79.png?#)


.png?width=1920&height=1920&fit=bounds&quality=70&format=jpg&auto=webp#)


_David_Hall_-Alamy.jpg?width=1280&auto=webp&quality=80&disable=upscale#)
_Andriy_Popov_Alamy_Stock_Photo.jpg?width=1280&auto=webp&quality=80&disable=upscale#)


![Spotify will get a new Android Auto app ‘in the coming months’ with Jam support [Gallery]](https://i0.wp.com/9to5google.com/wp-content/uploads/sites/4/2025/05/spotify-jam-android-auto-4.jpg?resize=1200%2C628&quality=82&strip=all&ssl=1)


![Apple 15-inch M4 MacBook Air On Sale for $1049.99 [Deal]](https://www.iclarified.com/images/news/97419/97419/97419-640.jpg)
![Xiaomi Tops Wearables Market as Apple Slips to Second in Q1 2025 [Chart]](https://www.iclarified.com/images/news/97417/97417/97417-640.jpg)


Automating the generation of Markdown articles with Crosspost
Photo by Alexa Williams on Unsplash Today, it is not a new practice to use Markdown files as a data source for (statically generated) blogs. I use it to write on my blog, powered by Next.js and Vercel. It comes with a number of advantages: 1. Simplicity and Focus: Markdown is easy to read and write. Its minimal syntax lets you focus on content, not formatting, making it perfect for distraction-free writing. 2. Portability: Markdown files are plain text, meaning they’re lightweight, cross-platform, and can be opened or edited with any text editor or version control system. 3. Version Control Friendly: Because Markdown is plain text, it works seamlessly with Git. You can easily track changes, collaborate via pull requests, and roll back edits. 4. Static Site Compatibility: Static site generators like Next.js, Gatsby, Jekyll, and Hugo support Markdown natively, making it ideal for content-driven sites and blogs. 5. Flexible Output: Markdown can be converted to HTML, PDF, DOCX, and more using tools like Pandoc or markdown parsers—great for repurposing content across platforms. Modern blogs powered by static site generators like Next.js, Gatsby, Jekyll, and Hugo often rely on Markdown files for managing content. However, manually writing .md files and committing them to your repo for every blog post can be tedious. That’s where Crosspost’s Webhook integration feature comes in. It enables you to automate the creation of Markdown files from posts you write once, streamlining publishing across your blog and third-party platforms. Understanding the workflow Here’s how I use it: The integration involves setting up a webhook that listens for new content events from Crosspost and providing this webhook’s URL to Crosspost. When a new article is published (or cross-posted) on Crosspost, Crosspost sends out event data to the provided webhook URL. The webhook triggers a function that: 1. Receives the article data: Captures the title, content, and metadata, etc. 2. Generates a Markdown file: Formats the content into Markdown syntax and saves it in your project’s designated folder. 3. Commits to Version Control: Checks out the current branch to a new one, creates and commits the new file to your Git repository while maintaining a history of changes, and automatically opens a new pull request for the new article file. 4. Triggers a site rebuild: If you’re using platforms like Netlify or Vercel, the new commit (and PR) can automatically trigger a site rebuild, giving you a preview of the new article. You can then simply merge the new PR, publishing your new content live. Writing the webhook As I mentioned, my blog is built on Next.js and deployed to Vercel. However, this will work almost the same way with little adjustments to suit your tech stack. To get this to work, you will need some external packages: Octokit: Octokit is GitHub’s official JavaScript/TypeScript client for interacting with the GitHub REST and GraphQL APIs. It allows developers to programmatically manage repositories, issues, pull requests, commits, and more using simple, structured methods. Turndown: Turndown is a JavaScript library that converts HTML into clean, structured Markdown. To install these packages, run the command: yarn add @octokit/rest turndown You will also need to create a GitHub personal access token (PAT) to authorize the creation of the remote branch and pull request. Visit the official documentation to create your PAT and provide the necessary Read and Write permissions. Required permissions for GitHub PATs It is advised to verify webhooks (of any source and type) to make sure they are intended and coming from the right source. Crosspost generates and provides a webhook secret, which can be found on the Webhook integration screen and is subsequently set in the X-Webhook-Signature header of the webhook POST calls. This can be used to confirm the call is actually coming from Crosspost and no one else who knows your webhook endpoint will send unwanted or malicious data to it. Screenshot highlighting the webhook secret from Crosspost Take care to store these highly sensitive tokens securely in a .env file. Never commit sensitive keys to git. The next step is to create a new route handler. In this file, I added the code below: import { Octokit } from '@octokit/rest' import { NextResponse } from 'next/server' import TurndownService from 'turndown' const REPO\_OWNER = 'your\_gh\_username' const REPO\_NAME = 'your\_blog\_repo\_name' const POSTS\_PATH = 'src/content/posts' // or path to your posts directory const GITHUB\_TOKEN = process.env.GITHUB\_TOKEN // your GH PAT, securely written in a .env file function slugify(str: string) { return str .toLowerCase() .replace(/\[^a-z0-9\]+/g, '-') .replace(/^-+|-+$/g, '') .substring(0, 50) } export async function POST(request: Request) { try { // verify webhook signature from Crosspost

Photo by Alexa Williams on Unsplash
Today, it is not a new practice to use Markdown files as a data source for (statically generated) blogs. I use it to write on my blog, powered by Next.js and Vercel.
It comes with a number of advantages:
1. Simplicity and Focus: Markdown is easy to read and write. Its minimal syntax lets you focus on content, not formatting, making it perfect for distraction-free writing.
2. Portability: Markdown files are plain text, meaning they’re lightweight, cross-platform, and can be opened or edited with any text editor or version control system.
3. Version Control Friendly: Because Markdown is plain text, it works seamlessly with Git. You can easily track changes, collaborate via pull requests, and roll back edits.
4. Static Site Compatibility: Static site generators like Next.js, Gatsby, Jekyll, and Hugo support Markdown natively, making it ideal for content-driven sites and blogs.
5. Flexible Output: Markdown can be converted to HTML, PDF, DOCX, and more using tools like Pandoc or markdown parsers—great for repurposing content across platforms.
Modern blogs powered by static site generators like Next.js, Gatsby, Jekyll, and Hugo often rely on Markdown files for managing content. However, manually writing .md files and committing them to your repo for every blog post can be tedious. That’s where Crosspost’s Webhook integration feature comes in. It enables you to automate the creation of Markdown files from posts you write once, streamlining publishing across your blog and third-party platforms.
Understanding the workflow
Here’s how I use it:
The integration involves setting up a webhook that listens for new content events from Crosspost and providing this webhook’s URL to Crosspost. When a new article is published (or cross-posted) on Crosspost, Crosspost sends out event data to the provided webhook URL. The webhook triggers a function that:
1. Receives the article data: Captures the title, content, and metadata, etc.
2. Generates a Markdown file: Formats the content into Markdown syntax and saves it in your project’s designated folder.
3. Commits to Version Control: Checks out the current branch to a new one, creates and commits the new file to your Git repository while maintaining a history of changes, and automatically opens a new pull request for the new article file.
4. Triggers a site rebuild: If you’re using platforms like Netlify or Vercel, the new commit (and PR) can automatically trigger a site rebuild, giving you a preview of the new article. You can then simply merge the new PR, publishing your new content live.
Writing the webhook
As I mentioned, my blog is built on Next.js and deployed to Vercel. However, this will work almost the same way with little adjustments to suit your tech stack.
To get this to work, you will need some external packages:
- Octokit: Octokit is GitHub’s official JavaScript/TypeScript client for interacting with the GitHub REST and GraphQL APIs. It allows developers to programmatically manage repositories, issues, pull requests, commits, and more using simple, structured methods.
- Turndown: Turndown is a JavaScript library that converts HTML into clean, structured Markdown.
To install these packages, run the command:
yarn add @octokit/rest turndown
You will also need to create a GitHub personal access token (PAT) to authorize the creation of the remote branch and pull request. Visit the official documentation to create your PAT and provide the necessary Read and Write permissions.

Required permissions for GitHub PATs
It is advised to verify webhooks (of any source and type) to make sure they are intended and coming from the right source. Crosspost generates and provides a webhook secret, which can be found on the Webhook integration screen and is subsequently set in the X-Webhook-Signature header of the webhook POST calls. This can be used to confirm the call is actually coming from Crosspost and no one else who knows your webhook endpoint will send unwanted or malicious data to it.
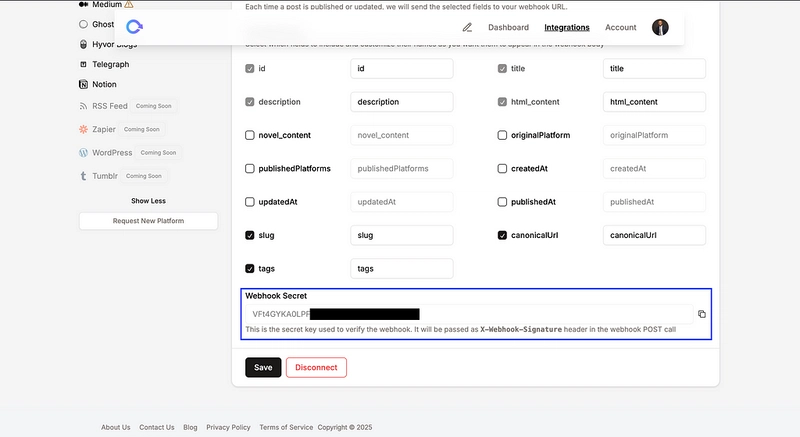
Screenshot highlighting the webhook secret from Crosspost
Take care to store these highly sensitive tokens securely in a .env file. Never commit sensitive keys to git.
The next step is to create a new route handler. In this file, I added the code below:
import { Octokit } from '@octokit/rest'
import { NextResponse } from 'next/server'
import TurndownService from 'turndown'

const REPO\_OWNER = 'your\_gh\_username'
const REPO\_NAME = 'your\_blog\_repo\_name'
const POSTS\_PATH = 'src/content/posts' // or path to your posts directory
const GITHUB\_TOKEN = process.env.GITHUB\_TOKEN // your GH PAT, securely written in a .env file

function slugify(str: string) {
  return str
    .toLowerCase()
    .replace(/\[^a-z0-9\]+/g, '-')
    .replace(/^-+|-+$/g, '')
    .substring(0, 50)
}

export async function POST(request: Request) {
  try {
    // verify webhook signature from Crosspost
    const signature = request.headers.get('X-Webhook-Signature')
    const expectedSignature = process.env.AUTO\_PUBLISH\_WEBOOK\_SECRET // your Crosspost webook verification token
    if (!signature || signature !== expectedSignature) {
      return NextResponse.json({ error: 'Unauthorized' }, { status: 401 })
    }

    const body = await request.json()
    const {
      id,
      title,
      description,
      html\_content,
      publishedAt,
      slug,
      canonicalUrl,
      tags,
    } = body

    if (!title || !html\_content || !slug) {
      throw new Error(
        'One of the following required fields is missing: title, html\_content, slug',
      )
    }

    if (!GITHUB\_TOKEN) {
      throw new Error('Missing Github token in env')
    }

    // Convert HTML to Markdown
    const turndownService = new TurndownService()
    const markdownContent = turndownService.turndown(html\_content)

    // Prepare frontmatter.
    // This may differ from your own frontmatter structure
    const frontmatter = \`---
title: "\"${title.replace(/\"/g, '\"')}\"  "
description: "\"${description ? description.replace(/\"/g, '\"') : ''}\"  "
cover\_image: ""
altText: "${title.replace(/"/g, '"')}"
keywords: \[${(tags || \[\]).map((t: string) => \`"${t}"\`).join(', ')}\]
published: true
date: "${publishedAt || new Date().toISOString()}"
canonicalUrl: "${canonicalUrl || ''}"
originalId: "${id}"
\---
\`

    const fileContent = \`${frontmatter}
${markdownContent}
\`

    const fileName = \`${slug}.md\`
    const filePath = \`${POSTS\_PATH}/${fileName}\`
    const branchName = slugify(title) + '-' + new Date().getTime()

    // Initialize Octokit
    const octokit = new Octokit({ auth: GITHUB\_TOKEN })

    // Get the default branch
    const repo = await octokit.repos.get({ owner: REPO\_OWNER, repo: REPO\_NAME })
    const defaultBranch = repo.data.default\_branch

    // Create a new branch from the default branch
    const defaultBranchRef = await octokit.git.getRef({
      owner: REPO\_OWNER,
      repo: REPO\_NAME,
      ref: \`heads/${defaultBranch}\`,
    })

    await octokit.git.createRef({
      owner: REPO\_OWNER,
      repo: REPO\_NAME,
      ref: \`refs/heads/${branchName}\`,
      sha: defaultBranchRef.data.object.sha,
    })

    // Create the file in the new branch
    await octokit.repos.createOrUpdateFileContents({
      owner: REPO\_OWNER,
      repo: REPO\_NAME,
      path: filePath,
      message: \`Add new post: ${title}\`,
      content: Buffer.from(fileContent).toString('base64'),
      branch: branchName,
    })

    // Create PR
    const pr = await octokit.pulls.create({
      owner: REPO\_OWNER,
      repo: REPO\_NAME,
      title: \`New post: ${title}\`,
      head: branchName,
      base: defaultBranch,
      body: \`Automated PR to add new post: ${title}\`,
    })

    return NextResponse.json({ pr\_url: pr.data.html\_url })
  } catch (e) {
    console.warn(e)
    let message = 'Unknown error'
    if (typeof e === 'object' && e && 'message' in e) {
      message = (e as { message: string }).message
    } else if (typeof e === 'string') {
      message = e
    }
    return NextResponse.json({ error: message }, { status: 500 })
  }
}
Code comments have been added to this file to explain what each block of code does. Also, note that my frontmatter (and generally, the Markdown content) structure may differ from what you have. So format accordingly. If all goes right, which it should, you will be able to see the new PR generated for you.
Here’s a demo showing this in action.
Automating the generation of Markdown articles with Crosspost was originally published in Write Once on Medium, where people are continuing the conversation by highlighting and responding to this story.