


![[The AI Show Episode 146]: Rise of “AI-First” Companies, AI Job Disruption, GPT-4o Update Gets Rolled Back, How Big Consulting Firms Use AI, and Meta AI App](https://www.marketingaiinstitute.com/hubfs/ep%20146%20cover.png)


-Mafia-The-Old-Country---The-Initiation-Trailer-00-00-54.png?width=1920&height=1920&fit=bounds&quality=70&format=jpg&auto=webp#)
-Nintendo-Switch-2---Reveal-Trailer-00-01-52.png?width=1920&height=1920&fit=bounds&quality=70&format=jpg&auto=webp#)


_Sergey_Tarasov_Alamy.jpg?width=1280&auto=webp&quality=80&disable=upscale#)


![Instacart’s new Fizz alcohol delivery app is aimed at Gen Z [U]](https://i0.wp.com/9to5mac.com/wp-content/uploads/sites/6/2025/05/Instacarts-new-Fizz-alcohol-delivery-app-is-aimed-at-Gen-Z.jpg?resize=1200%2C628&quality=82&strip=all&ssl=1)


![Beats Studio Pro Wireless Headphones Now Just $169.95 - Save 51%! [Deal]](https://www.iclarified.com/images/news/97258/97258/97258-640.jpg)


Automating Static Website Deployment to AWS S3 with Terraform and GitHub Actions
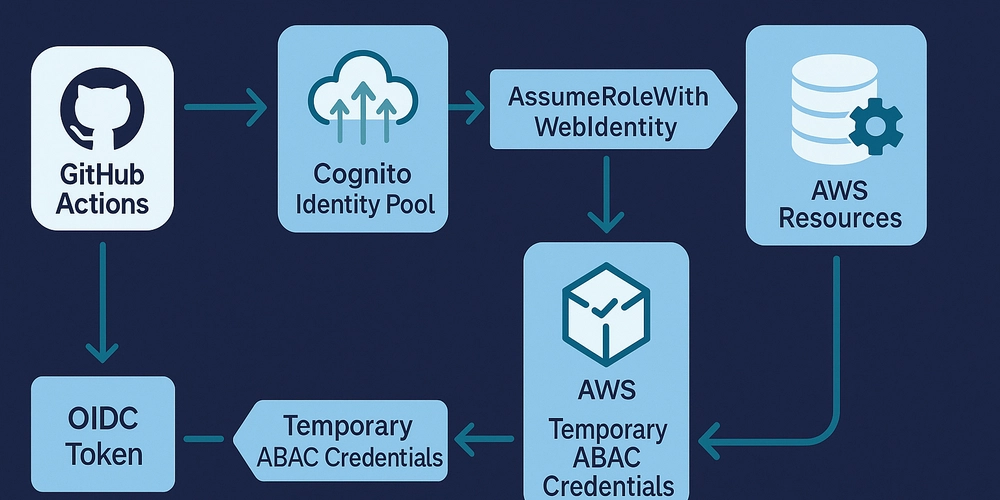
Overview This guide demonstrates how to automate the deployment of a static website to Amazon S3 using Terraform for infrastructure provisioning and GitHub Actions for continuous integration and deployment (CI/CD). By the end, you'll have a streamlined process that updates your website upon each code push. Setting Up AWS Credentials in Terraform Cloud To enable Terraform Cloud to provision resources in your AWS account, you need to securely store your AWS access keys within the platform. So we 1st create a organization first go to then create a new organization Crete a new workspace Now come to variable and create 2 variable for AWS ACCESS KEY and SECRET ACCESS KEY now Navigate to Terraform Cloud > Organization Settings > API Tokens > create an API token > give name generate token > save to notepad Now come to Github you can fork this repo code-pipeline-game Now come to git-repo -> settings -> secrets & variables -> action here you can save the API token you have generated from terraform cloud This token we will mention here in Github action workflow YAML file `name: Deploy website to AWS S3 on: push: branches: - main jobs: Terraform: name: 'Terraform' runs-on: ubuntu-latest steps: - name: Checkout uses: actions/checkout@v4 - name: Setup Terraform uses: hashicorp/setup-terraform@v1 with: cli_config_credentials_token: ${{ secrets.tfc_team_token }} - name: Terraform Init run: terraform init - name: Terraform Validate run: terraform validate - name: Terraform Plan run: terraform plan - name: Terraform Apply run: terraform apply -auto-approve - name: Terraform destroy run: terraform destroy -auto-approve` Now You can find all the other terraform files in github repo so we can run the the Github action file and check all the stage We can see in the image above that our job is completed. Its time to verify from our AWS console. We can confirm now that S3 bucket has been created and the website files uploaded in it. Its time to connect to the website. We will copy the website url from outputs in the workflow Its time to visit the website. Paste the website url into your browser

Overview
This guide demonstrates how to automate the deployment of a static website to Amazon S3 using Terraform for infrastructure provisioning and GitHub Actions for continuous integration and deployment (CI/CD). By the end, you'll have a streamlined process that updates your website upon each code push.
Setting Up AWS Credentials in Terraform Cloud
To enable Terraform Cloud to provision resources in your AWS account, you need to securely store your AWS access keys within the platform.
So we 1st create a organization first
go to
then create a new organization
Crete a new workspace

Now come to variable and create 2 variable for AWS ACCESS KEY and SECRET ACCESS KEY

now Navigate to Terraform Cloud > Organization Settings > API Tokens > create an API token > give name generate token > save to notepad

Now come to Github
you can fork this repo code-pipeline-game
Now come to git-repo -> settings -> secrets & variables -> action
here you can save the API token you have generated from terraform cloud

This token we will mention here in Github action workflow YAML file
`name: Deploy website to AWS S3
on:
push:
branches:
- main
jobs:
Terraform:
name: 'Terraform'
runs-on: ubuntu-latest
steps:
- name: Checkout
  uses: actions/checkout@v4

- name: Setup Terraform
  uses: hashicorp/setup-terraform@v1
  with:
    cli_config_credentials_token: ${{ secrets.tfc_team_token }}

- name: Terraform Init
  run: terraform init

- name: Terraform Validate
  run: terraform validate

- name: Terraform Plan
  run: terraform plan

- name: Terraform Apply
  run: terraform apply -auto-approve

- name: Terraform destroy
  run: terraform destroy -auto-approve`
Now You can find all the other terraform files in github repo
so we can run the the Github action file and check all the stage

We can see in the image above that our job is completed. Its time to verify from our AWS console.
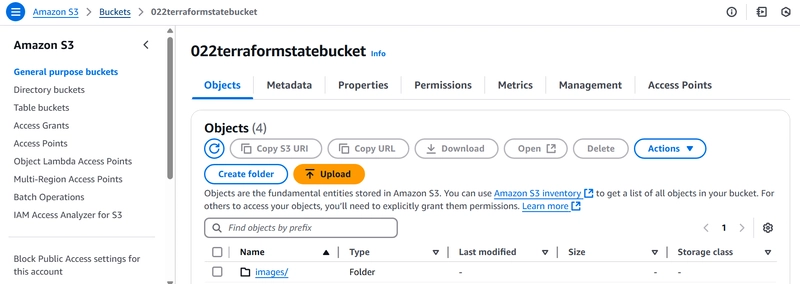
We can confirm now that S3 bucket has been created and the website files uploaded in it.
Its time to connect to the website.
We will copy the website url from outputs in the workflow

Its time to visit the website. Paste the website url into your browser