Unlock Your Twitch Bot's Potential: The Ultimate OAuth2 Guide
Hey developers! If you're looking to build a Twitch bot that can interact with chat, perform moderation actions, or access user data, you'll need to navigate the world of Twitch OAuth2. It might seem daunting at first, but this guide will walk you through every step, making the process clear and manageable. What is OAuth 2.0 and Why Do You Need It? OAuth 2.0 is the industry-standard protocol for authorization. It allows applications (like your bot) to access user resources on a service (Twitch, in this case) without needing the user's login credentials directly. Instead, it uses access tokens. Here's a quick rundown of the key components you'll be working with: Access Token: A short-lived credential used to authenticate API requests to Twitch on behalf of a user (your bot). Refresh Token: A long-lived credential used to obtain a new Access Token when the current one expires, without requiring the user to go through the authorization process again. Client ID: A public identifier for your application, which you get when you register your app on Twitch. Client Secret: A confidential key known only to your application and Twitch. Treat this like a password! By the end of this guide, you'll have all these tokens and understand how to use them to power up your Twitch bot. Table of Contents Prerequisites Step 1: Registering Your Application on the Twitch Developer Portal Step 2: Defining Necessary Permissions (Scopes) Step 3: Preparing for Authorization Step 4: Constructing the Authorization URL Step 5: Authorizing the Application and Obtaining the Code Step 6: Exchanging the Authorization Code for Tokens Step 7: Storing Your Tokens Securely Step 8: Validating Your Access Token (Recommended) Step 9: Refreshing the Access Token Wrapping Up and Next Steps Prerequisites Before you dive in, make sure you have: A Twitch Account for Your Bot: Create a separate Twitch account that your bot will use. Do not use your main Twitch account for the bot. A Twitch Account for Your Channel: The channel your bot will interact with or moderate. Step 1: Registering Your Application on the Twitch Developer Portal To interact with the Twitch API, your bot needs to be registered as an application. Go to the Twitch Developer Console. Log in using your main Twitch account (or your developer account). Do not use the bot's account at this stage. Click the "+ Register Your Application" button. Fill out the form: Name: Choose any name for your application (e.g., "MyAwesomeBot"). IMPORTANT: Do not use the word "Twitch" in the name. OAuth Redirect URLs: Enter http://localhost:3000. This URL is used during the authorization process. Even if you don't have a server running at this address, it's required to obtain the authorization code. Category: Select "Chat Bot". Click "Create". Getting Your Client ID and Client Secret Once your application is created, you'll see your Client ID. Copy it and save it somewhere safe. To get your Client Secret: On your application's page, click the "New Secret" button. Twitch will generate and display the Client Secret. IMPORTANT: The Client Secret is shown only once. Copy it immediately and store it securely with your Client ID. If you lose it, you'll have to generate a new one. These credentials are vital for your bot to authenticate with the Twitch API. Step 2: Defining Necessary Permissions (Scopes) Scopes define what actions your bot can perform on behalf of the user (the bot's account). For a typical moderation bot, you might need: chat:read - Read chat messages. chat:edit - Send chat messages (and delete messages via /delete command). channel:moderate - Use moderation commands (e.g., /timeout, /ban). moderator:manage:chat_messages - Allows deleting messages directly via API (if you plan to use this method). moderator:manage:banned_users - Manage banned users. moderator:read:followers - Read the list of followers (if your bot needs this). whispers:read - Read whispers. whispers:edit - Send whispers. user:manage:whispers - Manage whispers. Find the full list of scopes and their descriptions in the official Twitch documentation. For example, your scopes string might look like this: chat:read+chat:edit+channel:moderate+moderator:manage:chat_messages (The + sign is used as a separator when forming the URL, or a space if used in another context). Step 3: Preparing for Authorization Log out of your main Twitch account in all your browser tabs. This is crucial to avoid accidentally authorizing the app with your main account. Log into the Twitch account your bot will use (the bot's account). (Recommended) Make the bot's account a moderator on your main channel. This expands its capabilities (e.g., higher message rate limits, ability to execute moderation commands). In your main channel's chat, type: /mod YOUR_BOT_ACCOUNT_NAME Replace YOUR_BO
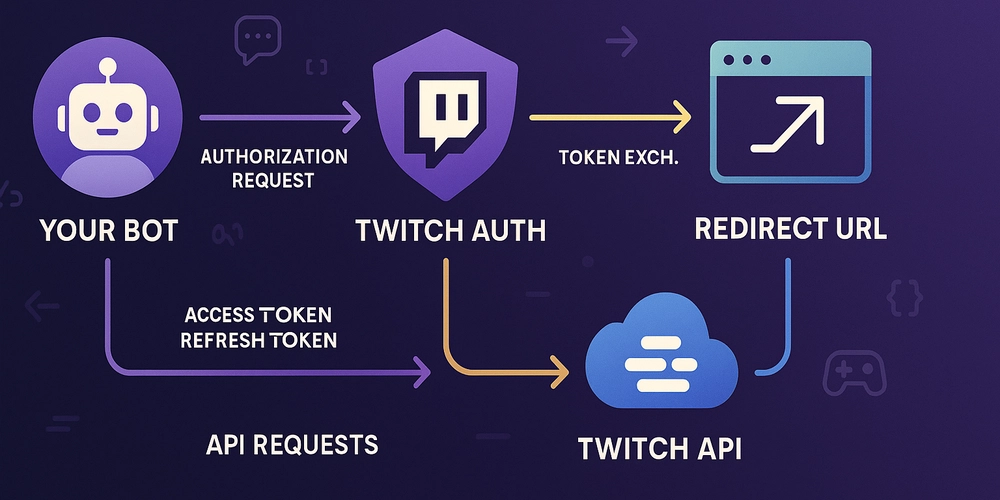
Hey developers! If you're looking to build a Twitch bot that can interact with chat, perform moderation actions, or access user data, you'll need to navigate the world of Twitch OAuth2. It might seem daunting at first, but this guide will walk you through every step, making the process clear and manageable.
What is OAuth 2.0 and Why Do You Need It?
OAuth 2.0 is the industry-standard protocol for authorization. It allows applications (like your bot) to access user resources on a service (Twitch, in this case) without needing the user's login credentials directly. Instead, it uses access tokens.
Here's a quick rundown of the key components you'll be working with:
- Access Token: A short-lived credential used to authenticate API requests to Twitch on behalf of a user (your bot).
- Refresh Token: A long-lived credential used to obtain a new Access Token when the current one expires, without requiring the user to go through the authorization process again.
- Client ID: A public identifier for your application, which you get when you register your app on Twitch.
- Client Secret: A confidential key known only to your application and Twitch. Treat this like a password!
By the end of this guide, you'll have all these tokens and understand how to use them to power up your Twitch bot.
Table of Contents
- Prerequisites
- Step 1: Registering Your Application on the Twitch Developer Portal
- Step 2: Defining Necessary Permissions (Scopes)
- Step 3: Preparing for Authorization
- Step 4: Constructing the Authorization URL
- Step 5: Authorizing the Application and Obtaining the Code
- Step 6: Exchanging the Authorization Code for Tokens
- Step 7: Storing Your Tokens Securely
- Step 8: Validating Your Access Token (Recommended)
- Step 9: Refreshing the Access Token
- Wrapping Up and Next Steps
Prerequisites
Before you dive in, make sure you have:
- A Twitch Account for Your Bot: Create a separate Twitch account that your bot will use. Do not use your main Twitch account for the bot.
- A Twitch Account for Your Channel: The channel your bot will interact with or moderate.
Step 1: Registering Your Application on the Twitch Developer Portal
To interact with the Twitch API, your bot needs to be registered as an application.
- Go to the Twitch Developer Console.
- Log in using your main Twitch account (or your developer account). Do not use the bot's account at this stage.
- Click the "+ Register Your Application" button.
- Fill out the form:
- Name: Choose any name for your application (e.g., "MyAwesomeBot"). IMPORTANT: Do not use the word "Twitch" in the name.
- OAuth Redirect URLs: Enter
http://localhost:3000. This URL is used during the authorization process. Even if you don't have a server running at this address, it's required to obtain the authorization code. - Category: Select "Chat Bot".
- Click "Create".
Getting Your Client ID and Client Secret
Once your application is created, you'll see your Client ID. Copy it and save it somewhere safe.
To get your Client Secret:
- On your application's page, click the "New Secret" button.
- Twitch will generate and display the Client Secret. IMPORTANT: The Client Secret is shown only once. Copy it immediately and store it securely with your Client ID. If you lose it, you'll have to generate a new one.
These credentials are vital for your bot to authenticate with the Twitch API.
Step 2: Defining Necessary Permissions (Scopes)
Scopes define what actions your bot can perform on behalf of the user (the bot's account). For a typical moderation bot, you might need:
-
chat:read- Read chat messages. -
chat:edit- Send chat messages (and delete messages via/deletecommand). -
channel:moderate- Use moderation commands (e.g.,/timeout,/ban). -
moderator:manage:chat_messages- Allows deleting messages directly via API (if you plan to use this method). -
moderator:manage:banned_users- Manage banned users. -
moderator:read:followers- Read the list of followers (if your bot needs this). -
whispers:read- Read whispers. -
whispers:edit- Send whispers. -
user:manage:whispers- Manage whispers.
Find the full list of scopes and their descriptions in the official Twitch documentation.
For example, your scopes string might look like this:
chat:read+chat:edit+channel:moderate+moderator:manage:chat_messages
(The + sign is used as a separator when forming the URL, or a space if used in another context).
Step 3: Preparing for Authorization
- Log out of your main Twitch account in all your browser tabs. This is crucial to avoid accidentally authorizing the app with your main account.
- Log into the Twitch account your bot will use (the bot's account).
- (Recommended) Make the bot's account a moderator on your main channel. This expands its capabilities (e.g., higher message rate limits, ability to execute moderation commands). In your main channel's chat, type:
/mod YOUR_BOT_ACCOUNT_NAMEReplaceYOUR_BOT_ACCOUNT_NAMEwith your bot's actual username.
Step 4: Constructing the Authorization URL
Now, you need to create a special URL. You'll open this URL in the browser where your bot's account is logged in to authorize your application.
The URL structure is:
https://id.twitch.tv/oauth2/authorize?response_type=code&client_id=YOUR_CLIENT_ID&redirect_uri=http://localhost:3000&scope=YOUR_SCOPES&force_verify=true
Replace:
-
YOUR_CLIENT_ID: With your Client ID from Step 1. -
YOUR_SCOPES: With the scopes string defined in Step 2 (e.g.,chat:read+chat:edit+channel:moderate). Ensure scopes are separated by+.
Example of a complete URL:
https://id.twitch.tv/oauth2/authorize?response_type=code&client_id=abcdef1234567890&redirect_uri=http://localhost:3000&scope=chat:read+chat:edit+channel:moderate&force_verify=true
The force_verify=true parameter prompts for explicit authorization, even if the user has previously granted permission.
Step 5: Authorizing the Application and Obtaining the Code
- Copy the URL you constructed in Step 4.
- Paste it into the address bar of the browser where you are logged in as the bot. Hit Enter.
- Twitch will ask you to authorize your application to access data according to the specified scopes. Carefully review the requested permissions and click "Authorize".
- After successful authorization, the browser will redirect you to the
redirect_uri(http://localhost:3000). Since you likely don't have a web server listening there, you'll see an error like "This site can't be reached." This is normal and expected! - The important part: Look at the browser's address bar. The URL will look something like this:
http://localhost:3000/?code=LONG_AUTHORIZATION_CODE&scope=requested_scopes - Copy the value of the
codeparameter from this URL. This is your Authorization Code. It's single-use and has a short lifespan.
Example: If the URL is http://localhost:3000/?code=zyxw9876543210&scope=chat:read+chat:edit, your authorization code is zyxw9876543210.
Step 6: Exchanging the Authorization Code for Tokens (Access & Refresh)
The Authorization Code you just got needs to be exchanged for an Access Token and a Refresh Token. This exchange happens by sending a POST request to the Twitch server. This request must include your Client Secret, so it cannot be done from client-side JavaScript in a browser.
Using curl to Exchange the Code for Tokens
curl is a powerful command-line tool for making HTTP requests, available on most operating systems.
Open your terminal or command prompt and execute the following command, substituting your actual values:
curl -X POST "https://id.twitch.tv/oauth2/token" \
-H "Content-Type: application/x-www-form-urlencoded" \
-d "client_id=YOUR_CLIENT_ID" \
-d "client_secret=YOUR_CLIENT_SECRET" \
-d "code=YOUR_AUTHORIZATION_CODE" \
-d "grant_type=authorization_code" \
-d "redirect_uri=http://localhost:3000"
Replace:
-
YOUR_CLIENT_ID: Your Client ID. -
YOUR_CLIENT_SECRET: Your Client Secret. -
YOUR_AUTHORIZATION_CODE: The Authorization Code obtained in Step 5.
Example JSON response from Twitch:
{
  "access_token": "NEW_ACCESS_TOKEN",
  "refresh_token": "NEW_REFRESH_TOKEN",
  "expires_in": 14058,
  "scope": [
    "chat:read",
    "chat:edit",
    "channel:moderate"
  ],
  "token_type": "bearer"
}
From this response, you need:
-
access_token: Your Access Token. -
refresh_token: Your Refresh Token.
Copy these and store them securely. expires_in indicates the Access Token's lifetime in seconds.
Pro Tip: If you prefer a GUI, tools like Postman or Insomnia can also be used to make this POST request.
Step 7: Storing Your Tokens Securely
You now have all the essential credentials for your bot:
-
CLIENT_ID -
CLIENT_SECRET -
ACCESS_TOKEN -
REFRESH_TOKEN -
BOT_USERNAME(the bot account's username) -
CHANNEL_NAME(the channel name where the bot will operate)
It's crucial to store these securely, especially CLIENT_SECRET, ACCESS_TOKEN, and REFRESH_TOKEN.
Recommended storage methods:
- Environment Variables: The most secure method for production.
-
.envfile: Create a file named.envin your project's root directory and add key-value pairs. Always add.envto your.gitignorefile to prevent accidentally committing it to your repository.
Example .env file content:
BOT_USERNAME=your_bot_name
CHANNEL_NAME=your_channel_name
CLIENT_ID=your_client_id
CLIENT_SECRET=your_client_secret
ACCESS_TOKEN=your_access_token
REFRESH_TOKEN=your_refresh_token
Step 8: Validating Your Access Token (Recommended)
To ensure your Access Token is valid and belongs to the correct user (your bot), you can make a validation request.
Request (GET):
URL: https://id.twitch.tv/oauth2/validate
Headers: Authorization: Bearer YOUR_ACCESS_TOKEN
Using curl:
curl -X GET "https://id.twitch.tv/oauth2/validate" \
-H "Authorization: Bearer YOUR_ACCESS_TOKEN"
Replace YOUR_ACCESS_TOKEN with the Access Token you obtained.
Example of a successful JSON response:
{
  "client_id": "your_client_id",
  "login": "your_bot_name",
  "scopes": ["chat:read", "chat:edit"],
  "user_id": "bot_user_id",
  "expires_in": 13900 // Remaining token lifetime in seconds
}
Verify that login matches your bot's username and client_id matches your application's Client ID.
Step 9: Refreshing the Access Token
Access Tokens have a limited lifespan (usually a few hours). When it expires, your bot will lose API access. To prevent this, use the Refresh Token to get a new Access Token.
Request (POST):
URL: https://id.twitch.tv/oauth2/token
Body (x-www-form-urlencoded):
-
grant_type:refresh_token -
refresh_token: YOUR_REFRESH_TOKEN -
client_id: YOUR_CLIENT_ID -
client_secret: YOUR_CLIENT_SECRET
Using curl:
curl -X POST "https://id.twitch.tv/oauth2/token" \
-H "Content-Type: application/x-www-form-urlencoded" \
-d "grant_type=refresh_token" \
-d "refresh_token=YOUR_REFRESH_TOKEN" \
-d "client_id=YOUR_CLIENT_ID" \
-d "client_secret=YOUR_CLIENT_SECRET"
Replace YOUR_REFRESH_TOKEN, YOUR_CLIENT_ID, and YOUR_CLIENT_SECRET with your values.
Server Response:
The server will return a new access_token and possibly a new refresh_token. Always save the new refresh_token if one is provided, as the old one might become invalid.
{
  "access_token": "LATEST_ACCESS_TOKEN",
  "refresh_token": "POSSIBLY_NEW_REFRESH_TOKEN",
  "scope": ["chat:read", "chat:edit"],
  "token_type": "bearer",
  "expires_in": 14400
}
Update your stored ACCESS_TOKEN and REFRESH_TOKEN with these new values. Your bot should automate this process before the Access Token expires.
Wrapping Up and Next Steps
Congratulations! You've successfully navigated the Twitch OAuth2 process and obtained the necessary tokens. Your bot is now ready for action.
Key Takeaways:
- Security First: Always keep your
Client Secret,Access Token, andRefresh Tokensecure. Never expose them in client-side code or commit them to public repositories. - Token Lifecycle: Understand that Access Tokens expire and need to be refreshed using the Refresh Token. Implement logic in your bot to handle this automatically.
- Scopes Matter: Only request the permissions (scopes) your bot absolutely needs.
Stay tuned for the next article in this series, where we'll dive into the actual implementation of a Twitch bot using the tokens and knowledge you've gained here!
Now that you have the keys to the kingdom, what cool features are you planning to build for your Twitch bot? Share your ideas or any questions you have in the comments below! Happy coding!






![[The AI Show Episode 146]: Rise of “AI-First” Companies, AI Job Disruption, GPT-4o Update Gets Rolled Back, How Big Consulting Firms Use AI, and Meta AI App](https://www.marketingaiinstitute.com/hubfs/ep%20146%20cover.png)






![[DEALS] The Premium Python Programming PCEP Certification Prep Bundle (67% off) & Other Deals Up To 98% Off – Offers End Soon!](https://www.javacodegeeks.com/wp-content/uploads/2012/12/jcg-logo.jpg)








-Mafia-The-Old-Country---The-Initiation-Trailer-00-00-54.png?width=1920&height=1920&fit=bounds&quality=70&format=jpg&auto=webp#)
-Nintendo-Switch-2---Reveal-Trailer-00-01-52.png?width=1920&height=1920&fit=bounds&quality=70&format=jpg&auto=webp#)




_Sergey_Tarasov_Alamy.jpg?width=1280&auto=webp&quality=80&disable=upscale#)














![Instacart’s new Fizz alcohol delivery app is aimed at Gen Z [U]](https://i0.wp.com/9to5mac.com/wp-content/uploads/sites/6/2025/05/Instacarts-new-Fizz-alcohol-delivery-app-is-aimed-at-Gen-Z.jpg?resize=1200%2C628&quality=82&strip=all&ssl=1)


![Beats Studio Pro Wireless Headphones Now Just $169.95 - Save 51%! [Deal]](https://www.iclarified.com/images/news/97258/97258/97258-640.jpg)


