


![[The AI Show Episode 145]: OpenAI Releases o3 and o4-mini, AI Is Causing “Quiet Layoffs,” Executive Order on Youth AI Education & GPT-4o’s Controversial Update](https://www.marketingaiinstitute.com/hubfs/ep%20145%20cover.png)


![Ditching a Microsoft Job to Enter Startup Purgatory with Lonewolf Engineer Sam Crombie [Podcast #171]](https://cdn.hashnode.com/res/hashnode/image/upload/v1746753508177/0cd57f66-fdb0-4972-b285-1443a7db39fc.png?#)


_Piotr_Adamowicz_Alamy.jpg?width=1280&auto=webp&quality=80&disable=upscale#)


-xl-xl-xl.jpg)


![Walmart’s $30 Google TV streamer is now in stores and it supports USB-C hubs [Video]](https://i0.wp.com/9to5google.com/wp-content/uploads/sites/4/2025/05/onn-4k-plus-store-reddit.jpg?resize=1200%2C628&quality=82&strip=all&ssl=1)


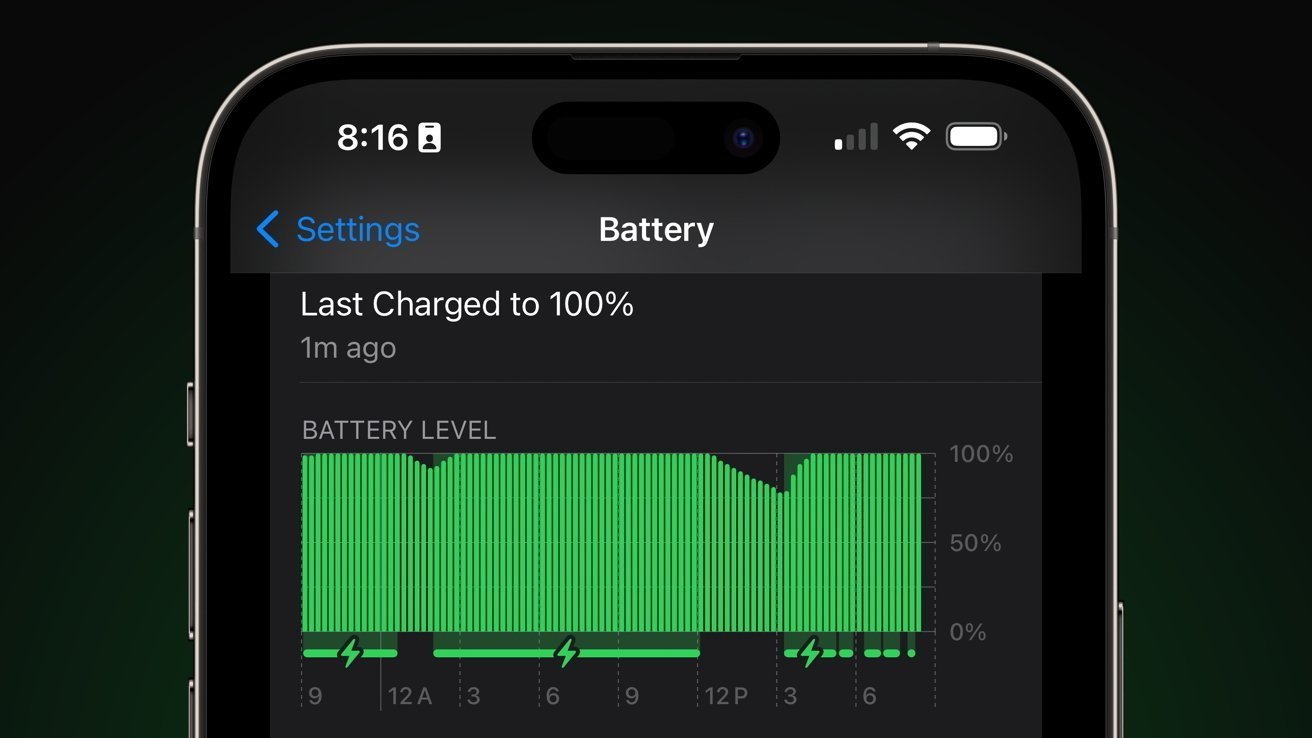
![Apple to Launch AI-Powered Battery Saver Mode in iOS 19 [Report]](https://www.iclarified.com/images/news/97309/97309/97309-1280.jpg)

![Apple Officially Releases macOS Sequoia 15.5 [Download]](https://www.iclarified.com/images/news/97308/97308/97308-640.jpg)


Running Python Programs in Your Browser
Using Pyodide and Webassembly The post Running Python Programs in Your Browser appeared first on Towards Data Science.

As a Python developer, one particularly exciting application is the ability to run Python code directly in the browser. In this article, I’ll explore what WebAssembly is (and its relation to the Pyodide library), talk about its benefits and everyday use cases, and dive into some practical examples of how you can use WebAssembly to run Python programs on the web.
These tools can also benefit data scientists and ML professionals. Pyodide brings a significant portion of the scientific Python stack (NumPy, Pandas, Scikit-learn, Matplotlib, SciPy, etc.) to the browser, meaning that using familiar tools and libraries during code development is possible. It can also be useful for demonstration purposes. As you’ll see in my final example, combining Python’s data processing power with HTML, CSS, and JavaScript for UI, you can quickly build interactive dashboards or tools without needing a separate backend for many use cases.
What is WebAssembly?
Webassembly is a low-level binary instruction format designed as a portable target for compiling high-level languages, such as C, C++, Rust, and even Python. It was created to enable high-performance applications on the web without some of the pitfalls of traditional JavaScript execution, such as run-time speed. Some key aspects of WebAssembly include:
- Portability. WebAssembly modules run consistently across all modern browsers.
- Performance. The binary format is compact and can be parsed quickly, which allows near-native execution speed.
- Security. Running in a sandboxed environment, WebAssembly provides strong security guarantees.
- Language Agnosticism. Although browsers primarily support JavaScript, WebAssembly enables developers to write code in other languages and compile it to WebAssembly (wasm).
What Can WebAssembly Be Used For?
WebAssembly has a wide array of applications. Some of the most common use cases include:-
- High-Performance Web Apps. WebAssembly can help applications such as games, image and video editors, and simulations achieve near-native performance.
- Porting Legacy Code. Code written in C, C++, or Rust can be compiled into WebAssembly, allowing developers to reuse existing libraries and codebases on the web.
- Multimedia Processing. Audio and video processing libraries benefit from webassembly’s speed, enabling more complex processing tasks in real-time.
- Scientific Computing. Heavy computations such as machine learning, data visualisation, or numerical simulations can be offloaded to WebAssembly modules.
- Running Multiple Languages. Projects like Pyodide allow Python (and its extensive ecosystem) to be executed in the browser without requiring a server backend.
If you frequently code in Python, that last point should make your ears prick up, so let’s dive into that aspect further.
Running Python on the Web
Traditionally, Python runs on the server or in desktop applications. However, thanks to initiatives like Pyodide, Python can run in the browser via WebAssembly. Pyodide compiles the CPython interpreter code into WebAssembly, allowing you to execute Python code and use many popular third-party libraries directly in your web application.
And this isn’t just a gimmick. There are several advantages to doing this, including:-
- Using Python’s extensive library ecosystem, including packages for data science (NumPy, Pandas, Matplotlib) and machine learning (Scikit-Learn, TensorFlow).
- Enhanced responsiveness as fewer round trips to a server are required.
- It is a simpler deployment as the entire application logic can reside in the front end.
We’ve mentioned Pyodide a few times already, so let’s take a closer look at what exactly Pyodide is.
What is Pyodide
The idea behind Pyodide was born from the growing need to run Python code directly in the browser without relying on a traditional server-side setup. Traditionally, web applications had depended on JavaScript for client-side interactions, leaving Python confined to back-end or desktop applications. However, with the advent of WebAssembly, an opportunity arose to bridge this gap.
Mozilla Research recognised the potential of this approach and set out to port CPython, the reference implementation of Python, to WebAssembly using the Emscripten toolchain. This effort was about running Python in the browser and unlocking a new world of interactive, client-side applications powered by Python’s rich set of libraries for data science, numerical computing, and more.
To summarise, at its core, Pyodide is a port of CPython compiled into WebAssembly. This means that when you run Python code in the browser using Pyodide, you execute a fully functional Python interpreter optimised for the web environment.
Right, it’s time to look at some code.
Setting up a development environment
Before we start coding, let’s set up our development environment. The best practice is to create a separate Python environment where you can install any necessary software and experiment with coding, knowing that anything you do in this environment won’t affect the rest of your system.
I use conda for this, but you can use whatever method you know best suits you. Note that I’m using Linux (WSL2 on Windows).
#create our test environment
(base) $ conda create -n wasm_test python=3.12 -y

# Now activate it
(base) $ conda activate wasm_test
Now that our environment is set up, we can install the required libraries and software.
#
#
(wasm_test) $ pip install jupyter nest-asyncio
Now type in jupyter notebook into your command prompt. You should see a jupyter notebook open in your browser. If that doesn’t happen automatically, you’ll likely see a screenful of information after the jupyter notebook command. Near the bottom, there will be a URL that you should copy and paste into your browser to initiate the Jupyter Notebook.
Your URL will be different to mine, but it should look something like this:-
http://127.0.0.1:8888/tree?token=3b9f7bd07b6966b41b68e2350721b2d0b6f388d248cc69daCode example 1 — Hello World equivalent using Pyodide
Let’s start with the easiest example possible. The simplest way to include Pyodide in your HTML page is via a Content Delivery Network (CDN). We then print out the text “Hello World!”
Hello, World! with Pyodide
Python Hello, World!
I ran the above code in W3Schools HTML TryIt editor and got this,

When the button is clicked, Pyodide runs the Python code that prints “Hello, World!”. We don’t see anything printed on the screen, as it is printed to the console by default. We’ll fix that in our following example.
Code Example 2 — Printing output to the browser
In our second example, we’ll use Pyodide to run Python code in the browser that will perform a simple mathematical calculation. In this case, we will calculate the square root of 16 and output the result to the browser.
Pyodide Example
Running Python in the Browser with Pyodide
Running the above code in the W3Schools TryIT browser, I got this output.

Code Example 3 – Calling Python Functions from JavaScript
Another valuable and powerful feature of using Pyodide is the ability to call Python functions from JavaScript and vice versa.
In this example, we create a Python function that performs a simple mathematical operation—calculating the factorial of a number—and call it from JavaScript code.
Call Python from JavaScript
Calculate the Factorial of a Number
Here is a sample output when running on W3Schools. I won’t include the code section this time, just the output.

Code Example 4— Using Python Libraries, e.g. NumPy
Python’s power comes from its rich ecosystem of libraries. With Pyodide, you can import and use popular libraries like NumPy for numerical computations.
The following example demonstrates how to perform array operations using NumPy in the browser. The Numpy library is loaded using the pyodide.loadPackage function.
NumPy in the Browser
Matrix Multiplication with NumPy

Code Example 5— Using Python libraries, e.g. matplotlib
Another powerful aspect of running Python in the browser is the ability to generate visualisations. With Pyodide, you can use GUI libraries such as Matplotlib to create plots dynamically. Here’s how to generate and display a simple plot on a canvas element.
In this example, we create a quadratic plot (y = x²) using Matplotlib, save the image to an in-memory buffer as a PNG, and encode it as a base64 string before displaying it.
Matplotlib in the Browser
Interactive Plot with Matplotlib
![Plot will appear here]()

Code Example 6: Running Python in a Web Worker
For more complex applications or when you need to ensure that heavy computations do not block the main UI thread, you can run Pyodide in a Web Worker. Web Workers allow you to run scripts in background threads, keeping your application responsive.
Below is an example of how to set up Pyodide in a Web Worker. We perform a calculation and simulate the calculation running for a while by introducing delays using the sleep() function. We also display a continuously updating counter showing the main UI running and responding normally.
We’ll need three files for this:- an index.html file and two JavaScript files.
index.html
Pyodide Web Worker Example
Running Python in a Web Worker
Status: Idle
worker.js
// Load Pyodide from the CDN inside the worker
self.importScripts("https://cdn.jsdelivr.net/pyodide/v0.23.4/full/pyodide.js");

async function initPyodide() {
  self.pyodide = await loadPyodide();
  // Inform the main thread that Pyodide has been loaded
  self.postMessage("Pyodide loaded in Worker");
}

initPyodide();

// Listen for messages from the main thread
self.onmessage = async (event) => {
  if (event.data === 'start') {
    // Execute a heavy computation in Python within the worker.
    // The compute function now pauses for 0.5 seconds every 1,000,000 iterations.
    let result = await self.pyodide.runPythonAsync(`
import time
def compute():
    total = 0
    for i in range(1, 10000001):  # Loop from 1 to 10,000,000
        total += i
        if i % 1000000 == 0:
            time.sleep(0.5)  # Pause for 0.5 seconds every 1,000,000 iterations
    return total
compute()
    `);
    // Send the computed result back to the main thread
    self.postMessage("Computed result: " + result);
  }
};
main.js
// Create a new worker from worker.js
const worker = new Worker('worker.js');

// DOM elements to update status and output
const statusElement = document.getElementById('status');
const outputElement = document.getElementById('workerOutput');
const startButton = document.getElementById('startWorker');

let timerInterval;
let secondsElapsed = 0;

// Listen for messages from the worker
worker.onmessage = (event) => {
  // Append any message from the worker to the output
  outputElement.textContent += event.data + "\n";

  if (event.data.startsWith("Computed result:")) {
    // When computation is complete, stop the timer and update status
    clearInterval(timerInterval);
    statusElement.textContent = `Status: Completed in ${secondsElapsed} seconds`;
  } else if (event.data === "Pyodide loaded in Worker") {
    // Update status when the worker is ready
    statusElement.textContent = "Status: Worker Ready";
  }
};

// When the start button is clicked, begin the computation
startButton.addEventListener('click', () => {
  // Reset the display and timer
  outputElement.textContent = "";
  secondsElapsed = 0;
  statusElement.textContent = "Status: Running...";

  // Start a timer that updates the main page every second
  timerInterval = setInterval(() => {
    secondsElapsed++;
    statusElement.textContent = `Status: Running... ${secondsElapsed} seconds elapsed`;
  }, 1000);

  // Tell the worker to start the heavy computation
  worker.postMessage('start');
});
To run this code, create all three files above and put them into the same directory on your local system. In that directory, type in the following command.
$ python -m http.server 8000Now, in your browser, type this URL into it.
http://localhost:8000/index.htmlYou should see a screen like this.

Now, if you press the Start Computation button, you should see a counter displayed on the screen, starting at 1 and ticking up by 1 every second until the computation is complete and its final result is displayed — about 5 seconds in total.
This shows that the front-end logic and computation are not constrained by the work that’s being done by the Python code behind the button.

Code Example 7: Running a simple data dashboard
For our final example, I’ll show you how to run a simple data dashboard directly in your browser. Our source data will be synthetic sales data in a CSV file.
We need three files for this, all of which should be in the same folder.
sales_data.csv
The file I used had 100,000 records, but you can make this file as big or small as you like. Here are the first twenty records to give you an idea of what the data looked like.
Date,Category,Region,Sales
2021-01-01,Books,West,610.57
2021-01-01,Beauty,West,2319.0
2021-01-01,Electronics,North,4196.76
2021-01-01,Electronics,West,1132.53
2021-01-01,Home,North,544.12
2021-01-01,Beauty,East,3243.56
2021-01-01,Sports,East,2023.08
2021-01-01,Fashion,East,2540.87
2021-01-01,Automotive,South,953.05
2021-01-01,Electronics,North,3142.8
2021-01-01,Books,East,2319.27
2021-01-01,Sports,East,4385.25
2021-01-01,Beauty,North,2179.01
2021-01-01,Fashion,North,2234.61
2021-01-01,Beauty,South,4338.5
2021-01-01,Beauty,East,783.36
2021-01-01,Sports,West,696.25
2021-01-01,Electronics,South,97.03
2021-01-01,Books,West,4889.65
index.html
This is the main GUI interface to our dashboard.
Pyodide Sales Dashboard
 Read More


